

Owners Manual
Page 3
..., or other sources, refer to the operating instructions, 12. Trans_rting Product A product and cart combination should be adhered to overturn. 11. PORTABLE CART WARNING Owner_ Manual 3 and those of the groundingotype p_ug, 13. Power Sources This product should be moved with the product. Read Instructions All the safety and operating before...
..., or other sources, refer to the operating instructions, 12. Trans_rting Product A product and cart combination should be adhered to overturn. 11. PORTABLE CART WARNING Owner_ Manual 3 and those of the groundingotype p_ug, 13. Power Sources This product should be moved with the product. Read Instructions All the safety and operating before...

Owners Manual
Page 5
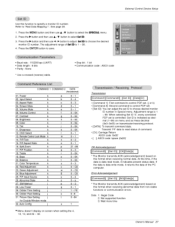
... Screen Menu Options Auto Adjustment 21 Setting Picture Format 21 Picture Size Zoom 21 Adjusting Horizonta_Nert[ca] Position ........ 22 Manual Configure 22 Screen Adjustments 22 Initializing 22 Luminance Noise Reduction 23 Selecting Wide VGA mode 23 Split Zoom 23 PiP (...25 External Control Device Setup 26~31 IR Code 32~33 Troubleshooting Checklist 34 Maintenance 35 Specifications 36 After reading this manual, keep it handy for future reference. VCR Setup Cable TV Setup External A]V Source Setup DVD Setup D'D,/Setup PC Setup...
... Screen Menu Options Auto Adjustment 21 Setting Picture Format 21 Picture Size Zoom 21 Adjusting Horizonta_Nert[ca] Position ........ 22 Manual Configure 22 Screen Adjustments 22 Initializing 22 Luminance Noise Reduction 23 Selecting Wide VGA mode 23 Split Zoom 23 PiP (...25 External Control Device Setup 26~31 IR Code 32~33 Troubleshooting Checklist 34 Maintenance 35 Specifications 36 After reading this manual, keep it handy for future reference. VCR Setup Cable TV Setup External A]V Source Setup DVD Setup D'D,/Setup PC Setup...

Owners Manual
Page 7
Owner_ Manual 7 This is turned on another monitor's PC input port, 5. EXPANDED INPUT 6. Here shown may be somewhat different from your wired remote control to the remote ... You can watch the RGB signal on Connection - EXTERNAL SPEAKER (8 ohm output) Connect to optional external speaker(s)_ * For further information, refer to 'Speaker & Speaker Stand' manual, 2_ RS-2320 INPUT (CONTROL/SERVICE) PORT Connect to the RS_232C port on a PC, 3_ DVI (Digital Visual Interface) INPUT/ RGB INPUT/AUDIO iNPUT JACKS...
Owner_ Manual 7 This is turned on another monitor's PC input port, 5. EXPANDED INPUT 6. Here shown may be somewhat different from your wired remote control to the remote ... You can watch the RGB signal on Connection - EXTERNAL SPEAKER (8 ohm output) Connect to optional external speaker(s)_ * For further information, refer to 'Speaker & Speaker Stand' manual, 2_ RS-2320 INPUT (CONTROL/SERVICE) PORT Connect to the RS_232C port on a PC, 3_ DVI (Digital Visual Interface) INPUT/ RGB INPUT/AUDIO iNPUT JACKS...

Owners Manual
Page 9
... a desktop etc. * The plasma display is designed to be installed in the optional Wall Mounting Bracket Installation and Setup Guide, Owner_ Manual 9 n _n Installation Ensure that you purchased the product, Owner's Manual Batteries BNC-RCA Adapter Remote Control D-sub 15 pin Cable Power Cord DVI-D Cable I nst a !Ia t io n * The Monitor can...
... a desktop etc. * The plasma display is designed to be installed in the optional Wall Mounting Bracket Installation and Setup Guide, Owner_ Manual 9 n _n Installation Ensure that you purchased the product, Owner's Manual Batteries BNC-RCA Adapter Remote Control D-sub 15 pin Cable Power Cord DVI-D Cable I nst a !Ia t io n * The Monitor can...
Owners Manual
Page 11
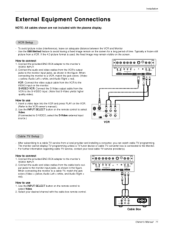
... with the plasma display. External Eq ui pment Connections NOTE: All cables shown are not included with the cable box remote control Cable Box Owner_ Manual 11 Installation - the fixed image may remain visible on the remote control to the monitor input jacks, as shown in the figure. How to the...
... with the plasma display. External Eq ui pment Connections NOTE: All cables shown are not included with the cable box remote control Cable Box Owner_ Manual 11 Installation - the fixed image may remain visible on the remote control to the monitor input jacks, as shown in the figure. How to the...
Owners Manual
Page 12
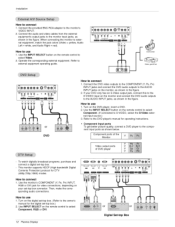
...Refer to connect 1 Use the monitoCs COMPONENT (Y, PB, PR) INPUT, RGB or DVI jack for DTV (480p,720p, 1080i) modes. How to the owner's manual for operating instructions. - Connect the DVD video outpu_ to the COMPONENT (Y, PB, PR) INPUT jacks and connect the DVD audio outputs to external equipment operating... guide. Use the INPUT SELECT button on the digital set -top box connector. Refer to the DVD playeFs manual for the digital set4op box.) 2, Use INPUT SELECT on the remote control to use 1 Use the INPUT SELECT button on the DVD player, ...
...Refer to connect 1 Use the monitoCs COMPONENT (Y, PB, PR) INPUT, RGB or DVI jack for DTV (480p,720p, 1080i) modes. How to the owner's manual for operating instructions. - Connect the DVD video outpu_ to the COMPONENT (Y, PB, PR) INPUT jacks and connect the DVD audio outputs to external equipment operating... guide. Use the INPUT SELECT button on the digital set -top box connector. Refer to the DVD playeFs manual for the digital set4op box.) 2, Use INPUT SELECT on the remote control to use 1 Use the INPUT SELECT button on the DVD player, ...
Owners Manual
Page 13
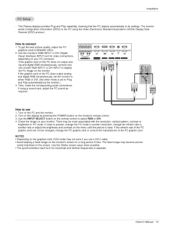
... the monitor.) 3. may not work if yeu use 1_ Turn on the PC and the monitor. 2 Turn on the remote control to its settings. Owner_ Manual 13 If using the Video Electronics Standard Association (VESA) Display Data Channel (DDC) protocol, How to connect 1, To get the best picture quality, adjust the...
... the monitor.) 3. may not work if yeu use 1_ Turn on the PC and the monitor. 2 Turn on the remote control to its settings. Owner_ Manual 13 If using the Video Electronics Standard Association (VESA) Display Data Channel (DDC) protocol, How to connect 1, To get the best picture quality, adjust the...

Owners Manual
Page 15
La ng ua ge S e Ie ct io n - Owner_ Manual 15 If the Monitor was turned off with the (D ON/OFF button on the Monitor • Press the _ ON/OFF button on the Monitor to ...
La ng ua ge S e Ie ct io n - Owner_ Manual 15 If the Monitor was turned off with the (D ON/OFF button on the Monitor • Press the _ ON/OFF button on the Monitor to ...
Owners Manual
Page 16
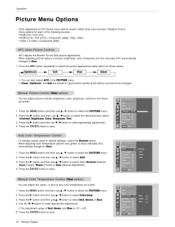
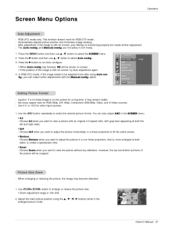
... settings), seiect the Normal option. Press the I_ button and then use & iV button to select either Normal Cool (Preset), Warm (Preset) or User (Manual Adjustment}, 4. Press the ENTER button to save , (Default), You can adjust red, green, or Mue to save . - To initialize vatues (reset to... the ENTER button to User. Readjust Picture = APC adjusts the Monitor for good picture quality at the factory and cannot be changed - and tint) manually, APC automatically 1. Press the I_ button and then use &/V button to select R_, 4 Use the 4/1_ button to select Cel_tte_. 3. When ...
... settings), seiect the Normal option. Press the I_ button and then use & iV button to select either Normal Cool (Preset), Warm (Preset) or User (Manual Adjustment}, 4. Press the ENTER button to save , (Default), You can adjust red, green, or Mue to save . - To initialize vatues (reset to... the ENTER button to User. Readjust Picture = APC adjusts the Monitor for good picture quality at the factory and cannot be changed - and tint) manually, APC automatically 1. Press the I_ button and then use &/V button to select R_, 4 Use the 4/1_ button to select Cel_tte_. 3. When ...
Owners Manual
Page 17
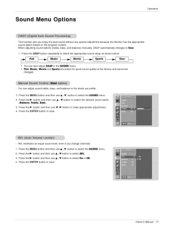
... at the factory and cannot be changed You can adjust sound treble, bass, and balance to select the appropriate sound setup as shown below. Owner _ Manual 17" Press the ENTER button to select _ or Off. 4. t, Press the MENU button and then use A _V button to User. 1. When adjusting sound options (treble...
... at the factory and cannot be changed You can adjust sound treble, bass, and balance to select the appropriate sound setup as shown below. Owner _ Manual 17" Press the ENTER button to select _ or Off. 4. t, Press the MENU button and then use A _V button to User. 1. When adjusting sound options (treble...

Owners Manual
Page 19
... allowing a fixed image to prevent unauthorized viewing by disabling the front pane_ controls. To avoid a permanent image on the front panel is not necessary - Owner_ Manual 19 This Monitor is programmed to remember which option it is best not to allow any button on the screen, the screen will move every...
... allowing a fixed image to prevent unauthorized viewing by disabling the front pane_ controls. To avoid a permanent image on the front panel is not necessary - Owner_ Manual 19 This Monitor is programmed to remember which option it is best not to allow any button on the screen, the screen will move every...
Owners Manual
Page 21
... further adjustment 1. Caution: If a 4:3 fixed image is on screen • If the position of - with an original 4:3 aspect ratio, with the Manual conflg, option, - After adjustment, if the image is still not correct, your Monitor is 100-300, 2_ Adjust the main picture position using Auto config... sides, to enlarge or reduce the picture size. * Zoom adjustment range is functioning The Auto conflg, and Manual co_ig, are not active in the Owner_ Manual 21 Use the ARC button repeatedly to view the _icture without any alteration. However, the top and bottom portions...
... further adjustment 1. Caution: If a 4:3 fixed image is on screen • If the position of - with an original 4:3 aspect ratio, with the Manual conflg, option, - After adjustment, if the image is still not correct, your Monitor is 100-300, 2_ Adjust the main picture position using Auto config... sides, to enlarge or reduce the picture size. * Zoom adjustment range is functioning The Auto conflg, and Manual co_ig, are not active in the Owner_ Manual 21 Use the ARC button repeatedly to view the _icture without any alteration. However, the top and bottom portions...
Owners Manual
Page 22
... the _ option if watching a VCR, • Select the _ option for double window: 22 Plasma Display if the image still isn't clear after auto adjustment Phase manually To correct the screen size, adjust Clock, and especially if characters are still jittery, adjust the picture 1. Press the ENTER button to save . Position_ Split.... • The Phe_e adjustment range is 0 ~ 31_ • The Clock adjustment range is -50 ~-+50, 5. Press the I_ button. • You can initialize Zoom IpJOut, Manual config.
... the _ option if watching a VCR, • Select the _ option for double window: 22 Plasma Display if the image still isn't clear after auto adjustment Phase manually To correct the screen size, adjust Clock, and especially if characters are still jittery, adjust the picture 1. Press the ENTER button to save . Position_ Split.... • The Phe_e adjustment range is 0 ~ 31_ • The Clock adjustment range is -50 ~-+50, 5. Press the I_ button. • You can initialize Zoom IpJOut, Manual config.

Owners Manual
Page 23
... in correct proportions. - In 2-Split Zoom mode, you can move the image up or down_ If an image is enlarged to fill the screen. Owner_ Manual 23 Split Zoom can be used for aH input sources. Press the MENU button and then use ,l iV button to select the $CRE_ 2 Press the...
... in correct proportions. - In 2-Split Zoom mode, you can move the image up or down_ If an image is enlarged to fill the screen. Owner_ Manual 23 Split Zoom can be used for aH input sources. Press the MENU button and then use ,l iV button to select the $CRE_ 2 Press the...
Owners Manual
Page 25
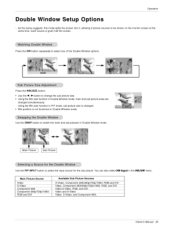
... Picture Sources S-Video, Component 480i/480p/720p/1080i, Video,SoVideo, RGB and DVi Video and S-Video Video, S-Video, and Component 480i, RGB and DVi Owner_ Manual 25 Press the WIN.SIZE button. • Use the 4/1_ button to select the input source for the sub picture, You can also select PIP...
... Picture Sources S-Video, Component 480i/480p/720p/1080i, Video,SoVideo, RGB and DVi Video and S-Video Video, S-Video, and Component 480i, RGB and DVi Owner_ Manual 25 Press the WIN.SIZE button. • Use the 4/1_ button to select the input source for the sub picture, You can also select PIP...
Owners Manual
Page 27
...'t display on this format when receiving abnormal data from non-viable functions or communication errors Data 1: Illegal Code 2: Not supported function 3: Wait more time Owner_ Manual 27 At this time, if the data is data read status of command. * [Or]: Carriage Return ASCII code '0x0D' * [ 1: ASCII code 'space (0x20)' OK Acknowledgement...
...'t display on this format when receiving abnormal data from non-viable functions or communication errors Data 1: Illegal Code 2: Not supported function 3: Wait more time Owner_ Manual 27 At this time, if the data is data read status of command. * [Or]: Carriage Return ASCII code '0x0D' * [ 1: ASCII code 'space (0x20)' OK Acknowledgement...
Owners Manual
Page 29
... zoom 4 of 2 split zoom 1 of 4 split zoom 2 of 4 split zoom 4 of 4 split zoom 5 of 4 split zoom 1 of 9 split zoom 99: Selection 9 of 9 split zoom Owner's Manual 29 Transmission [[k][o][ ][Set ID][ ][Data][Cr] Data 0:4:3 J 1' 16:9 Acknowledgement [[o][ ][Set IU][ ][OK][Uata][x] J 16. Max: 64 • Refer to 'Real data mapping 2'. When main power...
... zoom 4 of 2 split zoom 1 of 4 split zoom 2 of 4 split zoom 4 of 4 split zoom 5 of 4 split zoom 1 of 9 split zoom 99: Selection 9 of 9 split zoom Owner's Manual 29 Transmission [[k][o][ ][Set ID][ ][Data][Cr] Data 0:4:3 J 1' 16:9 Acknowledgement [[o][ ][Set IU][ ][OK][Uata][x] J 16. Max: 64 • Refer to 'Real data mapping 2'. When main power...
Owners Manual
Page 31
... 1 :Component 2 : Video ] 3 :S-Video 4 :DVl Acknowledgement [[y][ ][Set IU][ ][OK][Data][x] I 26. Transmission t[J][u][ ][Set ID][ ][Data][Cr] Data 1: To set Acknowledgement t[u][ ][Set IU][ ][OK][Data]Ix] Owner's Manual 31 Low Power (Command2:q) I_ To control the low power function on/off, Transmission [[j][q][ ][Set IU][ ][Uata][Cr] J Data 0: Low power off by AV board...
... 1 :Component 2 : Video ] 3 :S-Video 4 :DVl Acknowledgement [[y][ ][Set IU][ ][OK][Data][x] I 26. Transmission t[J][u][ ][Set ID][ ][Data][Cr] Data 1: To set Acknowledgement t[u][ ][Set IU][ ][OK][Data]Ix] Owner's Manual 31 Low Power (Command2:q) I_ To control the low power function on/off, Transmission [[j][q][ ][Set IU][ ][Uata][Cr] J Data 0: Low power off by AV board...

Owners Manual
Page 33
... MUTE R/C Button 10H Number Key 0 l_iC Button H ..... Discrete (Only 4:3 mode) Discrete (Onty 16;9 mode:) Discrete (Onty Zoom mode) Discrete _R Code Se!ect!on) Ovvner_ Manual 33 RJC Button 12H .....
... MUTE R/C Button 10H Number Key 0 l_iC Button H ..... Discrete (Only 4:3 mode) Discrete (Onty 16;9 mode:) Discrete (Onty Zoom mode) Discrete _R Code Se!ect!on) Ovvner_ Manual 33 RJC Button 12H .....

Owners Manual
Page 35
... off and unplug the power cord before you begin any cleaning, Here's a great way to protect against possible damage from lightning or power surges. Owner_ Manual 35
... off and unplug the power cord before you begin any cleaning, Here's a great way to protect against possible damage from lightning or power surges. Owner_ Manual 35


