

Owners Manual
Page 5
....... 19 Low power 19 Menu Rotation For Vertical Viewing ......... 20 Screen Menu Options Auto Adjustment 21 Setting Picture Format 21 Picture Size Zoom 21 Adjusting Horizonta_Nert[ca] Position ........ 22 Manual Configure 22 Screen Adjustments 22 Initializing 22 Luminance Noise... Reduction 23 Selecting Wide VGA mode 23 Split Zoom 23 PiP (Picture tn Picture) Feature Watching PiP 24 Swapping PIP 24 Moving PIP 24 Selecting a Input Signa_ Source for PiP ...
....... 19 Low power 19 Menu Rotation For Vertical Viewing ......... 20 Screen Menu Options Auto Adjustment 21 Setting Picture Format 21 Picture Size Zoom 21 Adjusting Horizonta_Nert[ca] Position ........ 22 Manual Configure 22 Screen Adjustments 22 Initializing 22 Luminance Noise... Reduction 23 Selecting Wide VGA mode 23 Split Zoom 23 PiP (Picture tn Picture) Feature Watching PiP 24 Swapping PIP 24 Moving PIP 24 Selecting a Input Signa_ Source for PiP ...
Owners Manual
Page 8
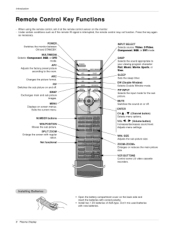
...NX. DASP Selects the sound appropriate to the room. SLEEP Sets the sleep timer. Changes the picture format. SWAP MENU PIP INP_ OH_ MU"f_ NUMBER buttons Moves the sub picture_ SPLIT ZOOM Enlarge the screen with regular ration. DW (Double Window) Selects Double Window mode PIP INPUT... Selects the input mode for the sub picture MUTE Switches the sound on and off ENTER OH _ t _ (Channel ...
...NX. DASP Selects the sound appropriate to the room. SLEEP Sets the sleep timer. Changes the picture format. SWAP MENU PIP INP_ OH_ MU"f_ NUMBER buttons Moves the sub picture_ SPLIT ZOOM Enlarge the screen with regular ration. DW (Double Window) Selects Double Window mode PIP INPUT... Selects the input mode for the sub picture MUTE Switches the sound on and off ENTER OH _ t _ (Channel ...
Owners Manual
Page 22
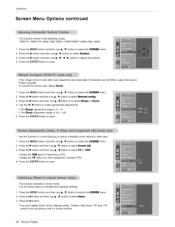
Press the ENTER button to save . Position_ Split zoom, PIP size, PIP position and sub picture size for other equipment, (Except 4 Press the ENTER button to select Reset, 3. Press the I_ button and then use A / V button to select Position 3 Press the ... image still isn't clear after auto adjustment Phase manually To correct the screen size, adjust Clock, and especially if characters are still jittery, adjust the picture 1. Press the I_ button. • You can initialize Zoom IpJOut, Manual config. Operation Screen Menu Options continued This function works in every mode Use the...
Press the ENTER button to save . Position_ Split zoom, PIP size, PIP position and sub picture size for other equipment, (Except 4 Press the ENTER button to select Reset, 3. Press the I_ button and then use A / V button to select Position 3 Press the ... image still isn't clear after auto adjustment Phase manually To correct the screen size, adjust Clock, and especially if characters are still jittery, adjust the picture 1. Press the I_ button. • You can initialize Zoom IpJOut, Manual config. Operation Screen Menu Options continued This function works in every mode Use the...

Owners Manual
Page 23
... the desired VGA resolution. 4_ Press the ENTER button to save menu, Operation o To see a normal picture, match the resolution of RGB mode and selection of choosing 5, _on 5 is enlarged to fill the screen...4. Press the I_ button and then use &/V button to save , Enlarges the picture in correct proportions. - In 2-Split Zoom mode, you can move the image up or down_ If an image is rotate 1.... Owner_ Manual 23 Press the SPLIT ZOOM button repeatedly to reduce the picture noise that may appear on the screen, 1 .. Split Zoom can onty move the enlarged screen Example ...
... the desired VGA resolution. 4_ Press the ENTER button to save menu, Operation o To see a normal picture, match the resolution of RGB mode and selection of choosing 5, _on 5 is enlarged to fill the screen...4. Press the I_ button and then use &/V button to save , Enlarges the picture in correct proportions. - In 2-Split Zoom mode, you can move the image up or down_ If an image is rotate 1.... Owner_ Manual 23 Press the SPLIT ZOOM button repeatedly to reduce the picture noise that may appear on the screen, 1 .. Split Zoom can onty move the enlarged screen Example ...
Owners Manual
Page 25
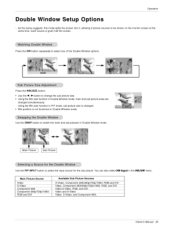
... - Press the DW button repeatedly to select the input source for the sub picture, You can also select PIP Input in DouMe Window mode. As the name suggests, this mode splits the screen into 2_ allowing 2 picture sources to be shown on to select one of the Double Window options. Using... the Win.size function in PIP mode, sub picture size is changed simuffaneously. Main Picture Sub Picture Use the PIP INPUT butt:on the monitor...
... - Press the DW button repeatedly to select the input source for the sub picture, You can also select PIP Input in DouMe Window mode. As the name suggests, this mode splits the screen into 2_ allowing 2 picture sources to be shown on to select one of the Double Window options. Using... the Win.size function in PIP mode, sub picture size is changed simuffaneously. Main Picture Sub Picture Use the PIP INPUT butt:on the monitor...
Owners Manual
Page 29
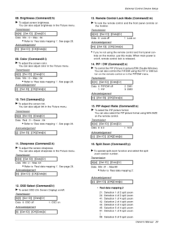
... 41 : Selection 42: Selection 44: Selection 45: Selection 91 : Selection 1 of 2 split zoom 4 of 2 split zoom 1 of 4 split zoom 2 of 4 split zoom 4 of 4 split zoom 5 of 4 split zoom 1 of 9 split zoom 99: Selection 9 of 9 split zoom Owner's Manual 29 You can also adjust sharpness in the Picture menu. Tint (Command2:j) I_ To adjust the screen tint. Max: 64 •...
... 41 : Selection 42: Selection 44: Selection 45: Selection 91 : Selection 1 of 2 split zoom 4 of 2 split zoom 1 of 4 split zoom 2 of 4 split zoom 4 of 4 split zoom 5 of 4 split zoom 1 of 9 split zoom 99: Selection 9 of 9 split zoom Owner's Manual 29 You can also adjust sharpness in the Picture menu. Tint (Command2:j) I_ To adjust the screen tint. Max: 64 •...


