

Owners Manual
Page 1
See the label attached on the back of the Monitor. Record model number and serial number of the Monitor and relate this owner's manual thoroughly before operating the Monitor. Model Number : Serial Number : LG Electronics U.S.A., Inc. PLASMA MONITOR OWNER'S MANUAL MODELS : MU-42PM11/12X/20 MU-50PM10/11/20 Please read this information to your dealer if you ever require service. Retain it for future reference.
See the label attached on the back of the Monitor. Record model number and serial number of the Monitor and relate this owner's manual thoroughly before operating the Monitor. Model Number : Serial Number : LG Electronics U.S.A., Inc. PLASMA MONITOR OWNER'S MANUAL MODELS : MU-42PM11/12X/20 MU-50PM10/11/20 Please read this information to your dealer if you ever require service. Retain it for future reference.

Owners Manual
Page 2
... and on a circuit different from LG Electronics. However, there is : LG Electronics U.S.A., Inc 1000 Sylvan Avenue, Englewood Cliffs, NJ 07632 1-201-816-2000 http://www.lgusa.com WARNING/CAUTION TO REDUCE THE RISK OF FIRE AND ELECTRIC SHOCK, DO NOT EXPOSE THIS PRODUCT TO RAIN OR MOISTURE. 2 Plasma Monitor These limits are designed to...
... and on a circuit different from LG Electronics. However, there is : LG Electronics U.S.A., Inc 1000 Sylvan Avenue, Englewood Cliffs, NJ 07632 1-201-816-2000 http://www.lgusa.com WARNING/CAUTION TO REDUCE THE RISK OF FIRE AND ELECTRIC SHOCK, DO NOT EXPOSE THIS PRODUCT TO RAIN OR MOISTURE. 2 Plasma Monitor These limits are designed to...

Owners Manual
Page 4
... cord or plug is used, use attachments/accessories specified by the manufacturer, or sold with liquids, such as vases, shall be placed on the apparatus. 4 Plasma Monitor To Reduce The Risk Of Fire Or Electric Shock, Do Not Expose This Appliance To Rain Or Moisture. 16. Safety Instructions Safety Instructions continued 11...
... cord or plug is used, use attachments/accessories specified by the manufacturer, or sold with liquids, such as vases, shall be placed on the apparatus. 4 Plasma Monitor To Reduce The Risk Of Fire Or Electric Shock, Do Not Expose This Appliance To Rain Or Moisture. 16. Safety Instructions Safety Instructions continued 11...

Owners Manual
Page 6
.... Several minute colored dots visible on the PDP screen The PDP (Plasma Display Panel) which is the display device of this product is composed of the Plasma Display is wide so that instant, light is designed to be exchanged or returned. 6 Plasma Monitor Our production technology is emitted. The fan noise doesn't have any...
.... Several minute colored dots visible on the PDP screen The PDP (Plasma Display Panel) which is the display device of this product is composed of the Plasma Display is wide so that instant, light is designed to be exchanged or returned. 6 Plasma Monitor Our production technology is emitted. The fan noise doesn't have any...

Owners Manual
Page 8
...S-VIDEO INPUT SOCKETS Connect S-Video out from your wired remote control to these jacks. 8. POWER CORD SOCKET This Monitor operates on DC power. 8 Plasma Monitor RS-232C INPUT (CONTROL/SERVICE) PORT Connect to 'Speaker & Speaker Stand' manual. 9. Never attempt to another... monitor's PC input port. 5. NOTE: AUDIO INPUT of S-VIDEO is indicated on the Monitor. 2. The voltage is worked by L(mono). 7. Back Connection Panel REMOTE RS-232C...
...S-VIDEO INPUT SOCKETS Connect S-Video out from your wired remote control to these jacks. 8. POWER CORD SOCKET This Monitor operates on DC power. 8 Plasma Monitor RS-232C INPUT (CONTROL/SERVICE) PORT Connect to 'Speaker & Speaker Stand' manual. 9. Never attempt to another... monitor's PC input port. 5. NOTE: AUDIO INPUT of S-VIDEO is indicated on the Monitor. 2. The voltage is worked by L(mono). 7. Back Connection Panel REMOTE RS-232C...

Owners Manual
Page 10
... speakers shown are not possible, have a qualified electrician install a separate circuit breaker. Power Supply Short-circuit Breaker 10 Plasma Monitor Installation Installation Ensure that you purchased the product. If an accessory is designed to be mounted horizontally or vertically. If ...shock. ZOOM + Remote Control Power Cord BNC-RCA Adapter Installation Instructions • The Monitor can be installed in various ways such as on a wall, or on a desktop etc. • The plasma display is missing, please contact the dealer where you connect the grounding / earth wire...
... speakers shown are not possible, have a qualified electrician install a separate circuit breaker. Power Supply Short-circuit Breaker 10 Plasma Monitor Installation Installation Ensure that you purchased the product. If an accessory is designed to be mounted horizontally or vertically. If ...shock. ZOOM + Remote Control Power Cord BNC-RCA Adapter Installation Instructions • The Monitor can be installed in various ways such as on a wall, or on a desktop etc. • The plasma display is missing, please contact the dealer where you connect the grounding / earth wire...

Owners Manual
Page 12
...4. compared to connecting a regular VCR to a Cable Box, match the jack colors (Video = yellow, Audio Left = white, and Audio Right = red). 3. When connecting the monitor to the TV. - For further information regarding cable TV service, contact your desired channel with using the INPUT SELECT button on the remote control. (If..., Audio Left = white, and Audio Right = red). Y PB PR COMPONENT INPUT R L AUDIO INPUT S-VIDEO R L (MONO) AUDIO INPUT VIDEO INPUT ( )R( ) ( )L( ) EXTERNAL SPEAKER AC INPUT 12 Plasma Monitor (R) AUDIO (L) VIDEO TV VCR RF Cable Cable Box
...4. compared to connecting a regular VCR to a Cable Box, match the jack colors (Video = yellow, Audio Left = white, and Audio Right = red). 3. When connecting the monitor to the TV. - For further information regarding cable TV service, contact your desired channel with using the INPUT SELECT button on the remote control. (If..., Audio Left = white, and Audio Right = red). Y PB PR COMPONENT INPUT R L AUDIO INPUT S-VIDEO R L (MONO) AUDIO INPUT VIDEO INPUT ( )R( ) ( )L( ) EXTERNAL SPEAKER AC INPUT 12 Plasma Monitor (R) AUDIO (L) VIDEO TV VCR RF Cable Cable Box

Owners Manual
Page 14
... DVI jack for the digital set-top box.) 2. Signal 480i 480p 720p 1080i Component Yes Yes Yes Yes RGB,DVI No Yes Yes Yes 14 Plasma Monitor How to select Component , RGB, or DVI source. Then, make the corresponding audio connections. To watch digitally broadcast programs, purchase and connect a digital set -top...
... DVI jack for the digital set-top box.) 2. Signal 480i 480p 720p 1080i Component Yes Yes Yes Yes RGB,DVI No Yes Yes Yes 14 Plasma Monitor How to select Component , RGB, or DVI source. Then, make the corresponding audio connections. To watch digitally broadcast programs, purchase and connect a digital set -top...

Owners Manual
Page 16
Installation Monitor Display Specifications • RGB Input (PC ) Resolution 640x350 720x400 640x480 800x600 832x624 848x480 Horizontal Vertical Frequency(KHz) Frequency(Hz) 31.468 70.09 37.861 ... 60.023 60.02 63.981 60.02 47.700 60.00 59.625 75.02 47.700 60.00 59.625 75.02 16 Plasma Monitor
Installation Monitor Display Specifications • RGB Input (PC ) Resolution 640x350 720x400 640x480 800x600 832x624 848x480 Horizontal Vertical Frequency(KHz) Frequency(Hz) 31.468 70.09 37.861 ... 60.023 60.02 63.981 60.02 47.700 60.00 59.625 75.02 47.700 60.00 59.625 75.02 16 Plasma Monitor
Owners Manual
Page 18
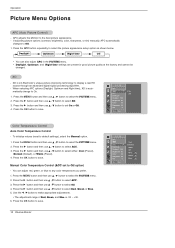
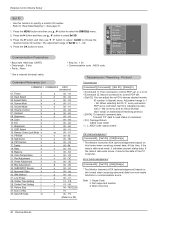
... On or Off. 4. Use the F / G button to make appropriate adjustments. • The adjustment range of Red, Green, and Blue is LG Electronic's unique picture improving technology to Off option) - Operation Picture Menu Options APC (Auto Picture Control) - When selecting APC options (Daylight, Optimum and...60 Tint 0 Menu Prev. Press the G button and then use D / E button to Off. 1. Press the OK button to save . 18 Plasma Monitor PICTURE APC ACC G Fleshtone Contrast 100 Brightness 55 Color 55 Sharpness 60 Tint 0 Menu Prev. Press the MENU button and then use D / E button...
... On or Off. 4. Use the F / G button to make appropriate adjustments. • The adjustment range of Red, Green, and Blue is LG Electronic's unique picture improving technology to Off option) - Operation Picture Menu Options APC (Auto Picture Control) - When selecting APC options (Daylight, Optimum and...60 Tint 0 Menu Prev. Press the G button and then use D / E button to Off. 1. Press the OK button to save . 18 Plasma Monitor PICTURE APC ACC G Fleshtone Contrast 100 Brightness 55 Color 55 Sharpness 60 Tint 0 Menu Prev. Press the MENU button and then use D / E button...

Owners Manual
Page 20
If you enjoy the best sound without any special adjustment because the Monitor has the appropriate sound options based on the program content. - Press the G button and then use D / E button to select On or Off. 4. Press the MENU ... OK button to select the appropriate sound setup as shown below. SOUND DASP BBE AVL G On Balance 0 Off Treble 50 Bass 50 Menu Prev. 20 Plasma Monitor SOUND DASP BBE G On AVL Off Balance 0 Treble 50 Bass 50 Menu Prev. AVL maintains an equal sound level; This function lets you adjust sound...
If you enjoy the best sound without any special adjustment because the Monitor has the appropriate sound options based on the program content. - Press the G button and then use D / E button to select On or Off. 4. Press the MENU ... OK button to select the appropriate sound setup as shown below. SOUND DASP BBE AVL G On Balance 0 Off Treble 50 Bass 50 Menu Prev. 20 Plasma Monitor SOUND DASP BBE G On AVL Off Balance 0 Treble 50 Bass 50 Menu Prev. AVL maintains an equal sound level; This function lets you adjust sound...
Owners Manual
Page 22
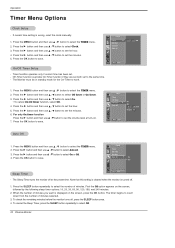
...button and then use D / E button to set to save . Press the OK button to the same time. - Note that this setting is cleared when the monitor is displayed on the screen, press the OK button. Press the G button and then use D / E button to select On or Off. 4. Off-Timer ...select On. • To cancel On/Off timer function, select Off. 4. Press the OK button to select Off. 22 Plasma Monitor If current time setting is wrong, reset the clock manually. 1. The Monitor must be in standby mode for the On-Timer to set the minutes. 5. Press the G button and then use D /...
...button and then use D / E button to set to save . Press the OK button to the same time. - Note that this setting is cleared when the monitor is displayed on the screen, press the OK button. Press the G button and then use D / E button to select On or Off. 4. Off-Timer ...select On. • To cancel On/Off timer function, select Off. 4. Press the OK button to select Off. 22 Plasma Monitor If current time setting is wrong, reset the clock manually. 1. The Monitor must be in standby mode for the On-Timer to set the minutes. 5. Press the G button and then use D /...

Owners Manual
Page 24
... the OK button to select Normal or Rotate. • Select Normal, if the monitor was installed horizontally. • Select Rotate, if the monitor was installed vertically. 4. XD Demo - Press the OK button to select Demo. 3. Low power reduces the plasma display power consumption. 1. Press the G button to see the difference between XD Demo..., XD Demo is disabled . Operation Special Menu Options continued Low Power - Press the G button and then use D / E button to stop XD Demo. Normal Rotate 24 Plasma Monitor
... the OK button to select Normal or Rotate. • Select Normal, if the monitor was installed horizontally. • Select Rotate, if the monitor was installed vertically. 4. XD Demo - Press the OK button to select Demo. 3. Low power reduces the plasma display power consumption. 1. Press the G button to see the difference between XD Demo..., XD Demo is disabled . Operation Special Menu Options continued Low Power - Press the G button and then use D / E button to stop XD Demo. Normal Rotate 24 Plasma Monitor
Owners Manual
Page 26
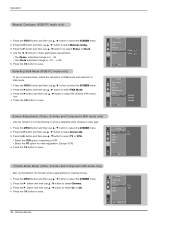
... to select Cinema.. 3. Selecting VGA Mode (RGB-PC mode only) - Press the MENU button and then use D / E button to save . 26 Plasma Monitor SCREEN Screen adj. ARC Position Manual config Reset VGA Mode G Menu Prev. 640x480 848x480 852x480 Screen Adjustments (Video, S-Video and Component 480i mode only) -... or VCR. • Select the VCR option if watching a VCR. • Select the TV option for viewing movies. 1. Sets up the Monitor for the best picture appearance for other equipment. (Except VCR) 4. Press the MENU button and then use D / E button to select the SCREEN...
... to select Cinema.. 3. Selecting VGA Mode (RGB-PC mode only) - Press the MENU button and then use D / E button to save . 26 Plasma Monitor SCREEN Screen adj. ARC Position Manual config Reset VGA Mode G Menu Prev. 640x480 848x480 852x480 Screen Adjustments (Video, S-Video and Component 480i mode only) -... or VCR. • Select the VCR option if watching a VCR. • Select the TV option for viewing movies. 1. Sets up the Monitor for the best picture appearance for other equipment. (Except VCR) 4. Press the MENU button and then use D / E button to select the SCREEN...
Owners Manual
Page 28
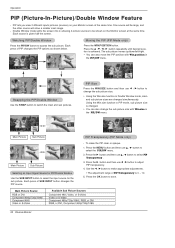
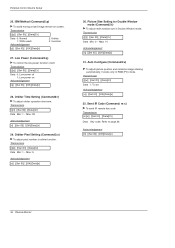
... the MENU button and then use F / G button to select the PIP/DW menu. 2. PIP lets you view 2 different inputs pictures (sources) on the Monitor screen at the same time. Press the G button and then use D / E button to adjust PIP transparency. 4. Watching PIP/Double Window Press the PIP/DW...480i, Video, or S-Video Video or S-Video Component 480p/720p/1080i, RGB, or DVI RGB, or DVI, Component 480p/720p/1080i 28 Plasma Monitor Using the Win.size function in the PIP/DW menu. Operation PIP (Picture-In-Picture)/Double Window Feature - PIP Transparency (PIP Mode only) -
... the MENU button and then use F / G button to select the PIP/DW menu. 2. PIP lets you view 2 different inputs pictures (sources) on the Monitor screen at the same time. Press the G button and then use D / E button to adjust PIP transparency. 4. Watching PIP/Double Window Press the PIP/DW...480i, Video, or S-Video Video or S-Video Component 480p/720p/1080i, RGB, or DVI RGB, or DVI, Component 480p/720p/1080i 28 Plasma Monitor Using the Win.size function in the PIP/DW menu. Operation PIP (Picture-In-Picture)/Double Window Feature - PIP Transparency (PIP Mode only) -
Owners Manual
Page 30
...ISM Method j 27. Orbiter Time Setting j 29. Orbiter Pixel Setting j 30. Error Acknowledgement [Command2][ ][Set ID][ ][NG][Data][x] * The Monitor transmits ACK (acknowledgement) based on this format when receiving normal data. See page 31. 1. Command Reference List COMMAND 1 COMMAND 2 DATA (Hexadecimal)... the data is 1 ~ 99. Data 1: Illegal Code 2: Not supported function 3: Wait more time 30 Plasma Monitor Press the OK button to choose the desired monitor ID number. SPECIAL Language Key lock ISM Method Low power Set ID G 1 Demo OSD Rotate Communication Parameters ...
...ISM Method j 27. Orbiter Time Setting j 29. Orbiter Pixel Setting j 30. Error Acknowledgement [Command2][ ][Set ID][ ][NG][Data][x] * The Monitor transmits ACK (acknowledgement) based on this format when receiving normal data. See page 31. 1. Command Reference List COMMAND 1 COMMAND 2 DATA (Hexadecimal)... the data is 1 ~ 99. Data 1: Illegal Code 2: Not supported function 3: Wait more time 30 Plasma Monitor Press the OK button to choose the desired monitor ID number. SPECIAL Language Key lock ISM Method Low power Set ID G 1 Demo OSD Rotate Communication Parameters ...

Owners Manual
Page 32
...][x] 12. OSD Select (Command2:l) G To select OSD (On Screen Display) on /off . When main power is on /off , remote control lock is released. 32 Plasma Monitor 14. Transmission [k][q][ ][Set ID][ ][Data][Cr] Data 0: Right down on screen 1: Left down on screen 2: Left up on screen 3: Right up on the... monitor. See page 31. You can also control the PIP/DW using the PIP/DW button on the remote control or in the Picture menu. Transmission [k][m][ ][...
...][x] 12. OSD Select (Command2:l) G To select OSD (On Screen Display) on /off . When main power is on /off , remote control lock is released. 32 Plasma Monitor 14. Transmission [k][q][ ][Set ID][ ][Data][Cr] Data 0: Right down on screen 1: Left down on screen 2: Left up on screen 3: Right up on the... monitor. See page 31. You can also control the PIP/DW using the PIP/DW button on the remote control or in the Picture menu. Transmission [k][m][ ][...
Owners Manual
Page 34
... wash Acknowledgement 2: Orbiter 3: Inversion [p][ ][Set ID][ ][OK][Data][x] 27. Orbiter Time Setting (Command2:r) G To adjust orbiter operation time term. Acknowledgement [c][ ][Set ID][ ][OK][Data][x] 34 Plasma Monitor Orbiter Pixel Setting (Command2:s) G To adjust pixel number in orbiter function. Send IR Code (Command: m c) G To send IR remote key code Transmission [m][c][ ][Set ID][ ][Data...
... wash Acknowledgement 2: Orbiter 3: Inversion [p][ ][Set ID][ ][OK][Data][x] 27. Orbiter Time Setting (Command2:r) G To adjust orbiter operation time term. Acknowledgement [c][ ][Set ID][ ][OK][Data][x] 34 Plasma Monitor Orbiter Pixel Setting (Command2:s) G To adjust pixel number in orbiter function. Send IR Code (Command: m c) G To send IR remote key code Transmission [m][c][ ][Set ID][ ][Data...

Owners Manual
Page 38
...cleaning can be prevented. Here's a great way to keep the dust off your Monitor dormant for a long time (such as a vacation), it's a good idea ...Monitor. Early malfunctions can extend the amount of time you begin any cleaning. Wring the cloth until it's almost dry, and then use a wet cloth. Make sure the excess water is off and unplug the power cord before you expect to wipe the screen. 2. Product Specifications MODELS MU-42PM11/20 MU-42PM12X MU... let it to leave your screen for quality improvement. 38 Plasma Monitor Be sure to use it air-dry before you will have your...
...cleaning can be prevented. Here's a great way to keep the dust off your Monitor dormant for a long time (such as a vacation), it's a good idea ...Monitor. Early malfunctions can extend the amount of time you begin any cleaning. Wring the cloth until it's almost dry, and then use a wet cloth. Make sure the excess water is off and unplug the power cord before you expect to wipe the screen. 2. Product Specifications MODELS MU-42PM11/20 MU-42PM12X MU... let it to leave your screen for quality improvement. 38 Plasma Monitor Be sure to use it air-dry before you will have your...
Service Manual
Page 1
CANADA : http//biz.lgservice.com USA : http//www.lgservice.com : http//lgservice.com/techsup.html PLASMA MONITOR SERVICE MANUAL CHASSIS : RF-043E MODEL : MU-42PM11 MU-42PM12X CAUTION BEFORE SERVICING THE CHASSIS, READ THE SAFETY PRECAUTIONS IN THIS MANUAL.
CANADA : http//biz.lgservice.com USA : http//www.lgservice.com : http//lgservice.com/techsup.html PLASMA MONITOR SERVICE MANUAL CHASSIS : RF-043E MODEL : MU-42PM11 MU-42PM12X CAUTION BEFORE SERVICING THE CHASSIS, READ THE SAFETY PRECAUTIONS IN THIS MANUAL.


