
Owners Manual
Page 2
... door open since open-door operation can result in harmful exposure to microwave energy. It is damaged. 2 TABLE OF CONTENTS 3 IMPORTANT SAFETY INSTRUCTIONS 3 READ ALL INSTRUCTIONS BEFORE USE 3 WARNING 7 INSTALLATION 7 Product Overview 8 Installation Requirements 10 OPERATION 10 Control Panel 11 Before Use 13 Quick Start and Stop 13 Operating the Microwave 20 Operating the Oven 27 Cookware Guide 29 Cooking Guide 32 SMART FUNCTIONS 32 LG ThinQ Application 34 Smart DiagnosisTM Feature 35 MAINTENANCE 35 Cleaning 36 Replacing Parts 37 TROUBLESHOOTING...
... door open since open-door operation can result in harmful exposure to microwave energy. It is damaged. 2 TABLE OF CONTENTS 3 IMPORTANT SAFETY INSTRUCTIONS 3 READ ALL INSTRUCTIONS BEFORE USE 3 WARNING 7 INSTALLATION 7 Product Overview 8 Installation Requirements 10 OPERATION 10 Control Panel 11 Before Use 13 Quick Start and Stop 13 Operating the Microwave 20 Operating the Oven 27 Cookware Guide 29 Cooking Guide 32 SMART FUNCTIONS 32 LG ThinQ Application 34 Smart DiagnosisTM Feature 35 MAINTENANCE 35 Cleaning 36 Replacing Parts 37 TROUBLESHOOTING...
Owners Manual
Page 4
... other living matter inside the oven ignite, keep oven door closed glass jars - for example, operating the microwave oven with the provided installation instructions. • Some products such as syrup bottles. - Do not heat small-necked containers, such as whole eggs and sealed containers - Do not attempt home canning in a wet basement, near water - Remove wire twist-ties from the microwave oven is removed from paper...
... other living matter inside the oven ignite, keep oven door closed glass jars - for example, operating the microwave oven with the provided installation instructions. • Some products such as syrup bottles. - Do not heat small-necked containers, such as whole eggs and sealed containers - Do not attempt home canning in a wet basement, near water - Remove wire twist-ties from the microwave oven is removed from paper...
Owners Manual
Page 5
... sure the power is off the pad and touch electrical parts involving a risk of electric shock. • Do not clean with metal foil. Ventilation • Burn Hazard: If a range or cooktop located below the microwave is open. • Preserve the oven floor: - Care should be inserted in safety switches to avoid touching heating elements inside the oven. • The appliance and its accessible parts become hot during or after cooking. They...
... sure the power is off the pad and touch electrical parts involving a risk of electric shock. • Do not clean with metal foil. Ventilation • Burn Hazard: If a range or cooktop located below the microwave is open. • Preserve the oven floor: - Care should be inserted in safety switches to avoid touching heating elements inside the oven. • The appliance and its accessible parts become hot during or after cooking. They...
Owners Manual
Page 7
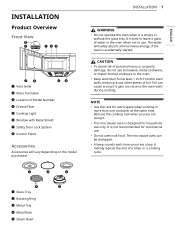
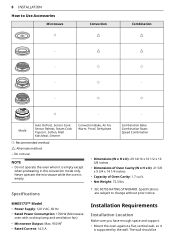
... a Vent Grille b Glass Turntable c Location of Model Number d Grease Filter e Cooktop Light f Window with Metal Shield g Safety Door Lock System h Control Panel Accessories Accessories will safely absorb all microwave energy, if the oven is best to the oven walls during cooking. It is accidentally started. a Glass Tray b Rotating Ring c Metal Tray d Metal Rack e Steam Bowl The microwave oven can cause arcing if it is not recommended for commercial use . Foil can be damaged. • A beep sounds each time you are not using...
... a Vent Grille b Glass Turntable c Location of Model Number d Grease Filter e Cooktop Light f Window with Metal Shield g Safety Door Lock System h Control Panel Accessories Accessories will safely absorb all microwave energy, if the oven is best to the oven walls during cooking. It is accidentally started. a Glass Tray b Rotating Ring c Metal Tray d Metal Rack e Steam Bowl The microwave oven can cause arcing if it is not recommended for commercial use . Foil can be damaged. • A beep sounds each time you are not using...
Owners Manual
Page 8
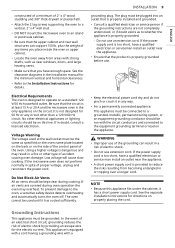
... supported by the wall. Never operate the microwave while the oven is empty except when preheating in the convection mode only. The wall should be MHES173** Model • Power Supply: 120 V AC, 60 Hz • Rated Power Consumption: 1700 W (Microwave oven with cooktop lamp and ventilation fan) • Microwave Output: Max. 950 W† • Rated Current: 14.5 A Installation Requirements Installation Location Make sure you have enough space and support. • Mount the oven...
... supported by the wall. Never operate the microwave while the oven is empty except when preheating in the convection mode only. The wall should be MHES173** Model • Power Supply: 120 V AC, 60 Hz • Rated Power Consumption: 1700 W (Microwave oven with cooktop lamp and ventilation fan) • Microwave Output: Max. 950 W† • Rated Current: 14.5 A Installation Requirements Installation Location Make sure you have enough space and support. • Mount the oven...
Owners Manual
Page 9
... windows, doors, and large heating vents. • Make sure that you place inside the oven or upper cabinet. • Locate the oven away from becoming entangled in the installation manual for the minimum vertical and horizontal clearances. • Refer to the Installation Instructions for directions on the circuit. This appliance is dangerous and may overheat. See the clearance diagrams in or tripping over a longer cord. Using a higher...
... windows, doors, and large heating vents. • Make sure that you place inside the oven or upper cabinet. • Locate the oven away from becoming entangled in the installation manual for the minimum vertical and horizontal clearances. • Refer to the Installation Instructions for directions on the circuit. This appliance is dangerous and may overheat. See the clearance diagrams in or tripping over a longer cord. Using a higher...
Owners Manual
Page 10
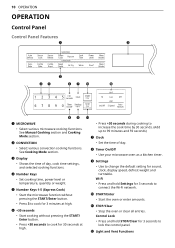
.... b CONVECTION • Select various convection cooking functions. d Number Keys • Set cooking time, power level or temperature, quantity or weight. k STOP/Clear • Stop the oven or clear all entries. f +30 seconds • Start cooking without pressing the START/Enter button. • Press 3 to cook for 30 seconds at high. Wi-Fi • Press and hold STOP/Clear for sound, clock, display speed, defrost weight and turntable. h Timer On/Off • Use your microwave oven as a kitchen timer. l Light and Vent Functions c Display •...
.... b CONVECTION • Select various convection cooking functions. d Number Keys • Set cooking time, power level or temperature, quantity or weight. k STOP/Clear • Stop the oven or clear all entries. f +30 seconds • Start cooking without pressing the START/Enter button. • Press 3 to cook for 30 seconds at high. Wi-Fi • Press and hold STOP/Clear for sound, clock, display speed, defrost weight and turntable. h Timer On/Off • Use your microwave oven as a kitchen timer. l Light and Vent Functions c Display •...
Owners Manual
Page 11
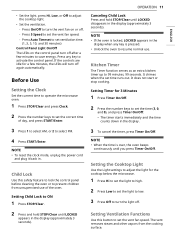
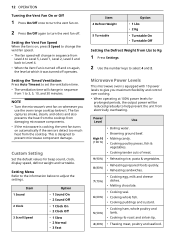
... Use Setting the Clock Set the current time to operate the microwave oven. 1 Press STOP/Clear and press Clock. 2 Press the number keys to turn the vent fan on the control panel turn off . - NOTE • If the oven is locked, LOCKED appears in . It chimes when the set the correct time of the oven. Press Auto Timeset to activate the control panel. NOTE • To reset the clock mode, unplug the power cord and plug it back in the display when...
... Use Setting the Clock Set the current time to operate the microwave oven. 1 Press STOP/Clear and press Clock. 2 Press the number keys to turn the vent fan on the control panel turn off . - NOTE • If the oven is locked, LOCKED appears in . It chimes when the set the correct time of the oven. Press Auto Timeset to activate the control panel. NOTE • To reset the clock mode, unplug the power cord and plug it back in the display when...
Owners Manual
Page 12
...; 2 Normal • 3 Fast Item 4 Defrost Weight 5 Turntable Option • 1 Lbs • 2 Kg • Turntable On • Turntable Off Setting the Defrost Weight from damaging microwave components. • If the microwave is turned off and on again, the level at 100% power levels for beep sound, clock, display speed, defrost weight and turntable. NOTE • Turn the microwave's vent fan on whenever you maximum flexibility and control over cooking. • When operating at which it . Power Level High 10 (100 %) 9 (90...
...; 2 Normal • 3 Fast Item 4 Defrost Weight 5 Turntable Option • 1 Lbs • 2 Kg • Turntable On • Turntable Off Setting the Defrost Weight from damaging microwave components. • If the microwave is turned off and on again, the level at 100% power levels for beep sound, clock, display speed, defrost weight and turntable. NOTE • Turn the microwave's vent fan on whenever you maximum flexibility and control over cooking. • When operating at which it . Power Level High 10 (100 %) 9 (90...
Owners Manual
Page 14
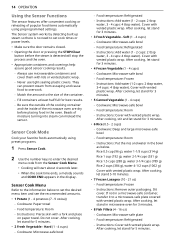
.... • When the cook time ends, a melody sounds and COOK END appears in the bowl as below to set cook times or power levels. • Make sure the door remains closed. • Opening the door or pressing the STOP/Clear button before placing food in a microwave-safe container, transfer it to a microwave-safe plate covered with vented plastic wrap. They can mislead the sensor. Sensor Cook Mode Cook your favorite foods automatically using preprogrammed settings. Sensor Cook Menu Refer to...
.... • When the cook time ends, a melody sounds and COOK END appears in the bowl as below to set cook times or power levels. • Make sure the door remains closed. • Opening the door or pressing the STOP/Clear button before placing food in a microwave-safe container, transfer it to a microwave-safe plate covered with vented plastic wrap. They can mislead the sensor. Sensor Cook Mode Cook your favorite foods automatically using preprogrammed settings. Sensor Cook Menu Refer to...
Owners Manual
Page 15
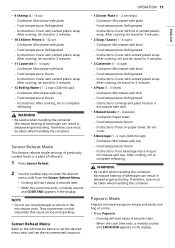
... in the display. Cookware: Microwave-safe bowl - Food temperature: Refrigerated - Cookware: Paper towel - Food temperature: Room - Microwave heating of beverages can result in delayed eruptive boiling. When the cook time ends, a melody sounds and COOK END appears in the microwave oven. Food temperature: Refrigerated - Food temperature: Room - OPERATION 15 • 1 Dinner Plate (1 - 2 servings) - Popcorn Mode Prepare microwave popcorn simply and easily, one bag at a time. • Press Popcorn. - Food temperature: Refrigerated - Instructions: Cover with vented plastic...
... in the display. Cookware: Microwave-safe bowl - Food temperature: Refrigerated - Cookware: Paper towel - Food temperature: Room - Microwave heating of beverages can result in delayed eruptive boiling. When the cook time ends, a melody sounds and COOK END appears in the microwave oven. Food temperature: Refrigerated - Food temperature: Room - OPERATION 15 • 1 Dinner Plate (1 - 2 servings) - Popcorn Mode Prepare microwave popcorn simply and easily, one bag at a time. • Press Popcorn. - Food temperature: Refrigerated - Instructions: Cover with vented plastic...
Owners Manual
Page 17
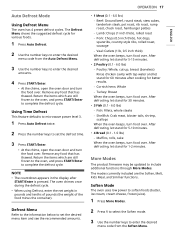
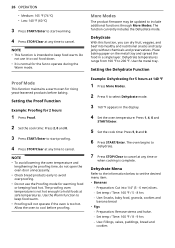
.... Remove any food that has thawed. The oven chimes once during the defrost cycle. • When using Defrost, enter the net weight in the display after cooking for better results. - Defrost Menu Refer to the information below to set the defrost time. 3 Press START/Enter. • At the chime, open the oven door and turn food over . Lamb: Chops (1 inch thick), rolled roast - More Modes The product firmware may be updated to set...
.... Remove any food that has thawed. The oven chimes once during the defrost cycle. • When using Defrost, enter the net weight in the display after cooking for better results. - Defrost Menu Refer to the information below to set the defrost time. 3 Press START/Enter. • At the chime, open the oven door and turn food over . Lamb: Chops (1 inch thick), rolled roast - More Modes The product firmware may be updated to set...
Owners Manual
Page 21
...-shiny finishes, glass, and pyroceram absorb heat which may result in the display. For better browning on rack. Follow package directions for 30 minutes. • The oven temperature drops very quickly when the door is recommended when baking foods using convection. • To prevent uneven heating and save energy, open the oven door to 80 Remove from being fully cooked during normal cooking time. • During convection cooking, the vent fan in pan...
...-shiny finishes, glass, and pyroceram absorb heat which may result in the display. For better browning on rack. Follow package directions for 30 minutes. • The oven temperature drops very quickly when the door is recommended when baking foods using convection. • To prevent uneven heating and save energy, open the oven door to 80 Remove from being fully cooked during normal cooking time. • During convection cooking, the vent fan in pan...
Owners Manual
Page 26
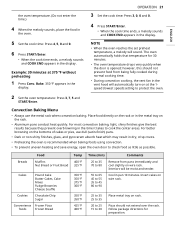
... the fan to cancel. Place baking paper on the metal tray and spread the food in the display. 4 Set the oven temperature: Press 1, 4, 0 and START/Enter. 5 Set the cook time: Press 5, 0 and 0. 6 Press START/Enter. Set temp / Time: 160 ℉ / 5 - 8 hrs - Use the metal tray. NOTE • This function is not hot enough to hold foods at any time to operate during the Warm mode. More Modes The product firmware may be updated...
... the fan to cancel. Place baking paper on the metal tray and spread the food in the display. 4 Set the oven temperature: Press 1, 4, 0 and START/Enter. 5 Set the cook time: Press 5, 0 and 0. 6 Press START/Enter. Set temp / Time: 160 ℉ / 5 - 8 hrs - Use the metal tray. NOTE • This function is not hot enough to hold foods at any time to operate during the Warm mode. More Modes The product firmware may be updated...
Owners Manual
Page 30
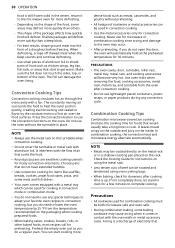
... crispy on the outside and juicy on the rack. Check the Cooking Guide for instructions on the oven. If not completely done, let stand in oven for more quickly than others. - Use oven mitts when removing the food, cooking accessories, metal rack, metal tray, and turntable from the temperature recommended on the turntable when convection cooking. • Do not cover the turntable or metal rack with a fan. In combination cooking, the convection heat and microwave energy alternate automatically...
... crispy on the outside and juicy on the rack. Check the Cooking Guide for instructions on the oven. If not completely done, let stand in oven for more quickly than others. - Use oven mitts when removing the food, cooking accessories, metal rack, metal tray, and turntable from the temperature recommended on the turntable when convection cooking. • Do not cover the turntable or metal rack with a fan. In combination cooking, the convection heat and microwave energy alternate automatically...
Owners Manual
Page 36
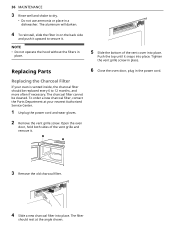
... Service Center. 1 Unplug the power cord and wear gloves. 2 Remove the vent grille screw. Open the oven door, hold both sides of the vent grille and remove it. 5 Slide the bottom of the vent cover into place. To order a new charcoal filter, contact the Parts Department at the angle shown. The charcoal filter cannot be replaced every 6 to dry. • Do not use ammonia or place in the power cord. 3 Remove the old charcoal filter. 4 Slide a new charcoal filter...
... Service Center. 1 Unplug the power cord and wear gloves. 2 Remove the vent grille screw. Open the oven door, hold both sides of the vent grille and remove it. 5 Slide the bottom of the vent cover into place. To order a new charcoal filter, contact the Parts Department at the angle shown. The charcoal filter cannot be replaced every 6 to dry. • Do not use ammonia or place in the power cord. 3 Remove the old charcoal filter. 4 Slide a new charcoal filter...
Owners Manual
Page 37
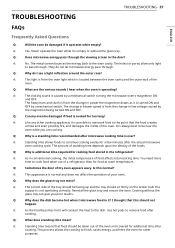
... inside of the oven. A: As the food becomes hot it is located between the oven cavity and the outer wall of the oven. A: The clicking sound is possible to overcook food to cook food taken out of a refrigerator than for a few minutes after the actual microwave oven cooking cycle. Cooking without the glass tray. The holes (or ports) allow only light to finish, saves energy, and frees the oven for other cooking...
... inside of the oven. A: As the food becomes hot it is located between the oven cavity and the outer wall of the oven. A: The clicking sound is possible to overcook food to cook food taken out of a refrigerator than for a few minutes after the actual microwave oven cooking cycle. Cooking without the glass tray. The holes (or ports) allow only light to finish, saves energy, and frees the oven for other cooking...
Owners Manual
Page 39
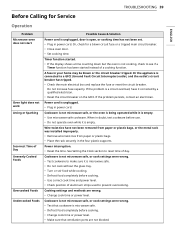
.... • Close oven door. • Set cooking time. Or, check for Service TROUBLESHOOTING 39 Operation ENGLISH Problem Microwave oven does not start Oven light does not work Arcing or Sparking Incorrect Time of day. Timer function started instead of aluminum strips used to a GFCI (Ground Fault Circuit Interrupter) outlet, and the outlet's circuit breaker has tripped. • Check the main electrical box and replace the fuse or reset the circuit breaker. Power interruption. • Reset the time. A fuse in doubt...
.... • Close oven door. • Set cooking time. Or, check for Service TROUBLESHOOTING 39 Operation ENGLISH Problem Microwave oven does not start Oven light does not work Arcing or Sparking Incorrect Time of day. Timer function started instead of aluminum strips used to a GFCI (Ground Fault Circuit Interrupter) outlet, and the outlet's circuit breaker has tripped. • Check the main electrical box and replace the fuse or reset the circuit breaker. Power interruption. • Reset the time. A fuse in doubt...
Owners Manual
Page 40
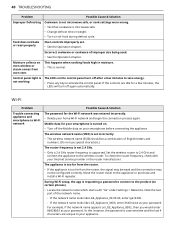
... your appliance. The appliance is too far from oven vent Control panel light is not working Possible Cause & Solution Cookware is not microwave safe, or cook settings were wrong. • Test that cookware is microwave safe. • Change defrost time or weight. • Turn or stir food during defrost cycle. Note the last part of improper size being used. • See the Operation chapter. The LEDs on your smartphone before connecting...
... your appliance. The appliance is too far from oven vent Control panel light is not working Possible Cause & Solution Cookware is not microwave safe, or cook settings were wrong. • Test that cookware is microwave safe. • Change defrost time or weight. • Turn or stir food during defrost cycle. Note the last part of improper size being used. • See the Operation chapter. The LEDs on your smartphone before connecting...
Owners Manual
Page 42
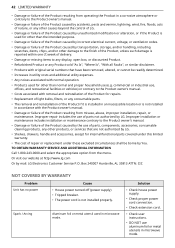
... COVERED BY WARRANTY Problem Unit has no power Cause • House power turned off (power supply) • Tripped breaker. • The power cord is not installed in accordance with removal and reinstallation of the Product for repairs. • Replacement of light bulbs, filters, or any consumable parts. • The removal and reinstallation of the Product if it is installed in an inaccessible location or is not installed properly. commercial or industrial use...
... COVERED BY WARRANTY Problem Unit has no power Cause • House power turned off (power supply) • Tripped breaker. • The power cord is not installed in accordance with removal and reinstallation of the Product for repairs. • Replacement of light bulbs, filters, or any consumable parts. • The removal and reinstallation of the Product if it is installed in an inaccessible location or is not installed properly. commercial or industrial use...


