
User Guide
Page 7
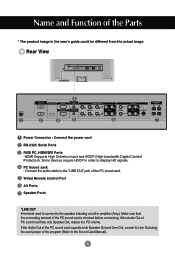
... Speaker Ports *LINE OUT A terminal used to connect to the Sound Card Manual). 6 Make sure that the connecting terminal of PC sound card has only Speaker Out, reduce the PC volume. PC Sound Jack : Connect the audio cable to display HD signals. Rear View AV IN/OUT Power Connector : Connect the power... in amplifier (Amp). Some devices require HDCP in order to the *LINE OUT jack of the program (Refer to the speaker including a built-in the user's guide could be different from the actual image. If the Audio Out of the PC sound card supports both Speaker Out and Line Out, convert...
... Speaker Ports *LINE OUT A terminal used to connect to the Sound Card Manual). 6 Make sure that the connecting terminal of PC sound card has only Speaker Out, reduce the PC volume. PC Sound Jack : Connect the audio cable to display HD signals. Rear View AV IN/OUT Power Connector : Connect the power... in amplifier (Amp). Some devices require HDCP in order to the *LINE OUT jack of the program (Refer to the speaker including a built-in the user's guide could be different from the actual image. If the Audio Out of the PC sound card supports both Speaker Out and Line Out, convert...
User Guide
Page 21
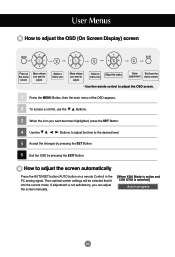
... item to adjust the screen automatically Press the AUTO/SET button (AUTO button on a remote Control) in the PC analog signal. User Menus How to adjust the OSD (On Screen Display) screen Pops up the menu screen Move where you want to adjust Select a menu icon Move where you want to adjust... the MENU Button, then the main menu of the OSD appears. 2 To access a control, use the Buttons. 3 When the icon you can adjust the screen manually. [When XGA Mode is active and 1360 X768 is selected] 20 How to the desired level. 5 Accept the changes by pressing the SET Button. 6 Exit...
... item to adjust the screen automatically Press the AUTO/SET button (AUTO button on a remote Control) in the PC analog signal. User Menus How to adjust the OSD (On Screen Display) screen Pops up the menu screen Move where you want to adjust Select a menu icon Move where you want to adjust... the MENU Button, then the main menu of the OSD appears. 2 To access a control, use the Buttons. 3 When the icon you can adjust the screen manually. [When XGA Mode is active and 1360 X768 is selected] 20 How to the desired level. 5 Accept the changes by pressing the SET Button. 6 Exit...
User Guide
Page 26
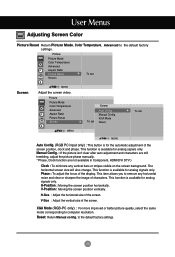
... signals only. User Menus Adjusting Screen Color Picture Reset Return Picture Mode, Color Temperature, Advanced to remove any vertical bars or stripes visible on the screen background. Phase : To adjust the focus of the screen. Reset: Return Manual config. This item...default factory settings. This function is available for analog signals only. V-Size : Adjust the vertical size of the display. The horizontal screen size will also change. Manual Config. V-Position : Moving the screen position vertically. H-Position : Moving the screen position horizontally. H-Size : ...
... signals only. User Menus Adjusting Screen Color Picture Reset Return Picture Mode, Color Temperature, Advanced to remove any vertical bars or stripes visible on the screen background. Phase : To adjust the focus of the screen. Reset: Return Manual config. This item...default factory settings. This function is available for analog signals only. V-Size : Adjust the vertical size of the display. The horizontal screen size will also change. Manual Config. V-Position : Moving the screen position vertically. H-Position : Moving the screen position horizontally. H-Size : ...

User Guide
Page 28
Once the on , the monitors are set to the same time. User Menus Adjusting the timer function Time Clock On/Off Timer Sleep Time Auto Sleep Power On Delay...Power On Delay When connecting multiple monitors and turning the power on or off time is incorrect, reset the clock manually. 1) Press the MENU button and then use button to select the Time menu. 2) Press the button and ...disconnection or power failure), the clock must be reset. On/Off Timer The off when the time set by a user is passed. 1) Press the MENU button and then use button to select the Sleep Time menu. 2) Press the ...
Once the on , the monitors are set to the same time. User Menus Adjusting the timer function Time Clock On/Off Timer Sleep Time Auto Sleep Power On Delay...Power On Delay When connecting multiple monitors and turning the power on or off time is incorrect, reset the clock manually. 1) Press the MENU button and then use button to select the Time menu. 2) Press the button and ...disconnection or power failure), the clock must be reset. On/Off Timer The off when the time set by a user is passed. 1) Press the MENU button and then use button to select the Sleep Time menu. 2) Press the ...
User Guide
Page 34
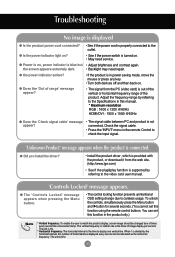
...the product is connected. G Does the 'Out of range' message appear? • If the product is in the remote Control to display one vertical line. L • The control locking function prevents unintentional OSD setting change due to the outlet. G the power indicator ...on , power indicator is supported by referring to the Specifications in the product only.) Note * Vertical frequency: To enable the user to the video card user manual. 'Controls Locked' message appears. the screen appears extremely dark. • Backlight may need service. When 1 is kHz....
...the product is connected. G Does the 'Out of range' message appear? • If the product is in the remote Control to display one vertical line. L • The control locking function prevents unintentional OSD setting change due to the outlet. G the power indicator ...on , power indicator is supported by referring to the Specifications in the product only.) Note * Vertical frequency: To enable the user to the video card user manual. 'Controls Locked' message appears. the screen appears extremely dark. • Backlight may need service. When 1 is kHz....


