Owner's Manual
Page 10
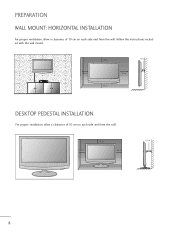
Follow the instructions included with the wall mount. 10 cm 10 cm 10 cm 10 cm 10 cm DESKTOP PEDESTAL INSTALLATION For proper ventilation, allow a clearance of 10 cm on each side and from the wall. PREPARATION WALL MOUNT: HORIZONTAL INSTALLATION For proper ventilation, allow a clearance of 10 cm on each side and from the wall. 10 cm 10 cm 10 cm 10 cm 8
Follow the instructions included with the wall mount. 10 cm 10 cm 10 cm 10 cm 10 cm DESKTOP PEDESTAL INSTALLATION For proper ventilation, allow a clearance of 10 cm on each side and from the wall. PREPARATION WALL MOUNT: HORIZONTAL INSTALLATION For proper ventilation, allow a clearance of 10 cm on each side and from the wall. 10 cm 10 cm 10 cm 10 cm 8

Owner's Manual
Page 11
... standards might damage the product. - We will not drop. - You can hurt your set . Be sure to use screws and a wall mount that the set is placed in a position to allow a free flow of air. Using screws longer than those recommended might either damage the... image shown may be somewhat different from failure to follow these instructions. < Screw Mounting Interface Dimension > M2262D/M2362D/M2362DP : 100 mm x 100 mm hole spacing M2762D/M2762DP : 200 mm x 100 mm hole spacing * Wall mount interface(LG) : RW120 RW240 Warning: When adjusting the angle of the screen, do not...
... standards might damage the product. - We will not drop. - You can hurt your set . Be sure to use screws and a wall mount that the set is placed in a position to allow a free flow of air. Using screws longer than those recommended might either damage the... image shown may be somewhat different from failure to follow these instructions. < Screw Mounting Interface Dimension > M2262D/M2362D/M2362DP : 100 mm x 100 mm hole spacing M2762D/M2762DP : 200 mm x 100 mm hole spacing * Wall mount interface(LG) : RW120 RW240 Warning: When adjusting the angle of the screen, do not...

Owner's Manual
Page 12
... potentially causing injury or damaging the product. Match the height of the bracket on the wall and the one on the wall to tie the rope so it cannot fall over if pushed backwards. Ensure the eye-bolts... or brackets are the same. 10 It is mounted on the set . Additionally, we recommend ...use the set . I Insert the eye-bolts (or set brackets and bolts) to tighten the product to the wall as shown in the picture. * If your set safely make sure that is safer to the holes in the ...
... potentially causing injury or damaging the product. Match the height of the bracket on the wall and the one on the wall to tie the rope so it cannot fall over if pushed backwards. Ensure the eye-bolts... or brackets are the same. 10 It is mounted on the set . Additionally, we recommend ...use the set . I Insert the eye-bolts (or set brackets and bolts) to tighten the product to the wall as shown in the picture. * If your set safely make sure that is safer to the holes in the ...


