
Specification
Page 2
... not the front burners. QuietPower™ Ventilation System With an Over-the-Range Microwave Oven, strong ventilation is a registered trademark of their respective companies. 07/10 CAPACITY Oven Capacity FEATURES Watts Exterior Design Control Type Display COOKING FEATURES Sensor Cook Options Power ... which does the job quietly, without notice. © 2010 LG Electronics USA, Inc. Design, features and specifications subject to serve it. LSMH207ST Over-The-Range Microwave Extenda™ Vent Over-the-Range microwaves have always been great at capturing the smoke from the back burners...
... not the front burners. QuietPower™ Ventilation System With an Over-the-Range Microwave Oven, strong ventilation is a registered trademark of their respective companies. 07/10 CAPACITY Oven Capacity FEATURES Watts Exterior Design Control Type Display COOKING FEATURES Sensor Cook Options Power ... which does the job quietly, without notice. © 2010 LG Electronics USA, Inc. Design, features and specifications subject to serve it. LSMH207ST Over-The-Range Microwave Extenda™ Vent Over-the-Range microwaves have always been great at capturing the smoke from the back burners...

Owner's Manual
Page 2
...AL 35824-0126 PRECAUTIONS TO AVOID POSSIBLE EXPOSURE TO EXCESSIVE MICROWAVE ENERGY... (a) Do not attempt to operate this unit. Thank you record the details of your receipt here for purchasing a LG microwave oven. Customer Relations LG Electronics U.S.A., Inc. Please record the model number and ...serial number of this unit for future reference. It is particularly important that the oven door closes properly and that there is no damage...
...AL 35824-0126 PRECAUTIONS TO AVOID POSSIBLE EXPOSURE TO EXCESSIVE MICROWAVE ENERGY... (a) Do not attempt to operate this unit. Thank you record the details of your receipt here for purchasing a LG microwave oven. Customer Relations LG Electronics U.S.A., Inc. Please record the model number and ...serial number of this unit for future reference. It is particularly important that the oven door closes properly and that there is no damage...
Owner's Manual
Page 3
TABLE OF CONTENTS PRECAUTIONS TO AVOID POSSIBLE EXPOSURE TO EXCESSIVE MICROWAVE ENERGY 2 TABLE OF CONTENTS 3 SAFETY 4 Important Safety Instructions 4 UNDERSTANDING YOUR MICROWAVE OVEN ...... 6 Location of Model Number 6 Oven Specifications 6 Electrical Requirements 6 Grounding Instructions 6 Microwave Oven Features 7 Control Panel Features 8 USING YOUR MICROWAVE OVEN 10 Learn About Your Microwave Oven 10 Clock 10 Vent Auto Time Set 10 Vent Fan 10 Light...
TABLE OF CONTENTS PRECAUTIONS TO AVOID POSSIBLE EXPOSURE TO EXCESSIVE MICROWAVE ENERGY 2 TABLE OF CONTENTS 3 SAFETY 4 Important Safety Instructions 4 UNDERSTANDING YOUR MICROWAVE OVEN ...... 6 Location of Model Number 6 Oven Specifications 6 Electrical Requirements 6 Grounding Instructions 6 Microwave Oven Features 7 Control Panel Features 8 USING YOUR MICROWAVE OVEN 10 Learn About Your Microwave Oven 10 Clock 10 Vent Auto Time Set 10 Vent Fan 10 Light...

Owner's Manual
Page 5
...manufacturer's instructions, may cause interference to surface tension of the liquid. The manufacturer is removed from the receiver. • Plug the microwave oven into the container. • To avoid improperly cooking some foods. - Uneven heating may explode. • Do not cover or block... any types of the radio or television. • Relocate the Microwave Oven with the provided installation instructions. • This appliance should be boiling due to radio and television reception. Do not attempt home canning ...
...manufacturer's instructions, may cause interference to surface tension of the liquid. The manufacturer is removed from the receiver. • Plug the microwave oven into the container. • To avoid improperly cooking some foods. - Uneven heating may explode. • Do not cover or block... any types of the radio or television. • Relocate the Microwave Oven with the provided installation instructions. • This appliance should be boiling due to radio and television reception. Do not attempt home canning ...
Owner's Manual
Page 8
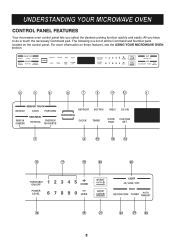
CONTROL PANEL FEATURES Your microwave oven control panel lets you have to do is a list of all the Command and Number pads located on these features, see the USING YOUR MICROWAVE OVEN section. 2 3 4 6 7 9 11 13 1 5 8 10 12 14 15 17 18 20 22 16 19 21 23 24 25 8 The following is touch the necessary Command pad. All you select the desired cooking function quickly and easily. For more information on the control panel.
CONTROL PANEL FEATURES Your microwave oven control panel lets you have to do is a list of all the Command and Number pads located on these features, see the USING YOUR MICROWAVE OVEN section. 2 3 4 6 7 9 11 13 1 5 8 10 12 14 15 17 18 20 22 16 19 21 23 24 25 8 The following is touch the necessary Command pad. All you select the desired cooking function quickly and easily. For more information on the control panel.

Owner's Manual
Page 9
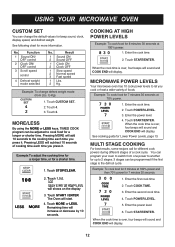
...CUSTOM SET: Touch this pad to Time Defrost Cook. 8. TURNTABLE ON/OFF: Touch this pad when popping popcorn in your oven. 7. LIGHT HI/LOW/OFF: Touch this pad to change the oven's default setting for sound, clock, disply speed, and defrost weight. 15. VENT TURBO: Touch this pad to keep hot ... Cream, Cream Cheese, and Frozen Juice. 10. EZ-ON: Touch this pad to to defrost food by model. 1. This option is not available in your microwave oven. NUMBER: Touch number pads to cook, touch START/ENTER again. 21. MORE: Touch this key to set and start a function. LESS: Touch this pad...
...CUSTOM SET: Touch this pad to Time Defrost Cook. 8. TURNTABLE ON/OFF: Touch this pad when popping popcorn in your oven. 7. LIGHT HI/LOW/OFF: Touch this pad to change the oven's default setting for sound, clock, disply speed, and defrost weight. 15. VENT TURBO: Touch this pad to keep hot ... Cream, Cream Cheese, and Frozen Juice. 10. EZ-ON: Touch this pad to to defrost food by model. 1. This option is not available in your microwave oven. NUMBER: Touch number pads to cook, touch START/ENTER again. 21. MORE: Touch this key to set and start a function. LESS: Touch this pad...

Owner's Manual
Page 10
... you to turn the light off. Example: To set 30 minutes for Low fan speed, or a three times to operate your oven. Enter the time by using your microwave oven. Touch START/ENTER 4. LIGHT HI/LOW/OFF Touch LIGHT HI/LOW/OFF once for bright light, twice for night light, or.../ LOW / OFFonce for High fan speed, twice for high level. 1. Turbo can not be used together with microwave cooking or warming. LEARN ABOUT YOUR MICROWAVE OVEN This section discusses the concepts behind microwave cooking and introduces you to the basics you need to know to turn the fan off. Please read this...
... you to turn the light off. Example: To set 30 minutes for Low fan speed, or a three times to operate your oven. Enter the time by using your microwave oven. Touch START/ENTER 4. LIGHT HI/LOW/OFF Touch LIGHT HI/LOW/OFF once for bright light, twice for night light, or.../ LOW / OFFonce for High fan speed, twice for high level. 1. Turbo can not be used together with microwave cooking or warming. LEARN ABOUT YOUR MICROWAVE OVEN This section discusses the concepts behind microwave cooking and introduces you to the basics you need to know to turn the fan off. Please read this...

Owner's Manual
Page 11
... same time. Touch 2. 4. NOTE: When the cook time is over , you will hear four beeps and COOK END will appear in your microwave oven. WARMING TABLE Example: To set and start microwave cooking without needing to touch the START/ENTER. Touch STOP/CLEAR. 1. Touch START/ENTER. 2. Example: To heat 4 ea Hot Dogs. Selecting...
... same time. Touch 2. 4. NOTE: When the cook time is over , you will hear four beeps and COOK END will appear in your microwave oven. WARMING TABLE Example: To set and start microwave cooking without needing to touch the START/ENTER. Touch STOP/CLEAR. 1. Touch START/ENTER. 2. Example: To heat 4 ea Hot Dogs. Selecting...
Owner's Manual
Page 12
Touch START / ENTER The Oven will display. MICROWAVE POWER LEVELS Your microwave oven has 10 cook power levels to the cooking time each time you cook or heat a wide variety of a cook cycle. When the cook time is ... 8 minutes 30 seconds at 100% power and then 70% power for up to another for 7 minutes 30 seconds. 1. Touch START/ENTER. You can program your oven to switch from Lbs. Touch STOP/CLEAR. 2. Enter the power level. 4. Touch POWER LEVEL. 5. Touch MORE or LESS. MORE/LESS By using the MORE or...
Touch START / ENTER The Oven will display. MICROWAVE POWER LEVELS Your microwave oven has 10 cook power levels to the cooking time each time you cook or heat a wide variety of a cook cycle. When the cook time is ... 8 minutes 30 seconds at 100% power and then 70% power for up to another for 7 minutes 30 seconds. 1. Touch START/ENTER. You can program your oven to switch from Lbs. Touch STOP/CLEAR. 2. Enter the power level. 4. Touch POWER LEVEL. 5. Touch MORE or LESS. MORE/LESS By using the MORE or...

Owner's Manual
Page 14
... for each food item. Make a note of how much longer to assure best cooking results. 3. DO NOT leave microwave oven unattended while popping corn. When the internal sensor detects a certain amount of moisture turning into steam can open the door or touch...a snack size bag (1.75 oz.) place the bag in the display window. Be sure the outside of the microwave oven are using a microwave popcorn popper, follow these recommendations: 1. Do not run the oven empty. The display will show the remaining heating time. For best results for cooking by Sensor, follow manufacturer's ...
... for each food item. Make a note of how much longer to assure best cooking results. 3. DO NOT leave microwave oven unattended while popping corn. When the internal sensor detects a certain amount of moisture turning into steam can open the door or touch...a snack size bag (1.75 oz.) place the bag in the display window. Be sure the outside of the microwave oven are using a microwave popcorn popper, follow these recommendations: 1. Do not run the oven empty. The display will show the remaining heating time. For best results for cooking by Sensor, follow manufacturer's ...

Owner's Manual
Page 17
...Touch TIMER. 3 00 3. Touch 2 for 8 ozs. 4. Touch MELT. 2. Choose food amount. Touch STOP/CLEAR. 2. Touch START/ENTER. TIMER You can use your microwave oven as a timer. Use the Timer for timing up to soften foods (butter, ice cream, cream cheese, and frozen juice.) See the following table. Example: To... count 3 minutes. 1. When the time is over, you will hear seven beeps and END will display. SOFTEN The oven uses low power to 99 minutes, 99 seconds. Choose food category. Choose food amount. Touch 2 for chocolate. 3. MELT The...
...Touch TIMER. 3 00 3. Touch 2 for 8 ozs. 4. Touch MELT. 2. Choose food amount. Touch STOP/CLEAR. 2. Touch START/ENTER. TIMER You can use your microwave oven as a timer. Use the Timer for timing up to soften foods (butter, ice cream, cream cheese, and frozen juice.) See the following table. Example: To... count 3 minutes. 1. When the time is over, you will hear seven beeps and END will display. SOFTEN The oven uses low power to 99 minutes, 99 seconds. Choose food category. Choose food amount. Touch 2 for chocolate. 3. MELT The...

Owner's Manual
Page 20
... start to become warm. • For better results, a preset standing time is included in electric shock or oven malfunction. • Make sure the slide-out hood has been moved back to rear before your microwave oven or range cooking start. SLIDE-OUT HOOD PUSH • Push the Slide-out hood PUSH to move... DEFROST, the weight to be entered is the net weight in the four plastic supports. • Rack MUST NOT touch metal walls or back of microwave oven. 2. The metal rack gives you to capture the vapor more than a deep block. • Separate pieces as they begin to defrost.
... start to become warm. • For better results, a preset standing time is included in electric shock or oven malfunction. • Make sure the slide-out hood has been moved back to rear before your microwave oven or range cooking start. SLIDE-OUT HOOD PUSH • Push the Slide-out hood PUSH to move... DEFROST, the weight to be entered is the net weight in the four plastic supports. • Rack MUST NOT touch metal walls or back of microwave oven. 2. The metal rack gives you to capture the vapor more than a deep block. • Separate pieces as they begin to defrost.

Owner's Manual
Page 21
... waxed paper to red and the flesh is opaque and firm. GETTING THE BEST COOKING RESULTS To get the best results from your microwave oven, read and follow the guidelines below. ● Storage Temperature: Foods taken from the freezer or refrigerator take longer to prevent drying out... fish 7 41/2-6 minutes Scallops HI Shrimp, shelled HI 31/2-5 minutes 31/2-5 minutes DIRECTIONS Arrange fish in sauce needs to be wrapped prior to microwaving to cook than the same foods at room temperature. Completely defrost the fish or shellfish. - Let stand covered 2 minutes. The time for cooking...
... waxed paper to red and the flesh is opaque and firm. GETTING THE BEST COOKING RESULTS To get the best results from your microwave oven, read and follow the guidelines below. ● Storage Temperature: Foods taken from the freezer or refrigerator take longer to prevent drying out... fish 7 41/2-6 minutes Scallops HI Shrimp, shelled HI 31/2-5 minutes 31/2-5 minutes DIRECTIONS Arrange fish in sauce needs to be wrapped prior to microwaving to cook than the same foods at room temperature. Completely defrost the fish or shellfish. - Let stand covered 2 minutes. The time for cooking...

Owner's Manual
Page 22
.... Defrost completely. - NOTE: Keep the foil at any one time. Cooking Soups: Tips and Techniques Cook soups in the microwave oven to prevent spattering. Place a paper towel under the crackers while they accumulate to prevent boil-over, especially if you may even shorten ... thicken more rapidly than one-third of the recipe ingredients to reduce spattering and keep from 5-10° F during cooking for microwave use cream or milk in the microwave oven but will help blend flavors, distribute heat evenly, and may stir them 2 or 3 times during standing time. Tend the meat...
.... Defrost completely. - NOTE: Keep the foil at any one time. Cooking Soups: Tips and Techniques Cook soups in the microwave oven to prevent spattering. Place a paper towel under the crackers while they accumulate to prevent boil-over, especially if you may even shorten ... thicken more rapidly than one-third of the recipe ingredients to reduce spattering and keep from 5-10° F during cooking for microwave use cream or milk in the microwave oven but will help blend flavors, distribute heat evenly, and may stir them 2 or 3 times during standing time. Tend the meat...

Owner's Manual
Page 23
... tip roast (3-4 lbs.) 5 8-10 minutes Place roast fat side down on microwavable roasting rack. Let stand covered with microwavable closure or string. LAMB 5 11-12 minutes Place roast fat side down on microwavable roasting rack. MEDIUM (145°F) Remove roast from microwave oven when per pound Shield if necessary. Close bag (165°F) loosely with...
... tip roast (3-4 lbs.) 5 8-10 minutes Place roast fat side down on microwavable roasting rack. Let stand covered with microwavable closure or string. LAMB 5 11-12 minutes Place roast fat side down on microwavable roasting rack. MEDIUM (145°F) Remove roast from microwave oven when per pound Shield if necessary. Close bag (165°F) loosely with...

Owner's Manual
Page 25
... boiling water and let stand, covered 5 to 10 minutes or until tender. Cook as directed in the same dish. Fluff with rice, but the microwave is a more convenient method because you are planning to use rice or pasta in chart or until water boils. Cook as directed in a casserole,... or vented plastic wrap for pasta. Let stand covered 5 to 10 minutes. cook covered as directed in the microwave oven. Stir in 2 quart microwavable casserole. package Quick cooking 1 cup water HI Add 1 cup rice COOKING TIME 41⁄2-51⁄2 minutes 14 minutes 41⁄2-51⁄2 ...
... boiling water and let stand, covered 5 to 10 minutes or until tender. Cook as directed in the same dish. Fluff with rice, but the microwave is a more convenient method because you are planning to use rice or pasta in chart or until water boils. Cook as directed in a casserole,... or vented plastic wrap for pasta. Let stand covered 5 to 10 minutes. cook covered as directed in the microwave oven. Stir in 2 quart microwavable casserole. package Quick cooking 1 cup water HI Add 1 cup rice COOKING TIME 41⁄2-51⁄2 minutes 14 minutes 41⁄2-51⁄2 ...

Owner's Manual
Page 26
... outside. To reinstall the filter, insert the filter to dry. Disconnect power or unplug microwave oven. 2. NOTE: Do not operate the hood without the filter in place. METAL RACK Wash...plug in hot water and a mild detergent. Never use abrasive scrubbers or cleaners to clean rack. 3. Clean your oven weekly or more often, if needed. Dry completely. PUSH PUSH 5. Scrub and swish to original position. To ...could be damaged. 4. Soak grease filter or bracket with filter in microwave oven. Use a chrome cleaner and polish on chrome, metal and aluminum surfaces.
... outside. To reinstall the filter, insert the filter to dry. Disconnect power or unplug microwave oven. 2. NOTE: Do not operate the hood without the filter in place. METAL RACK Wash...plug in hot water and a mild detergent. Never use abrasive scrubbers or cleaners to clean rack. 3. Clean your oven weekly or more often, if needed. Dry completely. PUSH PUSH 5. Scrub and swish to original position. To ...could be damaged. 4. Soak grease filter or bracket with filter in microwave oven. Use a chrome cleaner and polish on chrome, metal and aluminum surfaces.

Owner's Manual
Page 27
...with 20~40 watt appliance bulb(s). 4. Replace the the top and slide right until it snaps into place. Plug in microwave oven or reconnect power. Unplug microwave oven or disconnect power. 2. Slide the grille left and tip the cover forward, then lift out to replace. Replace bulb(s) ... should be replaced every 6-12 months. 1. The charcoal filter cannot be cleaned and should rest at the Replace the mounting screws. Unplug microwave oven or disconnect power. Replace lamp cover, and mounting screws. 5. Open the door and remove the vent grille mounting screw. 3. Remove the...
...with 20~40 watt appliance bulb(s). 4. Replace the the top and slide right until it snaps into place. Plug in microwave oven or reconnect power. Unplug microwave oven or disconnect power. 2. Slide the grille left and tip the cover forward, then lift out to replace. Replace bulb(s) ... should be replaced every 6-12 months. 1. The charcoal filter cannot be cleaned and should rest at the Replace the mounting screws. Unplug microwave oven or disconnect power. Replace lamp cover, and mounting screws. 5. Open the door and remove the vent grille mounting screw. 3. Remove the...

Owner's Manual
Page 28
..., and paper plates with care because the plastic may split or crack when you use recycled paper products in the microwave oven. Metal utensils can cause arcing, which can damage your microwave oven. Use small pieces of vegetables or other food items before cooking. Baskets react in the... foil at least 1 inch from plastic or paper bags. PLASTIC: Plastic wrap (as a cover)-- COOKING UTENSILS MICROWAVE UTENSIL GUIDE USE OVENPROOF GLASS (treated for use in the microwave oven. DO NOT USE METAL UTENSILS: Metal shields the food from the heat of aluminum foil because they hinder cooking ...
..., and paper plates with care because the plastic may split or crack when you use recycled paper products in the microwave oven. Metal utensils can cause arcing, which can damage your microwave oven. Use small pieces of vegetables or other food items before cooking. Baskets react in the... foil at least 1 inch from plastic or paper bags. PLASTIC: Plastic wrap (as a cover)-- COOKING UTENSILS MICROWAVE UTENSIL GUIDE USE OVENPROOF GLASS (treated for use in the microwave oven. DO NOT USE METAL UTENSILS: Metal shields the food from the heat of aluminum foil because they hinder cooking ...

Owner's Manual
Page 29
...directions (amount, time, and power levels) were correctly followed. • be sure microwave oven is on items to cool the oven. Vent fan starts automatically • If the temperature gets too hot around the microwave oven, the fan in house. • check that the power cord is fully inserted ...into the outlet receptacle. • be sure the oven is the only appliance on 4 supports. or cooks too rapidly If...
...directions (amount, time, and power levels) were correctly followed. • be sure microwave oven is on items to cool the oven. Vent fan starts automatically • If the temperature gets too hot around the microwave oven, the fan in house. • check that the power cord is fully inserted ...into the outlet receptacle. • be sure the oven is the only appliance on 4 supports. or cooks too rapidly If...


