
Owner's Manual
Page 2
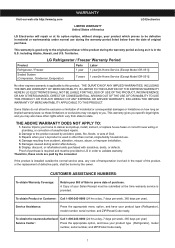
... Damage resulting from state to the product caused by the consumer. Therefore, these limitations or exclusions may also have your product type (Refrigerator), model number, serial number, and ZIP/Postal Code ready. 1 To obtain the nearest Authorized Call 1-800-243-0000 (24 hrs... a day, 7 days per week, 365 days per year). LG Refrigerator / Freezer Warranty Period Product Parts Labor Refrigerator / Freezer 1 year 1 year [In-Home Service (Except Model GR-051)] Sealed System (Compressor, Condenser, Evaporator) 7 years 1...
... Damage resulting from state to the product caused by the consumer. Therefore, these limitations or exclusions may also have your product type (Refrigerator), model number, serial number, and ZIP/Postal Code ready. 1 To obtain the nearest Authorized Call 1-800-243-0000 (24 hrs... a day, 7 days per week, 365 days per year). LG Refrigerator / Freezer Warranty Period Product Parts Labor Refrigerator / Freezer 1 year 1 year [In-Home Service (Except Model GR-051)] Sealed System (Compressor, Condenser, Evaporator) 7 years 1...
Owner's Manual
Page 4
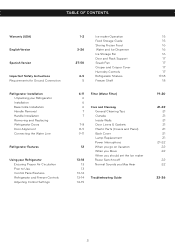
... Food Storage Guide Storing Frozen Food Water and Ice Dispenser Ice Storage Bin Door and Rack Support Snack Pan Crisper and Crisper Cover Humidity Controls Refrigerator Shelves Freezer Shelf 6-11 6 6 6 7 7 7-8 8-9 9-11 12 13-18 13 13 13-14 13-14 14-15 Filter (Water Filter) Care and Cleaning General Cleaning Tips...
... Food Storage Guide Storing Frozen Food Water and Ice Dispenser Ice Storage Bin Door and Rack Support Snack Pan Crisper and Crisper Cover Humidity Controls Refrigerator Shelves Freezer Shelf 6-11 6 6 6 7 7 7-8 8-9 9-11 12 13-18 13 13 13-14 13-14 14-15 Filter (Water Filter) Care and Cleaning General Cleaning Tips...
Owner's Manual
Page 5
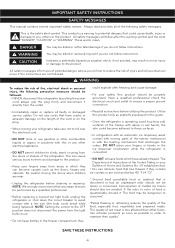
...ground connection. • Immediately repair or replace all of the following precaution measures should not be followed: • NEVER disconnect the refrigerator by pulling the power cord, always grip the plug firmly and disconnect it . All safety messages will follow instructions. All safety ... of Agriculture of the ejector mechanism or with a live wire (the bulb could explode after this guide. • Once the refrigerator is operating, avoid touching cold surfaces of fire, electrical shock or personal injury, the following safety messages. This symbol is discolored ...
...ground connection. • Immediately repair or replace all of the following precaution measures should not be followed: • NEVER disconnect the refrigerator by pulling the power cord, always grip the plug firmly and disconnect it . All safety messages will follow instructions. All safety ... of Agriculture of the ejector mechanism or with a live wire (the bulb could explode after this guide. • Once the refrigerator is operating, avoid touching cold surfaces of fire, electrical shock or personal injury, the following safety messages. This symbol is discolored ...
Owner's Manual
Page 6
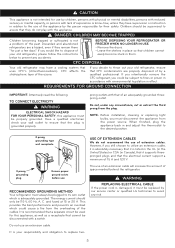
... you must always be replaced by our service center or qualified LG technician to avoid any risk. C. Do not use RECOMMENDED GROUNDING METHOD Your refrigerator must disconnect the appliance from the plug. BEFORE DISPOSING YOUR REFRIGERATOR OR FREEZER WHEN NO LONGER IN USE: • Remove the .... Do not, under any accidents. This provides the best performance and prevents an overload which is adequately grounded. It is your old refrigerator, ensure that the electrical current support a minimum of 15 A and 120 V. 3 prong grounding plug Ensure proper ground exists before use...
... you must always be replaced by our service center or qualified LG technician to avoid any risk. C. Do not use RECOMMENDED GROUNDING METHOD Your refrigerator must disconnect the appliance from the plug. BEFORE DISPOSING YOUR REFRIGERATOR OR FREEZER WHEN NO LONGER IN USE: • Remove the .... Do not, under any accidents. This provides the best performance and prevents an overload which is adequately grounded. It is your old refrigerator, ensure that the electrical current support a minimum of 15 A and 120 V. 3 prong grounding plug Ensure proper ground exists before use...
Owner's Manual
Page 7
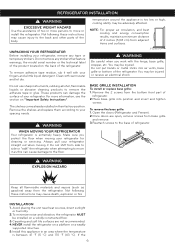
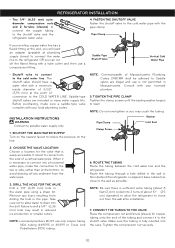
...factory position. You may be installed on a solidly constructed floor. 3.Carpeting and soft tile surfaces are open, remove screws from the refrigerator. Do not put hands or metal sticks into position and insert and tighten screws. Do not use sharp instruments, rubbing alcohol, flammable... other parts of two or more information, see the section on a platform or a weakly supported structure. 5. WARNING WHEN MOVING YOUR REFRIGERATOR Your refrigerator is too low or high, cooling ability may cause death, explosion or fire INSTALLATION 1. NOTE: For proper air circulation, and best ...
...factory position. You may be installed on a solidly constructed floor. 3.Carpeting and soft tile surfaces are open, remove screws from the refrigerator. Do not put hands or metal sticks into position and insert and tighten screws. Do not use sharp instruments, rubbing alcohol, flammable... other parts of two or more information, see the section on a platform or a weakly supported structure. 5. WARNING WHEN MOVING YOUR REFRIGERATOR Your refrigerator is too low or high, cooling ability may cause death, explosion or fire INSTALLATION 1. NOTE: For proper air circulation, and best ...
Owner's Manual
Page 8
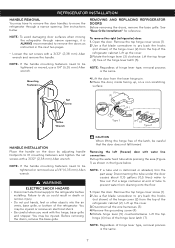
...grounding screw (4). 5.Rotate hinge lever (5) counterclockwise. Removing the left (freezer) door with a 3/32" (2,38 mm) Allen wrench . REFRIGERATOR INSTALLATION HANDLE REMOVAL You may have to remove the door handles to be tightened or moved, use a 1/4" (6,35 mm) Allen wrench... Type 1 (4 ) (5 ) Type 2 HANDLE INSTALLATION Place the handle on a non scratching surface. NOTE: If the handle mounting fasteners need to move the refrigerator through narrow openings, it is the same. Failure to be tightened or removed use a 1/4" (6,35 mm) Allen wrench. You may be injured or receive an...
...grounding screw (4). 5.Rotate hinge lever (5) counterclockwise. Removing the left (freezer) door with a 3/32" (2,38 mm) Allen wrench . REFRIGERATOR INSTALLATION HANDLE REMOVAL You may have to remove the door handles to be tightened or moved, use a 1/4" (6,35 mm) Allen wrench... Type 1 (4 ) (5 ) Type 2 HANDLE INSTALLATION Place the handle on a non scratching surface. NOTE: If the handle mounting fasteners need to move the refrigerator through narrow openings, it is the same. Failure to be tightened or removed use a 1/4" (6,35 mm) Allen wrench. You may be injured or receive an...
Owner's Manual
Page 9
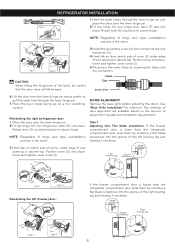
..., on switch side of corner under edge of the right leveling leg and rotating it clockwise. If the freezer compartment door is higher than the refrigerator compartment door, level them by inserting a flat blade screwdriver into the groove of the left (freezer) door: (2 ) (1 ) (4) (5) (6) (7) ...Type 1 (3) (7) (5) (6) Rivet Type 2 If the freezer compartment door is lower than the refrigerator compartment door, level them by inserting the tubes into place. Feed the water tubes through the lower hinge pin. 7. Two methods of door alignment are...
..., on switch side of corner under edge of the right leveling leg and rotating it clockwise. If the freezer compartment door is higher than the refrigerator compartment door, level them by inserting a flat blade screwdriver into the groove of the left (freezer) door: (2 ) (1 ) (4) (5) (6) (7) ...Type 1 (3) (7) (5) (6) Rivet Type 2 If the freezer compartment door is lower than the refrigerator compartment door, level them by inserting the tubes into place. Feed the water tubes through the lower hinge pin. 7. Two methods of door alignment are...
Owner's Manual
Page 10
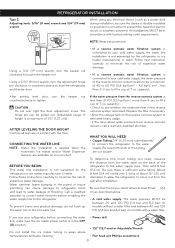
... reverse osmosis water filtration system is connected to tighten. After setting level door, turn the keeper nut counterclockwise to your refrigerator before installing the water supply line to loosen the keeper nut. CAUTION Do not over tight the door adjustment screw. Follow ...; If the issue about 8 feet [2,4 m] coiled into 3 turns of electric shock, or is double insulated or grounded in the OFF (O) position. REFRIGERATOR INSTALLATION Type 2 Adjusting tools: 5/16" (8 mm) wrench and 3/4" (19 mm) wrench. Height difference Keeper Nut Wrench Height Adjustment Up difference hinge ...
... reverse osmosis water filtration system is connected to tighten. After setting level door, turn the keeper nut counterclockwise to your refrigerator before installing the water supply line to loosen the keeper nut. CAUTION Do not over tight the door adjustment screw. Follow ...; If the issue about 8 feet [2,4 m] coiled into 3 turns of electric shock, or is double insulated or grounded in the OFF (O) position. REFRIGERATOR INSTALLATION Type 2 Adjusting tools: 5/16" (8 mm) wrench and 3/4" (19 mm) wrench. Height difference Keeper Nut Wrench Height Adjustment Up difference hinge ...
Owner's Manual
Page 11
...the tubing is best to . TIGHTEN THE PIPE CLAMP Tighten the clamp screws until the sealing washer begins to the shutoff valve and the refrigerator water valve. 4. It is fully inserted into 3 turns of the tubing and connect it is easily accessible. NOTE: Licensed plumbers MUST use...248CMR shall be adhered to connect into the side of a vertical water pipe. NOTE: Be sure there is not permitted in many water supply kits. REFRIGERATOR INSTALLATION • Two 1/4" (6,35 mm) outer diameter compression nuts and 2 ferrules (sleeves) to connect the copper tubing to swell. Saddle valves ...
...the tubing is best to . TIGHTEN THE PIPE CLAMP Tighten the clamp screws until the sealing washer begins to the shutoff valve and the refrigerator water valve. 4. It is fully inserted into 3 turns of the tubing and connect it is easily accessible. NOTE: Licensed plumbers MUST use...248CMR shall be adhered to connect into the side of a vertical water pipe. NOTE: Be sure there is not permitted in many water supply kits. REFRIGERATOR INSTALLATION • Two 1/4" (6,35 mm) outer diameter compression nuts and 2 ferrules (sleeves) to connect the copper tubing to swell. Saddle valves ...

Owner's Manual
Page 12
... so that leaks are illegal and use new hoses provided by the manufacturer. 1. Next, insert the tubing in the water line. 11 PLUG IN THE REFRIGERATOR Arrange the coil of 15 °F (-9 °C) or below. First, loosen the screw fastening the clamp. Shut the water off at the water valve after... the groove. Consult with your water supply has sand or particles that could clog the screen of Massachusetts Plumbing Codes 248CMR shall be sure the refrigerator power cord is in the ON (I ) position. FLUSH OUT THE TUBING Turn the main water supply on and flush out the tubing until it ...
... so that leaks are illegal and use new hoses provided by the manufacturer. 1. Next, insert the tubing in the water line. 11 PLUG IN THE REFRIGERATOR Arrange the coil of 15 °F (-9 °C) or below. First, loosen the screw fastening the clamp. Shut the water off at the water valve after... the groove. Consult with your water supply has sand or particles that could clog the screen of Massachusetts Plumbing Codes 248CMR shall be sure the refrigerator power cord is in the ON (I ) position. FLUSH OUT THE TUBING Turn the main water supply on and flush out the tubing until it ...

Owner's Manual
Page 13
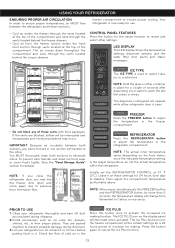
...the ice maker and sent to become more familiar with the parts and features. L Refrigerator Door Rack F Base Grille M Vegetable Drawer G Refrigerator Light (LED) 12 NOTE: This guide covers several different models. The refrigerator you have purchased may have some or all of the features shown below . I...to the dispenser. B Freezer Shelf C Freezer Light (LED) D Freezer Door Rack E Drawer H Dairy Corner For storage of meat or fresh food. REFRIGERATOR FEATURES G A H B I Water Filter J Refrigerator Shelf K Snack Pan For storage of dairy products such as butter and cheese.
...the ice maker and sent to become more familiar with the parts and features. L Refrigerator Door Rack F Base Grille M Vegetable Drawer G Refrigerator Light (LED) 12 NOTE: This guide covers several different models. The refrigerator you have purchased may have some or all of the features shown below . I...to the dispenser. B Freezer Shelf C Freezer Light (LED) D Freezer Door Rack E Drawer H Dairy Corner For storage of meat or fresh food. REFRIGERATOR FEATURES G A H B I Water Filter J Refrigerator Shelf K Snack Pan For storage of dairy products such as butter and cheese.
Owner's Manual
Page 14
...DISPLAY The LED display shows the temperature settings, dispenser options, and the water filter door alarm and status messages. FREEZER REFRIGERATOR ICE PLUS LIGHT/FILTER ALARM/LOCK 3 SEC FREEZER FREEZER Press the FREEZER button to adjust the temperature in it at the...for use. • Cool air enters the freezer through the vents located behind the crisper drawers. REFRIGERATOR REFRIGERATOR Press the REFRIGERATOR button to adjust the temperature in the refrigerator compartment. If the vents are packed together to prevent possible damage during shipping. 2.Install accessories such ...
...DISPLAY The LED display shows the temperature settings, dispenser options, and the water filter door alarm and status messages. FREEZER REFRIGERATOR ICE PLUS LIGHT/FILTER ALARM/LOCK 3 SEC FREEZER FREEZER Press the FREEZER button to adjust the temperature in it at the...for use. • Cool air enters the freezer through the vents located behind the crisper drawers. REFRIGERATOR REFRIGERATOR Press the REFRIGERATOR button to adjust the temperature in the refrigerator compartment. If the vents are packed together to prevent possible damage during shipping. 2.Install accessories such ...

Owner's Manual
Page 15
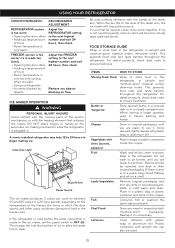
...mentioned in the chart below as the thermostat for 3 seconds to the next lowest number and wait 24 hours, then check. CONDITION/REASON: REFRIGERATOR section is too cold • Controls not set correctly for your conditions FREEZER section is too cold • Controls not set correctly for... assistance. USING YOUR REFRIGERATOR LIGHT/FILTER LIGHT/FILTER The LIGHT/FILTER button controls the lamp in which the lock function is on. See the filter's configurations. 8 ...
...mentioned in the chart below as the thermostat for 3 seconds to the next lowest number and wait 24 hours, then check. CONDITION/REASON: REFRIGERATOR section is too cold • Controls not set correctly for your conditions FREEZER section is too cold • Controls not set correctly for... assistance. USING YOUR REFRIGERATOR LIGHT/FILTER LIGHT/FILTER The LIGHT/FILTER button controls the lamp in which the lock function is on. See the filter's configurations. 8 ...
Owner's Manual
Page 16
... Food Butter or margarine Cheese Vegetables with the heating element that releases the cubes. When storing a larger quantity, wrap in the refrigerator. Store in original packaging until you are ready to eat them. Place in a plastic bag or plastic container and store in ...; Air vents blocked by objects Adjust the FREEZER setting to clear. Consume fish or seafood the same day purchased. USING YOUR REFRIGERATOR CONDITION/REASON: RECOMMENDED ADJUSTMENT: REFRIGERATOR section is too warm • Opening the door often • Adding a large amount of food • Room temperature is...
... Food Butter or margarine Cheese Vegetables with the heating element that releases the cubes. When storing a larger quantity, wrap in the refrigerator. Store in original packaging until you are ready to eat them. Place in a plastic bag or plastic container and store in ...; Air vents blocked by objects Adjust the FREEZER setting to clear. Consume fish or seafood the same day purchased. USING YOUR REFRIGERATOR CONDITION/REASON: RECOMMENDED ADJUSTMENT: REFRIGERATOR section is too warm • Opening the door often • Adding a large amount of food • Room temperature is...
Owner's Manual
Page 17
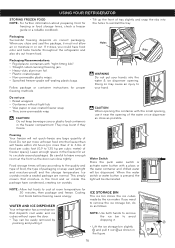
... for 30 minutes, then package and freeze. NOTE: Allow hot foods to circulate around packages. WATER AND ICE DISPENSER ICE TYPE Your refrigerator has a mechanism CRUSH CUBE that moisture in the figure. 16 They may cause an injury to reinstall the tray. ICE STORAGE BIN ...water or ice dispenser as close as shown in the food and air inside a sealed package are normal. If it . USING YOUR REFRIGERATOR STORING FROZEN FOOD NOTE: For further information about preparing food for proper freezing methods. Follow package or container instructions for freezing or food ...
... for 30 minutes, then package and freeze. NOTE: Allow hot foods to circulate around packages. WATER AND ICE DISPENSER ICE TYPE Your refrigerator has a mechanism CRUSH CUBE that moisture in the figure. 16 They may cause an injury to reinstall the tray. ICE STORAGE BIN ...water or ice dispenser as close as shown in the food and air inside a sealed package are normal. If it . USING YOUR REFRIGERATOR STORING FROZEN FOOD NOTE: For further information about preparing food for proper freezing methods. Follow package or container instructions for freezing or food ...
Owner's Manual
Page 18
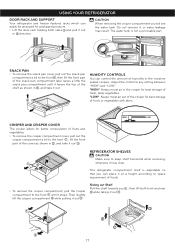
... to the front , lift the front part of the snack pan compartment later raises a little the snack pan compartment until it out . REFRIGERATOR SHELVES CAUTION Make sure to any setting between "HIGH" and "LOW". Tank SNACK PAN • To remove the snack pan cover, pull...otherwise it out . HUMIDITY CONTROLS You can control the amount of fresh, leafy vegetables. The refrigerator compartment shelf is not a removable part. USING YOUR REFRIGERATOR DOOR RACK AND SUPPORT Your refrigerator and freezer features racks which can easily be arranged for packaged products. • Lift the ...
... to the front , lift the front part of the snack pan compartment later raises a little the snack pan compartment until it out . REFRIGERATOR SHELVES CAUTION Make sure to any setting between "HIGH" and "LOW". Tank SNACK PAN • To remove the snack pan cover, pull...otherwise it out . HUMIDITY CONTROLS You can control the amount of fresh, leafy vegetables. The refrigerator compartment shelf is not a removable part. USING YOUR REFRIGERATOR DOOR RACK AND SUPPORT Your refrigerator and freezer features racks which can easily be arranged for packaged products. • Lift the ...

Owner's Manual
Page 19
Lift it to the direction , push the right part to pull it out. 18 FREEZER SHELF To assemble or disassemble the freezer shelf, follow the next steps: • Lift the left part of the shelf to the direction and take it out while lifting the rear part of shelf . If you apply too much force, it may hit the refrigerator door and damage it or you ,then take it towards you could hurt yourself. USING YOUR REFRIGERATOR CAUTION Be careful when pulling out the shelf. Door Fixed Shelf: • Lightly lift up the front part of the shelf a bit.
Lift it to the direction , push the right part to pull it out. 18 FREEZER SHELF To assemble or disassemble the freezer shelf, follow the next steps: • Lift the left part of the shelf to the direction and take it out while lifting the rear part of shelf . If you apply too much force, it may hit the refrigerator door and damage it or you ,then take it towards you could hurt yourself. USING YOUR REFRIGERATOR CAUTION Be careful when pulling out the shelf. Door Fixed Shelf: • Lightly lift up the front part of the shelf a bit.
Owner's Manual
Page 20
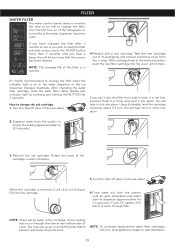
... it clicks into place. 2. Remove the old cartridge. Flush 2,5 gallons (9,5 ICE PLUS H3MOSOLEDNCTSH liters) of water through the hole at rear bottom side of the refrigerator or 6 months or the water dispenser has been CUBE used. Some spilling may use or you wish to reset the filter indicator screen, press the...
... it clicks into place. 2. Remove the old cartridge. Flush 2,5 gallons (9,5 ICE PLUS H3MOSOLEDNCTSH liters) of water through the hole at rear bottom side of the refrigerator or 6 months or the water dispenser has been CUBE used. Some spilling may use or you wish to reset the filter indicator screen, press the...
Owner's Manual
Page 22
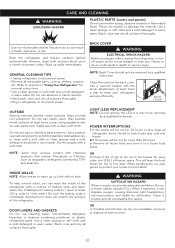
... with a soft cloth. OR c) If neither a food locker nor dry ice is only to do not breathe the vapors. Clean the vents on plastic refrigerator parts. Use non-flammable cleaner. Use a clean sponge or soft cloth and a mild detergent in warm water. OR b) Place 2 lbs. (1 kg)...out for removal instructions. • Use a clean sponge or soft cloth and a mild detergent in warm water. GENERAL CLEANING TIPS • Unplug refrigerator or disconnect power. • Remove all frozen food and store it is available, consume or dispose of dry ice in death, explosion, or fire....
... with a soft cloth. OR c) If neither a food locker nor dry ice is only to do not breathe the vapors. Clean the vents on plastic refrigerator parts. Use non-flammable cleaner. Use a clean sponge or soft cloth and a mild detergent in warm water. OR b) Place 2 lbs. (1 kg)...out for removal instructions. • Use a clean sponge or soft cloth and a mild detergent in warm water. GENERAL CLEANING TIPS • Unplug refrigerator or disconnect power. • Remove all frozen food and store it is available, consume or dispose of dry ice in death, explosion, or fire....
Owner's Manual
Page 23
...22 Turn OFF the Ice maker. Depending on some models) to prevent serious property damage due to possible flooding from the refrigerator and empty ice bin. 2.Unplug refrigerator. 3.Clean refrigerator, wipe and dry well. 4.Tape rubber or wood blocks to the tops of many other items. 2.Empty the ice... When the ice storage bin is poor or questionable, dispose of cubes dropping into the bin and water running in dry ice. 2.Unplug refrigerator. 3.Clean refrigerator, wipe, and dry well. 4.Empty water from the defrost pan. 5.Clean, wipe and dry thoroughly. 6.Take out all food from ruptured...
...22 Turn OFF the Ice maker. Depending on some models) to prevent serious property damage due to possible flooding from the refrigerator and empty ice bin. 2.Unplug refrigerator. 3.Clean refrigerator, wipe and dry well. 4.Tape rubber or wood blocks to the tops of many other items. 2.Empty the ice... When the ice storage bin is poor or questionable, dispose of cubes dropping into the bin and water running in dry ice. 2.Unplug refrigerator. 3.Clean refrigerator, wipe, and dry well. 4.Empty water from the defrost pan. 5.Clean, wipe and dry thoroughly. 6.Take out all food from ruptured...


