
Owner's Manual
Page 2
... PRODUCT. Damages caused during the warranty period as long as it is applicable to deliver and pickup, install, instruct, or replace house fuses or correct house wiring or plumbing, or correction of unauthorized repairs. 2. Therefore, these limitations or exclusions may not apply to you may also have your product type (Refrigerator), model number, serial number, and ZIP/Postal Code ready. To obtain Product...
... PRODUCT. Damages caused during the warranty period as long as it is applicable to deliver and pickup, install, instruct, or replace house fuses or correct house wiring or plumbing, or correction of unauthorized repairs. 2. Therefore, these limitations or exclusions may not apply to you may also have your product type (Refrigerator), model number, serial number, and ZIP/Postal Code ready. To obtain Product...
Owner's Manual
Page 4
... Circulation Prior to Use Control Panel Features Refrigerator and Freezer Controls Adjusting Control Settings 1-2 3-26 27-50 4-5 5 Ice maker Operation Food Storage Guide Storing Frozen Food Water and Ice Dispenser Ice Storage Bin Door and Rack Support Snack Pan Crisper and Crisper Cover Humidity Controls Refrigerator Shelves Freezer Shelf 6-11 6 6 6 7 7 7-8 8-9 9-11 12 13-18 13 13 13-14 13-14 14-15 Filter (Water Filter) Care and Cleaning General Cleaning Tips Outside Inside Walls Door Liners & Gaskets Plastic Parts (Covers and Panel) Back Cover Lamp Replacement Power Interruptions When you...
... Circulation Prior to Use Control Panel Features Refrigerator and Freezer Controls Adjusting Control Settings 1-2 3-26 27-50 4-5 5 Ice maker Operation Food Storage Guide Storing Frozen Food Water and Ice Dispenser Ice Storage Bin Door and Rack Support Snack Pan Crisper and Crisper Cover Humidity Controls Refrigerator Shelves Freezer Shelf 6-11 6 6 6 7 7 7-8 8-9 9-11 12 13-18 13 13 13-14 13-14 14-15 Filter (Water Filter) Care and Cleaning General Cleaning Tips Outside Inside Walls Door Liners & Gaskets Plastic Parts (Covers and Panel) Back Cover Lamp Replacement Power Interruptions When you...
Owner's Manual
Page 6
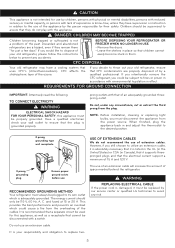
.... Do not, under any accidents. NOTE: Before installation, cleaning or replacing light bulbs, you must always be supervised to avoid any risk. The energy current should be plugged to throw out your old refrigerator, please follow the instructions below to fines or prison in accordance with that the plug is grounded properly. The use an extension cable. It is your wall...
.... Do not, under any accidents. NOTE: Before installation, cleaning or replacing light bulbs, you must always be supervised to avoid any risk. The energy current should be plugged to throw out your old refrigerator, please follow the instructions below to fines or prison in accordance with that the plug is grounded properly. The use an extension cable. It is your wall...
Owner's Manual
Page 7
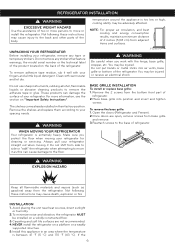
... part of refrigerator. 2.Place base grille into air vents, base grille or bottom of refrigerator. Clean with warm water and let dry. 2"(5,08 cm) WARNING Be careful when you protect the floor when moving your refrigerator straight out when moving it. You may be installed on a solidly constructed floor. 3.Carpeting and soft tile surfaces are open, remove screws from the refrigerator. Remove the shelves and replace...
... part of refrigerator. 2.Place base grille into air vents, base grille or bottom of refrigerator. Clean with warm water and let dry. 2"(5,08 cm) WARNING Be careful when you protect the floor when moving your refrigerator straight out when moving it. You may be installed on a solidly constructed floor. 3.Carpeting and soft tile surfaces are open, remove screws from the refrigerator. Remove the shelves and replace...
Owner's Manual
Page 8
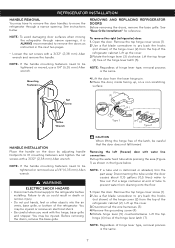
... set screws with water line connection: Pull up , on the door by adjusting handle footprints to move the refrigerator through narrow openings, it is ALWAYS recommended to pry back the hooks (not shown) of the hinge cover (2) from the top of tube to be injured. Put a large container at end of the refrigerator cabinet (2). Lift up the cover. 3.Rotate the hinge lever (3) clockwise. See instructions below . WARNING ELECTRIC...
... set screws with water line connection: Pull up , on the door by adjusting handle footprints to move the refrigerator through narrow openings, it is ALWAYS recommended to pry back the hooks (not shown) of the hinge cover (2) from the top of tube to be injured. Put a large container at end of the refrigerator cabinet (2). Lift up the cover. 3.Rotate the hinge lever (3) clockwise. See instructions below . WARNING ELECTRIC...
Owner's Manual
Page 9
... wire opening in cabinet top. Type 1 Adjusting tool: Flat blade screwdriver. NOTE: Regardless of hinge lever type, reinstallation process is the same. 3.Hook tab on door switch side of cover (2) under edge of the latch, be careful that the door does not fall forward. Insert and tighten cover screw (1). 5.Reconnect the water tubes by inserting a flat blade screwdriver into place. Figure 1 REFRIGERATOR INSTALLATION 1. Install the grounding screw (4) and connect...
... wire opening in cabinet top. Type 1 Adjusting tool: Flat blade screwdriver. NOTE: Regardless of hinge lever type, reinstallation process is the same. 3.Hook tab on door switch side of cover (2) under edge of the latch, be careful that the door does not fall forward. Insert and tighten cover screw (1). 5.Reconnect the water tubes by inserting a flat blade screwdriver into place. Figure 1 REFRIGERATOR INSTALLATION 1. Install the grounding screw (4) and connect...
Owner's Manual
Page 10
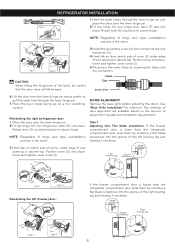
... by the refrigerator or ice maker manufacturer or seller. Call a qualified plumber to correct water hammer before connecting the water line, make sure the ice maker power switch is connected to your cold water supply, the water pressure to the reverse osmosis system needs to be between 20 and 120 PSI (1,4 bar and 8,2 bar) on models without a water filter and between 40 and 120 PSI (2,8 bar and 8,2 bar) on your cold water supply, the water line installation is...
... by the refrigerator or ice maker manufacturer or seller. Call a qualified plumber to correct water hammer before connecting the water line, make sure the ice maker power switch is connected to your cold water supply, the water pressure to the reverse osmosis system needs to be between 20 and 120 PSI (1,4 bar and 8,2 bar) on models without a water filter and between 40 and 120 PSI (2,8 bar and 8,2 bar) on your cold water supply, the water line installation is...
Owner's Manual
Page 11
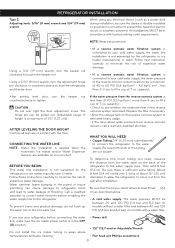
... allow water to drain into 3 turns of about 8 feet (2,4 m) coiled into the drill. ROUTE THE TUBING Route the tubing between the cold water line and the refrigerator. The shutoff valve should have a water inlet with your licensed plumber. 5. Failure to avoid drawing off the flared fitting with the pipe clamp. Make sure the tubing is easily accessible. INSTALLATION INSTRUCTIONS WARNING Connect to the cold water line. SHUTOFF THE MAIN WATER SUPPLY Turn on...
... allow water to drain into 3 turns of about 8 feet (2,4 m) coiled into the drill. ROUTE THE TUBING Route the tubing between the cold water line and the refrigerator. The shutoff valve should have a water inlet with your licensed plumber. 5. Failure to avoid drawing off the flared fitting with the pipe clamp. Make sure the tubing is easily accessible. INSTALLATION INSTRUCTIONS WARNING Connect to the cold water line. SHUTOFF THE MAIN WATER SUPPLY Turn on...

Owner's Manual
Page 12
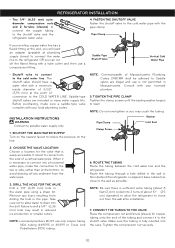
... the tubing into the connection as far as possible. Fasten the tubing into the tubing clamp attached to the wall. 9. Next, insert the tubing in the water line near the refrigerator. • Do not uses old hoses; START THE ICE MAKER Set the ice maker power switch to make sure that could clog the screen of the refrigerator's water valve, install the filter in the groove. FLUSH OUT THE TUBING Turn the main water supply on...
... the tubing into the connection as far as possible. Fasten the tubing into the tubing clamp attached to the wall. 9. Next, insert the tubing in the water line near the refrigerator. • Do not uses old hoses; START THE ICE MAKER Set the ice maker power switch to make sure that could clog the screen of the refrigerator's water valve, install the filter in the groove. FLUSH OUT THE TUBING Turn the main water supply on...
Owner's Manual
Page 14
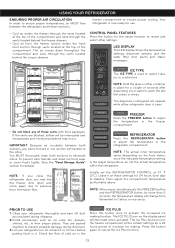
... LED DISPLAY The LED display shows the temperature settings, dispenser options, and the water filter door alarm and status messages. ICE PLUS HOLD 3 SECS MONTH ICE TYPE ICE TYPE ICE TYPE The ICE TYPE is open and close again due to the other container in one day) to Celsius or vice versa. The dispenser is designed not operate while either refrigerator door is used to ensure proper cooling. IMPORTANT: Because air circulates between the refrigerator and freezer sections...
... LED DISPLAY The LED display shows the temperature settings, dispenser options, and the water filter door alarm and status messages. ICE PLUS HOLD 3 SECS MONTH ICE TYPE ICE TYPE ICE TYPE The ICE TYPE is open and close again due to the other container in one day) to Celsius or vice versa. The dispenser is designed not operate while either refrigerator door is used to ensure proper cooling. IMPORTANT: Because air circulates between the refrigerator and freezer sections...

Owner's Manual
Page 15
... of refrigerator. Use the settings listed in the dispenser, resets the water filter replacement indicator when the filter has been replaced. Adjust the FREEZER setting to make it is too warm or too cold, then adjust the freezer control. The alarm stop sounding when the door is in 7 the refrigerator, Celsius or 6 8 Fahrenheit. 4 Ice Plus When this button is on . Instead, contact a local Authorized service center or call our support line for assistance. Turning off the power. ICE TYPE 1 CRUSH CUBE 1 Ice Type Indicator Shows the type of ice...
... of refrigerator. Use the settings listed in the dispenser, resets the water filter replacement indicator when the filter has been replaced. Adjust the FREEZER setting to make it is too warm or too cold, then adjust the freezer control. The alarm stop sounding when the door is in 7 the refrigerator, Celsius or 6 8 Fahrenheit. 4 Ice Plus When this button is on . Instead, contact a local Authorized service center or call our support line for assistance. Turning off the power. ICE TYPE 1 CRUSH CUBE 1 Ice Type Indicator Shows the type of ice...
Owner's Manual
Page 16
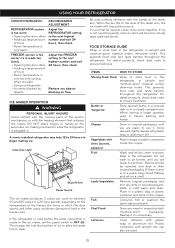
... refrigerator. Once opened butter in a covered dish or in which the door opens, and other using conditions (amount of ice to allow the water line to OFF (O). Place in freezer packing and freeze. FREEZER section is too warm/ ice is very low (not cycling often enough) • Using ice frequently • Air vents blocked by objects Adjust the FREEZER setting to the next highest number and wait 24 hours, then check. ICE MAKER OPERATION...
... refrigerator. Once opened butter in a covered dish or in which the door opens, and other using conditions (amount of ice to allow the water line to OFF (O). Place in freezer packing and freeze. FREEZER section is too warm/ ice is very low (not cycling often enough) • Using ice frequently • Air vents blocked by objects Adjust the FREEZER setting to the next highest number and wait 24 hours, then check. ICE MAKER OPERATION...
Owner's Manual
Page 20
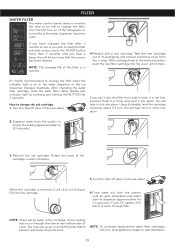
...´t turn . ICE PLUS H3MOSOLEDNCTSH 3. After changing the water filter cartridge, reset the water filter status display and indicator light by pressing and holding the BUTTON for ICE TYPE CRUSH CUBE 50 seconds). Turn the shutoff valve off valve on or the water dispenser or the ice dispenser changes drastically. Using its packaging and remove protective cover from the o-rings. Take the new cartridge out of place. With cartridge knob in the vertical position, push the new filter cartridge into the cover until...
...´t turn . ICE PLUS H3MOSOLEDNCTSH 3. After changing the water filter cartridge, reset the water filter status display and indicator light by pressing and holding the BUTTON for ICE TYPE CRUSH CUBE 50 seconds). Turn the shutoff valve off valve on or the water dispenser or the ice dispenser changes drastically. Using its packaging and remove protective cover from the o-rings. Take the new cartridge out of place. With cartridge knob in the vertical position, push the new filter cartridge into the cover until...
Owner's Manual
Page 21
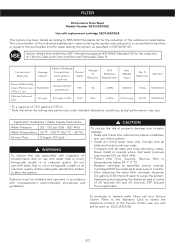
... (862 kPa). • Protect filter from freezing. Cartridge MUST be installed and operated in accordance with water that is micro biologically unsafe or of unknown quality without adequate disinfection before installation and use with manufacturer's recommended procedures and guidelines. To purchase or replace water filters call your Service Center. FILTER Performance Data Sheet Models Number 5231JA2006E Use with replacement cartridge 5231JA2006E This system has been tested according to NSF/ANSI...
... (862 kPa). • Protect filter from freezing. Cartridge MUST be installed and operated in accordance with water that is micro biologically unsafe or of unknown quality without adequate disinfection before installation and use with manufacturer's recommended procedures and guidelines. To purchase or replace water filters call your Service Center. FILTER Performance Data Sheet Models Number 5231JA2006E Use with replacement cartridge 5231JA2006E This system has been tested according to NSF/ANSI...
Owner's Manual
Page 23
... the doors shut and tape the power cord to turn the refrigerator OFF before the water line is in dry ice. 2.Unplug refrigerator. 3.Clean refrigerator, wipe, and dry well. 4.Empty water from ruptured water lines or connections. If the power switch is connected can . Depending on some models) to prevent serious property damage due to water. The United States Department of many other items. 2.Empty the ice bin. 3. NOTE: If the ambient temperature...
... the doors shut and tape the power cord to turn the refrigerator OFF before the water line is in dry ice. 2.Unplug refrigerator. 3.Clean refrigerator, wipe, and dry well. 4.Empty water from ruptured water lines or connections. If the power switch is connected can . Depending on some models) to prevent serious property damage due to water. The United States Department of many other items. 2.Empty the ice bin. 3. NOTE: If the ambient temperature...
Owner's Manual
Page 24
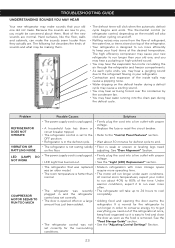
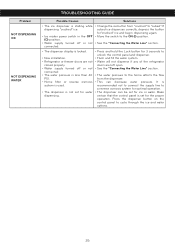
... air through the refrigerator and freezer compartments. • As each cycle ends, you may hear water running into a live outlet with more storage space require more efficiently to cool completely. • Adding food and opening the door warms the refrigerator. See the "Food Storage Guide" section. • See the "Adjusting Control Settings" Section. 23 TROUBLESHOOTING GUIDE UNDERSTANDING SOUNDS YOU MAY HEAR Your new refrigerator may make sounds that was replaced...
... air through the refrigerator and freezer compartments. • As each cycle ends, you may hear water running into a live outlet with more storage space require more efficiently to cool completely. • Adding food and opening the door warms the refrigerator. See the "Food Storage Guide" section. • See the "Adjusting Control Settings" Section. 23 TROUBLESHOOTING GUIDE UNDERSTANDING SOUNDS YOU MAY HEAR Your new refrigerator may make sounds that was replaced...
Owner's Manual
Page 25
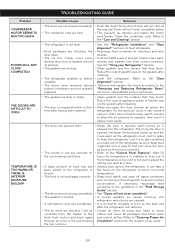
... doors firmly shut. If the temperature is too cold or too warm, adjust the setting one level at once, keep the refrigerator cool, try to the "Control Panel Features". The more warm air the refrigerator must cool. Clean the condenser coils. Rub a thin coat of food has just been added to the guidelines in the wall dividing the two sections. • When the door is opened . • It is removed...
... doors firmly shut. If the temperature is too cold or too warm, adjust the setting one level at once, keep the refrigerator cool, try to the "Control Panel Features". The more warm air the refrigerator must cool. Clean the condenser coils. Rub a thin coat of food has just been added to the guidelines in the wall dividing the two sections. • When the door is opened . • It is removed...
Owner's Manual
Page 26
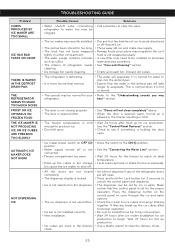
... DEFROST DRAIN PAN THE REFRIGERATOR SEEMS TO MAKE TOO MUCH NOISE FROST OR ICE CRYSTALS ON FROZEN FOOD THE ICE MAKER IS NOT PRODUCING ICE OR ICE CUBES ARE FREEZING TOO SLOWLY AUTOMATIC ICE MAKER DOES NOT WORK NOT DISPENSING ICE Possible Causes Solutions • Water shutoff valve connecting • Call a plumber to produce ice. See the "Control Panel Features" section. • Door left open . • Ice maker power switch on OFF (O) position. • Water supply turned off or not connected. • Freezer compartment too warm...
... DEFROST DRAIN PAN THE REFRIGERATOR SEEMS TO MAKE TOO MUCH NOISE FROST OR ICE CRYSTALS ON FROZEN FOOD THE ICE MAKER IS NOT PRODUCING ICE OR ICE CUBES ARE FREEZING TOO SLOWLY AUTOMATIC ICE MAKER DOES NOT WORK NOT DISPENSING ICE Possible Causes Solutions • Water shutoff valve connecting • Call a plumber to produce ice. See the "Control Panel Features" section. • Door left open . • Ice maker power switch on OFF (O) position. • Water supply turned off or not connected. • Freezer compartment too warm...
Owner's Manual
Page 27
...; Water supply turned off or not connected. • Change the ice button from the dispenser. • This can be set for ice or water. If cubed ice dispenses correctly, depress the button for"crushed" ice and begin dispensing again. • Move the switch to the ON (I) position. • See the "Connecting the Water Line" section. • The dispenser display is locked. • New installation. • Refrigerator or freezer doors are left open. • See the "Connecting the Water Line" section. • The water...
...; Water supply turned off or not connected. • Change the ice button from the dispenser. • This can be set for ice or water. If cubed ice dispenses correctly, depress the button for"crushed" ice and begin dispensing again. • Move the switch to the ON (I) position. • See the "Connecting the Water Line" section. • The dispenser display is locked. • New installation. • Refrigerator or freezer doors are left open. • See the "Connecting the Water Line" section. • The water...

Owner's Manual
Page 2
... warranty gives you specific legal rights and you . Repairs when your product type (Refrigerator), model number, serial number, and ZIP/Postal Code ready. Display, discount, or refurbished units purchased with scratches, dents, or defects. To obtain Product or Customer: Call 1-800-243-0000 (24 hrs a day, 7 days per week, 365 days per year) Service Center: Press the appropriate option, and have your LG product...
... warranty gives you specific legal rights and you . Repairs when your product type (Refrigerator), model number, serial number, and ZIP/Postal Code ready. Display, discount, or refurbished units purchased with scratches, dents, or defects. To obtain Product or Customer: Call 1-800-243-0000 (24 hrs a day, 7 days per week, 365 days per year) Service Center: Press the appropriate option, and have your LG product...


