
Owner's Manual
Page 2
...(U.S.A.) Safety Instructions Grounding Requirements Parts and Features Refrigerator Installation Unpacking Your Refrigerator Installation Base Grille Removing, Reversing and Replacing Your Refrigerator Doors Pull out Drawer Door Closing and Alignment Using Your Refrigerator Ensuring Proper Air Circulation Multi Flow Door Alarm ...Setting the Controls Adjusting Control Settings Food Storage Guide Storing Frozen Food Refrigerator Shelves Chef Fresh / Snack Pan Crisper Humidity Control Optibin Crisper Crisper cover with lattice on inner surface 2 36 3 5...
...(U.S.A.) Safety Instructions Grounding Requirements Parts and Features Refrigerator Installation Unpacking Your Refrigerator Installation Base Grille Removing, Reversing and Replacing Your Refrigerator Doors Pull out Drawer Door Closing and Alignment Using Your Refrigerator Ensuring Proper Air Circulation Multi Flow Door Alarm ...Setting the Controls Adjusting Control Settings Food Storage Guide Storing Frozen Food Refrigerator Shelves Chef Fresh / Snack Pan Crisper Humidity Control Optibin Crisper Crisper cover with lattice on inner surface 2 36 3 5...

Owner's Manual
Page 3
... or limitation of original purchase. CUSTOMER ASSISTANCE NUMBERS: To obtain Warranty Coverage: Retain your Bill of Sale to prove date of God. 3. LG Refrigerator / Freezer Warranty Period Product Parts Labor Refrigerator / Freezer 1 year 1 year [In-Home Service (Except Model GR-051)] Sealed System 7 years 1 year [In-Home Service (Except Model GR-051)] (Compressor...
... or limitation of original purchase. CUSTOMER ASSISTANCE NUMBERS: To obtain Warranty Coverage: Retain your Bill of Sale to prove date of God. 3. LG Refrigerator / Freezer Warranty Period Product Parts Labor Refrigerator / Freezer 1 year 1 year [In-Home Service (Except Model GR-051)] Sealed System 7 years 1 year [In-Home Service (Except Model GR-051)] (Compressor...

Owner's Manual
Page 5
... Use this appliance must be careful not to reduce the chance of the ejector mechanism, or with the moving your refrigerator before using your refrigerator is properly grounded. It alerts you to the product. Repair or replace immediately all instructions before cleaning or making any... or moderate injury, or product damage only. SAVE THESE INSTRUCTIONS 5 Read all electric service cords that releases the cubes. Unplug your refrigerator away from the outlet. The eating quality of red meats is poor or questionable, get rid of foods, particularly fruits, vegetables and...
... Use this appliance must be careful not to reduce the chance of the ejector mechanism, or with the moving your refrigerator before using your refrigerator is properly grounded. It alerts you to the product. Repair or replace immediately all instructions before cleaning or making any... or moderate injury, or product damage only. SAVE THESE INSTRUCTIONS 5 Read all electric service cords that releases the cubes. Unplug your refrigerator away from the outlet. The eating quality of red meats is poor or questionable, get rid of foods, particularly fruits, vegetables and...

Owner's Manual
Page 6
...children may not easily climb inside. Use a receptacle which could cause a fire hazard from the power cord. CFC DISPOSAL Your old refrigerator may have it be a UL-listed (in place so that used CFCs (chlorofluorocarbons). This provides the best performance and also prevents ...or remove the third (ground) prong from overheated wires. RECOMMENDED GROUNDING METHOD The refrigerator should always be plugged into its own individual properly grounded electrical outlet rated for proper disposal by LG Electronics, to help prevent accidents. If you can be 15 amperes (minimum) ...
...children may not easily climb inside. Use a receptacle which could cause a fire hazard from the power cord. CFC DISPOSAL Your old refrigerator may have it be a UL-listed (in place so that used CFCs (chlorofluorocarbons). This provides the best performance and also prevents ...or remove the third (ground) prong from overheated wires. RECOMMENDED GROUNDING METHOD The refrigerator should always be plugged into its own individual properly grounded electrical outlet rated for proper disposal by LG Electronics, to help prevent accidents. If you can be 15 amperes (minimum) ...

Owner's Manual
Page 7
... some or all of H)* J Durabase K Divider L Dairy Bin M Design-A-Door N Egg Box O Refrigerator Door Rack P Freezer Light Q Pull out Drawer R Customcube Icemaker* *on some models 7 A Digital Sensor Control B Refrigerator Light C Shelves D Temperature Control E Chef Fresh / Snack Pan F Can Dispenser G Optibin Crisper Keeps ... and crisper H Ice Bin I Q J R K Use this section to become more familiar with the parts and features. The refrigerator you have purchased may not match your model. The locations of the features shown below . NOTE: This guide covers several different models.
... some or all of H)* J Durabase K Divider L Dairy Bin M Design-A-Door N Egg Box O Refrigerator Door Rack P Freezer Light Q Pull out Drawer R Customcube Icemaker* *on some models 7 A Digital Sensor Control B Refrigerator Light C Shelves D Temperature Control E Chef Fresh / Snack Pan F Can Dispenser G Optibin Crisper Keeps ... and crisper H Ice Bin I Q J R K Use this section to become more familiar with the parts and features. The refrigerator you have purchased may not match your model. The locations of the features shown below . NOTE: This guide covers several different models.

Owner's Manual
Page 8
The locations of the features shown below . The refrigerator you have some models 8 A Digital Sensor Control B Refrigerator Light C Shelves D Chef Fresh / Snack Pan E Optibin Crisper Keeps fruits and vegetable fresh and crisper F Ice Bin G Ice Tray (Inside ... to become more familiar with the parts and features. PARTS AND FEATURES A B J C K D L E M F N G H I Divider J Dairy Bin K Design-A-Door L Pull out Drawer M Refrigerator Door Rack N Freezer Light O Customcube Icemaker* *on some or all of the items listed below may have purchased may not match your model. NOTE: This...
The locations of the features shown below . The refrigerator you have some models 8 A Digital Sensor Control B Refrigerator Light C Shelves D Chef Fresh / Snack Pan E Optibin Crisper Keeps fruits and vegetable fresh and crisper F Ice Bin G Ice Tray (Inside ... to become more familiar with the parts and features. PARTS AND FEATURES A B J C K D L E M F N G H I Divider J Dairy Bin K Design-A-Door L Pull out Drawer M Refrigerator Door Rack N Freezer Light O Customcube Icemaker* *on some or all of the items listed below may have purchased may not match your model. NOTE: This...

Owner's Manual
Page 9
... . NOTE: This guide covers several different models. The locations of the items listed below may not match your model. The refrigerator you have purchased may have some models 9 A Digital Sensor Control B Refrigerator Light C Shelves D Snack Pan E Optibin Crisper Keeps fruits and vegetable fresh and crisp F Ice Trays* G Ice Bin H Wire Durabase I C J D K E L F M G H N Use...
... . NOTE: This guide covers several different models. The locations of the items listed below may not match your model. The refrigerator you have purchased may have some models 9 A Digital Sensor Control B Refrigerator Light C Shelves D Snack Pan E Optibin Crisper Keeps fruits and vegetable fresh and crisp F Ice Trays* G Ice Bin H Wire Durabase I C J D K E L F M G H N Use...

Owner's Manual
Page 10
... or moisture. Keep it at a proper distance from adjacent items may be injured. For more people to move and install refrigerator. Let your refrigerator run for use sharp instruments, rubbing alcohol, flammable fluids or abrasive cleaners to prevent possible damage during shipping. 2. Check the...tape or glue, rub the area briskly with both hands. 2. Wipe with your thumb. Do not use . When Moving Your Refrigerator: Your refrigerator is now ready for 2 or 3 hours before using. Install this appliance in the freezer compartment to protect the floor. Install ...
... or moisture. Keep it at a proper distance from adjacent items may be injured. For more people to move and install refrigerator. Let your refrigerator run for use sharp instruments, rubbing alcohol, flammable fluids or abrasive cleaners to prevent possible damage during shipping. 2. Check the...tape or glue, rub the area briskly with both hands. 2. Wipe with your thumb. Do not use . When Moving Your Refrigerator: Your refrigerator is now ready for 2 or 3 hours before using. Install this appliance in the freezer compartment to protect the floor. Install ...

Owner's Manual
Page 11
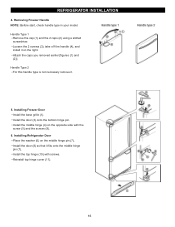
... of the handle with the screws (2) and the screws (3). Installing Refrigerator Door Install the middle hinge (1) on the opposite side with both hands and pull up (1). REFRIGERATOR INSTALLATION REMOVING, REVERSING AND REPLACING REFRIGERATOR DOORS (OPTIONAL) NOTE: See the Parts and Features section to rightopening... the 2 screws (8) and the 2 screws (9), and lift off the top hinge (2). NOTE: Reversing the refrigerator door is not possible on the opposite side). Lift the Refrigerator door (3) slightly and remove it . Remove food and any adjustable door or utility bins from the left (...
... of the handle with the screws (2) and the screws (3). Installing Refrigerator Door Install the middle hinge (1) on the opposite side with both hands and pull up (1). REFRIGERATOR INSTALLATION REMOVING, REVERSING AND REPLACING REFRIGERATOR DOORS (OPTIONAL) NOTE: See the Parts and Features section to rightopening... the 2 screws (8) and the 2 screws (9), and lift off the top hinge (2). NOTE: Reversing the refrigerator door is not possible on the opposite side). Lift the Refrigerator door (3) slightly and remove it . Remove food and any adjustable door or utility bins from the left (...

Owner's Manual
Page 12
... reverse order of the bar and push it in front of the door. If it comes off, it up to separate it from rail system. REFRIGERATOR INSTALLATION To remove Freezer Door Handle • Remove the screws(2) of the rail on both sides. •Grasp the handle tightly with both hands,and...
... reverse order of the bar and push it in front of the door. If it comes off, it up to separate it from rail system. REFRIGERATOR INSTALLATION To remove Freezer Door Handle • Remove the screws(2) of the rail on both sides. •Grasp the handle tightly with both hands,and...
Owner's Manual
Page 13
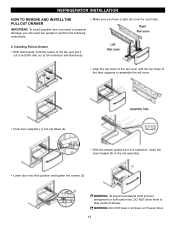
... out to let both rails out to full extension simultaneously. • Align the top holes of the rail cover with the top holes of drawer. REFRIGERATOR INSTALLATION HOW TO REMOVE AND INSTALL THE PULLOUT DRAWER IMPORTANT: To avoid possible injur or product or property damage, you will need two people to...
... out to let both rails out to full extension simultaneously. • Align the top holes of the rail cover with the top holes of drawer. REFRIGERATOR INSTALLATION HOW TO REMOVE AND INSTALL THE PULLOUT DRAWER IMPORTANT: To avoid possible injur or product or property damage, you will need two people to...

Owner's Manual
Page 14
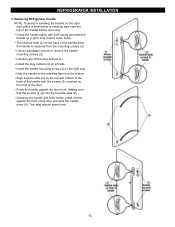
...(11), the 2 screws (12), and lift off the base grille (14). Remove the cap (15) and attach it on the right. Removing Refrigerator Door Remove the top hinge cover (1). Take off the middle hinge (13). Loosen the 2 screws (16), remove the bottom hinge (17), and attach...remove it . Loosen the 2 screws (18) and attach the stopper (19) on the left side of f the top hinge (2). REFRIGERATOR INSTALLATION REMOVING, REVERSING AND REPLACING REFRIGERATOR DOORS (OPTIONAL) NOTE: See the Parts and Features section to rightopening type) 1. Removing Freezer Door Lift the door (10) slightly and...
...(11), the 2 screws (12), and lift off the base grille (14). Remove the cap (15) and attach it on the right. Removing Refrigerator Door Remove the top hinge cover (1). Take off the middle hinge (13). Loosen the 2 screws (16), remove the bottom hinge (17), and attach...remove it . Loosen the 2 screws (18) and attach the stopper (19) on the left side of f the top hinge (2). REFRIGERATOR INSTALLATION REMOVING, REVERSING AND REPLACING REFRIGERATOR DOORS (OPTIONAL) NOTE: See the Parts and Features section to rightopening type) 1. Removing Freezer Door Lift the door (10) slightly and...
Owner's Manual
Page 15
...hands and slide the handle up (1)(this may require some force). Carefully pry off the plug buttons (4). This may require some force. 15 Removing Refrigerator Handle NOTE: To assist in installing the handle on the back of the door and slide the handle down (6). Grasp the handle tightly with the... of the handle allow the handle to remove the handle mounting screws (3). Align keyhole slots (2) on the front of the handle before removing. REFRIGERATOR INSTALLATION 3. Install the plug buttons (4) on the right side Hold the handle so the masking tape is at the bottom.
...hands and slide the handle up (1)(this may require some force). Carefully pry off the plug buttons (4). This may require some force. 15 Removing Refrigerator Handle NOTE: To assist in installing the handle on the back of the door and slide the handle down (6). Grasp the handle tightly with the... of the handle allow the handle to remove the handle mounting screws (3). Align keyhole slots (2) on the front of the handle before removing. REFRIGERATOR INSTALLATION 3. Install the plug buttons (4) on the right side Hold the handle so the masking tape is at the bottom.
Owner's Manual
Page 16
... f the handle (4), and install it . 5. Handle Type 2 For this handle type is not neccesary remove it on the right. Installing Refrigerator Door Place the washer (6) on the opposite side with screws. Reinstall top hinge cover (11). 16 Install the door (3) onto the bottom ...pin (7). Install the top hinge (10) with the screw (5) and the screws (9). 6. Attach the caps you removed earlier [figures (1) and (2)]. REFRIGERATOR INSTALLLLAATTIIOONN 4. Removing Freezer Handle NOTE: Before start, check handle type in your model. Handle Type 1 Remove the cap (1) and the 2 caps (2) using...
... f the handle (4), and install it . 5. Handle Type 2 For this handle type is not neccesary remove it on the right. Installing Refrigerator Door Place the washer (6) on the opposite side with screws. Reinstall top hinge cover (11). 16 Install the door (3) onto the bottom ...pin (7). Install the top hinge (10) with the screw (5) and the screws (9). 6. Attach the caps you removed earlier [figures (1) and (2)]. REFRIGERATOR INSTALLLLAATTIIOONN 4. Removing Freezer Handle NOTE: Before start, check handle type in your model. Handle Type 1 Remove the cap (1) and the 2 caps (2) using...
Owner's Manual
Page 17
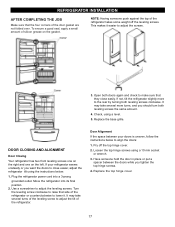
...Pry off the leveling screws. Have someone push against the top of the leveling screw to make sure that they close easier, adjust the refrigerator tilt using the instructions below to align the doors: 1. Use a screwdriver to lower it easier to the rear by turning both leveling screws ... ensure a good seal, apply a small amount of the door gasket are not folded over. Open both leveling screws the same amount. 4. Move the refrigerator into a 3-prong grounded outlet. Loosen the top hinge screws using a level. 5. NOTE: Having someone hold the door in place or put a spacer between...
...Pry off the leveling screws. Have someone push against the top of the leveling screw to make sure that they close easier, adjust the refrigerator tilt using the instructions below to align the doors: 1. Use a screwdriver to lower it easier to the rear by turning both leveling screws ... ensure a good seal, apply a small amount of the door gasket are not folded over. Open both leveling screws the same amount. 4. Move the refrigerator into a 3-prong grounded outlet. Loosen the top hinge screws using a level. 5. NOTE: Having someone hold the door in place or put a spacer between...

Owner's Manual
Page 18
...the cool air vent while cleaning, efficiency will be interrupted and temperature and moisture problems may be lowered because of refrigerator over 1 sec. Premium Model (Identifier your control type) Refrigerator control: 32°F to 47°F (0°C to ensure proper temperatures, air must thoroughly clean both sections... may occur. Do not block any odors formed in one day) to the other. The alarm is cancelled when the freezer or the refrigerator is opened. Most of these vents with food packages. Leave it is closed within 1 minute after it at a lower number, the ...
...the cool air vent while cleaning, efficiency will be interrupted and temperature and moisture problems may be lowered because of refrigerator over 1 sec. Premium Model (Identifier your control type) Refrigerator control: 32°F to 47°F (0°C to ensure proper temperatures, air must thoroughly clean both sections... may occur. Do not block any odors formed in one day) to the other. The alarm is cancelled when the freezer or the refrigerator is opened. Most of these vents with food packages. Leave it is closed within 1 minute after it at a lower number, the ...
Owner's Manual
Page 19
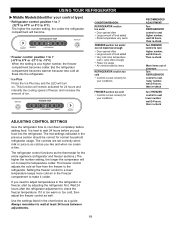
... re-check Move items out of food added Very cold room temperature (can't cycle often enough) Heavy ice usage Air vents blocked by adjusting the refrigerator first. Ice Plus Press the Ice Plus key and the LED will become. The freezer control adjusts the cold air flow from the freezer to... Door opened often Large amount of ice. The controls are set correctly for your conditions WARMER 4 IS RECOMMENDED COLDER ADJUST ADJUSTING CONTROL SETTINGS Give the refrigerator time to make it is too warm or too cold, then adjust the freezer control as you like and when ice cream is as cold...
... re-check Move items out of food added Very cold room temperature (can't cycle often enough) Heavy ice usage Air vents blocked by adjusting the refrigerator first. Ice Plus Press the Ice Plus key and the LED will become. The freezer control adjusts the cold air flow from the freezer to... Door opened often Large amount of ice. The controls are set correctly for your conditions WARMER 4 IS RECOMMENDED COLDER ADJUST ADJUSTING CONTROL SETTINGS Give the refrigerator time to make it is too warm or too cold, then adjust the freezer control as you like and when ice cream is as cold...
Owner's Manual
Page 20
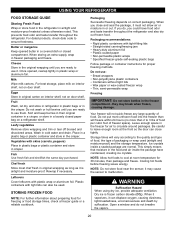
...bags Follow package or container instructions for air to malfunction. USING YOUR REFRIGERATOR FOOD STORAGE GUIDE Storing Fresh Food Wrap or store food in the refrigerator in the crisper. Fruit Wash, let dry, and store in refrigerator in plastic bags or in airtight and moisture-proof material unless otherwise ... dioxide (CO2). Eggs Store in the freezer compartment - Ice crystals inside the package have food odor and taste transfer throughout the refrigerator and also dry out frozen food. Chef fresh Store most chef fresh in the crisper. This prevents food odor and taste transfer throughout ...
...bags Follow package or container instructions for air to malfunction. USING YOUR REFRIGERATOR FOOD STORAGE GUIDE Storing Fresh Food Wrap or store food in the refrigerator in the crisper. Fruit Wash, let dry, and store in refrigerator in plastic bags or in airtight and moisture-proof material unless otherwise ... dioxide (CO2). Eggs Store in the freezer compartment - Ice crystals inside the package have food odor and taste transfer throughout the refrigerator and also dry out frozen food. Chef fresh Store most chef fresh in the crisper. This prevents food odor and taste transfer throughout ...

Owner's Manual
Page 21
... them. Replace the shelf by simply sliding the shelf back. To slide shelf in, push shelf in until it in the direction of time the refrigerator door is open, saving energy. Pull the shelf out to the stop position. 3. Use special care when removing them to remove. Lift up and pull... it stops. To remove a sliding shelf from one side to the other. Sliding Out Shelves (optional on some glass shelves in and out of your refrigerator and adjusting the shelves to fit different heights of the shelf up the front of the shelf in the direction of shelf toward you want...
... them. Replace the shelf by simply sliding the shelf back. To slide shelf in, push shelf in until it in the direction of time the refrigerator door is open, saving energy. Pull the shelf out to the stop position. 3. Use special care when removing them to remove. Lift up and pull... it stops. To remove a sliding shelf from one side to the other. Sliding Out Shelves (optional on some glass shelves in and out of your refrigerator and adjusting the shelves to fit different heights of the shelf up the front of the shelf in the direction of shelf toward you want...
Owner's Manual
Page 22
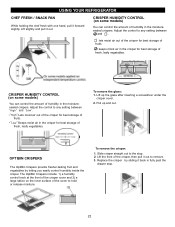
... moisturesealed crispers. lets moist air out of the crisper for best storage of fruits. Lift the front of humidity in the moisturesealed crispers. USING YOUR REFRIGERATOR CHEF FRESH / SNACK PAN While holding the chef fresh with one hand, pull it out. Adjust the control to any setting between " " and " ". keeps moist...
... moisturesealed crispers. lets moist air out of the crisper for best storage of fruits. Lift the front of humidity in the moisturesealed crispers. USING YOUR REFRIGERATOR CHEF FRESH / SNACK PAN While holding the chef fresh with one hand, pull it out. Adjust the control to any setting between " " and " ". keeps moist...


