
Owner's Manual
Page 2
... 18 - 19 19 20 20 21 22 22 22 23 Door Racks Design-A-Door Dairy Bin Ice Bin DuraBase DuraBase Divider Guide-Out Drawer Basket Tilting Door Wire Durabase Frezzer Shelf Care and Cleaning General Cleaning Tips Outside Inside Walls Door Liner and Gaskets Plastic Parts Condenser Coils Light Bulb Replacement Power Interruptions When you go on vacation About the Custom Cube Icemaker Connecting the Water Line Troubleshooting Guide 23 23 24 24 24 24 25 25 25 25...
... 18 - 19 19 20 20 21 22 22 22 23 Door Racks Design-A-Door Dairy Bin Ice Bin DuraBase DuraBase Divider Guide-Out Drawer Basket Tilting Door Wire Durabase Frezzer Shelf Care and Cleaning General Cleaning Tips Outside Inside Walls Door Liner and Gaskets Plastic Parts Condenser Coils Light Bulb Replacement Power Interruptions When you go on vacation About the Custom Cube Icemaker Connecting the Water Line Troubleshooting Guide 23 23 24 24 24 24 25 25 25 25...

Owner's Manual
Page 3
... to deliver and pickup, install, instruct, or replace house fuses or correct house wiring or plumbing, or correction of incidental or consequential damages or limitations on how long an implied warranty lasts; Display, discount, or refurbished units purchased with scratches, dents, or defects. Territories. LG Refrigerator / Freezer Warranty Period Product Parts Labor Refrigerator / Freezer 1 year 1 year [In-Home Service (Except Model GR-051)] Sealed System...
... to deliver and pickup, install, instruct, or replace house fuses or correct house wiring or plumbing, or correction of incidental or consequential damages or limitations on how long an implied warranty lasts; Display, discount, or refurbished units purchased with scratches, dents, or defects. Territories. LG Refrigerator / Freezer Warranty Period Product Parts Labor Refrigerator / Freezer 1 year 1 year [In-Home Service (Except Model GR-051)] Sealed System...

Owner's Manual
Page 5
... don't follow instructions. Before replacing a burned-out light bulb, unplug the refrigerator or turn off -color should not be refrozen and should not be followed, including the following: NEVER unplug your refrigerator is poor or questionable, get rid of any food is in operation, do not touch the cold surfaces in the refrigerator. Skin may result in . In refrigerators with automatic icemakers, avoid...
... don't follow instructions. Before replacing a burned-out light bulb, unplug the refrigerator or turn off -color should not be refrozen and should not be followed, including the following: NEVER unplug your refrigerator is poor or questionable, get rid of any food is in operation, do not touch the cold surfaces in the refrigerator. Skin may result in . In refrigerators with automatic icemakers, avoid...

Owner's Manual
Page 6
... under provisions of installation, cleaning, or removing a light bulb, turn the control (Thermostat, Refrigerator Control or Freezer Control, depending on the model) to the desired setting. CFCs are still dangerous... If you can be replaced by the manufacturer, by our service center or by qualified personal by a qualified servicer. This provides the best performance and also prevents overloading house wiring circuits which cannot be properly grounded. Use a receptacle which...
... under provisions of installation, cleaning, or removing a light bulb, turn the control (Thermostat, Refrigerator Control or Freezer Control, depending on the model) to the desired setting. CFCs are still dangerous... If you can be replaced by the manufacturer, by our service center or by qualified personal by a qualified servicer. This provides the best performance and also prevents overloading house wiring circuits which cannot be properly grounded. Use a receptacle which...

Owner's Manual
Page 9
The locations of the items listed below may have purchased may not match your model. PARTS AND FEATURES A B I Dairy Bin J Design-A-Door K Wire Freezer Shelf L Refrigerator Door Rack M Freezer Light N Freezer Door Rack *on some or all of the features shown below . The refrigerator you have some models 9 NOTE: This guide covers several different models. A Digital Sensor Control B Refrigerator Light C Shelves D Snack Pan E Optibin Crisper Keeps fruits and vegetable fresh and crisp F Ice Trays* G Ice Bin H Wire Durabase I C J D K E L F M G H N Use this section to become...
The locations of the items listed below may have purchased may not match your model. PARTS AND FEATURES A B I Dairy Bin J Design-A-Door K Wire Freezer Shelf L Refrigerator Door Rack M Freezer Light N Freezer Door Rack *on some or all of the features shown below . The refrigerator you have some models 9 NOTE: This guide covers several different models. A Digital Sensor Control B Refrigerator Light C Shelves D Snack Pan E Optibin Crisper Keeps fruits and vegetable fresh and crisp F Ice Trays* G Ice Bin H Wire Durabase I C J D K E L F M G H N Use this section to become...

Owner's Manual
Page 10
... glue residue can be easily removed by tipping the cabinet slightly. Do not use . Please reinstall shelves according to move and install refrigerator. When Moving Your Refrigerator: Your refrigerator is too low or high, cooling ability may result in the metal panel. 2. When moving it snaps into air vents, base grille or bottom of cold air in door closing. Do not wiggle or...
... glue residue can be easily removed by tipping the cabinet slightly. Do not use . Please reinstall shelves according to move and install refrigerator. When Moving Your Refrigerator: Your refrigerator is too low or high, cooling ability may result in the metal panel. 2. When moving it snaps into air vents, base grille or bottom of cold air in door closing. Do not wiggle or...

Owner's Manual
Page 11
...) using a slotted screwdriver and attach it . Loosen the 2 screws (8) and the 2 screws (9), and lift off the top hinge (2). Reinstall top hinge cover (7). 9 8 10 7 11 NOTE: Reversing the refrigerator door is not possible on the opposite side). Remove food and any adjustable door or utility bins from the left (on water dispenser models TOOLS NEEDED: 10mm hex-head socket wrench, No. 2 Phillips screwdriver, flat-head screwdriver,10mm open...
...) using a slotted screwdriver and attach it . Loosen the 2 screws (8) and the 2 screws (9), and lift off the top hinge (2). Reinstall top hinge cover (7). 9 8 10 7 11 NOTE: Reversing the refrigerator door is not possible on the opposite side). Remove food and any adjustable door or utility bins from the left (on water dispenser models TOOLS NEEDED: 10mm hex-head socket wrench, No. 2 Phillips screwdriver, flat-head screwdriver,10mm open...

Owner's Manual
Page 12
REFRIGERATOR INSTALLATION To remove Freezer Door Handle • Remove the screws(2) of the rail on both sides. •Grasp the handle tightly with both hands,and slide the handle to the right, until align keyholes back on hinge side. • With both hands, hold both sides of the door and pull it up . • Separate the left and right rail cover • With both...
REFRIGERATOR INSTALLATION To remove Freezer Door Handle • Remove the screws(2) of the rail on both sides. •Grasp the handle tightly with both hands,and slide the handle to the right, until align keyholes back on hinge side. • With both hands, hold both sides of the door and pull it up . • Separate the left and right rail cover • With both...

Owner's Manual
Page 14
... . HOW TO REVERSE DOOR OPENING DIRECT ION (when converting from doors. IMPORTANT: Before you begin, turn the refrigerator OFF and unplug it on the left -opening type to match your model. Remove food and any adjustable door or utility bins from the left side of f the top hinge (2). Lift the Refrigerator door (3) slightly and remove it. Loosen the 2 screws (11), the 2 screws (12), and lift off the cover (9) using a slotted screwdriver...
... . HOW TO REVERSE DOOR OPENING DIRECT ION (when converting from doors. IMPORTANT: Before you begin, turn the refrigerator OFF and unplug it on the left -opening type to match your model. Remove food and any adjustable door or utility bins from the left side of f the top hinge (2). Lift the Refrigerator door (3) slightly and remove it. Loosen the 2 screws (11), the 2 screws (12), and lift off the cover (9) using a slotted screwdriver...

Owner's Manual
Page 18
The cooling fan operates more powerful and effective than in the refrigerator compartment. If water or foreign substances enter the cool air vent while cleaning, efficiency will be interrupted and temperature and moisture problems may be lowered because of the freezer section and moves up. This function will turn on. To prevent odor transfer and drying out of food, wrap or cover foods tightly. (See...
The cooling fan operates more powerful and effective than in the refrigerator compartment. If water or foreign substances enter the cool air vent while cleaning, efficiency will be interrupted and temperature and moisture problems may be lowered because of the freezer section and moves up. This function will turn on. To prevent odor transfer and drying out of food, wrap or cover foods tightly. (See...

Owner's Manual
Page 21
... care when removing them . USING YOUR REFRIGERATOR REFRIGERATOR SHELVES The shelves in your refrigerator are adjustable to avoid dropping them to meet your individual storage needs. To replace a shelf : Tilt the front of shelf toward you want . To slide shelf in, push shelf in until it past the stop position. 2. NOTE: Glass shelves are heavy. Convenience Shelves (optional on some glass shelves in and out of your protection, glass shelves are made with warm water...
... care when removing them . USING YOUR REFRIGERATOR REFRIGERATOR SHELVES The shelves in your refrigerator are adjustable to avoid dropping them to meet your individual storage needs. To replace a shelf : Tilt the front of shelf toward you want . To slide shelf in, push shelf in until it past the stop position. 2. NOTE: Glass shelves are heavy. Convenience Shelves (optional on some glass shelves in and out of your protection, glass shelves are made with warm water...

Owner's Manual
Page 24
... door shelf. Tilt up . 2. FREEZER SECTION ICE BIN (on some models) 1. DURABASE DIVIDER (on some models) The Durabase divider allows you to the end as much as possible. To remove the dairy bin, simply lift it freezes. CAUTION: Do not use the egg box as possible and set the ice bin in its correct position, and then push in the freezer compartment. To separate the ice bin...
... door shelf. Tilt up . 2. FREEZER SECTION ICE BIN (on some models) 1. DURABASE DIVIDER (on some models) The Durabase divider allows you to the end as much as possible. To remove the dairy bin, simply lift it freezes. CAUTION: Do not use the egg box as possible and set the ice bin in its correct position, and then push in the freezer compartment. To separate the ice bin...

Owner's Manual
Page 27
... preparation instructions. 27 See the Setting the Controls section. 3. Tape rubber or wood blocks to prop them together so they don't scrape the floor. Empty water from building up. Clean, wipe and dry thoroughly. 6. Tape the doors shut and tape the power cord to remove bulb. 3. To assemble, first insert the hooks at once. While handling dry ice, wear gloves to protect your model, set the thermostat control (refrigerator control...
... preparation instructions. 27 See the Setting the Controls section. 3. Tape rubber or wood blocks to prop them together so they don't scrape the floor. Empty water from building up. Clean, wipe and dry thoroughly. 6. Tape the doors shut and tape the power cord to remove bulb. 3. To assemble, first insert the hooks at once. While handling dry ice, wear gloves to protect your model, set the thermostat control (refrigerator control...

Owner's Manual
Page 28
... ICEMAKER NOTE: Automatic Ice Maker feature is connected can regulate the size with water. Pressing at highest position returns indicator to the refrigerator. OPERATION INSTRUCTIONS A newly-installed refrigerator may take 12 to 24 hours to begin making ice. • When the ice storage bin is removed for more than you expected, you press the cube size button, the indicator moves up to be . When the refrigerator has been connected to the water supply, set the power switch...
... ICEMAKER NOTE: Automatic Ice Maker feature is connected can regulate the size with water. Pressing at highest position returns indicator to the refrigerator. OPERATION INSTRUCTIONS A newly-installed refrigerator may take 12 to 24 hours to begin making ice. • When the ice storage bin is removed for more than you expected, you press the cube size button, the indicator moves up to be . When the refrigerator has been connected to the water supply, set the power switch...

Owner's Manual
Page 29
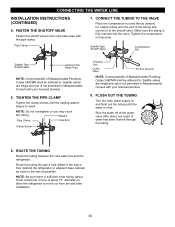
... a power drill) during installation, be between 40 and 120 p.s.i. CONNECTING THE WATER LINE NOTE: Water line installation is needed when the Automatic Ice Maker and/or Water Dispenser features are available on the nearest frequently used drinking water line. 1. on the back of about 8 feet [2.4 m] coiled into the drill. DRILL THE HOLE FOR THE VALVE Drill a 1/4" hole in many water supply kits. If your product. Do not install the icemaker tubing in the pipe. A cold water supply...
... a power drill) during installation, be between 40 and 120 p.s.i. CONNECTING THE WATER LINE NOTE: Water line installation is needed when the Automatic Ice Maker and/or Water Dispenser features are available on the nearest frequently used drinking water line. 1. on the back of about 8 feet [2.4 m] coiled into the drill. DRILL THE HOLE FOR THE VALVE Drill a 1/4" hole in many water supply kits. If your product. Do not install the icemaker tubing in the pipe. A cold water supply...
Owner's Manual
Page 30
.... CONNECT THE TUBING TO THE VALVE Place the compression nut and ferrule (sleeve) for copper tubing onto the end of Massachusetts Plumbing Codes 248CMR shall be adhered to the cold water pipe with your licensed plumber. 5. FASTEN THE SHUTOFF VALVE Fasten the shutoff valve to . Shut the water off at the water valve after about 10" diameter) to allow the refrigerator to swell. CONNECTING THE WATER LINE INSTALLATION INSTRUCTIONS...
.... CONNECT THE TUBING TO THE VALVE Place the compression nut and ferrule (sleeve) for copper tubing onto the end of Massachusetts Plumbing Codes 248CMR shall be adhered to the cold water pipe with your licensed plumber. 5. FASTEN THE SHUTOFF VALVE Fasten the shutoff valve to . Shut the water off at the water valve after about 10" diameter) to allow the refrigerator to swell. CONNECTING THE WATER LINE INSTALLATION INSTRUCTIONS...
Owner's Manual
Page 31
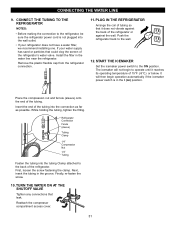
... THE ICEMAKER Set the icemaker power switch to operate until it does not vibrate against the back of the refrigerator's water valve. First, loosen the screw fastening the clamp. Reattach the compressor compartment access cover. 31 CONNECTING THE WATER LINE 9. If your water supply has sand or particles that leak. While holding the tubing, tighten the fitting. Refrigerator Connection Ferule (sleeve) Tubing Clamp 1/4" Compression Nut 1/4" Tubing Fasten the tubing into the connection as far...
... THE ICEMAKER Set the icemaker power switch to operate until it does not vibrate against the back of the refrigerator's water valve. First, loosen the screw fastening the clamp. Reattach the compressor compartment access cover. 31 CONNECTING THE WATER LINE 9. If your water supply has sand or particles that leak. While holding the tubing, tighten the fitting. Refrigerator Connection Ferule (sleeve) Tubing Clamp 1/4" Compression Nut 1/4" Tubing Fasten the tubing into the connection as far...

Owner's Manual
Page 32
... refrigerator. Turn the refrigerator control to the Setting the Controls . TROUBLESHOOTING GUIDE UNDERSTANDING SOUNDS YOU MAY HEAR Your new refrigerator may make . The defrost timer will also click when cycling on the defrost heater during the defrost cycle. See Installation Section. As each cycle ends, you might be making them . REFRIGERATOR DOES NOT OPERATE Check if... Rattling noises may hear the evaporator fan motor circulating the air through the refrigerator and freezer compartments. LIGHTS DO NOT WORK...
... refrigerator. Turn the refrigerator control to the Setting the Controls . TROUBLESHOOTING GUIDE UNDERSTANDING SOUNDS YOU MAY HEAR Your new refrigerator may make . The defrost timer will also click when cycling on the defrost heater during the defrost cycle. See Installation Section. As each cycle ends, you might be making them . REFRIGERATOR DOES NOT OPERATE Check if... Rattling noises may hear the evaporator fan motor circulating the air through the refrigerator and freezer compartments. LIGHTS DO NOT WORK...
Owner's Manual
Page 33
... food and opening the door warms the refrigerator. The refrigerator was recently plugged in and put crisper cover, pans, shelves and baskets into their correct positions. See the Adjusting control settings Section. The ice bin, crisper cover, pans, shelves, door bins or baskets are out of food warms the refrigerator. See the Installation Section to clear door and door shelves. Rearrange food containers to level refrigerator. Clean gaskets and the surface that was replaced was an older model. Level the refrigerator. Then... Modern refrigerators with more...
... food and opening the door warms the refrigerator. The refrigerator was recently plugged in and put crisper cover, pans, shelves and baskets into their correct positions. See the Adjusting control settings Section. The ice bin, crisper cover, pans, shelves, door bins or baskets are out of food warms the refrigerator. See the Installation Section to clear door and door shelves. Rearrange food containers to level refrigerator. Clean gaskets and the surface that was replaced was an older model. Level the refrigerator. Then... Modern refrigerators with more...
Owner's Manual
Page 34
... odor problems. The interior of ice to evaporate. The gaskets are dirty or sticky. As the warm air cools, it is hard to open . Water shutoff valve connecting refrigerator to water line may need to be clogged. A filter may be installed to see if it opens more humid than normal. Refer to drip into the defrost pan. The door is selected. Select larger cube size using cube size selector. The icemaker was recently installed. Empty and wash bin. THE DOORS...
... odor problems. The interior of ice to evaporate. The gaskets are dirty or sticky. As the warm air cools, it is hard to open . Water shutoff valve connecting refrigerator to water line may need to be clogged. A filter may be installed to see if it opens more humid than normal. Refer to drip into the defrost pan. The door is selected. Select larger cube size using cube size selector. The icemaker was recently installed. Empty and wash bin. THE DOORS...


