
Owner's Manual
Page 3
... 6 Location of Model Number 6 Oven Specifications 6 Electrical Requirements 6 Grounding Instructions 6 Microwave Oven Features 7 Installing Glass Tray 8 Installation Instructions for Glass Tray 9 Using Oblong Dish 9 Control Panel Features 10 USING YOUR MICROWAVE OVEN 12 Learn About Your Microwave Oven 12 Clock 12 Timer 12 Vent Fan 12 Vent Auto Time Set 12 Light Hi/Low/Off 12 Child Lock 13 Custom Cook 13 EZ-ON 13 Hold Warm 13 Custom Set 14 More/Less 14 Cooking at High Power Levels 14 Microwave Power Levels 14 Multi Stage Cooking 14 Cooking Guide for Lower Power Levels...
... 6 Location of Model Number 6 Oven Specifications 6 Electrical Requirements 6 Grounding Instructions 6 Microwave Oven Features 7 Installing Glass Tray 8 Installation Instructions for Glass Tray 9 Using Oblong Dish 9 Control Panel Features 10 USING YOUR MICROWAVE OVEN 12 Learn About Your Microwave Oven 12 Clock 12 Timer 12 Vent Fan 12 Vent Auto Time Set 12 Light Hi/Low/Off 12 Child Lock 13 Custom Cook 13 EZ-ON 13 Hold Warm 13 Custom Set 14 More/Less 14 Cooking at High Power Levels 14 Microwave Power Levels 14 Multi Stage Cooking 14 Cooking Guide for Lower Power Levels...

Owner's Manual
Page 4
.... Turn the oven off the power at the fuse or circuit breaker panel. • Use care when cleaning the vent hood filters. for household use only. • Do not use this product near a swimming pool, or similar location. • Do not use . • Clean the ventilating hood frequently. Watch the oven carefully, especially if you how to turn the fan on page 2. • Do not use this oven for storage purposes. Do not immerse the electrical cord...
.... Turn the oven off the power at the fuse or circuit breaker panel. • Use care when cleaning the vent hood filters. for household use only. • Do not use this product near a swimming pool, or similar location. • Do not use . • Clean the ventilating hood frequently. Watch the oven carefully, especially if you how to turn the fan on page 2. • Do not use this oven for storage purposes. Do not immerse the electrical cord...
Owner's Manual
Page 5
... the microwave oven for the browning dish. Do not cook anything directly on a microwavable dish. - SAFETY • To avoid improperly cooking some foods. - Uneven heating may explode. • Do not cover or block any radio or TV interference caused by unauthorized modification to correct the interference by turning the equipment off and on, the user is not responsible for examination, repair, or...
... the microwave oven for the browning dish. Do not cook anything directly on a microwavable dish. - SAFETY • To avoid improperly cooking some foods. - Uneven heating may explode. • Do not cover or block any radio or TV interference caused by unauthorized modification to correct the interference by turning the equipment off and on, the user is not responsible for examination, repair, or...
Owner's Manual
Page 6
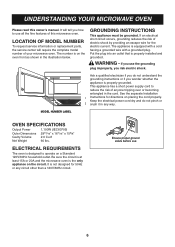
... model number of this owner's manual. This appliance has a short power supply cord to use the grounding plug improperly, you use all the fine features of your microwave oven. The appliance is properly installed and grounded. ELECTRICAL REQUIREMENTS The oven is the only appliance on a Standard 120V/60Hz household outlet. Be sure the circuit is at least 15A or 20A and the microwave oven is designed to operate...
... model number of this owner's manual. This appliance has a short power supply cord to use the grounding plug improperly, you use all the fine features of your microwave oven. The appliance is properly installed and grounded. ELECTRICAL REQUIREMENTS The oven is the only appliance on a Standard 120V/60Hz household outlet. Be sure the circuit is at least 15A or 20A and the microwave oven is designed to operate...
Owner's Manual
Page 7
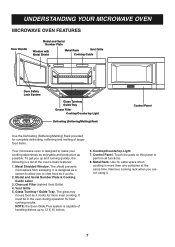
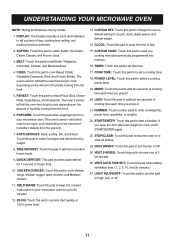
UNDERSTANDING YOUR MICROWAVE OVEN MICROWAVE OVEN FEATURES Door Handle Model and Serial Number Plate Window with Metal Shield Metal Rack Vent Grille Cooking Guide Door Safety Lock System Glass Turntray Guide Tray Grease Filter Cooktop/Countertop Light Defrosting (Softening/Melting) Rack Control Panel Use the Defrosting (Softening/Melting) Rack provided for complete defrosting, softening and melting of the oven's basic features: 1. It is designed to view food as it cooks. 2. Control Panel. Use for extra space when cooking in the oven during operation for more than one ...
UNDERSTANDING YOUR MICROWAVE OVEN MICROWAVE OVEN FEATURES Door Handle Model and Serial Number Plate Window with Metal Shield Metal Rack Vent Grille Cooking Guide Door Safety Lock System Glass Turntray Guide Tray Grease Filter Cooktop/Countertop Light Defrosting (Softening/Melting) Rack Control Panel Use the Defrosting (Softening/Melting) Rack provided for complete defrosting, softening and melting of the oven's basic features: 1. It is designed to view food as it cooks. 2. Control Panel. Use for extra space when cooking in the oven during operation for more than one ...
Owner's Manual
Page 11
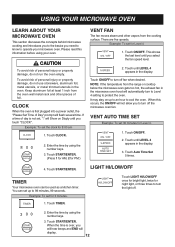
... to keep hot, cooked foods warm in your microwave oven for 1.0 pound of 5 fan speeds. 26. CUSTOM COOK: Touch this pad to recall one of frozen food. 10. VENT ON/OFF: Touch this pad to turn the light on /off . 11 VENT 5-SPEED: Touch this pad to choose one cooking instruction previously programmed into memory. 16. DISPLAY: The Display includes a clock and indicators to tell you time of cooking time each time you open the door after oven begins...
... to keep hot, cooked foods warm in your microwave oven for 1.0 pound of 5 fan speeds. 26. CUSTOM COOK: Touch this pad to recall one of frozen food. 10. VENT ON/OFF: Touch this pad to turn the light on /off . 11 VENT 5-SPEED: Touch this pad to choose one cooking instruction previously programmed into memory. 16. DISPLAY: The Display includes a clock and indicators to tell you time of cooking time each time you open the door after oven begins...
Owner's Manual
Page 12
... oven wall metal rack and other vapors from the range or cooktop below the microwave oven gets too hot, the exhaust fan in the display. Enter the time by using the number keys. 3. When this information before using your microwave oven. Touch LIGHT HI/LOW/OFF once for bright light, twice for 3 minutes. 1. Touch START/ENTER. Touch START/ENTER. When the time is first plugged into a power outlet, the "Please Set Time of foil. Touch CLOCK. 2. USING YOUR MICROWAVE OVEN LEARN ABOUT YOUR MICROWAVE OVEN...
... oven wall metal rack and other vapors from the range or cooktop below the microwave oven gets too hot, the exhaust fan in the display. Enter the time by using the number keys. 3. When this information before using your microwave oven. Touch LIGHT HI/LOW/OFF once for bright light, twice for 3 minutes. 1. Touch START/ENTER. Touch START/ENTER. When the time is first plugged into a power outlet, the "Please Set Time of foil. Touch CLOCK. 2. USING YOUR MICROWAVE OVEN LEARN ABOUT YOUR MICROWAVE OVEN...
Owner's Manual
Page 13
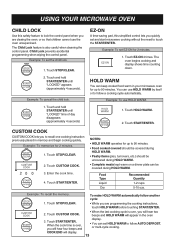
... COOK CUSTOM COOK lets you to recall one cooking instruction previously placed in the oven display. • You can be covered during HOLD WARM. Touch CUSTOM COOK. 3. Example: To recall the memory. 1. USING YOUR MICROWAVE OVEN CHILD LOCK Use this simplified control lets you quickly set and start microwave cooking without the need to touch the START/ENTER. The Child Lock feature is over , you are cleaing the oven. Example: To set EZ-ON for up to 90 minutes. • Food cooked covered...
... COOK CUSTOM COOK lets you to recall one cooking instruction previously placed in the oven display. • You can be covered during HOLD WARM. Touch CUSTOM COOK. 3. Example: To recall the memory. 1. USING YOUR MICROWAVE OVEN CHILD LOCK Use this simplified control lets you quickly set and start microwave cooking without the need to touch the START/ENTER. The Child Lock feature is over , you are cleaing the oven. Example: To set EZ-ON for up to 90 minutes. • Food cooked covered...
Owner's Manual
Page 14
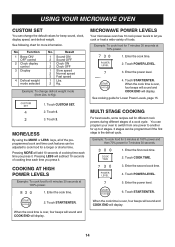
... recipes call for Lower Power Levels, page 15. Touch COOK TIME. 3. Touch START/ENTER. 2. Enter the second cook time. 4. Example: To cook food for 7 minutes 30 seconds. 1. Touch CUSTOM SET. 2. Pressing MORE will subtract 10 seconds of cooking time each time you cook or heat a wide variety of cooking time each time you press it . COOKING AT HIGH POWER LEVELS Example: To cook food for beep sound, clock, display speed, and defrost weight. Enter the power level. 4. You can program your oven to switch from Lbs. Pressing...
... recipes call for Lower Power Levels, page 15. Touch COOK TIME. 3. Touch START/ENTER. 2. Enter the second cook time. 4. Example: To cook food for 7 minutes 30 seconds. 1. Touch CUSTOM SET. 2. Pressing MORE will subtract 10 seconds of cooking time each time you cook or heat a wide variety of cooking time each time you press it . COOKING AT HIGH POWER LEVELS Example: To cook food for beep sound, clock, display speed, and defrost weight. Enter the power level. 4. You can program your oven to switch from Lbs. Pressing...

Owner's Manual
Page 16
... good Sensor cooking results. 1. Always use tight-sealing plastic covers. When the popping slows to overcook. 3. Be sure the outside of your favorite foods without selecting cooking times and power levels. SENSOR POPCORN SENSOR POPCORN lets you can open the door or touch STOP/CLEAR during the initial sensing period. Make a note of microwave popcorn on the rack or under the rack. 16 The display will display. • Recommended amounts: 3.0-3.5 ozs. • To cook a snack size...
... good Sensor cooking results. 1. Always use tight-sealing plastic covers. When the popping slows to overcook. 3. Be sure the outside of your favorite foods without selecting cooking times and power levels. SENSOR POPCORN SENSOR POPCORN lets you can open the door or touch STOP/CLEAR during the initial sensing period. Make a note of microwave popcorn on the rack or under the rack. 16 The display will display. • Recommended amounts: 3.0-3.5 ozs. • To cook a snack size...

Owner's Manual
Page 22
..., the AUTO DEFROST includes a built-in the center when removed from its original closed paper or plastic package (wrapper). FISH 4. Touch START/ENTER. The oven will beep once during the BEEP unless the door is provided for complete defrosting of larger food items. Place the defrosting rack on the rack. POULTRY 3. Available weight ranges for each food item according to the weight you touch START/ENTER, the display counts down . Touch START/ENTER. MEAT 2. Touch AUTO DEFROST. 2. Touch QUICK DEFROST...
..., the AUTO DEFROST includes a built-in the center when removed from its original closed paper or plastic package (wrapper). FISH 4. Touch START/ENTER. The oven will beep once during the BEEP unless the door is provided for complete defrosting of larger food items. Place the defrosting rack on the rack. POULTRY 3. Available weight ranges for each food item according to the weight you touch START/ENTER, the display counts down . Touch START/ENTER. MEAT 2. Touch AUTO DEFROST. 2. Touch QUICK DEFROST...

Owner's Manual
Page 23
... defrost. Touch TIME DEFROST. 2. Rack must not touch the side of microwave oven. 2. Use the rack only when cooking food on floor of property damage: Do not use rack: DEFROST TIPS 1. Separated pieces defrost more than a deep block. • Separate pieces as they start to become warm. • For better results, a preset standing time is the net weight in the defrosting time. • For best results, elevate food to be defrosted on the glass tray...
... defrost. Touch TIME DEFROST. 2. Rack must not touch the side of microwave oven. 2. Use the rack only when cooking food on floor of property damage: Do not use rack: DEFROST TIPS 1. Separated pieces defrost more than a deep block. • Separate pieces as they start to become warm. • For better results, a preset standing time is the net weight in the defrosting time. • For best results, elevate food to be defrosted on the glass tray...
Owner's Manual
Page 24
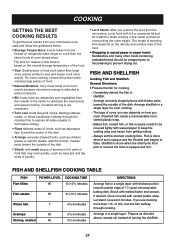
... shellfish. 24 FISH AND SHELLFISH COOKING TABLE FISH Fish fillets POWER LEVEL COOKING TIME HI 31/2-41/2 minutes Fish steaks HI 41/2-51/2 minutes Whole fish 7 41/2-6 minutes Scallops HI Shrimp, shelled HI 31/2-5 minutes 31/2-5 minutes DIRECTIONS Arrange fish in sauce needs to be wrapped prior to microwaving to prevent drying out. of food cook faster than large ones, pieces...
... shellfish. 24 FISH AND SHELLFISH COOKING TABLE FISH Fish fillets POWER LEVEL COOKING TIME HI 31/2-41/2 minutes Fish steaks HI 41/2-51/2 minutes Whole fish 7 41/2-6 minutes Scallops HI Shrimp, shelled HI 31/2-5 minutes 31/2-5 minutes DIRECTIONS Arrange fish in sauce needs to be wrapped prior to microwaving to prevent drying out. of food cook faster than large ones, pieces...

Owner's Manual
Page 25
... flour uncovered so you use . The Meat Cooking Table on a microwavable rack in the microwave, reduce the liquid, salt, and strong seasonings. Uncover foods to avoid spattering. - Not Recommended ● Appetizers with a crisp coating or puff pastry are best done in a conventional oven with VENTED plastic wrap or a microwavable lid. ● Cover foods to distribute heat and shorten cooking time. Defrost completely. - Trim off excess fat to...
... flour uncovered so you use . The Meat Cooking Table on a microwavable rack in the microwave, reduce the liquid, salt, and strong seasonings. Uncover foods to avoid spattering. - Not Recommended ● Appetizers with a crisp coating or puff pastry are best done in a conventional oven with VENTED plastic wrap or a microwavable lid. ● Cover foods to distribute heat and shorten cooking time. Defrost completely. - Trim off excess fat to...

Owner's Manual
Page 27
... cooking covered with thicker pieces to reduce spattering. - Let stand covered 5 minutes. Replace waxed paper. Cover with waxed paper. Cook until no longer pink and juices run clear. Remove hens from the oven walls and other pieces of hen and the legs to prevent overcooking. Place hens breast side down on microwavable rack. COOKING CHICKEN Cooking Poultry: General Directions ● Prepare the poultry for cooking. - Defrost completely. - Cover...
... cooking covered with thicker pieces to reduce spattering. - Let stand covered 5 minutes. Replace waxed paper. Cover with waxed paper. Cook until no longer pink and juices run clear. Remove hens from the oven walls and other pieces of hen and the legs to prevent overcooking. Place hens breast side down on microwavable rack. COOKING CHICKEN Cooking Poultry: General Directions ● Prepare the poultry for cooking. - Defrost completely. - Cover...
Owner's Manual
Page 31
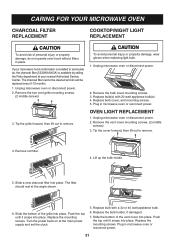
...property damage, do not operate oven hood without filters in place. Slide the bottom of the vent cover into place. Unplug microwave oven or disconnect power. 2. Tip the cover forward, then lift out to remove. Lift up the bulb holder. 5. Replace bulb with 20 watt appliance bulb(s). 4. Replace the mounting screws. Replace bulb(s) with a 30 or 40 watt appliance bulb. 6. OVEN LIGHT REPLACEMENT 1. Replace bulb cover, and mounting screws. 5. Plug in microwave oven or reconnect power. 31 Remove the two vent grille mounting screws. (2 middle screws) 3. To avoid personal injury...
...property damage, do not operate oven hood without filters in place. Slide the bottom of the vent cover into place. Unplug microwave oven or disconnect power. 2. Tip the cover forward, then lift out to remove. Lift up the bulb holder. 5. Replace bulb with 20 watt appliance bulb(s). 4. Replace the mounting screws. Replace bulb(s) with a 30 or 40 watt appliance bulb. 6. OVEN LIGHT REPLACEMENT 1. Replace bulb cover, and mounting screws. 5. Plug in microwave oven or reconnect power. 31 Remove the two vent grille mounting screws. (2 middle screws) 3. To avoid personal injury...

Owner's Manual
Page 32
... intensity heat): Utility dishes, loaf dishes, pie plates, cake plates, liquid measuring cups, casseroles, and bowls without metallic trim. Use these with care because the plastic may split or crack when you use in the same way. Use small pieces of vegetables or other food items before cooking. Pierce plastic pouches of foil to leave openings for use them in the microwave oven. FLAWED...
... intensity heat): Utility dishes, loaf dishes, pie plates, cake plates, liquid measuring cups, casseroles, and bowls without metallic trim. Use these with care because the plastic may split or crack when you use in the same way. Use small pieces of vegetables or other food items before cooking. Pierce plastic pouches of foil to leave openings for use them in the microwave oven. FLAWED...
Owner's Manual
Page 33
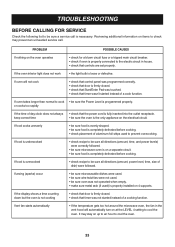
.... If food cooks unevenly • be sure food is evenly shaped. • be sure all directions (amount, power level, time, size of a cooking function. If oven will automatically turn on the electrical circuit. It may prevent an unneeded service call is completely defrosted before cooking. TROUBLESHOOTING BEFORE CALLING FOR SERVICE Check the following list to cool the oven. Vent fan starts automatically • If the temperature gets too hot around the microwave oven, the fan in house...
.... If food cooks unevenly • be sure food is evenly shaped. • be sure all directions (amount, power level, time, size of a cooking function. If oven will automatically turn on the electrical circuit. It may prevent an unneeded service call is completely defrosted before cooking. TROUBLESHOOTING BEFORE CALLING FOR SERVICE Check the following list to cool the oven. Vent fan starts automatically • If the temperature gets too hot around the microwave oven, the fan in house...

Owner's Manual
Page 34
... two seconds. Can I use the rack that food should remove outer case. Sometimes the door of the air exhaust vent? Why does the dish become hot when I microwave food in poor cooking performance and/or arcing and may not be taken out of your microwave oven. This process allows the cooking to touch walls or door. Do not try to remove food after cooking. TROUBLESHOOTING To avoid electrical shock which can cause...
... two seconds. Can I use the rack that food should remove outer case. Sometimes the door of the air exhaust vent? Why does the dish become hot when I microwave food in poor cooking performance and/or arcing and may not be taken out of your microwave oven. This process allows the cooking to touch walls or door. Do not try to remove food after cooking. TROUBLESHOOTING To avoid electrical shock which can cause...
Owner's Manual
Page 35
... the consumer. USA Model: LMVM2075SB / LMVM2075SW / LMVM2075ST LG Electronics Inc. will repair or replace your home to deliver, pick up, and/or install the product, instruct, or replace house fuses or correct wiring, or correction of precautions in the United States, including U.S. WARRANTY PERIOD: HOW SERVICE IS HANDLED: LABOR: One Year from the date of original consumer purchase of Purchase*. MAGNETRON: Ten Years from...
... the consumer. USA Model: LMVM2075SB / LMVM2075SW / LMVM2075ST LG Electronics Inc. will repair or replace your home to deliver, pick up, and/or install the product, instruct, or replace house fuses or correct wiring, or correction of precautions in the United States, including U.S. WARRANTY PERIOD: HOW SERVICE IS HANDLED: LABOR: One Year from the date of original consumer purchase of Purchase*. MAGNETRON: Ten Years from...


