
Owner's Manual
Page 3
... Warm 12 Cleaning the Grease Filters 28 More/Less 12 Charcoal Filter Replacement 28 Light Hi-Low-Off 12 Cooktop/Countertop Light Replacement ....... 29 Vent Hi-Low-Off 12 Oven Light Replacement 29 Auto Touch 13 Questions and Answers 29 Auto Touch Table 13 Microwave Utensil Guide 30 Cooking at High Cook Power 14 Cooking at Lower Power Levels 14 TROUBLESHOOTING 31 Cooking With More Than One Cook Cycle ..... 14 Before Calling for Service 31 Cooking Guide for Lower Power Levels........ 15 Memo 32 Sensor Operating Instructions 16 WARRANTY Inside back cover -3-
... Warm 12 Cleaning the Grease Filters 28 More/Less 12 Charcoal Filter Replacement 28 Light Hi-Low-Off 12 Cooktop/Countertop Light Replacement ....... 29 Vent Hi-Low-Off 12 Oven Light Replacement 29 Auto Touch 13 Questions and Answers 29 Auto Touch Table 13 Microwave Utensil Guide 30 Cooking at High Cook Power 14 Cooking at Lower Power Levels 14 TROUBLESHOOTING 31 Cooking With More Than One Cook Cycle ..... 14 Before Calling for Service 31 Cooking Guide for Lower Power Levels........ 15 Memo 32 Sensor Operating Instructions 16 WARRANTY Inside back cover -3-
Owner's Manual
Page 4
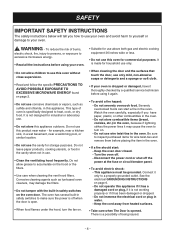
... to persons, or exposure to heat, cook, or dry food. Be sure to turn the fan on the hood or the filters. • Use care when cleaning the vent hood filters. Keep the cord away from heated surfaces. • Take care when The Door is not designed for wire twist-ties and remove them before placing the item in the oven. - It is opened. Corrosive cleaning agents such as sulfide and chloride...
... to persons, or exposure to heat, cook, or dry food. Be sure to turn the fan on the hood or the filters. • Use care when cleaning the vent hood filters. Keep the cord away from heated surfaces. • Take care when The Door is not designed for wire twist-ties and remove them before placing the item in the oven. - It is opened. Corrosive cleaning agents such as sulfide and chloride...
Owner's Manual
Page 5
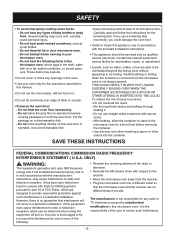
Do not heat the following : • Reorient the receiving antenna of table or counter. • Preserve the oven floor: - Do not allow the container to persons; - Do not cook anything directly on a microwavable dish. - Carefully read and follow the instructions for the operations described in this ...microwave oven. - It has been type tested and found to comply with oil or fat, sealed containers, or closed glass jars. These items may explode. • Do not cover or block any types of FCC Rules, which can be serviced only by turning the equipment off and on, the user...
Do not heat the following : • Reorient the receiving antenna of table or counter. • Preserve the oven floor: - Do not allow the container to persons; - Do not cook anything directly on a microwavable dish. - Carefully read and follow the instructions for the operations described in this ...microwave oven. - It has been type tested and found to comply with oil or fat, sealed containers, or closed glass jars. These items may explode. • Do not cover or block any types of FCC Rules, which can be serviced only by turning the equipment off and on, the user...
Owner's Manual
Page 6
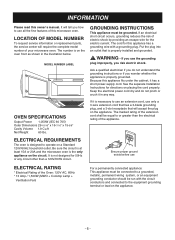
... to operate on the appliance. -6- ELECTRICAL REQUIREMENTS The oven is necessary to use ELECTRICAL RATING * Electrical Rating of the appliance. The number is not designed for this owner's manual. WARNING - See the separate Installation Instructions for the electric current. It is on the oven front as shown in any circuit other than the electrical rating of the Oven: 120V AC, 60Hz * 13 Amp./ 1,500W (MWO + Cooktop Lamp + Ventilation Fan) For...
... to operate on the appliance. -6- ELECTRICAL REQUIREMENTS The oven is necessary to use ELECTRICAL RATING * Electrical Rating of the appliance. The number is not designed for this owner's manual. WARNING - See the separate Installation Instructions for the electric current. It is on the oven front as shown in any circuit other than the electrical rating of the Oven: 120V AC, 60Hz * 13 Amp./ 1,500W (MWO + Cooktop Lamp + Ventilation Fan) For...
Owner's Manual
Page 7
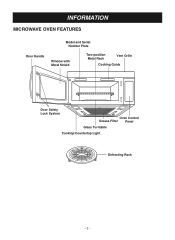
INFORMATION MICROWAVE OVEN FEATURES Model and Serial Number Plate Door Handle Window with Metal Shield Two-position Metal Rack Vent Grille Cooking Guide Door Safety Lock System Oven Control Grease Filter Panel Glass Turntable Cooktop/Countertop Light Defrosting Rack -7-
INFORMATION MICROWAVE OVEN FEATURES Model and Serial Number Plate Door Handle Window with Metal Shield Two-position Metal Rack Vent Grille Cooking Guide Door Safety Lock System Oven Control Grease Filter Panel Glass Turntable Cooktop/Countertop Light Defrosting Rack -7-
Owner's Manual
Page 9
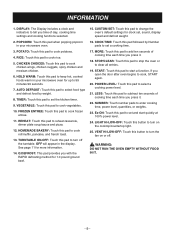
... change the oven's default settings for up to turn the fan on the cooktop/countertop light. 25. RICE: Touch this pad to cook rice. 5. TURNTABLE ON-OFF: Touch this pad to turn on or off the turntable. START: Touch this pad to start quickly at 100% power level. 24. WARNING: DO NOT RUN THE OVEN EMPTY WITHOUT FOOD IN IT. - 9 - POTATO: Touch this pad to cook potatoes. 4. AUTO DEFROST: Touch this pad to set , sound, display speed and defrost weight. 16. REHEAT: Touch...
... change the oven's default settings for up to turn the fan on the cooktop/countertop light. 25. RICE: Touch this pad to cook rice. 5. TURNTABLE ON-OFF: Touch this pad to turn on or off the turntable. START: Touch this pad to start quickly at 100% power level. 24. WARNING: DO NOT RUN THE OVEN EMPTY WITHOUT FOOD IN IT. - 9 - POTATO: Touch this pad to cook potatoes. 4. AUTO DEFROST: Touch this pad to set , sound, display speed and defrost weight. 16. REHEAT: Touch...
Owner's Manual
Page 10
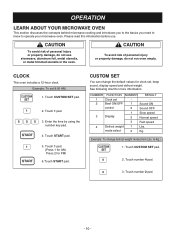
... set , beep sound, display speed and defrost weight. Touch CUSTOM SET pad. 2. Touch 1 pad. (Press 1 for AM, Press 2 for more information. to operate your microwave oven. Touch number 4 pad. 3. CLOCK This oven includes a 12-hour clock. CUSTOM SET You can change defrost weight mode.(from Lbs. See following chart for PM) 6.Touch START pad. mode select 2 Kg. Example: To change the default values for clock set 8:00 AM. 1. OPERATION LEARN ABOUT YOUR MICROWAVE OVEN This section discusses the concepts behind microwave cooking and...
... set , beep sound, display speed and defrost weight. Touch CUSTOM SET pad. 2. Touch 1 pad. (Press 1 for AM, Press 2 for more information. to operate your microwave oven. Touch number 4 pad. 3. CLOCK This oven includes a 12-hour clock. CUSTOM SET You can change defrost weight mode.(from Lbs. See following chart for PM) 6.Touch START pad. mode select 2 Kg. Example: To change the default values for clock set 8:00 AM. 1. OPERATION LEARN ABOUT YOUR MICROWAVE OVEN This section discusses the concepts behind microwave cooking and...
Owner's Manual
Page 11
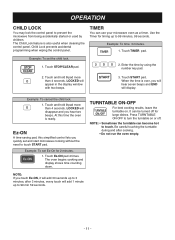
... Child Lock feature is over, you quickly set and start microwave cooking without the need to turn the turntable on . Touch Ez-ON pad 4 times. Press TURNTABLE ON-OFF to touch START pad. NOTE: • Sometimes the turntable can become hot to 3 minutes; NOTE: If you hear two beeps. Touch TIMER pad. When the time is also useful when cleaning the control panel. At this simplified control lets you will hear seven beeps and END will display. TURNTABLE ON...
... Child Lock feature is over, you quickly set and start microwave cooking without the need to turn the turntable on . Touch Ez-ON pad 4 times. Press TURNTABLE ON-OFF to touch START pad. NOTE: • Sometimes the turntable can become hot to 3 minutes; NOTE: If you hear two beeps. Touch TIMER pad. When the time is also useful when cleaning the control panel. At this simplified control lets you will hear seven beeps and END will display. TURNTABLE ON...
Owner's Manual
Page 12
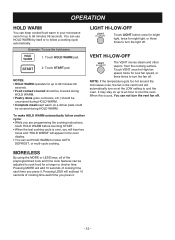
...-OFF Touch LIGHT button once for bright light, twice for night light, or three times to turn on at the LOW setting to cool the oven. It may stay on a dinner plate could be adjusted to cook food for Low fan speed, or three times to follow AUTO DEFROST, or multi-cycle cooking. To make HOLD WARM automatically follow another cycle: • While you are programming the cooking instructions, touch HOLD...
...-OFF Touch LIGHT button once for bright light, twice for night light, or three times to turn on at the LOW setting to cool the oven. It may stay on a dinner plate could be adjusted to cook food for Low fan speed, or three times to follow AUTO DEFROST, or multi-cycle cooking. To make HOLD WARM automatically follow another cycle: • While you are programming the cooking instructions, touch HOLD...

Owner's Manual
Page 13
... you heat common microwave-prepared foods without selecting cooking times and power levels. Choose food category. Amount 6 oz. 12 oz. Touch HOMEMADE BAKERY pad. 2. Category Roll/Muffin Pancake French toast Touch pad number 1 2 3 3. Touch 2 pad. Touch CHICKEN CHOICES pad. 2. Amount 1 slice 2 slices 3 slices 4 slices Touch pad number 1 2 3 4 AUTO TOUCH TABLE FUNCTION CODE CATEGORY INSTRUCTIONS AMOUNT Chicken 1 choices 2 3 4 Homemade 1 bakery 2 3 Chicken wings Place in a single layer around the edge of a dinner plate...
... you heat common microwave-prepared foods without selecting cooking times and power levels. Choose food category. Amount 6 oz. 12 oz. Touch HOMEMADE BAKERY pad. 2. Category Roll/Muffin Pancake French toast Touch pad number 1 2 3 3. Touch 2 pad. Touch CHICKEN CHOICES pad. 2. Amount 1 slice 2 slices 3 slices 4 slices Touch pad number 1 2 3 4 AUTO TOUCH TABLE FUNCTION CODE CATEGORY INSTRUCTIONS AMOUNT Chicken 1 choices 2 3 4 Homemade 1 bakery 2 3 Chicken wings Place in a single layer around the edge of a dinner plate...
Owner's Manual
Page 14
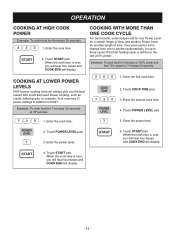
... 70% power. 1. Your oven can be set to change from one Power Level for a certain length of time, and another Power Level for another automatically, for 7 minutes 30 seconds. Example: To cook food for 8 minutes 30 seconds. 1. Touch POWER LEVEL pad. 1. Enter the cook time. 5. Enter the cook time. 2. Touch START pad. Touch POWER LEVEL pad. 3. Enter the power level. 6. When the cook time is over, you will hear four beeps and COOK END will display. - 14 - When the cook time is...
... 70% power. 1. Your oven can be set to change from one Power Level for a certain length of time, and another Power Level for another automatically, for 7 minutes 30 seconds. Example: To cook food for 8 minutes 30 seconds. 1. Touch POWER LEVEL pad. 1. Enter the cook time. 5. Enter the cook time. 2. Touch START pad. Touch POWER LEVEL pad. 3. Enter the power level. 6. When the cook time is over, you will hear four beeps and COOK END will display. - 14 - When the cook time is...
Owner's Manual
Page 16
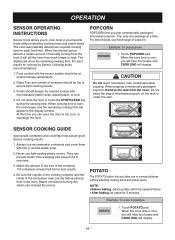
... selecting cooking times and power levels. Pop only one or several potatoes without selecting cooking times and power levels. Food cooked with lids or vented plastic wrap. 2. OPERATION SENSOR OPERATING INSTRUCTIONS Sensor Cook allows you can open the door or touch the STOP/CLEAR key during the sensing time. POPCORN POPCORN lets you bake one package at normal storage temperature. 2. Always use tight-sealing plastic covers. When popping commercially packaged popcorn, Remove the rack from the oven; POTATO The POTATO button...
... selecting cooking times and power levels. Pop only one or several potatoes without selecting cooking times and power levels. Food cooked with lids or vented plastic wrap. 2. OPERATION SENSOR OPERATING INSTRUCTIONS Sensor Cook allows you can open the door or touch the STOP/CLEAR key during the sensing time. POPCORN POPCORN lets you bake one package at normal storage temperature. 2. Always use tight-sealing plastic covers. When popping commercially packaged popcorn, Remove the rack from the oven; POTATO The POTATO button...
Owner's Manual
Page 18
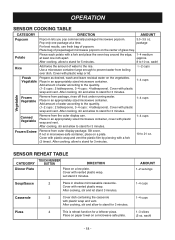
... display package. Vegetable Place in an appropriately sized microwave container. Place in an appropriately sized microwave container, cover with plastic wrap and vent. If not in shallow microwavable casserole. AMOUNT 1~2 servings 1~4 cups 1~4 cups 1~3 slices (5 oz. each ) Rice Add twice the amount of glass tray. Pop only one inch apart. each ) - 18 - Cover with plastic wrap and vent. SENSOR REHEAT TABLE CATEGORY Dinner Plate TOUCH NUMBER BUTTON DIRECTION 1 Place on a plate...
... display package. Vegetable Place in an appropriately sized microwave container. Place in an appropriately sized microwave container, cover with plastic wrap and vent. If not in shallow microwavable casserole. AMOUNT 1~2 servings 1~4 cups 1~4 cups 1~3 slices (5 oz. each ) Rice Add twice the amount of glass tray. Pop only one inch apart. each ) - 18 - Cover with plastic wrap and vent. SENSOR REHEAT TABLE CATEGORY Dinner Plate TOUCH NUMBER BUTTON DIRECTION 1 Place on a plate...
Owner's Manual
Page 19
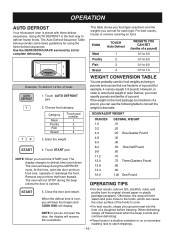
... defrost 1.2 lbs. The display changes to catch drippings. - 19 - This table shows you food type selections and the weights you touch the START pad. When the defrost time is the best way to food weights as being in Auto Defrost, you can set for example, 4 ounces equals 1/4 pound). NOTE: If you will hear four beeps and COOK END will display. Using AUTO DEFROST is over, you do not open the door and turn food over...
... defrost 1.2 lbs. The display changes to catch drippings. - 19 - This table shows you food type selections and the weights you touch the START pad. When the defrost time is the best way to food weights as being in Auto Defrost, you can set for example, 4 ounces equals 1/4 pound). NOTE: If you will hear four beeps and COOK END will display. Using AUTO DEFROST is over, you do not open the door and turn food over...
Owner's Manual
Page 22
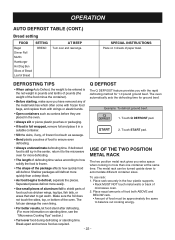
... food bags, and replace them with the rapid defrosting method for 1.0 pound ground beef. Separated pieces defrost more defrosting. To use rack: 1. Shallow packages will defrost. Break apart and remove food as cartons before they are placed in the four plastic supports. • Rack MUST NOT touch metal walls or back of paper towel. DEFROSTING TIPS Q DEFROST • When using Auto Defrost, the weight to be turned upside down to the microwave oven...
... food bags, and replace them with the rapid defrosting method for 1.0 pound ground beef. Separated pieces defrost more defrosting. To use rack: 1. Shallow packages will defrost. Break apart and remove food as cartons before they are placed in the four plastic supports. • Rack MUST NOT touch metal walls or back of paper towel. DEFROSTING TIPS Q DEFROST • When using Auto Defrost, the weight to be turned upside down to the microwave oven...
Owner's Manual
Page 24
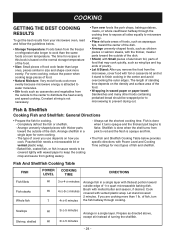
... needs a microwavable lid or vented plastic wrap. - Always set the shortest cooking time. HI 41/2-51/2 minutes Brush with vented plastic wrap. If you remove the food from the outside to the center to flake. Baked fish, coated fish, or fish in a single layer with Small pieces of aluminum foil, parts of food that may cook quickly, such as directed above, except stir instead of cover...
... needs a microwavable lid or vented plastic wrap. - Always set the shortest cooking time. HI 41/2-51/2 minutes Brush with vented plastic wrap. If you remove the food from the outside to the center to flake. Baked fish, coated fish, or fish in a single layer with Small pieces of aluminum foil, parts of food that may cook quickly, such as directed above, except stir instead of cover...
Owner's Manual
Page 25
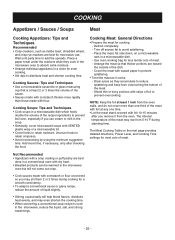
... most cuts of meat. - Use oven cooking bag for microwave use cream or milk in the microwave, reduce the liquid, salt, and strong seasonings. - 25 - Cooking Sauces: Tips and Techniques • Use a microwavable casserole or glass measuring cup that thicker portions are best for less tender cuts of meat. Place the meat, fat side down, on the next page provides detailed directions, Power Level, and Cooking Time settings...
... most cuts of meat. - Use oven cooking bag for microwave use cream or milk in the microwave, reduce the liquid, salt, and strong seasonings. - 25 - Cooking Sauces: Tips and Techniques • Use a microwavable casserole or glass measuring cup that thicker portions are best for less tender cuts of meat. Place the meat, fat side down, on the next page provides detailed directions, Power Level, and Cooking Time settings...
Owner's Manual
Page 28
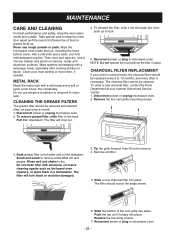
... hot) mild detergent solution. Disconnect power or unplug microwave oven. 2. Remove the two vent grille mounting screws. 3. Remove old filter. 5. MAINTENANCE CARE AND CLEANING For best performance and safety, keep the inner door panel and the oven front frame free of the vent grille into place. Use a chrome cleaner and polish on chrome, metal, and aluminum surfaces. Clean your oven weekly or more often if necessary. CLEANING THE GREASE FILTERS The grease filter should be damaged. 3. The filter...
... hot) mild detergent solution. Disconnect power or unplug microwave oven. 2. Remove the two vent grille mounting screws. 3. Remove old filter. 5. MAINTENANCE CARE AND CLEANING For best performance and safety, keep the inner door panel and the oven front frame free of the vent grille into place. Use a chrome cleaner and polish on chrome, metal, and aluminum surfaces. Clean your oven weekly or more often if necessary. CLEANING THE GREASE FILTERS The grease filter should be damaged. 3. The filter...
Owner's Manual
Page 29
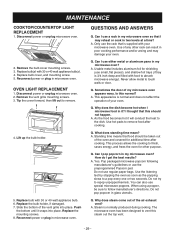
... or 40 watt appliance bulb. 6. Replace bulb(s) with your oven. Replace the mounting screws. 8. Sometimes the door of the oven and covered for additional time after cooking. As the food becomes hot it ? This process allows the cooking to touch walls or door. Replace bulb cover, and mounting screw. 5. Reconnect power or plug in glass utensils. Never allow metal to finish, saves energy, and frees the oven for shielding (use either metal or aluminum pans in my microwave oven? Why does...
... or 40 watt appliance bulb. 6. Replace bulb(s) with your oven. Replace the mounting screws. 8. Sometimes the door of the oven and covered for additional time after cooking. As the food becomes hot it ? This process allows the cooking to touch walls or door. Replace bulb cover, and mounting screw. 5. Reconnect power or plug in glass utensils. Never allow metal to finish, saves energy, and frees the oven for shielding (use either metal or aluminum pans in my microwave oven? Why does...
Owner's Manual
Page 31
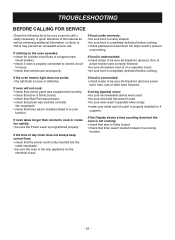
... electrical circuit. If food cooks unevenly: • be sure food is evenly shaped. • be sure all directions (amount, time, & power levels) were correctly followed. • be sure microwave oven is on a separate circuit. • be sure oven wasn't operated when empty. • make sure metal rack (if used . • be sure food is the only appliance on 4 supports. If the oven interior light does not works: • the light bulb is completely defrosted before cooking. TROUBLESHOOTING...
... electrical circuit. If food cooks unevenly: • be sure food is evenly shaped. • be sure all directions (amount, time, & power levels) were correctly followed. • be sure microwave oven is on a separate circuit. • be sure oven wasn't operated when empty. • make sure metal rack (if used . • be sure food is the only appliance on 4 supports. If the oven interior light does not works: • the light bulb is completely defrosted before cooking. TROUBLESHOOTING...


