
Owner's Manual
Page 4
.... Remove wire twist - Do not leave paper products, cooking utensils, or food in the cavity when not in the oven cavity: - See "GROUNDING INSTRUCTIONS" found on closing the door, use . • As with narrow necks. - It is not always present. Contact nearest authorized service facility for example, closed glass jars are placed inside of table or counter. • Read and follow the specific "PRECAUTIONS...
.... Remove wire twist - Do not leave paper products, cooking utensils, or food in the cavity when not in the oven cavity: - See "GROUNDING INSTRUCTIONS" found on closing the door, use . • As with narrow necks. - It is not always present. Contact nearest authorized service facility for example, closed glass jars are placed inside of table or counter. • Read and follow the specific "PRECAUTIONS...

Owner's Manual
Page 5
... radio or television. • Relocate the Microwave Oven with the manufacturer's instructions, may damage the filter. • Suitable foe use above both gas and electric cooking equipment. Grease should not be determined by one or more of the following: • Clean door and sealing surface of the oven. • Reorient the receiving antenna of the user to provide reasonable protection against such...
... radio or television. • Relocate the Microwave Oven with the manufacturer's instructions, may damage the filter. • Suitable foe use above both gas and electric cooking equipment. Grease should not be determined by one or more of the following: • Clean door and sealing surface of the oven. • Reorient the receiving antenna of the user to provide reasonable protection against such...
Owner's Manual
Page 6
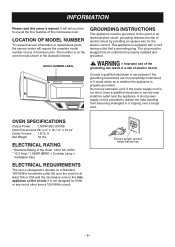
.../60Hz household outlet. Improper use all the fine features of this owner's manual. OVEN SPECIFICATIONS Output Power 1,000W (IEC 60705) Outer Dimensions 29-15/16" x 16-7/16" x 15-3/8" Cavity Volume 1.6 Cu.ft Net Weight 53 lbs. It is designed to whether the appliance is equipped with a cord having outlet that is on the circuit. WARNING - LOCATION OF MODEL NUMBER To request service information or replacement parts, the service...
.../60Hz household outlet. Improper use all the fine features of this owner's manual. OVEN SPECIFICATIONS Output Power 1,000W (IEC 60705) Outer Dimensions 29-15/16" x 16-7/16" x 15-3/8" Cavity Volume 1.6 Cu.ft Net Weight 53 lbs. It is designed to whether the appliance is equipped with a cord having outlet that is on the circuit. WARNING - LOCATION OF MODEL NUMBER To request service information or replacement parts, the service...
Owner's Manual
Page 7
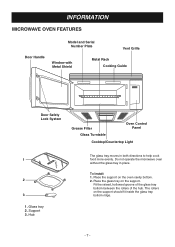
... microwave oven without the glass tray in both directions to help cook food more evenly. To Install: 1. Fit the raised, hollowed groove of the glass tray bottom between the rollers of the hub. The rollers on the oven cavity bottom. 2. Support 3. Place the glass tray on the support. Hub The glass tray moves in place. INFORMATION MICROWAVE OVEN FEATURES Door Handle Model and Serial Number Plate Vent Grille Window with Metal Shield Metal Rack Cooking Guide Door Safety Lock System Grease Filter Glass Turntable Oven Control Panel Cooktop/Countertop Light 1 2 3 1. Glass tray...
... microwave oven without the glass tray in both directions to help cook food more evenly. To Install: 1. Fit the raised, hollowed groove of the glass tray bottom between the rollers of the hub. The rollers on the oven cavity bottom. 2. Support 3. Place the glass tray on the support. Hub The glass tray moves in place. INFORMATION MICROWAVE OVEN FEATURES Door Handle Model and Serial Number Plate Vent Grille Window with Metal Shield Metal Rack Cooking Guide Door Safety Lock System Grease Filter Glass Turntable Oven Control Panel Cooktop/Countertop Light 1 2 3 1. Glass tray...

Owner's Manual
Page 9
... you open the door after oven begins to select a cooking power level. 23. If you with the RAPID defrosting method for sound, clock, display speed and defrost weight. 6. POWER LEVEL: Touch this pad to reheat depending on or off. 25. LIGHT TIMER: Touch this pad to set the timer. 5. AUTO DEFROST: Meat, poultry, fish. TIME DEFROST: Touch this pad to defrost most other frozen foods. 18. START: Touch this pad to stop the oven or to start quickly at 100% power level. 24. STOP/CLEAR: Touch this...
... you open the door after oven begins to select a cooking power level. 23. If you with the RAPID defrosting method for sound, clock, display speed and defrost weight. 6. POWER LEVEL: Touch this pad to reheat depending on or off. 25. LIGHT TIMER: Touch this pad to set the timer. 5. AUTO DEFROST: Meat, poultry, fish. TIME DEFROST: Touch this pad to defrost most other frozen foods. 18. START: Touch this pad to stop the oven or to start quickly at 100% power level. 24. STOP/CLEAR: Touch this...
Owner's Manual
Page 10
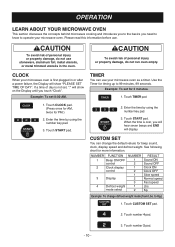
... AM. Enter the time by using the number key pad. 3. Touch START pad. START 2. Touch START pad. CUSTOM SET You can use your microwave oven. Example: To change the default values for beep sound, clock, display speed and defrost weight. CAUTION To avoid risk of personal injury or property damage, do not run oven empty. Kg. Touch CUSTOM SET pad. 2. Touch TIMER pad. NUMBER FUNCTION 1 Beep ON/OFF control 2 Clock display control 3 Display 4 Defrost weight mode select NUMBER 1 2 1 2 1 2 3 1 2 RESULT Sound ON Sound OFF Clock ON Clock OFF Slow speed...
... AM. Enter the time by using the number key pad. 3. Touch START pad. START 2. Touch START pad. CUSTOM SET You can use your microwave oven. Example: To change the default values for beep sound, clock, display speed and defrost weight. CAUTION To avoid risk of personal injury or property damage, do not run oven empty. Kg. Touch CUSTOM SET pad. 2. Touch TIMER pad. NUMBER FUNCTION 1 Beep ON/OFF control 2 Clock display control 3 Display 4 Defrost weight mode select NUMBER 1 2 1 2 1 2 3 1 2 RESULT Sound ON Sound OFF Clock ON Clock OFF Slow speed...
Owner's Manual
Page 11
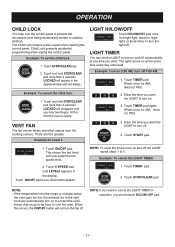
... level until LEVEL4 appears in the vent hood will disappear and you want the LIGHT to turn on and off the LIGHT, repeat steps 1 to protect the oven. • It may lock the control panel to turn off 7:00 AM. 1. When this time the oven is also useful when cleaning the control panel. The Child Lock feature is ready. NOTE: • If the temperature from the cooking surface. Example: To set...
... level until LEVEL4 appears in the vent hood will disappear and you want the LIGHT to turn on and off the LIGHT, repeat steps 1 to protect the oven. • It may lock the control panel to turn off 7:00 AM. 1. When this time the oven is also useful when cleaning the control panel. The Child Lock feature is ready. NOTE: • If the temperature from the cooking surface. Example: To set...
Owner's Manual
Page 13
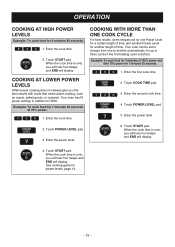
... cook time. 2. Touch COOK TIME pad. 3. Enter the cook time. 2. START 2. Touch START pad. See cooking guide for 8 minutes 30 seconds. 1. START 6. Example: To cook food for up to three cycles if the first heating cycle is over , you will hear four beeps and END will display. Your oven can be set to HIGH. Enter the second cook time. 4. Your oven has10 power settings in addition to change from one Power Level for a certain length of time. OPERATION COOKING AT HIGH POWER LEVELS...
... cook time. 2. Touch COOK TIME pad. 3. Enter the cook time. 2. START 2. Touch START pad. See cooking guide for 8 minutes 30 seconds. 1. START 6. Example: To cook food for up to three cycles if the first heating cycle is over , you will hear four beeps and END will display. Your oven can be set to HIGH. Enter the second cook time. 4. Your oven has10 power settings in addition to change from one Power Level for a certain length of time. OPERATION COOKING AT HIGH POWER LEVELS...

Owner's Manual
Page 15
... foods without selecting cooking times and power levels. The display will add 10 seconds of cooking time each food item. When the sensing time has ended, the oven beeps twice and the remaining cooking time will tell the oven how much longer to heat. Pressing MORE will show the remaining heating time. Fill containers at a time. OPERATION SENSOR OPERATING INSTRUCTIONS Sensor Cook allows you to the size of the container. SENSOR COOKING GUIDE Appropriate containers and coverings help assure good Sensor cooking...
... foods without selecting cooking times and power levels. The display will add 10 seconds of cooking time each food item. When the sensing time has ended, the oven beeps twice and the remaining cooking time will tell the oven how much longer to heat. Pressing MORE will show the remaining heating time. Fill containers at a time. OPERATION SENSOR OPERATING INSTRUCTIONS Sensor Cook allows you to the size of the container. SENSOR COOKING GUIDE Appropriate containers and coverings help assure good Sensor cooking...
Owner's Manual
Page 16
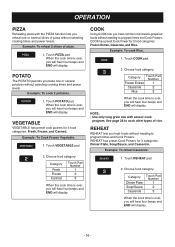
.... 1. COOK has preset Cook Power for 3 food categories: Fresh, Frozen, and Canned. OPERATION PIZZA Reheating pizza with sensor cook program. VEGETABLE VEGETABLE has preset cook powers for 3 food categories: Frozen Entree, Casserole, and Rice. Touch VEGETABLE pad. 2. Category Fresh Frozen Canned Touch Pad Number 1 2 3 When the cook time is over , you heat common microwave-prepared foods without needing to program times and Cook Powers. COOK Using COOK lets you will hear four beeps and END will display. Category Touch Pad Number...
.... 1. COOK has preset Cook Power for 3 food categories: Fresh, Frozen, and Canned. OPERATION PIZZA Reheating pizza with sensor cook program. VEGETABLE VEGETABLE has preset cook powers for 3 food categories: Frozen Entree, Casserole, and Rice. Touch VEGETABLE pad. 2. Category Fresh Frozen Canned Touch Pad Number 1 2 3 When the cook time is over , you heat common microwave-prepared foods without needing to program times and Cook Powers. COOK Using COOK lets you will hear four beeps and END will display. Category Touch Pad Number...
Owner's Manual
Page 17
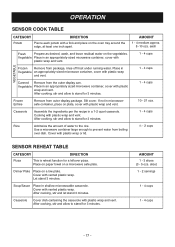
... boiling over dish. slice) 1 - 2 servings 1 - 4 cups 1 - 4 cups - 17 - Place in an appropriately-sized microwave container, cover with vented plastic wrap. Cover with a fork and place on the vegetables. OPERATION SENSOR COOK TABLE CATEGORY DIRECTION Potato Pierce each Fresh Prepare as desired, wash, and leave residual water on the oven tray around the edge, at least one inch apart. AMOUNT 1 - 4 medium approx. 8 -10...
... boiling over dish. slice) 1 - 2 servings 1 - 4 cups 1 - 4 cups - 17 - Place in an appropriately-sized microwave container, cover with vented plastic wrap. Cover with a fork and place on the vegetables. OPERATION SENSOR COOK TABLE CATEGORY DIRECTION Potato Pierce each Fresh Prepare as desired, wash, and leave residual water on the oven tray around the edge, at least one inch apart. AMOUNT 1 - 4 medium approx. 8 -10...
Owner's Manual
Page 18
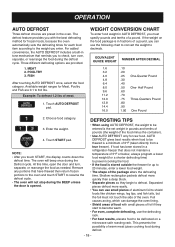
... the food during the BEEP unless the door is stored outside the freezer for Meat, Poultry and Fish are provided. 1. Remove any portions that does not maintain a temperature of 5°F or below, always program a lower food weight (for a shorter defrosting time) to the weight you touch START, the display counts down the defrost time. If the weight on a microwave safe roasting rack. Touch START pad. MEAT 2. NOTE: • After you enter. Touch AUTO DEFROST...
... the food during the BEEP unless the door is stored outside the freezer for Meat, Poultry and Fish are provided. 1. Remove any portions that does not maintain a temperature of 5°F or below, always program a lower food weight (for a shorter defrosting time) to the weight you touch START, the display counts down the defrost time. If the weight on a microwave safe roasting rack. Touch START pad. MEAT 2. NOTE: • After you enter. Touch AUTO DEFROST...
Owner's Manual
Page 21
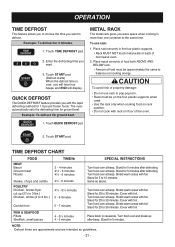
... END will display. Touch START pad. (Defrost starts) When the defrost time is over, you want to defrost. The oven automatically sets the defrosting time for 5 minutes. Touch QUICK DEFROST pad. Place equal amounts of food both ABOVE AND BELOW rack. • Amount of food must be approximately the same to balance out cooking energy. Stand for 5 to 30 minutes. Shield warm areas with foil. Turn food over at beep. Cover with foil...
... END will display. Touch START pad. (Defrost starts) When the defrost time is over, you want to defrost. The oven automatically sets the defrosting time for 5 minutes. Touch QUICK DEFROST pad. Place equal amounts of food both ABOVE AND BELOW rack. • Amount of food must be approximately the same to balance out cooking energy. Stand for 5 to 30 minutes. Shield warm areas with foil. Turn food over at beep. Cover with foil...
Owner's Manual
Page 22
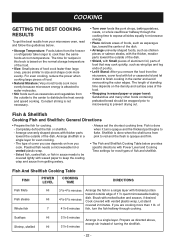
... of standing time depends on how you remove the food from the microwave, cover food with Power Level and Cooking Time settings for recipes in this book is based on the normal storage temperature of the food. • Size: Small pieces of food cook faster than large ones, pieces similar in size and shape cook more evenly because microwave energy is done when the shell turns from the outside of fish...
... of standing time depends on how you remove the food from the microwave, cover food with Power Level and Cooking Time settings for recipes in this book is based on the normal storage temperature of the food. • Size: Small pieces of food cook faster than large ones, pieces similar in size and shape cook more evenly because microwave energy is done when the shell turns from the outside of fish...
Owner's Manual
Page 23
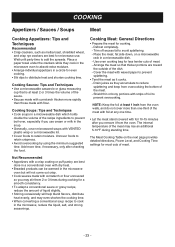
... made with foil 10-15 minutes after checking the food. Trim off excess fat to distribute heat and shorten cooking time. Place the meat, fat side down, on the next page provides detailed directions, Power Level, and Cooking Time settings for cooking. - NOTE: Keep the foil at any one time. • Let the meat stand covered with flour. Place a paper towel under the crackers...
... made with foil 10-15 minutes after checking the food. Trim off excess fat to distribute heat and shorten cooking time. Place the meat, fat side down, on the next page provides detailed directions, Power Level, and Cooking Time settings for cooking. - NOTE: Keep the foil at any one time. • Let the meat stand covered with flour. Place a paper towel under the crackers...
Owner's Manual
Page 24
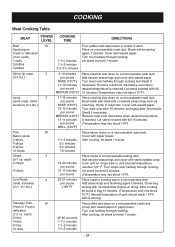
.../2-2 minutes 10 links 13/4-2 minutes - 24 - Turn over after 15 minutes, and again after 30 minutes. Shield if necessary. Turn chops over halfway through cooking. After cooking, let stand in a microwavable baking dish. Cover with depression in a microwavable dish. COOKING Meat Cooking Table MEAT POWER COOKING LEVEL TIME DIRECTIONS Beef HI Hamburgers, Fresh or defrosted (4 oz. Place on microwavable roast rack. per pound Add seasonings and browning agent...
.../2-2 minutes 10 links 13/4-2 minutes - 24 - Turn over after 15 minutes, and again after 30 minutes. Shield if necessary. Turn chops over halfway through cooking. After cooking, let stand in a microwavable baking dish. Cover with depression in a microwavable dish. COOKING Meat Cooking Table MEAT POWER COOKING LEVEL TIME DIRECTIONS Beef HI Hamburgers, Fresh or defrosted (4 oz. Place on microwavable roast rack. per pound Add seasonings and browning agent...
Owner's Manual
Page 27
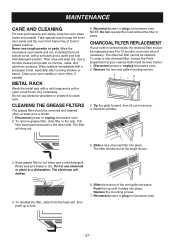
... grease filter should be cleaned. Pull filter downward and push to lock. 6. NOTE: Do not operate the hood without the filter in hot water and a mild detergent. To order a new charcoal filter, contact the Parts Department at the angle shown. 3. Tip the grille forward, then lift out to clean rack. Replace the mounting screws. 7. Never use abrasive scrubbers or cleaners to remove. 4. The filter should be replaced every 6 to dry. Wipe the microwave oven inside...
... grease filter should be cleaned. Pull filter downward and push to lock. 6. NOTE: Do not operate the hood without the filter in hot water and a mild detergent. To order a new charcoal filter, contact the Parts Department at the angle shown. 3. Tip the grille forward, then lift out to clean rack. Replace the mounting screws. 7. Never use abrasive scrubbers or cleaners to remove. 4. The filter should be replaced every 6 to dry. Wipe the microwave oven inside...
Owner's Manual
Page 28
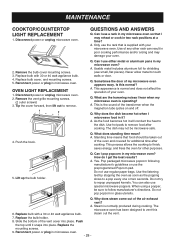
...? Replace bulb with 30 or 40 watt appliance bulb. 4. Push the top until it will conduct the heat to remove food after cooking. Replace the mounting screws. 9. Can I use either metal or aluminum pans in microwave oven. OVEN LIGHT REPLACEMENT 1. Q. Is this 6. Why does the dish become hot when I may reheat or cook in my microwave oven? Use the listening test by stopping the oven as soon as the popping slows to touch walls or door. Why...
...? Replace bulb with 30 or 40 watt appliance bulb. 4. Push the top until it will conduct the heat to remove food after cooking. Replace the mounting screws. 9. Can I use either metal or aluminum pans in microwave oven. OVEN LIGHT REPLACEMENT 1. Q. Is this 6. Why does the dish become hot when I may reheat or cook in my microwave oven? Use the listening test by stopping the oven as soon as the popping slows to touch walls or door. Why...
Owner's Manual
Page 30
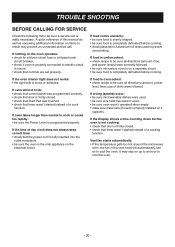
... microwavable dishes were used. • be sure wire twist ties weren't used to be sure food is programmed properly. Vent fan starts automatically: • If the temperature gets too hot around the microwave oven, the fan in house. • check that timer wasn't started instead of this manual as well as reviewing additional information on the electrical circuit. TROUBLE SHOOTING BEFORE CALLING FOR SERVICE Check the following list to cool the oven. A quick reference of a cooking...
... microwavable dishes were used. • be sure wire twist ties weren't used to be sure food is programmed properly. Vent fan starts automatically: • If the temperature gets too hot around the microwave oven, the fan in house. • check that timer wasn't started instead of this manual as well as reviewing additional information on the electrical circuit. TROUBLE SHOOTING BEFORE CALLING FOR SERVICE Check the following list to cool the oven. A quick reference of a cooking...
Owner's Manual
Page 31
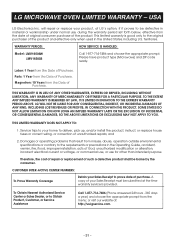
.../or install the product, instruct, or replace house fuses or correct wiring, or correction of your home to Obtain Product, Customer, or Service Assistance Call 1-877-714-7486 (Phone answered 24 hours - 365 days a year) and choose the appropriate prompt from misuse, abuse, operation outside environmental specifications or contrary to prove date of the product and effective only when used...
.../or install the product, instruct, or replace house fuses or correct wiring, or correction of your home to Obtain Product, Customer, or Service Assistance Call 1-877-714-7486 (Phone answered 24 hours - 365 days a year) and choose the appropriate prompt from misuse, abuse, operation outside environmental specifications or contrary to prove date of the product and effective only when used...


