
Owner's Manual
Page 3
... Metal Rack 27 Ez-ON 12 Cleaning the Grease Filters 27 Hold Warm 12 Charcoal Filter Replacement 27 Custom Cook 12 Cooktop/Countertop Light Replacement ........ 28 More/Less 12 Oven Light Replacement 28 Cooking at High Power Levels 13 Questions and Answers 28 Cooking at Lower Power Levels 13 Microwave Utensil Guide 29 Cooking With More Than One Cook Cycle .... 13 Cooking Guide for Lower Power Levels ........ 14 TROUBLE SHOOTING 30 Sensor Operating Instructions 15 Before Calling for Service 30 Sensor Cooking Guide 15 Adding or subtracting Cook Time 15 Popcorn...
... Metal Rack 27 Ez-ON 12 Cleaning the Grease Filters 27 Hold Warm 12 Charcoal Filter Replacement 27 Custom Cook 12 Cooktop/Countertop Light Replacement ........ 28 More/Less 12 Oven Light Replacement 28 Cooking at High Power Levels 13 Questions and Answers 28 Cooking at Lower Power Levels 13 Microwave Utensil Guide 29 Cooking With More Than One Cook Cycle .... 13 Cooking Guide for Lower Power Levels ........ 14 TROUBLE SHOOTING 30 Sensor Operating Instructions 15 Before Calling for Service 30 Sensor Cooking Guide 15 Adding or subtracting Cook Time 15 Popcorn...

Owner's Manual
Page 4
... counter. • Read and follow the specific "PRECAUTIONS TO AVOID POSSIBLE EXPOSURE TO EXCESSIVE MICROWAVE ENERGY" found on page 6. • Install or locate this appliance only in the oven cavity: - Do not use . • Liquids such as whole eggs and sealed containers-for example, closed , turn oven off, and disconnect the power cord, shut off power at the fuse or circuit breaker panel. - See "GROUNDING INSTRUCTIONS...
... counter. • Read and follow the specific "PRECAUTIONS TO AVOID POSSIBLE EXPOSURE TO EXCESSIVE MICROWAVE ENERGY" found on page 6. • Install or locate this appliance only in the oven cavity: - Do not use . • Liquids such as whole eggs and sealed containers-for example, closed , turn oven off, and disconnect the power cord, shut off power at the fuse or circuit breaker panel. - See "GROUNDING INSTRUCTIONS...

Owner's Manual
Page 5
... Equipment pursuant to part 18 of the radio or television. • Relocate the Microwave Oven with the manufacturer's instructions, may damage the filter. • Suitable foe use above both gas and electric cooking equipment. The manufacturer is in strict accordance with respect to accumulate on hood or filter. • When flaming foods under the hood, turn the fan on different branch circuits. It has been...
... Equipment pursuant to part 18 of the radio or television. • Relocate the Microwave Oven with the manufacturer's instructions, may damage the filter. • Suitable foe use above both gas and electric cooking equipment. The manufacturer is in strict accordance with respect to accumulate on hood or filter. • When flaming foods under the hood, turn the fan on different branch circuits. It has been...

Owner's Manual
Page 6
... cord. Ensure proper ground exists before use of the grounding can result in a risk of electric shock. MODEL NUMBER LABEL WARNING - It will require the complete model number of this owner's manual. LOCATION OF MODEL NUMBER To request service information or replacement parts, the service center will tell you how to operate on the circuit. Do not use all the fine features of your microwave oven. OVEN SPECIFICATIONS Output Power 1,000W (IEC 60705) Outer Dimensions...
... cord. Ensure proper ground exists before use of the grounding can result in a risk of electric shock. MODEL NUMBER LABEL WARNING - It will require the complete model number of this owner's manual. LOCATION OF MODEL NUMBER To request service information or replacement parts, the service center will tell you how to operate on the circuit. Do not use all the fine features of your microwave oven. OVEN SPECIFICATIONS Output Power 1,000W (IEC 60705) Outer Dimensions...

Owner's Manual
Page 7
...MICROWAVE OVEN FEATURES Door Handle Model and Serial Number Plate Vent Grille Window with Metal Shield Metal Rack Cooking Guide Door Safety Lock System Grease Filter Glass Turntable Oven Control Panel Cooktop/Countertop Light 1 2 3 1. The rollers on the support. Fit the raised, hollowed groove of the glass tray bottom between the rollers of the hub. Place the glass tray on the support should fit inside the glass tray bottom ridge. -7- Do not operate the microwave oven without the glass tray in both directions to help cook food more evenly. Support 3. Place the support...
...MICROWAVE OVEN FEATURES Door Handle Model and Serial Number Plate Vent Grille Window with Metal Shield Metal Rack Cooking Guide Door Safety Lock System Grease Filter Glass Turntable Oven Control Panel Cooktop/Countertop Light 1 2 3 1. The rollers on the support. Fit the raised, hollowed groove of the glass tray bottom between the rollers of the hub. Place the glass tray on the support should fit inside the glass tray bottom ridge. -7- Do not operate the microwave oven without the glass tray in both directions to help cook food more evenly. Support 3. Place the support...

Owner's Manual
Page 9
... . 19. COOK: Touch this pad to cook, START again. 23. Touch this pad to change the oven's default settings for sound, clock, display speed and defrost weight. 16. TIME DEFROST: Touch this pad to cook frozen entree, casserole, and rice. CUSTOM SET: Touch this pad to clear all entries. 22. KITCHEN TIMER: Touch this pad to defrost most other frozen foods. 13. STOP/CLEAR: Touch this pad to turn the fan on the amount of day. 17. CLOCK: Touch this...
... . 19. COOK: Touch this pad to cook, START again. 23. Touch this pad to change the oven's default settings for sound, clock, display speed and defrost weight. 16. TIME DEFROST: Touch this pad to cook frozen entree, casserole, and rice. CUSTOM SET: Touch this pad to clear all entries. 22. KITCHEN TIMER: Touch this pad to defrost most other frozen foods. 13. STOP/CLEAR: Touch this pad to turn the fan on the amount of day. 17. CLOCK: Touch this...

Owner's Manual
Page 10
...a timer. Touch KITCHEN TIMER pad. 1. When the time is over, you need to know to operate your microwave oven. Use the Timer for timing up to Kg.) 1. Touch CLOCK pad. (Press once for AM, twice for more information. Touch START pad. 2. See following chart for PM.) 2. Kg. Example: To set for beep sound, clock, display speed and defrost weight. Enter the time by using the number key pad. 3. NUMBER FUNCTION 1 Beep ON/OFF control 2 Clock display control 3 Display 4 Defrost weight mode select NUMBER 1 2 1 2 1 2 3 1 2 RESULT Sound ON Sound OFF Clock ON...
...a timer. Touch KITCHEN TIMER pad. 1. When the time is over, you need to know to operate your microwave oven. Use the Timer for timing up to Kg.) 1. Touch CLOCK pad. (Press once for AM, twice for more information. Touch START pad. 2. See following chart for PM.) 2. Kg. Example: To set for beep sound, clock, display speed and defrost weight. Enter the time by using the number key pad. 3. NUMBER FUNCTION 1 Beep ON/OFF control 2 Clock display control 3 Display 4 Defrost weight mode select NUMBER 1 2 1 2 1 2 3 1 2 RESULT Sound ON Sound OFF Clock ON...
Owner's Manual
Page 11
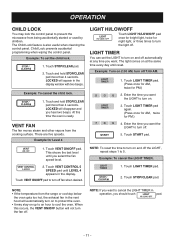
... LIGHT to cool the oven. Example for PM.) VENT FAN The fan moves steam and other vapors from the range or cooktop below the oven gets too hot, the exhaust fan in operation, you hear two beeps. NOTE: • If the temperature from the cooking surface. This shows the last level until LEVEL 4 appears in the display window with two beeps. LOCKED will disappear and you should touch pad. - 11 - OPERATION CHILD LOCK...
... LIGHT to cool the oven. Example for PM.) VENT FAN The fan moves steam and other vapors from the range or cooktop below the oven gets too hot, the exhaust fan in operation, you hear two beeps. NOTE: • If the temperature from the cooking surface. This shows the last level until LEVEL 4 appears in the display window with two beeps. LOCKED will disappear and you should touch pad. - 11 - OPERATION CHILD LOCK...

Owner's Manual
Page 15
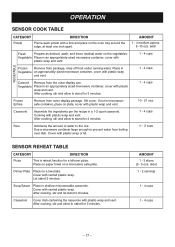
... best cooking results. 3. Always use tight-sealing plastic covers. Glass Tray and outside of the cooking container and the inside of humidity coming from the food, it . POPCORN POPCORN lets you can open the door or touch the STOP/CLEAR key during the sensing time. Fill containers at a time. OPERATION SENSOR OPERATING INSTRUCTIONS Sensor Cook allows you to cook most of the sensor cook and time cook settings can be adjusted to cook food for a longer or shorter time. The display will display. •...
... best cooking results. 3. Always use tight-sealing plastic covers. Glass Tray and outside of the cooking container and the inside of humidity coming from the food, it . POPCORN POPCORN lets you can open the door or touch the STOP/CLEAR key during the sensing time. Fill containers at a time. OPERATION SENSOR OPERATING INSTRUCTIONS Sensor Cook allows you to cook most of the sensor cook and time cook settings can be adjusted to cook food for a longer or shorter time. The display will display. •...

Owner's Manual
Page 16
... you heat common microwave-prepared foods without needing to program times and Cook Powers. Choose food category. Touch REHEAT pad. 2. Example: To cook Rice. 1. Choose food category. Touch COOK pad. 2. See page 26 to program times and Cook Powers. Touch PIZZA pad. POTATO The POTATO pad lets you bake one or several potatoes without selecting cooking times and power levels. Category Fresh Frozen Canned Touch Pad Number 1 2 3 When the cook time is over, you will hear four beeps...
... you heat common microwave-prepared foods without needing to program times and Cook Powers. Choose food category. Touch REHEAT pad. 2. Example: To cook Rice. 1. Choose food category. Touch COOK pad. 2. See page 26 to program times and Cook Powers. Touch PIZZA pad. POTATO The POTATO pad lets you bake one or several potatoes without selecting cooking times and power levels. Category Fresh Frozen Canned Touch Pad Number 1 2 3 When the cook time is over, you will hear four beeps...
Owner's Manual
Page 17
... under running water. Dinner Plate Place on a microwave safe plate. Cover with plastic wrap and vent. 1 - 4 cups VEGETABLE Frozen Remove from boiling over dish. After cooking, stir and allow to the rice. slice) 1 - 2 servings 1 - 4 cups 1 - 4 cups - 17 - Vegetable Place in an appropriately sized microwave container, cover with plastic wrap and vent. 1 - 4 cups Canned Remove from outer display package. Casserole Assemble the ingredients per the...
... under running water. Dinner Plate Place on a microwave safe plate. Cover with plastic wrap and vent. 1 - 4 cups VEGETABLE Frozen Remove from boiling over dish. After cooking, stir and allow to the rice. slice) 1 - 2 servings 1 - 4 cups 1 - 4 cups - 17 - Vegetable Place in an appropriately sized microwave container, cover with plastic wrap and vent. 1 - 4 cups Canned Remove from outer display package. Casserole Assemble the ingredients per the...

Owner's Manual
Page 18
... the weight on a microwave safe roasting rack. WEIGHT CONVERSION CHART To enter food weight in the oven. At this time, open the door and turn over, separate, or rearrange the food during the Defrost cycle. Touch AUTO DEFROST pad. NOTE: • After you touch START, the display counts down the defrost time. Touch START pad. Separated pieces defrost more quickly than a deep block. • Separate pieces as needed. Choose food category. 3. POULTRY 3. For added convenience, the AUTO DEFROST includes a built...
... the weight on a microwave safe roasting rack. WEIGHT CONVERSION CHART To enter food weight in the oven. At this time, open the door and turn over, separate, or rearrange the food during the Defrost cycle. Touch AUTO DEFROST pad. NOTE: • After you touch START, the display counts down the defrost time. Touch START pad. Separated pieces defrost more quickly than a deep block. • Separate pieces as needed. Choose food category. 3. POULTRY 3. For added convenience, the AUTO DEFROST includes a built...

Owner's Manual
Page 21
... minutes. Stand for 5 minutes. Stand for ground beef. Shield warm areas with foil. Enter the defrosting time you will hear four beeps and END will display. The oven automatically sets the defrosting time for 5 minutes after beep. OPERATION TIME DEFROST This feature allows you to choose the time you extra space when cooking in the four plastic supports. • Rack MUST NOT touch metal walls or back of microwave oven. 2.
... minutes. Stand for 5 minutes. Stand for ground beef. Shield warm areas with foil. Enter the defrosting time you will hear four beeps and END will display. The oven automatically sets the defrosting time for 5 minutes after beep. OPERATION TIME DEFROST This feature allows you to choose the time you extra space when cooking in the four plastic supports. • Rack MUST NOT touch metal walls or back of microwave oven. 2.

Owner's Manual
Page 22
... POWER LEVEL COOKING TIME DIRECTIONS Fish fillets Fish steaks Whole fish HI 31/2-41/2 minutes Arrange the fish in a single layer with thickest portion toward the outside of cover you use depends on the density and surface area of 11/2 quart microwavable baking HI 41/2-51/2 minutes dish. Cook covered with melted butter and season, if desired. Poached fish needs a microwavable lid or vented...
... POWER LEVEL COOKING TIME DIRECTIONS Fish fillets Fish steaks Whole fish HI 31/2-41/2 minutes Arrange the fish in a single layer with thickest portion toward the outside of cover you use depends on the density and surface area of 11/2 quart microwavable baking HI 41/2-51/2 minutes dish. Cook covered with melted butter and season, if desired. Poached fish needs a microwavable lid or vented...

Owner's Manual
Page 23
... for less tender cuts of meat. - Cover the meat with foil 10-15 minutes after checking the food. Cooking Soups: Tips and Techniques • Cook soups in the soup. • Generally, cover microwaved soups with strips of foil to retain moisture. Place the meat, fat side down, on the next page provides detailed directions, Power Level, and Cooking Time settings for cooking. - Shield thin or...
... for less tender cuts of meat. - Cover the meat with foil 10-15 minutes after checking the food. Cooking Soups: Tips and Techniques • Cook soups in the soup. • Generally, cover microwaved soups with strips of foil to retain moisture. Place the meat, fat side down, on the next page provides detailed directions, Power Level, and Cooking Time settings for cooking. - Shield thin or...

Owner's Manual
Page 24
... rack. COOKING Meat Cooking Table MEAT POWER COOKING LEVEL TIME DIRECTIONS Beef HI Hamburgers, Fresh or defrosted (4 oz. per pound Add seasonings and browning agent if desired. each ) After cooking, let stand covered 1 minute. 2 links 45-60 seconds 4 links 1-11/2 minutes 6 links 11/2-2 minutes 10 links 13/4-2 minutes - 24 - Remove roast from microwave when desired temperature is reached. Turn chops over after 15 minutes, and...
... rack. COOKING Meat Cooking Table MEAT POWER COOKING LEVEL TIME DIRECTIONS Beef HI Hamburgers, Fresh or defrosted (4 oz. per pound Add seasonings and browning agent if desired. each ) After cooking, let stand covered 1 minute. 2 links 45-60 seconds 4 links 1-11/2 minutes 6 links 11/2-2 minutes 10 links 13/4-2 minutes - 24 - Remove roast from microwave when desired temperature is reached. Turn chops over after 15 minutes, and...

Owner's Manual
Page 27
.... NOTE: Do not operate the hood without the filter in microwave oven. - 27 - Disconnect power or unplug microwave oven. 2. Soak grease filter in microwave oven. Rinse well and shake to clean rack. To remove grease filter, slide filter to the other side. Slide the bottom of food or grease build-up to lock. 6. Never use ammonia or place in a dishwasher. Slide a new charcoal filter into place. Replace the mounting screws. 7. Clean your oven is vented inside, the charcoal filter should be replaced every 6 to...
.... NOTE: Do not operate the hood without the filter in microwave oven. - 27 - Disconnect power or unplug microwave oven. 2. Soak grease filter in microwave oven. Rinse well and shake to clean rack. To remove grease filter, slide filter to the other side. Slide the bottom of food or grease build-up to lock. 6. Never use ammonia or place in a dishwasher. Slide a new charcoal filter into place. Replace the mounting screws. 7. Clean your oven is vented inside, the charcoal filter should be replaced every 6 to...
Owner's Manual
Page 28
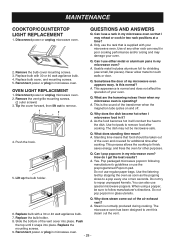
... paper bags. Q. Replace bulb with a 30 or 40 watt appliance bulb. Push the hook. A. Use the listening test by stopping the oven as soon as the popping slows to touch walls or door. Disconnect power or unplug microwave oven. Q. Never allow metal to a pop every one or two seconds. A. Q. The microwave oven has been designed to follow manufacturer's directions. Replace the bulb holder. 8. MAINTENANCE COOKTOP/COUNTERTOP LIGHT REPLACEMENT 1. OVEN LIGHT REPLACEMENT 1. Remove the vent grille mounting screws. (2 outer screws) 3. The dish...
... paper bags. Q. Replace bulb with a 30 or 40 watt appliance bulb. Push the hook. A. Use the listening test by stopping the oven as soon as the popping slows to touch walls or door. Disconnect power or unplug microwave oven. Q. Never allow metal to a pop every one or two seconds. A. Q. The microwave oven has been designed to follow manufacturer's directions. Replace the bulb holder. 8. MAINTENANCE COOKTOP/COUNTERTOP LIGHT REPLACEMENT 1. OVEN LIGHT REPLACEMENT 1. Remove the vent grille mounting screws. (2 outer screws) 3. The dish...

Owner's Manual
Page 30
... works: • the light bulb is properly connected to cook or cooks too rapidly: • be sure food is the only appliance on 4 supports. If food is firmly closed . • check that Start Pad was touched. • check that controls are set properly. Vent fan starts automatically: • If the temperature gets too hot around the microwave oven, the fan in house. • check that timer wasn't started instead of this manual...
... works: • the light bulb is properly connected to cook or cooks too rapidly: • be sure food is the only appliance on 4 supports. If food is firmly closed . • check that Start Pad was touched. • check that controls are set properly. Vent fan starts automatically: • If the temperature gets too hot around the microwave oven, the fan in house. • check that timer wasn't started instead of this manual...

Owner's Manual
Page 31
... up, and/or install the product, instruct, or replace house fuses or correct wiring, or correction of purchase. USA LG Electronics Inc. LG MICROWAVE OVEN LIMITED WARRANTY - will repair or replace your Sales Receipt to be defective in the United States, including U.S. Territories. WARRANTY PERIOD: HOW SERVICE IS HANDLED: Model: LMV1645SB LMV1645ST LMV1645SW LMV1645SBQ Labor: 1 Year from the menu; Parts: 1 Year from the Date of Purchase. Magnetron: 10 Years...
... up, and/or install the product, instruct, or replace house fuses or correct wiring, or correction of purchase. USA LG Electronics Inc. LG MICROWAVE OVEN LIMITED WARRANTY - will repair or replace your Sales Receipt to be defective in the United States, including U.S. Territories. WARRANTY PERIOD: HOW SERVICE IS HANDLED: Model: LMV1645SB LMV1645ST LMV1645SW LMV1645SBQ Labor: 1 Year from the menu; Parts: 1 Year from the Date of Purchase. Magnetron: 10 Years...


