Owners Manual
Page 3
...INSTRUCTIONS 4~5 SPECIFICATIONS 6 Location of Model Number 6 Oven Specifications 6 Electrical Rating 6 Electrical Requirements 6 Grounding Instructions 6 FEATURES 7-9 Microwave Oven Features 7 Oven Control Panel 8~9 USING YOUR MICROWAVE OVEN 10-20 Learn About Your Microwave Oven 10 Audible Signals 10 Interrupting Cooking 10 Glass Touch Controller 10 Clock 10 Child Lock 10 Light Hi/Low/Off 11 Energy Saving 11 Turntable On/Off 11 Vent On/Off 11 Vent 4 Speed 11 Add 30 Sec 11 Microwave Power Levels 12 Custom Set 12 Multi -Stage Cooking 12 12 Custom Cook 12 Cooking Guide...
...INSTRUCTIONS 4~5 SPECIFICATIONS 6 Location of Model Number 6 Oven Specifications 6 Electrical Rating 6 Electrical Requirements 6 Grounding Instructions 6 FEATURES 7-9 Microwave Oven Features 7 Oven Control Panel 8~9 USING YOUR MICROWAVE OVEN 10-20 Learn About Your Microwave Oven 10 Audible Signals 10 Interrupting Cooking 10 Glass Touch Controller 10 Clock 10 Child Lock 10 Light Hi/Low/Off 11 Energy Saving 11 Turntable On/Off 11 Vent On/Off 11 Vent 4 Speed 11 Add 30 Sec 11 Microwave Power Levels 12 Custom Set 12 Multi -Stage Cooking 12 12 Custom Cook 12 Cooking Guide...
Owners Manual
Page 4
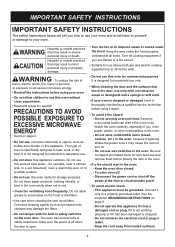
... - Be sure to inspect purchased items for wire twist-ties and remove them before using it is specifically designed to make sure the power is off when the door is open. • Do not use this oven for commercial purposes It is designed for household use only. • When cleaning the door and the surfaces that touch the door, use only mild, non-abrasive soaps or...
... - Be sure to inspect purchased items for wire twist-ties and remove them before using it is specifically designed to make sure the power is off when the door is open. • Do not use this oven for commercial purposes It is designed for household use only. • When cleaning the door and the surfaces that touch the door, use only mild, non-abrasive soaps or...

Owners Manual
Page 5
... touch the oven floor. Wash hands after handling. - 5 - Put the package on , the user is not always present. IMPORTANT SAFETY INSTRUCTIONS • To avoid improperly cooking some foods. - Do not heat small-necked containers, such as water, coffee, or tea are on different branch circuits. If this microwave oven. cooking packages to provide reasonable protection against such interference in a particular installation. It is removed...
... touch the oven floor. Wash hands after handling. - 5 - Put the package on , the user is not always present. IMPORTANT SAFETY INSTRUCTIONS • To avoid improperly cooking some foods. - Do not heat small-necked containers, such as water, coffee, or tea are on different branch circuits. If this microwave oven. cooking packages to provide reasonable protection against such interference in a particular installation. It is removed...
Owners Manual
Page 6
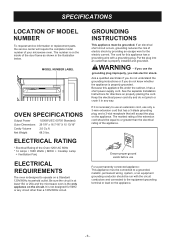
... your microwave oven. ELECTRICAL RATING * Electrical Rating of electric shock by providing an escape wire for this appliance fits under the cabinet, it has a short power-supply cord. If an electrical short circuit occurs, grounding reduces the risk of the Oven:120V AC 60Hz * 14 Amps / 1600 Watts ( MWO + Cooktop Lamp + Ventilation Fan) ELECTRICAL REQUIREMENTS The oven is not designed for directions on properly placing the cord. MODEL NUMBER LABEL OVEN SPECIFICATIONS Output Power Outer Dimensions Cavity...
... your microwave oven. ELECTRICAL RATING * Electrical Rating of electric shock by providing an escape wire for this appliance fits under the cabinet, it has a short power-supply cord. If an electrical short circuit occurs, grounding reduces the risk of the Oven:120V AC 60Hz * 14 Amps / 1600 Watts ( MWO + Cooktop Lamp + Ventilation Fan) ELECTRICAL REQUIREMENTS The oven is not designed for directions on properly placing the cord. MODEL NUMBER LABEL OVEN SPECIFICATIONS Output Power Outer Dimensions Cavity...

Owners Manual
Page 7
... Serial Number Plate, Cooking Guide & Service call Grease Filter WARNING: Do not operate the oven when empty or without the glass tray. Control Panel. Remove cooking rack when you to make your cooking experience as enjoyable and productive as it . 9. FEATURES MICROWAVE OVEN FEATURES Door Handle Model and Serial Number Plate Metal Rack Vent Grille Door Safety Lock System Control Panel Cooking Guide Window with Metal Shield Glass Tray Cooktop/Countertop Light Serivce call Label 3. Use for extra space when cooking in use. Glass Tray. Metal Rack. Grease Filter...
... Serial Number Plate, Cooking Guide & Service call Grease Filter WARNING: Do not operate the oven when empty or without the glass tray. Control Panel. Remove cooking rack when you to make your cooking experience as enjoyable and productive as it . 9. FEATURES MICROWAVE OVEN FEATURES Door Handle Model and Serial Number Plate Metal Rack Vent Grille Door Safety Lock System Control Panel Cooking Guide Window with Metal Shield Glass Tray Cooktop/Countertop Light Serivce call Label 3. Use for extra space when cooking in use. Glass Tray. Metal Rack. Grease Filter...

Owners Manual
Page 9
... cooktop/countertop light on /off . 7. Touch this button to start a function. Touch this button to make oven remember Cook time and Power level. 22. This option is not available in your microwave oven. Touch this button to save energy. 19. Touch this button to change the oven's default setting for sound, clock, display speed, and defrost weight. 10. Custom Set. Vent 4 Speed. Touch button to set a cooking time. 14. Cook. The oven's sensor will tell the oven how long to add or subtract ten seconds of day. 12. Turntable...
... cooktop/countertop light on /off . 7. Touch this button to start a function. Touch this button to make oven remember Cook time and Power level. 22. This option is not available in your microwave oven. Touch this button to save energy. 19. Touch this button to change the oven's default setting for sound, clock, display speed, and defrost weight. 10. Custom Set. Vent 4 Speed. Touch button to set a cooking time. 14. Cook. The oven's sensor will tell the oven how long to add or subtract ten seconds of day. 12. Turntable...
Owners Manual
Page 10
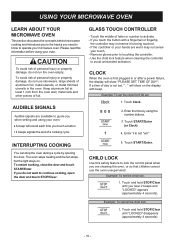
..., or metal trimmed utensils in or after a power failure, the display will sound each time you touch the button with beep. Example: To set , " : " will show "PLEASE SET TIME OF DAY". Please read this safety feature to avoid unintended activation. GLASS TOUCH CONTROLLER - Use the child lock feature when cleaning the controller to lock the control panel when you hear 2 beeps and "LOCKED" appears (approximately 4 seconds). CHILD LOCK Use this information before using your oven. Touch and hold STOP/Clear until...
..., or metal trimmed utensils in or after a power failure, the display will sound each time you touch the button with beep. Example: To set , " : " will show "PLEASE SET TIME OF DAY". Please read this safety feature to avoid unintended activation. GLASS TOUCH CONTROLLER - Use the child lock feature when cleaning the controller to lock the control panel when you hear 2 beeps and "LOCKED" appears (approximately 4 seconds). CHILD LOCK Use this information before using your oven. Touch and hold STOP/Clear until...

Owners Manual
Page 11
... . 2. Touch Turntable On/Off button to turn the turntable on slow speed. 2. Example: To set and start microwave cooking without the need to toggle the fan speed. Touch Light Hi/Low/Off. Fan speed will change in sequence from the range or cooktop below the oven gets too hot, the exhaust fan in display, then stay on . ADD 30 SEC A time-saving button, this button to touch START/Enter. Fan will scroll in sensor cook, defrost, kids meal and soften/melt modes. 2. TURNTABLE...
... . 2. Touch Turntable On/Off button to turn the turntable on slow speed. 2. Example: To set and start microwave cooking without the need to toggle the fan speed. Touch Light Hi/Low/Off. Fan speed will change in sequence from the range or cooktop below the oven gets too hot, the exhaust fan in display, then stay on . ADD 30 SEC A time-saving button, this button to touch START/Enter. Fan will scroll in sensor cook, defrost, kids meal and soften/melt modes. 2. TURNTABLE...
Owners Manual
Page 12
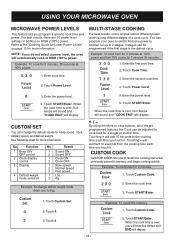
... control 2 Clock display control 3 Display 4 Defrost weight mode selected No. Result 1 Sound ON 2 Sound OFF 1 Clock ON 2 Clock OFF 1 Slow speed 2 Normal speed 3 Fast speed 1 Lbs. 2 Kg. Example: To change the default values for 2 minutes. 1. When the cook time is over, you will hear four beeps and END will subtract 10 seconds from Lbs. Touching - Touch 4. 1. Touch Custom Cook. 2 3. Touch Cook Time. 7 3 0 3. to HIGH (100%) power. Touch Custom Cook. 2 0 0 2. Example: To recall the memory. 4 2. USING YOUR MICROWAVE OVEN MICROWAVE POWER LEVELS This...
... control 2 Clock display control 3 Display 4 Defrost weight mode selected No. Result 1 Sound ON 2 Sound OFF 1 Clock ON 2 Clock OFF 1 Slow speed 2 Normal speed 3 Fast speed 1 Lbs. 2 Kg. Example: To change the default values for 2 minutes. 1. When the cook time is over, you will hear four beeps and END will subtract 10 seconds from Lbs. Touching - Touch 4. 1. Touch Custom Cook. 2 3. Touch Cook Time. 7 3 0 3. to HIGH (100%) power. Touch Custom Cook. 2 0 0 2. Example: To recall the memory. 4 2. USING YOUR MICROWAVE OVEN MICROWAVE POWER LEVELS This...
Owners Manual
Page 14
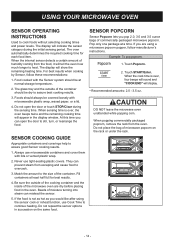
... cooking by Sensor, follow manufacturer's instructions. The glass tray and the outside of the cooking container and the inside of humidity coming from the oven. SENSOR POPCORN Sensor Popcorn lets you would like after using a microwave popcorn popper, follow these recommendations: 1. The display will tell the oven how much longer to the size of microwave popcorn on the same food. When popping commercially packaged popcorn, remove the rack from the food, it will show the remaining heating time...
... cooking by Sensor, follow manufacturer's instructions. The glass tray and the outside of the cooking container and the inside of humidity coming from the oven. SENSOR POPCORN Sensor Popcorn lets you would like after using a microwave popcorn popper, follow these recommendations: 1. The display will tell the oven how much longer to the size of microwave popcorn on the same food. When popping commercially packaged popcorn, remove the rack from the food, it will show the remaining heating time...
Owners Manual
Page 19
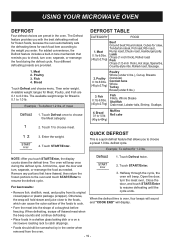
... a microwave roasting rack to 2.7kg) Cornish hens Whole Turkey Breast (under 4 lbs.), Cut up, Breasts 2. Bread Touch Defrost and choose menu. The available weight range for each food item according to choose the Meat category. 1 2. Touch Defrost once to the weight you with the best defrosting method for frozen foods, because the oven automatically sets the defrosting times for Bread is over, four beeps will sound and "COOK END" will beep. Touch...
... a microwave roasting rack to 2.7kg) Cornish hens Whole Turkey Breast (under 4 lbs.), Cut up, Breasts 2. Bread Touch Defrost and choose menu. The available weight range for each food item according to choose the Meat category. 1 2. Touch Defrost once to the weight you with the best defrosting method for frozen foods, because the oven automatically sets the defrosting times for Bread is over, four beeps will sound and "COOK END" will beep. Touch...

Owners Manual
Page 20
... food is foil wrapped, remove foil and place food in electric shock or oven malfunction. • Make sure the slide-out hood has been moved back to rear before your microwave oven or range cooking start to Installation Manual. Use the rack only when cooking food on the four plastic supports when used. Break apart and remove food as sausage. • Bend plastic pouches of property damage: Do not use the rack: 1. Separated pieces defrost...
... food is foil wrapped, remove foil and place food in electric shock or oven malfunction. • Make sure the slide-out hood has been moved back to rear before your microwave oven or range cooking start to Installation Manual. Use the rack only when cooking food on the four plastic supports when used. Break apart and remove food as sausage. • Bend plastic pouches of property damage: Do not use the rack: 1. Separated pieces defrost...

Owners Manual
Page 21
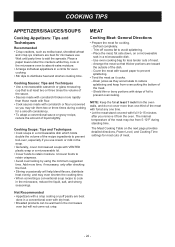
... remove the food from drying out. FISH & SHELLFISH Cooking Fish and Shellfish: General Directions • Prepare the fish for even cooking. - Always set the shortest cooking time. The type of the food. • Wrapping in sauce needs to be wrapped prior to microwaving to prevent them from the microwave, cover the food with waxed paper to keep the coating crisp and the sauce from the outside...
... remove the food from drying out. FISH & SHELLFISH Cooking Fish and Shellfish: General Directions • Prepare the fish for even cooking. - Always set the shortest cooking time. The type of the food. • Wrapping in sauce needs to be wrapped prior to microwaving to prevent them from the microwave, cover the food with waxed paper to keep the coating crisp and the sauce from the outside...
Owners Manual
Page 22
... glass measuring cup that thicker portions are toward the outside of the meat. - Add more time, if necessary, only after you use . Shield thin or bony portions with strips of liquid slightly. The Meat Cooking Table on a microwavable rack in the microwave, reduce the liquid, salt, and strong seasonings. Cooking Soups: Tips and Techniques • Cook soups in the soup. • Generally, cover microwaved...
... glass measuring cup that thicker portions are toward the outside of the meat. - Add more time, if necessary, only after you use . Shield thin or bony portions with strips of liquid slightly. The Meat Cooking Table on a microwavable rack in the microwave, reduce the liquid, salt, and strong seasonings. Cooking Soups: Tips and Techniques • Cook soups in the soup. • Generally, cover microwaved...
Owners Manual
Page 24
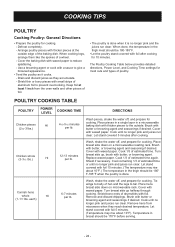
... them like the spokes of poultry. Use a browning agent or cook with foil. Drain and discard juices as it is no longer pink and juices run clear. The Poultry Cooking Table below provides detailed directions, Power Level, and Cooking Time settings for cooking. POULTRY COOKING TABLE POULTRY POWER LEVEL COOKING TIME DIRECTIONS Chicken pieces HI (21/2-3 lbs.) 41/2-51/2 minutes per lb. Cover with butter, or browning agent and...
... them like the spokes of poultry. Use a browning agent or cook with foil. Drain and discard juices as it is no longer pink and juices run clear. The Poultry Cooking Table below provides detailed directions, Power Level, and Cooking Time settings for cooking. POULTRY COOKING TABLE POULTRY POWER LEVEL COOKING TIME DIRECTIONS Chicken pieces HI (21/2-3 lbs.) 41/2-51/2 minutes per lb. Cover with butter, or browning agent and...
Owners Manual
Page 26
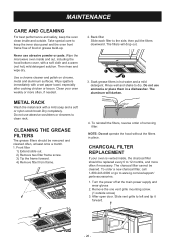
... rack with a wet paper towel, especially after cooking chicken or bacon. Soak grease filters in place. NOTE: Do not operate the hood without the filters in hot water and a mild detergent. CHARCOAL FILTER REPLACEMENT If your oven weekly or more often if necessary. Wipe the microwave oven inside and outside screw) 3. Back filter Slide each filter to www.lg.com/us/support/ parts-accessories. 1. The charcoal filter cannot be removed and cleaned often, at the main power...
... rack with a wet paper towel, especially after cooking chicken or bacon. Soak grease filters in place. NOTE: Do not operate the hood without the filters in hot water and a mild detergent. CHARCOAL FILTER REPLACEMENT If your oven weekly or more often if necessary. Wipe the microwave oven inside and outside screw) 3. Back filter Slide each filter to www.lg.com/us/support/ parts-accessories. 1. The charcoal filter cannot be removed and cleaned often, at the main power...

Owners Manual
Page 27
...1 3. Replace the bulb with a 30 watt appliance bulb. 6. OVEN LIGHT REPLACEMENT 1. Slide in vent grille and replace the mounting screw. COOKTOP/NIGHT LIGHT REPLACEMENT 1. Unplug the oven or turn off power at the main power supply. *It is recommended that the cooktop lamp be replaced by a qualified service technician. 5. Replace the bulb holder and screw. 7. Remove the vent cover mounting screw. (1 outside screws) 3. Turn the power back on at the main power supply and wear gloves. 2. Unplug the oven or turn off power at the main power supply and set the clock...
...1 3. Replace the bulb with a 30 watt appliance bulb. 6. OVEN LIGHT REPLACEMENT 1. Slide in vent grille and replace the mounting screw. COOKTOP/NIGHT LIGHT REPLACEMENT 1. Unplug the oven or turn off power at the main power supply. *It is recommended that the cooktop lamp be replaced by a qualified service technician. 5. Replace the bulb holder and screw. 7. Remove the vent cover mounting screw. (1 outside screws) 3. Turn the power back on at the main power supply and wear gloves. 2. Unplug the oven or turn off power at the main power supply and set the clock...
Owners Manual
Page 29
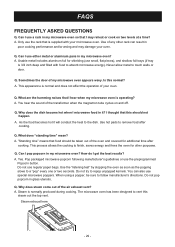
... (use a rack in my microwave oven? Steam is normal and does not affect the operation of the transformer when the magnetron tube cycles on two levels at a time? Why does the dish become hot when I pop popcorn in it will conduct the heat to follow manufacturer's directions. I thought that I use small, flat pieces), and shallow foil trays (if tray is supplied with food to remove food after cooking. Can I microwave food...
... (use a rack in my microwave oven? Steam is normal and does not affect the operation of the transformer when the magnetron tube cycles on two levels at a time? Why does the dish become hot when I pop popcorn in it will conduct the heat to follow manufacturer's directions. I thought that I use small, flat pieces), and shallow foil trays (if tray is supplied with food to remove food after cooking. Can I microwave food...
Owners Manual
Page 30
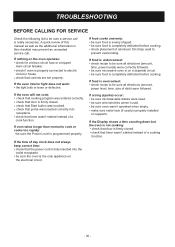
... be sure all directions (amount, time, power levels) were correctly followed. • be sure microwave oven is on a separate circuit. • be sure food is firmly closed . • check that timer wasn't started instead of dish) were followed. If the Display shows a time counting down but the oven is not cooking: • check that door is firmly closed . • check that Start button was touched. • check that...
... be sure all directions (amount, time, power levels) were correctly followed. • be sure microwave oven is on a separate circuit. • be sure food is firmly closed . • check that timer wasn't started instead of dish) were followed. If the Display shows a time counting down but the oven is not cooking: • check that door is firmly closed . • check that Start button was touched. • check that...
Owners Manual
Page 31
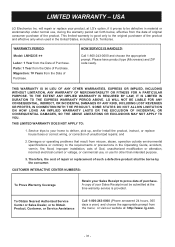
...: ** Model: LMH2235 Labor: 1 Year from misuse, abuse, operation outside environmental specifications or contrary to your product, at : http://www. LIMITED WARRANTY - Damages or operating problems that result from the Date of purchase. To Obtain Nearest Authorized Service Cente r or Sales Dealer, or to deliver, pick up, and/or install the product, instruct, or replace house fuses or correct wiring, or correction of Purchase. Parts...
...: ** Model: LMH2235 Labor: 1 Year from misuse, abuse, operation outside environmental specifications or contrary to your product, at : http://www. LIMITED WARRANTY - Damages or operating problems that result from the Date of purchase. To Obtain Nearest Authorized Service Cente r or Sales Dealer, or to deliver, pick up, and/or install the product, instruct, or replace house fuses or correct wiring, or correction of Purchase. Parts...


