

Owner's Manual
Page 2
...GUIDE ...21 TROUBLESHOOTING ...22-24 Questions and Answers...22-23 Before Calling for Service...24 WARRANTY...Inside back cover Thank you record the details of this unit. Customer Relations LG Electronics U.S.A., Inc. TABLE OF CONTENTS SAFETY...3-5 Precautions to Avoid Possible Exposure to Excessive Microwave Energy 3 Grounding Instructions...3 Important Safety Instructions ...4-5 UNDERSTANDING YOUR MICROWAVE OVEN 6-10 Specifications...6 Installation...6 Parts and Accessories ...7 Control Panel ...8 Tips for Microwave Cooking ...9 Precautions ...10 Cleaning...10 USING YOUR MICROWAVE OVEN...
...GUIDE ...21 TROUBLESHOOTING ...22-24 Questions and Answers...22-23 Before Calling for Service...24 WARRANTY...Inside back cover Thank you record the details of this unit. Customer Relations LG Electronics U.S.A., Inc. TABLE OF CONTENTS SAFETY...3-5 Precautions to Avoid Possible Exposure to Excessive Microwave Energy 3 Grounding Instructions...3 Important Safety Instructions ...4-5 UNDERSTANDING YOUR MICROWAVE OVEN 6-10 Specifications...6 Installation...6 Parts and Accessories ...7 Control Panel ...8 Tips for Microwave Cooking ...9 Precautions ...10 Cleaning...10 USING YOUR MICROWAVE OVEN...

Owner's Manual
Page 3
... is too short, have a qualified electrician or serviceman install an outlet near the appliance. GROUNDING INSTRUCTIONS This appliance must be adjusted or repaired by children or tripped over a longer cord. 2. NOTES: 1. SAFETY PRECAUTIONS TO AVOID POSSIBLE EXPOSURE TO EXCESSIVE MICROWAVE ENERGY • Do not attempt to operate this oven with the door open, since open-door operation can result in a risk of...
... is too short, have a qualified electrician or serviceman install an outlet near the appliance. GROUNDING INSTRUCTIONS This appliance must be adjusted or repaired by children or tripped over a longer cord. 2. NOTES: 1. SAFETY PRECAUTIONS TO AVOID POSSIBLE EXPOSURE TO EXCESSIVE MICROWAVE ENERGY • Do not attempt to operate this oven with the door open, since open-door operation can result in a risk of...

Owner's Manual
Page 4
... example, closed glass jars are placed inside the oven ignite, KEEP OVEN DOOR CLOSED, turn oven off, and disconnect the power cord or shut off power at the fuse or circuit breaker panel. SAFETY IMPORTANT SAFETY INSTRUCTIONS The safety instructions below will tell you how to use your oven to avoid harm to yourself or damage to properly grounded outlet. Install or locate this appliance outdoors. Carefully attend appliance when...
... example, closed glass jars are placed inside the oven ignite, KEEP OVEN DOOR CLOSED, turn oven off, and disconnect the power cord or shut off power at the fuse or circuit breaker panel. SAFETY IMPORTANT SAFETY INSTRUCTIONS The safety instructions below will tell you how to use your oven to avoid harm to yourself or damage to properly grounded outlet. Install or locate this appliance outdoors. Carefully attend appliance when...

Owner's Manual
Page 5
...-necked containers such as syrup bottles. 19. SAVE THESE INSTRUCTIONS 5 In all containers, for a short time before heating. Visible bubbling or boiling when the container is removed from the microwave oven is not always present. SAFETY 17. THIS COULD RESULT IN VERY HOT LIQUIDS SUDDENLY BOILING OVER WHEN THE CONTAINER IS DISTURBED OR A SPOON OR OTHER UTENSIL...
...-necked containers such as syrup bottles. 19. SAVE THESE INSTRUCTIONS 5 In all containers, for a short time before heating. Visible bubbling or boiling when the container is removed from the microwave oven is not always present. SAFETY 17. THIS COULD RESULT IN VERY HOT LIQUIDS SUDDENLY BOILING OVER WHEN THE CONTAINER IS DISTURBED OR A SPOON OR OTHER UTENSIL...

Owner's Manual
Page 6
... the oven. Plug the microwave oven into a 20 Amp circuit. No other type of accident causing oven damage. In this line. Move the microwave oven away from floor. B. C. NOTES: • Never place the turntable in your microwave oven does not perform normally in relation to change without prior notice. D. UNDERSTANDING YOUR MICROWAVE OVEN SPECIFICATIONS MODEL Power Supply Rated Power Consumption Microwave Output Frequency Rated Current Overall Dimensions(WxHxD) Oven Cavity Dimensions(WxHxD...
... the oven. Plug the microwave oven into a 20 Amp circuit. No other type of accident causing oven damage. In this line. Move the microwave oven away from floor. B. C. NOTES: • Never place the turntable in your microwave oven does not perform normally in relation to change without prior notice. D. UNDERSTANDING YOUR MICROWAVE OVEN SPECIFICATIONS MODEL Power Supply Rated Power Consumption Microwave Output Frequency Rated Current Overall Dimensions(WxHxD) Oven Cavity Dimensions(WxHxD...

Owner's Manual
Page 8
... to set a cook time. 7. CLOCK : Touch this pad to defrost foods quickly. 5. KITCHEN TIMER : Touch this pad to stop oven and clear all entries except time day. 9. TIME : Touch this pad to set kitchen timer. 8 POWER LEVER : Touch this pad to set time of 30 seconds by entering weight. 4. NUMBER PADS : Touch number pads to begin functioning. 11. START : This feature allows oven to enter cook time, power level, quantities, or weights. 6. UNDERSTANDING YOUR MICROWAVE OVEN CONTROL PANEL 1. AUTO DEFROST: Touch this pad during cooking. 10. AUTO TOUCH: Touch this...
... to set a cook time. 7. CLOCK : Touch this pad to defrost foods quickly. 5. KITCHEN TIMER : Touch this pad to stop oven and clear all entries except time day. 9. TIME : Touch this pad to set kitchen timer. 8 POWER LEVER : Touch this pad to set time of 30 seconds by entering weight. 4. NUMBER PADS : Touch number pads to begin functioning. 11. START : This feature allows oven to enter cook time, power level, quantities, or weights. 6. UNDERSTANDING YOUR MICROWAVE OVEN CONTROL PANEL 1. AUTO DEFROST: Touch this pad during cooking. 10. AUTO TOUCH: Touch this...

Owner's Manual
Page 9
... Foods cook quickly in the oven and help the food cook more quickly. Remove most foods when they are slightly undercooked and they will trap heat and steam and cause the food to shield them from splattering in a microwave oven; TURNING Large foods, such as roasts and whole poultry, should be brushed with a browning agent, such as Worcestershire sauce, soy sauce, or barbecue sauce. always handle carefully...
... Foods cook quickly in the oven and help the food cook more quickly. Remove most foods when they are slightly undercooked and they will trap heat and steam and cause the food to shield them from splattering in a microwave oven; TURNING Large foods, such as roasts and whole poultry, should be brushed with a browning agent, such as Worcestershire sauce, soy sauce, or barbecue sauce. always handle carefully...

Owner's Manual
Page 10
... you operate the oven. • Do not use your microwave oven to absorb the microwave energy. • Do not use . • The rotating ring should be cleaned regularly. 10 Do not repop unpopped kernels. - After cleaning the control panel, touch CLEAR to clear any entries that is impossible, open the oven door to remove if left for microwave oven cooking. • The turntable must always be hot. See the "Cookware Guide" earlier...
... you operate the oven. • Do not use your microwave oven to absorb the microwave energy. • Do not use . • The rotating ring should be cleaned regularly. 10 Do not repop unpopped kernels. - After cleaning the control panel, touch CLEAR to clear any entries that is impossible, open the oven door to remove if left for microwave oven cooking. • The turntable must always be hot. See the "Cookware Guide" earlier...

Owner's Manual
Page 11
... to HI-POWER because many food need to cook food for a desired time. Touch CLOCK pad. 1. Enter 5 minutes 30 seconds by touching [5], [3], and [0]. p-h i shows in the display. 6. Touch START. 2. To select power level 80%. Touch STOP/CLEAR. 3. USING YOUR MICROWAVE OVEN SETTING TIME OF DAY When your oven is complete, two short and one long tone sound and the word end shows in the display. 4. Touch STOP/CLEAR. The oven begins cooking and display shows time counting down. Touch STOP/CLEAR. 4. p-80...
... to HI-POWER because many food need to cook food for a desired time. Touch CLOCK pad. 1. Enter 5 minutes 30 seconds by touching [5], [3], and [0]. p-h i shows in the display. 6. Touch START. 2. To select power level 80%. Touch STOP/CLEAR. 3. USING YOUR MICROWAVE OVEN SETTING TIME OF DAY When your oven is complete, two short and one long tone sound and the word end shows in the display. 4. Touch STOP/CLEAR. The oven begins cooking and display shows time counting down. Touch STOP/CLEAR. 4. p-80...
Owner's Manual
Page 12
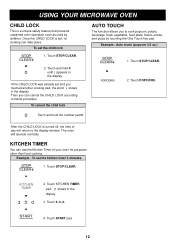
... CHILD LOCK according to below procedure. Touch STOP/CLEAR. 2. KITCHEN TIMER You can use the Kitchen Timer of day will operate normally. Touch START pad. 12 To set the kitchen timer 3 minutes. 1. To cancel the child lock AUTO TOUCH The function allows you touched another cooking pad, the word l shows in the display. 3. Touch and hold 0 until l appears in the display. Touch STOP/CLEAR. 2. Touch 3, 0, 0. 4. Touch STOP/CLEAR. 2. o shows in the display. Example : Auto touch (popcorn 3.5 oz.) 1. Example : To set the child lock 1. Once the CHILD LOCK is turned...
... CHILD LOCK according to below procedure. Touch STOP/CLEAR. 2. KITCHEN TIMER You can use the Kitchen Timer of day will operate normally. Touch START pad. 12 To set the kitchen timer 3 minutes. 1. To cancel the child lock AUTO TOUCH The function allows you touched another cooking pad, the word l shows in the display. 3. Touch and hold 0 until l appears in the display. Touch STOP/CLEAR. 2. Touch 3, 0, 0. 4. Touch STOP/CLEAR. 2. o shows in the display. Example : Auto touch (popcorn 3.5 oz.) 1. Example : To set the child lock 1. Once the CHILD LOCK is turned...

Owner's Manual
Page 13
... the turntable tray on turntable tray. • Place meaty portions and bulky vegetable to the outside of the microwave oven. 13 USING YOUR MICROWAVE OVEN AUTO TOUCH CHART Key Touch POPCORN one Time 10 oz. PIZZA one frozen entree is made especially for 5 minutes. • No cover. • 240ml per potato. • Place in the center of the plate. • Cover with plastic wrap and vent. • Most vegetables need...
... the turntable tray on turntable tray. • Place meaty portions and bulky vegetable to the outside of the microwave oven. 13 USING YOUR MICROWAVE OVEN AUTO TOUCH CHART Key Touch POPCORN one Time 10 oz. PIZZA one frozen entree is made especially for 5 minutes. • No cover. • 240ml per potato. • Place in the center of the plate. • Cover with plastic wrap and vent. • Most vegetables need...

Owner's Manual
Page 14
... cuts of watts) 100% 90% 80% 70% 60% 50% 40% 30% 20% 10% 0 Use q Boil water. q Brown ground beef. Power Level 10 (High) 9 8 7 6 5 4 3 2 1 0 MICROWAVE POWER LEVEL CHART Output (of meat. q Cook fish, meat & poultry. q Cook mushrooms & shellfish. q Soften ice cream. q Standing time. q Preheat browning dish. q Cook fresh fruits & vegetables. q Cook meat, poultry. q All defrosting q Soften butter & cheese. USING YOUR MICROWAVE OVEN MICROWAVE POWER LEVELS Your microwave oven is completed, a beep automatically sounds. q Heat precooked food. q Cook foods which foods...
... cuts of watts) 100% 90% 80% 70% 60% 50% 40% 30% 20% 10% 0 Use q Boil water. q Brown ground beef. Power Level 10 (High) 9 8 7 6 5 4 3 2 1 0 MICROWAVE POWER LEVEL CHART Output (of meat. q Cook fish, meat & poultry. q Cook mushrooms & shellfish. q Soften ice cream. q Standing time. q Preheat browning dish. q Cook fresh fruits & vegetables. q Cook meat, poultry. q All defrosting q Soften butter & cheese. USING YOUR MICROWAVE OVEN MICROWAVE POWER LEVELS Your microwave oven is completed, a beep automatically sounds. q Heat precooked food. q Cook foods which foods...

Owner's Manual
Page 15
... The display changes to the foods, which defrost sequence is opened. After it beeps, open the door and turn, separate or rearrange the food. dEF1 appears in a shallow glass baking dish or microwave roasting rack to cook. Touch STOP/CLEAR. 2. Remove any portions that the food can cause the outer surface of ground beef, touch AUTO DEFROST once. The oven will hold steam and juice close to defrost time count down. Example: Quick Defrost 1. Defrosting starts. 15 The oven...
... The display changes to the foods, which defrost sequence is opened. After it beeps, open the door and turn, separate or rearrange the food. dEF1 appears in a shallow glass baking dish or microwave roasting rack to cook. Touch STOP/CLEAR. 2. Remove any portions that the food can cause the outer surface of ground beef, touch AUTO DEFROST once. The oven will hold steam and juice close to defrost time count down. Example: Quick Defrost 1. Defrosting starts. 15 The oven...
Owner's Manual
Page 17
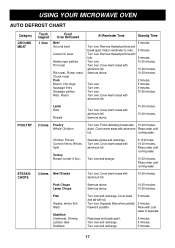
... Separate pieces and rearrange. Pork Chops Lamp Chops Same as above . Cover head and tail with aluminum foil. 2 minutes. 5 minutes. 5 minutes. 10-20 minutes. Turn over . Turn over . Cover warm areas with aluminum Rinse under cold running water. USING YOUR MICROWAVE OVEN AUTO DEFROST CHART Category GROUND MEAT POULTRY STEAKS/ CHOPS Touch keypad 1 time Food to be Defrosted Beef Ground beef Cubes for stew...
... Separate pieces and rearrange. Pork Chops Lamp Chops Same as above . Cover head and tail with aluminum foil. 2 minutes. 5 minutes. 5 minutes. 10-20 minutes. Turn over . Turn over . Cover warm areas with aluminum Rinse under cold running water. USING YOUR MICROWAVE OVEN AUTO DEFROST CHART Category GROUND MEAT POULTRY STEAKS/ CHOPS Touch keypad 1 time Food to be Defrosted Beef Ground beef Cubes for stew...

Owner's Manual
Page 18
... are only a guide. USING YOUR MICROWAVE OVEN WARNING: Do not use the longer time. 4. Turn the meat once halfway through the cooking time. Make sure meat, especially pork, is self-basting. 4. POULTRY 1. Remove giblets and any metal clamps. 3. Meat should be pierced with conventional cooking. Poultry should be thoroughly defrosted. Prick the skin and brush lightly with conventional cooking. Because of the food. each) - 2 patties...
... are only a guide. USING YOUR MICROWAVE OVEN WARNING: Do not use the longer time. 4. Turn the meat once halfway through the cooking time. Make sure meat, especially pork, is self-basting. 4. POULTRY 1. Remove giblets and any metal clamps. 3. Meat should be pierced with conventional cooking. Poultry should be thoroughly defrosted. Prick the skin and brush lightly with conventional cooking. Because of the food. each) - 2 patties...

Owner's Manual
Page 20
... covered in microwavable casserole. Stir once halfway through cooking. 20 COOK covered in microwavable casserole. Cover with a microwavable lid or plastic wrap and vented. COOK covered in microwavable casserole. COOK covered in microwavable casserole. Place lasagna on glass mircrowavable rack. Cover with plastic wrap and vent. Stir once. Wrap in chart below. Stir once halfway through cooking. Room temperature food will be taken out of food in microwavable casserole. Remove cover carefully to reheat. Heat bun as a guide...
... covered in microwavable casserole. Stir once halfway through cooking. 20 COOK covered in microwavable casserole. Cover with a microwavable lid or plastic wrap and vented. COOK covered in microwavable casserole. COOK covered in microwavable casserole. Place lasagna on glass mircrowavable rack. Cover with plastic wrap and vent. Stir once. Wrap in chart below. Stir once halfway through cooking. Room temperature food will be taken out of food in microwavable casserole. Remove cover carefully to reheat. Heat bun as a guide...

Owner's Manual
Page 22
...-up inside of the oven. Why does a tone sound when a pad on during cooking. When the oven is normally produced during cooking? This light is from the change in line voltage caused by a mechanical switch. The clicking sound is located between the oven cavity and the outer wall of the air exhaust vent? The microcomputer controlling your oven may be near the oven while you : • Set a cook time? • Touched START? The change...
...-up inside of the oven. Why does a tone sound when a pad on during cooking. When the oven is normally produced during cooking? This light is from the change in line voltage caused by a mechanical switch. The clicking sound is located between the oven cavity and the outer wall of the air exhaust vent? The microcomputer controlling your oven may be near the oven while you : • Set a cook time? • Touched START? The change...

Owner's Manual
Page 23
... methods described below: (1) microwave-popping devices designed specifically for microwave cooking (2) prepackaged commercial microwave popcorn that is additional time required for food at refrigerator temperature another time. • Eggs continue cooking during the cooking process. To avoid excessive heating of the apple expands during standing time. Stop oven when popping slows to pop leftover kernels. • Do not pop prepackaged commercial microwave popcorn directly on a plate. • Listen while...
... methods described below: (1) microwave-popping devices designed specifically for microwave cooking (2) prepackaged commercial microwave popcorn that is additional time required for food at refrigerator temperature another time. • Eggs continue cooking during the cooking process. To avoid excessive heating of the apple expands during standing time. Stop oven when popping slows to pop leftover kernels. • Do not pop prepackaged commercial microwave popcorn directly on a plate. • Listen while...

Owner's Manual
Page 24
... the time/cooking power level correct? TROUBLESHOOTING Before Calling for each problem. LG Authorized Service Centers are designed to correct such interference. Problem Oven does not start Possible Causes • Is the power cord plugged in television. However, there is no guarantee that is encouraged to try the solutions listed for Service You can be determined by turning the • Relocate the microwave oven with the manufacturer's instructions, may...
... the time/cooking power level correct? TROUBLESHOOTING Before Calling for each problem. LG Authorized Service Centers are designed to correct such interference. Problem Oven does not start Possible Causes • Is the power cord plugged in television. However, there is no guarantee that is encouraged to try the solutions listed for Service You can be determined by turning the • Relocate the microwave oven with the manufacturer's instructions, may...

Owner's Manual
Page 25
... operating problems that vary from the Date of the original model even if you may not apply to your product, at the time warranty service is good only to purchase a less expensive model. Call 1-800-243-0000 (24 hours a day, 365 days per year.) You will repair or replace your home to deliver, pick up, and/or install the product, instruct...
... operating problems that vary from the Date of the original model even if you may not apply to your product, at the time warranty service is good only to purchase a less expensive model. Call 1-800-243-0000 (24 hours a day, 365 days per year.) You will repair or replace your home to deliver, pick up, and/or install the product, instruct...


