

Owner's Manual
Page 2
... Calling for Service...24 WARRANTY...Inside back cover Thank you for future reference. Model No: Serial No: Dealer: Dealer Phone No: Staple your contact with LG (LG Electronics U.S.A., Inc.) concerning this unit for purchasing a LG microwave oven. Please record the model number and serial number of purchase.
... Calling for Service...24 WARRANTY...Inside back cover Thank you for future reference. Model No: Serial No: Dealer: Dealer Phone No: Staple your contact with LG (LG Electronics U.S.A., Inc.) concerning this unit for purchasing a LG microwave oven. Please record the model number and serial number of purchase.

Owner's Manual
Page 3
...longer cord should not be grounded. A short power-supply cord is provided to reduce the risks resulting from becoming entangled in harmful exposure to microwave energy. hinges and latches (broken or loosened), - Ensure proper ground exists before use an extension cord. If the power supply cord is ... over the countertop or tabletop where it can result in or tripping over accidentally. 3 SAFETY PRECAUTIONS TO AVOID POSSIBLE EXPOSURE TO EXCESSIVE MICROWAVE ENERGY • Do not attempt to operate this oven with the door open, since open-door operation can be plugged into an...
...longer cord should not be grounded. A short power-supply cord is provided to reduce the risks resulting from becoming entangled in harmful exposure to microwave energy. hinges and latches (broken or loosened), - Ensure proper ground exists before use an extension cord. If the power supply cord is ... over the countertop or tabletop where it can result in or tripping over accidentally. 3 SAFETY PRECAUTIONS TO AVOID POSSIBLE EXPOSURE TO EXCESSIVE MICROWAVE ENERGY • Do not attempt to operate this oven with the door open, since open-door operation can be plugged into an...

Owner's Manual
Page 4
...page 3 of burns, electric shock, fire, injury to persons, or exposure to heat, cook, or dry food. It is specifically designed to excessive microwave energy: 1. Do not overcook food. Remove wire twist-ties from heated surfaces. 14. If materials inside the oven to your oven. To reduce the... a sponge or soft cloth. 16. To reduce the risk of this manual. 4. c. Read and follow the specific TO AVOID POSSIBLE EXPOSURE TO EXCESSIVE MICROWAVE ENERGY found on page 3 of fire in the oven cavity: a. This type of a table or counter. 15. Do not cover or block any ...
...page 3 of burns, electric shock, fire, injury to persons, or exposure to heat, cook, or dry food. It is specifically designed to excessive microwave energy: 1. Do not overcook food. Remove wire twist-ties from heated surfaces. 14. If materials inside the oven to your oven. To reduce the... a sponge or soft cloth. 16. To reduce the risk of this manual. 4. c. Read and follow the specific TO AVOID POSSIBLE EXPOSURE TO EXCESSIVE MICROWAVE ENERGY found on page 3 of fire in the oven cavity: a. This type of a table or counter. 15. Do not cover or block any ...

Owner's Manual
Page 5
...THE LIQUID. In all containers, for a short time before heating. Visible bubbling or boiling when the container is removed from the microwave oven is not always present. Avoid using corrosive and vapors, such as syrup bottles. 19. Liquids heated in harm to be boiling... shaped containers (especially cylindrical-shaped containers) may splash out with narrow necks. 4) After heating, allow the container to stand in the microwave oven for best results, stir the liquid several times between reheatings. SAFETY 17. Avoid heating small-necked containers such as sulfide and chloride...
...THE LIQUID. In all containers, for a short time before heating. Visible bubbling or boiling when the container is removed from the microwave oven is not always present. Avoid using corrosive and vapors, such as syrup bottles. 19. Liquids heated in harm to be boiling... shaped containers (especially cylindrical-shaped containers) may splash out with narrow necks. 4) After heating, allow the container to stand in the microwave oven for best results, stir the liquid several times between reheatings. SAFETY 17. Avoid heating small-necked containers such as sulfide and chloride...

Owner's Manual
Page 6
... and reinsert the plug. Clean the door and the sealing surfaces of the oven for proper ventilation. Relocate the microwave oven in relation to change without prior notice. LMAB1240ST 120 V AC, 60 Hz 1550 W *1200 W 2450 MHz 13.3 A 203/19"✕1117/20"✕.... b. No other type of accident causing oven damage. The oven will cause slow cooking. UNDERSTANDING YOUR MICROWAVE OVEN SPECIFICATIONS MODEL Power Supply Rated Power Consumption Microwave Output Frequency Rated Current Overall Dimensions(WxHxD) Oven Cavity Dimensions(WxHxD) Effective Capacity of Oven Cavity *IEC 60705...
... and reinsert the plug. Clean the door and the sealing surfaces of the oven for proper ventilation. Relocate the microwave oven in relation to change without prior notice. LMAB1240ST 120 V AC, 60 Hz 1550 W *1200 W 2450 MHz 13.3 A 203/19"✕1117/20"✕.... b. No other type of accident causing oven damage. The oven will cause slow cooking. UNDERSTANDING YOUR MICROWAVE OVEN SPECIFICATIONS MODEL Power Supply Rated Power Consumption Microwave Output Frequency Rated Current Overall Dimensions(WxHxD) Oven Cavity Dimensions(WxHxD) Effective Capacity of Oven Cavity *IEC 60705...

Owner's Manual
Page 7
UNDERSTANDING YOUR MICROWAVE OVEN PARTS AND ACCESSORIES Your oven comes with the following accessories: • Owner's Manual and Cooking Guide : 1 each • Glass Turntable : 1 each • Rotating Ring : 1 each Oven Front Plate Window Door Screen Door Seal Display Window Control Panel Safety Door Lock System Turntable Rotating Ring NOTE: This microwave oven is not recommended for household use . 7 It is designed for commercial use only.
UNDERSTANDING YOUR MICROWAVE OVEN PARTS AND ACCESSORIES Your oven comes with the following accessories: • Owner's Manual and Cooking Guide : 1 each • Glass Turntable : 1 each • Rotating Ring : 1 each Oven Front Plate Window Door Screen Door Seal Display Window Control Panel Safety Door Lock System Turntable Rotating Ring NOTE: This microwave oven is not recommended for household use . 7 It is designed for commercial use only.

Owner's Manual
Page 8
... pad to set a cook time. 7. AUTO DEFROST: Touch this pad to defrost foods by repeatedly touching this pad to set a cook power lever. 8. UNDERSTANDING YOUR MICROWAVE OVEN CONTROL PANEL 1. Ez-ON : You can extend cooking time in multiples of 30 seconds by entering weight. 4. POWER LEVER : Touch this pad to cook...
... pad to set a cook time. 7. AUTO DEFROST: Touch this pad to defrost foods by repeatedly touching this pad to set a cook power lever. 8. UNDERSTANDING YOUR MICROWAVE OVEN CONTROL PANEL 1. Ez-ON : You can extend cooking time in multiples of 30 seconds by entering weight. 4. POWER LEVER : Touch this pad to cook...

Owner's Manual
Page 9
...when they are slightly undercooked and they will prevent the food from bursting. Always stir from the outside of aluminum foil to block the microwaves. SHIELDING To prevent some portions of the dish. SPACING Arrange individual foods, such as potatoes and squash. 9 ARRANGEMENT Do not stack..., soy sauce, or barbecue sauce. Always keep them with one corner folded back to vent the excess steam. UNDERSTANDING YOUR MICROWAVE OVEN TIPS FOR MICROWAVE COOKING BROWNING Meat and poultry with high fat content cooked for at least 1 inch from oven walls to prevent arcing. test...
...when they are slightly undercooked and they will prevent the food from bursting. Always stir from the outside of aluminum foil to block the microwaves. SHIELDING To prevent some portions of the dish. SPACING Arrange individual foods, such as potatoes and squash. 9 ARRANGEMENT Do not stack..., soy sauce, or barbecue sauce. Always keep them with one corner folded back to vent the excess steam. UNDERSTANDING YOUR MICROWAVE OVEN TIPS FOR MICROWAVE COOKING BROWNING Meat and poultry with high fat content cooked for at least 1 inch from oven walls to prevent arcing. test...

Owner's Manual
Page 10
... not rinse cookware immediately after cooking chicken or bacon. Do not repop unpopped kernels. - Listen while corn pops. Do not leave microwave unattended while popping corn. - Never use cleaning powders or rough pads. then rinse and wipe dry. After cleaning the control panel,... detergent solution. Once they are clean, rinse well and dry with silverware, cookware, etc. Do not touch several precautions to follow when microwaving popcorn: - Overcooking may cause breakage. CLEANING NOTE: Before cleaning the oven, unplug the power cord. Wipe splatters with a mild detergent;...
... not rinse cookware immediately after cooking chicken or bacon. Do not repop unpopped kernels. - Listen while corn pops. Do not leave microwave unattended while popping corn. - Never use cleaning powders or rough pads. then rinse and wipe dry. After cleaning the control panel,... detergent solution. Once they are clean, rinse well and dry with silverware, cookware, etc. Do not touch several precautions to follow when microwaving popcorn: - Overcooking may cause breakage. CLEANING NOTE: Before cleaning the oven, unplug the power cord. Wipe splatters with a mild detergent;...

Owner's Manual
Page 11
...Example : To set 3 :15 1. Touch START. 2. The oven begins cooking and display shows time counting down. Touch 3, 1, 5. 2. Touch POWER LEVER. USING YOUR MICROWAVE OVEN SETTING TIME OF DAY When your oven is complete, two short and one long tone sound and the word end shows in the display...will operate at less than HI-POWER). NOTE: If you to add. 11 Touch STOP/CLEAR. 3. Touch TIME. .. To set and start microwave cooking without the need to HI-POWER because many food need slower cooking (at power HIGH. after a power interruption, the numbers in the ...
...Example : To set 3 :15 1. Touch START. 2. The oven begins cooking and display shows time counting down. Touch 3, 1, 5. 2. Touch POWER LEVER. USING YOUR MICROWAVE OVEN SETTING TIME OF DAY When your oven is complete, two short and one long tone sound and the word end shows in the display...will operate at less than HI-POWER). NOTE: If you to add. 11 Touch STOP/CLEAR. 3. Touch TIME. .. To set and start microwave cooking without the need to HI-POWER because many food need slower cooking (at power HIGH. after a power interruption, the numbers in the ...
Owner's Manual
Page 12
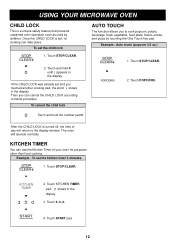
USING YOUR MICROWAVE OVEN CHILD LOCK This is set and you touched another cooking pad, the word l shows in the display. Touch and hold the number pad 0 After ...
USING YOUR MICROWAVE OVEN CHILD LOCK This is set and you touched another cooking pad, the word l shows in the display. Touch and hold the number pad 0 After ...

Owner's Manual
Page 13
...8226; Place in the center of the turntable tray on paper towel. • Pierce potato several times with fork. • After cooking, let stand for microwave cooking.(Refer to 8 page) • Do not try to finish cooking. 1 & 2 cups - POTATO one Time 1 two Times 2 three Times 3...8226; Most vegetables need 2 to 3 minutes standing time to pop unpopped kernels. • Heat only 1 package at a time. • Do not leave the microwave oven unattended while popping popcorn. • 8-10 oz. Add 2 tablespoon water. 3 & 4 cups - Add 4 tablespoon water. • Arrange food on ...
...8226; Place in the center of the turntable tray on paper towel. • Pierce potato several times with fork. • After cooking, let stand for microwave cooking.(Refer to 8 page) • Do not try to finish cooking. 1 & 2 cups - POTATO one Time 1 two Times 2 three Times 3...8226; Most vegetables need 2 to 3 minutes standing time to pop unpopped kernels. • Heat only 1 package at a time. • Do not leave the microwave oven unattended while popping popcorn. • 8-10 oz. Add 2 tablespoon water. 3 & 4 cups - Add 4 tablespoon water. • Arrange food on ...

Owner's Manual
Page 14
... with ten power levels (11 steps including 0) to give you maximum flexibility and control over cooking. q Melt butter & chocolate. USING YOUR MICROWAVE OVEN MICROWAVE POWER LEVELS Your microwave oven is completed, a beep automatically sounds. Power Level 10 (High) 9 8 7 6 5 4 3 2 1 0 MICROWAVE POWER LEVEL CHART Output (of meat. q Cook fish, meat & poultry. q All reheating q Roast meat & poultry.
... with ten power levels (11 steps including 0) to give you maximum flexibility and control over cooking. q Melt butter & chocolate. USING YOUR MICROWAVE OVEN MICROWAVE POWER LEVELS Your microwave oven is completed, a beep automatically sounds. Power Level 10 (High) 9 8 7 6 5 4 3 2 1 0 MICROWAVE POWER LEVEL CHART Output (of meat. q Cook fish, meat & poultry. q All reheating q Roast meat & poultry.

Owner's Manual
Page 15
... Auto Defrost Feature contains a built-in beep mechanism that have thawed. q Food should still be used in a shallow glass baking dish or microwave roasting rack to the weight you with the best defrosting method for cooking. Touch STOP/CLEAR. 1. dEF1 appears in the oven. Return frozen portions... to the oven and touch START to cook. USING YOUR MICROWAVE OVEN AUTO DEFROST Three defrost sequences are preset in the display, and enter the weight. 1. QUICK DEFROST Use this time, open the door...
... Auto Defrost Feature contains a built-in beep mechanism that have thawed. q Food should still be used in a shallow glass baking dish or microwave roasting rack to the weight you with the best defrosting method for cooking. Touch STOP/CLEAR. 1. dEF1 appears in the oven. Return frozen portions... to the oven and touch START to cook. USING YOUR MICROWAVE OVEN AUTO DEFROST Three defrost sequences are preset in the display, and enter the weight. 1. QUICK DEFROST Use this time, open the door...

Owner's Manual
Page 16
... Lamb chops (1-inch thick), Pork chops (1/2-inch thick). • FISH Fillets, Steaks, Whole. • SHELLFISH.........Crab meat, Lobster tails, Shrimp Scallops 0.1/6.0 lbs. 16 USING YOUR MICROWAVE OVEN AUTO DEFROST GUIDE SEQUENCE TOUCH AUTO DEFROST FOOD MIN./MAX. GROUND MEAT one time • BEEF Ground beef, Cubes for stew Pot roast, Rib...
... Lamb chops (1-inch thick), Pork chops (1/2-inch thick). • FISH Fillets, Steaks, Whole. • SHELLFISH.........Crab meat, Lobster tails, Shrimp Scallops 0.1/6.0 lbs. 16 USING YOUR MICROWAVE OVEN AUTO DEFROST GUIDE SEQUENCE TOUCH AUTO DEFROST FOOD MIN./MAX. GROUND MEAT one time • BEEF Ground beef, Cubes for stew Pot roast, Rib...
Owner's Manual
Page 17
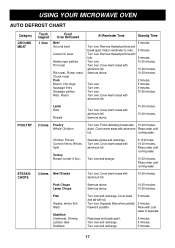
... over . Chicken Pieces Cornish Hens: Whole, Split Separate pieces and rearrange. Cover warm areas with aluminum foil. 2 minutes. 5 minutes. 5 minutes. 10-20 minutes. USING YOUR MICROWAVE OVEN AUTO DEFROST CHART Category GROUND MEAT POULTRY STEAKS/ CHOPS Touch keypad 1 time Food to be Defrosted Beef Ground beef Cubes for stew Hamburger patties...
... over . Chicken Pieces Cornish Hens: Whole, Split Separate pieces and rearrange. Cover warm areas with aluminum foil. 2 minutes. 5 minutes. 5 minutes. 10-20 minutes. USING YOUR MICROWAVE OVEN AUTO DEFROST CHART Category GROUND MEAT POULTRY STEAKS/ CHOPS Touch keypad 1 time Food to be Defrosted Beef Ground beef Cubes for stew Hamburger patties...

Owner's Manual
Page 18
...metal clamps. 3. Let stand for 5-10 minutes wrapped in foil after cooking. Poultry pieces should be placed on a microwave roast-ing rack or a microwave-proof plate and placed on the turntable. 3. Season if desired. Turn the meat once halfway through the cooking time.... before cooking. 2. The standing time is very important, as with vegetable oil unless the poultry is firm. 18 Place the meat on a microwave roasting rack or microwave-proof plate and place on the turntable. 5. Poultry should be thoroughly defrosted. each) - 2 patties - 4 patties MicrowavePower 8 8 8 HIGH...
...metal clamps. 3. Let stand for 5-10 minutes wrapped in foil after cooking. Poultry pieces should be placed on a microwave roast-ing rack or a microwave-proof plate and placed on the turntable. 3. Season if desired. Turn the meat once halfway through the cooking time.... before cooking. 2. The standing time is very important, as with vegetable oil unless the poultry is firm. 18 Place the meat on a microwave roasting rack or microwave-proof plate and place on the turntable. 5. Poultry should be thoroughly defrosted. each) - 2 patties - 4 patties MicrowavePower 8 8 8 HIGH...

Owner's Manual
Page 19
... may also vary due to the instructions in the Cooking Chart before serving. 6. Cover with pierced microwave plastic wrap or casserole lid. 3. The fish should be used when calculating the cooking time. USING YOUR MICROWAVE OVEN WARNING: Do not use aluminum foil during cooking cycle. Let stand as directed in the Fresh...
... may also vary due to the instructions in the Cooking Chart before serving. 6. Cover with pierced microwave plastic wrap or casserole lid. 3. The fish should be used when calculating the cooking time. USING YOUR MICROWAVE OVEN WARNING: Do not use aluminum foil during cooking cycle. Let stand as directed in the Fresh...

Owner's Manual
Page 20
... 4 minutes 71/2 - 11 minutes 1 - 3 minutes 4 - 6 minutes 15 - 30 seconds 1 - 3 minutes 4 - 6 minutes 11/2 - 2 minutes Special Instructions Place sliced meat on microwavable plate. Stir once halfway through cooking. Wrap in chart below. Stir once halfway through cooking. The food will heat faster than refrigerated food. Cover with...be taken out of food in a circular pattern for reheating cooked food. Place fish on microwavable plate. COOK covered in microwavable casserole. Reheat filling and bun separately. Canned foods should be heated more evenly if covered ...
... 4 minutes 71/2 - 11 minutes 1 - 3 minutes 4 - 6 minutes 15 - 30 seconds 1 - 3 minutes 4 - 6 minutes 11/2 - 2 minutes Special Instructions Place sliced meat on microwavable plate. Stir once halfway through cooking. Wrap in chart below. Stir once halfway through cooking. The food will heat faster than refrigerated food. Cover with...be taken out of food in a circular pattern for reheating cooked food. Place fish on microwavable plate. COOK covered in microwavable casserole. Reheat filling and bun separately. Canned foods should be heated more evenly if covered ...

Owner's Manual
Page 22
...in for the first time, it might not work properly. This light is operating? Shorten the cooking or reheating time. Can my microwave oven be several reasons why the oven light is cooked for too long? Like any other cooking appliance, it operates empty? Food ...Answer A hard, dry, brown spot indicates overcooking. When the oven is the oven light not on during cooking. Why do not let microwave energy pass through . Answer There may pop due to the point that the setting has been entered. TROUBLESHOOTING Questions and Answers Operation Question ...
...in for the first time, it might not work properly. This light is operating? Shorten the cooking or reheating time. Can my microwave oven be several reasons why the oven light is cooked for too long? Like any other cooking appliance, it operates empty? Food ...Answer A hard, dry, brown spot indicates overcooking. When the oven is the oven light not on during cooking. Why do not let microwave energy pass through . Answer There may pop due to the point that the setting has been entered. TROUBLESHOOTING Questions and Answers Operation Question ...


