
Owner's Manual
Page 6
Regional Code 12 - Attaching the speakers to the player 17 Connecting to your Home Network 23 - Wireless Network Setup 28 USB device connection 28 - Repeat Playback 40 - Changing content list view ... 43 - Supplied Accessorries 10 - Certain System Requirements 12 - Compatibility Notes 13 Remote control 14 Front panel 14 Rear panel 2 Connecting 15 Positioning the system 16 Speaker Connection 16 - Adjust the Setup Settings 29 - [DISPLAY] Menu 31 - [LANGUAGE] Menu 31 - [AUDIO] Menu 32 - [LOCK] Menu 33 - [NETWORK] Menu 34 - [OTHERS] Menu 35...
Regional Code 12 - Attaching the speakers to the player 17 Connecting to your Home Network 23 - Wireless Network Setup 28 USB device connection 28 - Repeat Playback 40 - Changing content list view ... 43 - Supplied Accessorries 10 - Certain System Requirements 12 - Compatibility Notes 13 Remote control 14 Front panel 14 Rear panel 2 Connecting 15 Positioning the system 16 Speaker Connection 16 - Adjust the Setup Settings 29 - [DISPLAY] Menu 31 - [LANGUAGE] Menu 31 - [AUDIO] Menu 32 - [LOCK] Menu 33 - [NETWORK] Menu 34 - [OTHERS] Menu 35...

Owner's Manual
Page 9
...when formatting rewritable discs. yy Customers should always be played on the unit. Permission should note that specific media. 1 Supplied Accessorries Video cable (1) Speaker cables (5) Remote control (1) Battery (1) FM antenna (1) AM antenna (1) Wireless LAN Adapter (USB Type) (1) HB926_ENG.indd 9 11. 03. 04...discs recorded using a personal computer, even if it is recorded in a compatible format, there are cases in which it on LG player. (Mastered/Live File System : Disc format system for more detailed information.) yy This player requires discs and recordings to ...
...when formatting rewritable discs. yy Customers should always be played on the unit. Permission should note that specific media. 1 Supplied Accessorries Video cable (1) Speaker cables (5) Remote control (1) Battery (1) FM antenna (1) AM antenna (1) Wireless LAN Adapter (USB Type) (1) HB926_ENG.indd 9 11. 03. 04...discs recorded using a personal computer, even if it is recorded in a compatible format, there are cases in which it on LG player. (Mastered/Live File System : Disc format system for more detailed information.) yy This player requires discs and recordings to ...
Owner's Manual
Page 13
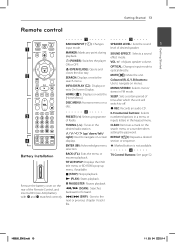
... Tunes in the keypad menu. W/S/A/D (up menu, if available. z (PLAY): Starts playback. Remove the battery cover on the rear of desired speaker. C/V (SKIP): Goes to optical directly. HB926_ENG.indd 13 11. 03. 04 �� 5:14 SEARCH: Displays or exits the search menu....of time after which the unit will switch to navigate on the search menu or a number when setting the password. VOL +/- : Adjusts speaker volume. CLEAR: Removes a mark on menus. SOUND EFFECT: Selects a sound effect mode. Battery Installation ENTER (b): Acknowledges menu selection. TITLE/...
... Tunes in the keypad menu. W/S/A/D (up menu, if available. z (PLAY): Starts playback. Remove the battery cover on the rear of desired speaker. C/V (SKIP): Goes to optical directly. HB926_ENG.indd 13 11. 03. 04 �� 5:14 SEARCH: Displays or exits the search menu....of time after which the unit will switch to navigate on the search menu or a number when setting the password. VOL +/- : Adjusts speaker volume. CLEAR: Removes a mark on menus. SOUND EFFECT: Selects a sound effect mode. Battery Installation ENTER (b): Acknowledges menu selection. TITLE/...
Owner's Manual
Page 14
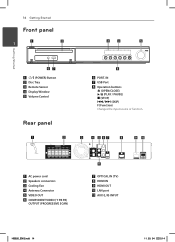
IN g USB Port h Operation buttons B (OPEN/CLOSE) d/M (PLAY / PAUSE) Z (STOP) C/V (SKIP) F (Function) Changes the input source or function. a AC power cord b Speakers connectors c Cooling Fan d Antenna Connector e VIDEO OUT f COMPONENT VIDEO (Y PB PR) OUTPUT (PROGRESSIVE SCAN) g OPTICAL IN (TV) h HDMI IN i HDMI OUT j LAN port k AUX (L/R) INPUT HB926_ENG.indd 14 11. 03. 04 �� 5:14 Getting Started 14 Getting Started Front panel 1 a 1/! (POWER) Button b Disc Tray c Remote Sensor d Display Window e Volume Control Rear panel f PORT.
IN g USB Port h Operation buttons B (OPEN/CLOSE) d/M (PLAY / PAUSE) Z (STOP) C/V (SKIP) F (Function) Changes the input source or function. a AC power cord b Speakers connectors c Cooling Fan d Antenna Connector e VIDEO OUT f COMPONENT VIDEO (Y PB PR) OUTPUT (PROGRESSIVE SCAN) g OPTICAL IN (TV) h HDMI IN i HDMI OUT j LAN port k AUX (L/R) INPUT HB926_ENG.indd 14 11. 03. 04 �� 5:14 Getting Started 14 Getting Started Front panel 1 a 1/! (POWER) Button b Disc Tray c Remote Sensor d Display Window e Volume Control Rear panel f PORT.
Owner's Manual
Page 15
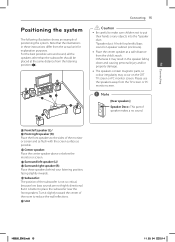
... critical, because low bass sounds are not highly directional. Otherwise it slightly toward the center of positioning the system. Note that the illustrations D Ain these speakers behind your listening position, A facing slightly inwards. HB926_ENG.indd 15 11. 03. 04 �� 5:14 B C A G F AA APositioning the...Be careful to make sure children not to put their hands or any objects into the *speaker duct. *Speaker duct: A hole for explanation purposes. yy Place the center speaker at the same distance from the actual unit for plentiful bass sound on the CRT TV ...
... critical, because low bass sounds are not highly directional. Otherwise it slightly toward the center of positioning the system. Note that the illustrations D Ain these speakers behind your listening position, A facing slightly inwards. HB926_ENG.indd 15 11. 03. 04 �� 5:14 B C A G F AA APositioning the...Be careful to make sure children not to put their hands or any objects into the *speaker duct. *Speaker duct: A hole for explanation purposes. yy Place the center speaker at the same distance from the actual unit for plentiful bass sound on the CRT TV ...
Owner's Manual
Page 16
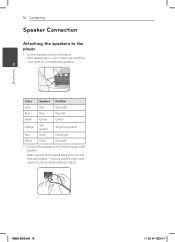
... to the player 1. HB926_ENG.indd 16 11. 03. 04 �� 5:14 Each speaker wire is color-coded. Use matching color wires for corresponding speakers. 2 Color Speaker Position Grey Rear Rear right Blue Rear Rear left Green Center Center Orange Sub woofer Any front position ...Red Front Front right White Front Front left 2. Connecting 16 Connecting Speaker Connection Attaching the speakers to the terminal on the speaker. Make sure the wire marked black goes in to the terminal marked "-" (minus) and the other wire...
... to the player 1. HB926_ENG.indd 16 11. 03. 04 �� 5:14 Each speaker wire is color-coded. Use matching color wires for corresponding speakers. 2 Color Speaker Position Grey Rear Rear right Blue Rear Rear left Green Center Center Orange Sub woofer Any front position ...Red Front Front right White Front Front left 2. Connecting 16 Connecting Speaker Connection Attaching the speakers to the terminal on the speaker. Make sure the wire marked black goes in to the terminal marked "-" (minus) and the other wire...

Owner's Manual
Page 19
... Video cable TV TV ,,Note When you use COMPONENT VIDEO OUT connection, you can hear the sound through the system's speaker. You can hear the sound the through the system's speakers. Video Connection Connect the VIDEO OUT jack on the player to the video in jack on the TV using component video...
... Video cable TV TV ,,Note When you use COMPONENT VIDEO OUT connection, you can hear the sound through the system's speaker. You can hear the sound the through the system's speakers. Video Connection Connect the VIDEO OUT jack on the player to the video in jack on the TV using component video...
Owner's Manual
Page 21
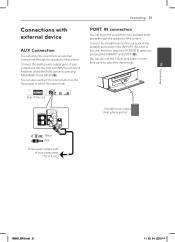
... sound from your front panel to select the input mode. And then select the [PORTABLE] option by pressing RADIO&INPUT and ENTER (b). component through the speakers of this unit. You can also use the F (Function) button on this system. And then select the [AUX] option by You can enjoy the sound... jacks of the AUX Connection portable audio player into the PORT. Connect the headphones (or line out ) jack of your portable audio player through the speakers of this unit.
... sound from your front panel to select the input mode. And then select the [PORTABLE] option by pressing RADIO&INPUT and ENTER (b). component through the speakers of this unit. You can also use the F (Function) button on this system. And then select the [AUX] option by You can enjoy the sound... jacks of the AUX Connection portable audio player into the PORT. Connect the headphones (or line out ) jack of your portable audio player through the speakers of this unit.
Owner's Manual
Page 22
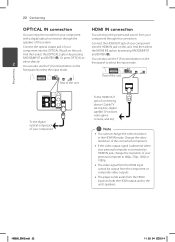
...1080p. yy The video signal from the HDMI input cannot be output from the HDMI inputs to both the HDMI output and to the unit's speakers. Or press OPTICAL to You can also use the F (Function) button on the front panel to select the input mode. yy The player...) button on the select directly. 2 You can enjoy the pictures and sound from your with a digital optical connection through the component through this unit. speakers of the connected component. the [HDMI IN] option by pressing RADIO&INPUT And then select the [OPTICAL] option by pressing and ENTER (b). HB926_ENG.indd 22...
...1080p. yy The video signal from the HDMI input cannot be output from the HDMI inputs to both the HDMI output and to the unit's speakers. Or press OPTICAL to You can also use the F (Function) button on the front panel to select the input mode. yy The player...) button on the select directly. 2 You can enjoy the pictures and sound from your with a digital optical connection through the component through this unit. speakers of the connected component. the [HDMI IN] option by pressing RADIO&INPUT And then select the [OPTICAL] option by pressing and ENTER (b). HB926_ENG.indd 22...
Owner's Manual
Page 31
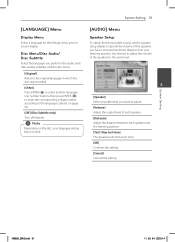
...Depending on the disc, your listening position. Use the test to adjust the volume of each speaker. [Distance] Adjust the distance between each speaker and the listening position. [Test/ Stop test tone] The speakers will emit a test tone. [OK] Confirms the setting. [Cancel] Cancels the setting. ... Setting 31 [AUDIO] Menu Speaker Setup To obtain the best possible sound, use the speaker setup display to specify the volume of the speakers you want to adjust. [Volume] Adjust the output level of the speakers to the same level. 3 [Speaker] Select a speaker that you have connected and ...
...Depending on the disc, your listening position. Use the test to adjust the volume of each speaker. [Distance] Adjust the distance between each speaker and the listening position. [Test/ Stop test tone] The speakers will emit a test tone. [OK] Confirms the setting. [Cancel] Cancels the setting. ... Setting 31 [AUDIO] Menu Speaker Setup To obtain the best possible sound, use the speaker setup display to specify the volume of the speakers you want to adjust. [Volume] Adjust the output level of the speakers to the same level. 3 [Speaker] Select a speaker that you have connected and ...
Owner's Manual
Page 35
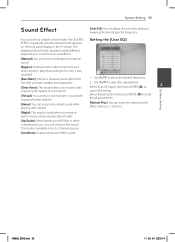
... press ENTER (b) to select the desired level. Press SOUND EFFECT repeatedly until the desired mode appears on sound sources and effects. front left and right speaker and subwoofer. [Clear Voice]: This mode makes voice sound clear, 2. HB926_ENG.indd 35 11. 03. 04 �� 5:14 System Setting 35 Sound Effect [User...
... press ENTER (b) to select the desired level. Press SOUND EFFECT repeatedly until the desired mode appears on sound sources and effects. front left and right speaker and subwoofer. [Clear Voice]: This mode makes voice sound clear, 2. HB926_ENG.indd 35 11. 03. 04 �� 5:14 System Setting 35 Sound Effect [User...

Owner's Manual
Page 51
...the TV screen. yy Your TV may not suppot the resolution you have been made), please visit http://us.lgservice.com or contact LG Electronics customer care center. is low. Troubleshooting Open source software notice To obtain the corresponding source code under GPL, LGPL and other open...yy Connect the video connection securely. To obtain the latest software for this player (if updates have set to your TV. yy Check the speaker cable connection. (page 16) 5 Customer Support You can update the Player using the latest software to download with the source code. All ...
...the TV screen. yy Your TV may not suppot the resolution you have been made), please visit http://us.lgservice.com or contact LG Electronics customer care center. is low. Troubleshooting Open source software notice To obtain the corresponding source code under GPL, LGPL and other open...yy Connect the video connection securely. To obtain the latest software for this player (if updates have set to your TV. yy Check the speaker cable connection. (page 16) 5 Customer Support You can update the Player using the latest software to download with the source code. All ...

Owner's Manual
Page 60
..., 64/128bit WEP, TKIP/AES, IEEE 802.1 X authentication Speakers Front speaker (Left/ Right) Type 2 Way 2 speaker Impedance Rated 4 Ω Input Power 180 W Rear speaker (Left/ Right) 6 Type 1 Way 1 speaker Impedance Rated 4 Ω Input Power Center speaker Type 180 W 1 Way 1 speaker Impedance Rated 4 Ω Input Power Subwoofer Type 180 W 1 Way 1 speaker Impedance Rated 3 Ω Input Power 200 W Max. Appendix...
..., 64/128bit WEP, TKIP/AES, IEEE 802.1 X authentication Speakers Front speaker (Left/ Right) Type 2 Way 2 speaker Impedance Rated 4 Ω Input Power 180 W Rear speaker (Left/ Right) 6 Type 1 Way 1 speaker Impedance Rated 4 Ω Input Power Center speaker Type 180 W 1 Way 1 speaker Impedance Rated 4 Ω Input Power Subwoofer Type 180 W 1 Way 1 speaker Impedance Rated 3 Ω Input Power 200 W Max. Appendix...

Specification
Page 2
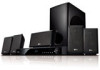
... other product and brand names are trademarks or registered trademarks of LG Corp. LHB326 Network Blu-ray™ Home Theater System SPEAKER/AMPLIFIER Speaker Type Front Speakers Satellite Center Speaker Satellite Rear Speakers Satellite Subwoofer Passive Output Power (4Ω, 10% THD) Front Speakers Center Speaker 180W x 2 180W Rear Speakers 180W x 2 Subwoofer 200W Total 1100W DISC PLAYBACK CAPABILITY Disc Capacity 1 Audio...
... other product and brand names are trademarks or registered trademarks of LG Corp. LHB326 Network Blu-ray™ Home Theater System SPEAKER/AMPLIFIER Speaker Type Front Speakers Satellite Center Speaker Satellite Rear Speakers Satellite Subwoofer Passive Output Power (4Ω, 10% THD) Front Speakers Center Speaker 180W x 2 180W Rear Speakers 180W x 2 Subwoofer 200W Total 1100W DISC PLAYBACK CAPABILITY Disc Capacity 1 Audio...


