
Specification
Page 1
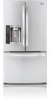
....ft. The water dispenser is one of your answer. Oh, and it comes with our own Exterior/Interior Styling Package, so it comes with a refrigerator this LG refrigerator is extra tall so you can fill nearly any size container. Slim SpacePlus™ Ice System It's great having an ice maker, but not if...
....ft. The water dispenser is one of your answer. Oh, and it comes with our own Exterior/Interior Styling Package, so it comes with a refrigerator this LG refrigerator is extra tall so you can fill nearly any size container. Slim SpacePlus™ Ice System It's great having an ice maker, but not if...
Specification
Page 2
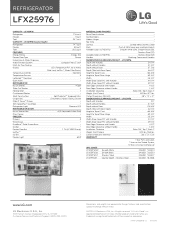
... REFRIGERATOR DOOR No. Total 20.5 cu.ft. Carton Dimensions (WxHxD) 38" x 73" x 33" WARRANTY 1 Year Parts and Labor, 7 Years on the Sealed System, 10 Years on Linear Compressor UPC CODES LFX25976SW Smooth White 048231 783514 LFX25976SB Smooth Black 048231 783521 LFX25976ST... 1 3/4" Installation Clearance Sides 1/8", Top 1", Back 1" Weight (Unit/Carton) 300 lbs./355 lbs. Stainless Steel 048231 783538 www.LG.com LG Electronics U.S.A., Inc. 1000 Sylvan Avenue Englewood Cliffs, NJ 07632 Customer Service and Technical Support: (800) 243-0000 Dimensions and weights ...
... REFRIGERATOR DOOR No. Total 20.5 cu.ft. Carton Dimensions (WxHxD) 38" x 73" x 33" WARRANTY 1 Year Parts and Labor, 7 Years on the Sealed System, 10 Years on Linear Compressor UPC CODES LFX25976SW Smooth White 048231 783514 LFX25976SB Smooth Black 048231 783521 LFX25976ST... 1 3/4" Installation Clearance Sides 1/8", Top 1", Back 1" Weight (Unit/Carton) 300 lbs./355 lbs. Stainless Steel 048231 783538 www.LG.com LG Electronics U.S.A., Inc. 1000 Sylvan Avenue Englewood Cliffs, NJ 07632 Customer Service and Technical Support: (800) 243-0000 Dimensions and weights ...
Owner's Manual
Page 1
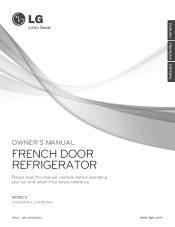
OWNER'S MANUAL FRENCH DOOR REFRIGERATOR Please read this manual carefully before operating your set and retain it for future reference. MODELS LFX25976**, LFX21976** P/NO : MFL63728501 www.lge.com ENGLISH FRANÇAIS ESPAÑOL
OWNER'S MANUAL FRENCH DOOR REFRIGERATOR Please read this manual carefully before operating your set and retain it for future reference. MODELS LFX25976**, LFX21976** P/NO : MFL63728501 www.lge.com ENGLISH FRANÇAIS ESPAÑOL

Owner's Manual
Page 2
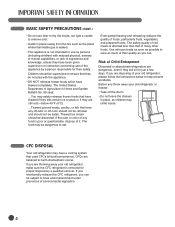
... CFC Disposal 4 How to the LG family. Your new LG French Door Refrigerator combines advanced cooling technology with many years of Foods 29 Shelf Height Adjustment 30 CARE AND CLEANING Removing and Replacing Components 31 Cleaning the Refrigerator 35 General Information 35 Replacing the ... for Service 41 SPECIFICATIONS Key Dimensions and Specifications 47 WARRANTY Product Registration Information 48 2 THANK YOU! Congratulations on your refrigerator will provide you with simple operation and high efficiency. Follow the operating and care instructions in this manual and your...
... CFC Disposal 4 How to the LG family. Your new LG French Door Refrigerator combines advanced cooling technology with many years of Foods 29 Shelf Height Adjustment 30 CARE AND CLEANING Removing and Replacing Components 31 Cleaning the Refrigerator 35 General Information 35 Replacing the ... for Service 41 SPECIFICATIONS Key Dimensions and Specifications 47 WARRANTY Product Registration Information 48 2 THANK YOU! Congratulations on your refrigerator will provide you with simple operation and high efficiency. Follow the operating and care instructions in this manual and your...
Owner's Manual
Page 3
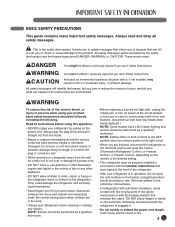
... that can happen if the instructions are damp or wet. Skin may adhere to the extremely cold surfaces. • In refrigerators with automatic icemakers, avoid contact with the moving your product, basic safety precautions should be properly installed in accordance with the ...or with the Installer Instructions that releases the cubes. BASIC SAFETY PRECAUTIONS This guide contains many important safety messages. They could damage the refrigerator and seriously injure themselves. • Keep fingers out of injury, and tell you are necessarily small. NOTE: Setting either the ...
... that can happen if the instructions are damp or wet. Skin may adhere to the extremely cold surfaces. • In refrigerators with automatic icemakers, avoid contact with the moving your product, basic safety precautions should be properly installed in accordance with the ...or with the Installer Instructions that releases the cubes. BASIC SAFETY PRECAUTIONS This guide contains many important safety messages. They could damage the refrigerator and seriously injure themselves. • Keep fingers out of injury, and tell you are necessarily small. NOTE: Setting either the ...
Owner's Manual
Page 4
...The food may safely refreeze frozen foods that have thawed if they still contain ice crystals or if they are disposing of your old refrigerator, please follow the instructions below 40°F (4°C). ...Thawed ground meats, poultry, or fish that they do not play with reduced... prepared foods. The United States Department of the appliance by a qualified servicer. Thawed ice cream should be eaten. CFC DISPOSAL Your old refrigerator may climb inside , nor light a candle to help prevent accidents. Children should be subject to fines and imprisonment under provisions of many other...
...The food may safely refreeze frozen foods that have thawed if they still contain ice crystals or if they are disposing of your old refrigerator, please follow the instructions below 40°F (4°C). ...Thawed ground meats, poultry, or fish that they do not play with reduced... prepared foods. The United States Department of the appliance by a qualified servicer. Thawed ice cream should be eaten. CFC DISPOSAL Your old refrigerator may climb inside , nor light a candle to help prevent accidents. Children should be subject to fines and imprisonment under provisions of many other...
Owner's Manual
Page 5
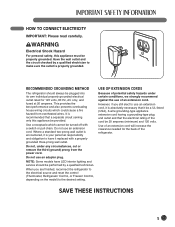
...that it replaced with a switch or pull chain. RECOMMENDED GROUNDING METHOD The refrigerator should be plugged into its own individual properly grounded electrical outlet rated for the back of the refrigerator. USE OF EXTENSION CORDS Because of an extension cord. When you still elect...turned off with a properly grounded three-prong wall outlet. However, if you are finished, reconnect the refrigerator to the electrical source and reset the control (Thermostat, Refrigerator Control, or Freezer Control, depending on the model) to make sure the outlet is recommended that ...
...that it replaced with a switch or pull chain. RECOMMENDED GROUNDING METHOD The refrigerator should be plugged into its own individual properly grounded electrical outlet rated for the back of the refrigerator. USE OF EXTENSION CORDS Because of an extension cord. When you still elect...turned off with a properly grounded three-prong wall outlet. However, if you are finished, reconnect the refrigerator to the electrical source and reset the control (Thermostat, Refrigerator Control, or Freezer Control, depending on the model) to make sure the outlet is recommended that ...

Owner's Manual
Page 6
... 3 2 2 ICE PLUS 4 When this feature is activated, the freezer section will run at 30-second intervals when the refrigerator or freezer door is left door is automatically closed within 30° of the opening angle.) NOTE: This guide covers several different ...refrigerator, it is automatically closed. (The door is opened. 9 AUTO CLOSING HINGE When you have purchased may have some or all of the features shown below . SPECIAL FEATURES 1 CONTROL PANEL LED DISPLAY SCREEN Simple electronic controls are user-friendly. The in-door design creates more shelf space. 6 7 6 CRISPERS LG...
... 3 2 2 ICE PLUS 4 When this feature is activated, the freezer section will run at 30-second intervals when the refrigerator or freezer door is left door is automatically closed within 30° of the opening angle.) NOTE: This guide covers several different ...refrigerator, it is automatically closed. (The door is opened. 9 AUTO CLOSING HINGE When you have purchased may have some or all of the features shown below . SPECIAL FEATURES 1 CONTROL PANEL LED DISPLAY SCREEN Simple electronic controls are user-friendly. The in-door design creates more shelf space. 6 7 6 CRISPERS LG...
Owner's Manual
Page 7
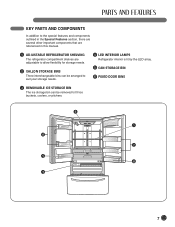
... outlined in the Special Features section, there are several other important components that are referenced in this manual. 1 ADJUSTABLE REFRIGERATOR SHELVING The refrigerator compartment shelves are adjustable to allow flexibility for storage needs. 2 GALLON STORAGE BINS Three interchangeable bins can be arranged to... suit your storage needs. 4 LED INTERIOR LAMPS Refrigerator interior is lit by the LED array. 5 CAN STORAGE BIN 6 FIXED DOOR BINS 3 REMOVABLE ICE STORAGE BIN The ice storage ...
... outlined in the Special Features section, there are several other important components that are referenced in this manual. 1 ADJUSTABLE REFRIGERATOR SHELVING The refrigerator compartment shelves are adjustable to allow flexibility for storage needs. 2 GALLON STORAGE BINS Three interchangeable bins can be arranged to... suit your storage needs. 4 LED INTERIOR LAMPS Refrigerator interior is lit by the LED array. 5 CAN STORAGE BIN 6 FIXED DOOR BINS 3 REMOVABLE ICE STORAGE BIN The ice storage ...
Owner's Manual
Page 8
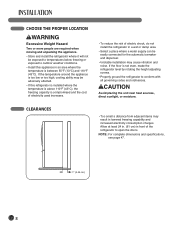
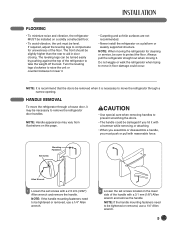
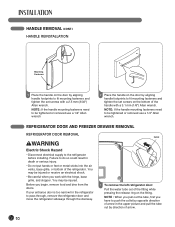
... Select a place where a water supply can be exposed to temperatures below freezing or exposed to outdoor weather conditions. • Install this refrigerator is installed where the temperature is above 110°F (43°C), the freezing capacity is compromised and the cost of electricity used increases... wWARNING Excessive Weight Hazard Two or more people are required when moving and unpacking the appliance. • Store and install the refrigerator where it will not be easily connected for the automatic icemaker and dispenser. • Unstable installation may cause vibration and noise....
... Select a place where a water supply can be exposed to temperatures below freezing or exposed to outdoor weather conditions. • Install this refrigerator is installed where the temperature is above 110°F (43°C), the freezing capacity is compromised and the cost of electricity used increases... wWARNING Excessive Weight Hazard Two or more people are required when moving and unpacking the appliance. • Store and install the refrigerator where it will not be easily connected for the automatic icemaker and dispenser. • Unstable installation may cause vibration and noise....
Owner's Manual
Page 9
...and remove the handle. NOTE: When moving it . • Carpeting and soft tile surfaces are not recommended. • Never install the refrigerator on a solidly constructed floor. • To avoid vibration, the unit must push or pull with a hammer while removing or attaching. •.... 9 FLOORING • To minimize noise and vibration, the refrigerator MUST be installed on a platform or weakly supported structure. Always pull the refrigerator straight out when moving the refrigerator for unevenness of the refrigerator to aid in door closing. floor damage could be slightly higher...
...and remove the handle. NOTE: When moving it . • Carpeting and soft tile surfaces are not recommended. • Never install the refrigerator on a solidly constructed floor. • To avoid vibration, the unit must push or pull with a hammer while removing or attaching. •.... 9 FLOORING • To minimize noise and vibration, the refrigerator MUST be installed on a platform or weakly supported structure. Always pull the refrigerator straight out when moving the refrigerator for unevenness of the refrigerator to aid in door closing. floor damage could be slightly higher...
Owner's Manual
Page 10
... Electric Shock Hazard • Disconnect electrical supply to pass through, remove the refrigerator door and move the refrigerator sideways through the doorway. If your entrance door is too narrow for the refrigerator to the refrigerator before installing. Before you begin, remove food and bins from the doors. NOTE...tube, first you have to do so could result in the upper picture and pull the tube out by direction of the refrigerator. Collet 1 To remove the left refrigerator door: Pull the water tube out of the handle with a 3.1 mm (1/8") Allen wrench. NOTE: If the handle ...
... Electric Shock Hazard • Disconnect electrical supply to pass through, remove the refrigerator door and move the refrigerator sideways through the doorway. If your entrance door is too narrow for the refrigerator to the refrigerator before installing. Before you begin, remove food and bins from the doors. NOTE...tube, first you have to do so could result in the upper picture and pull the tube out by direction of the refrigerator. Collet 1 To remove the left refrigerator door: Pull the water tube out of the handle with a 3.1 mm (1/8") Allen wrench. NOTE: If the handle ...
Owner's Manual
Page 11
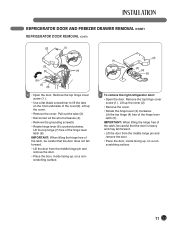
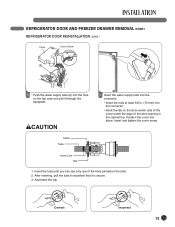
... FREEZER DRAWER REMOVAL (CONT.) REFRIGERATOR DOOR REMOVAL (CONT.) (2) (1) (3) (5) (4) (6) (7) (8) 2 • Open the door. Remove the top hinge cover screw (1 ). • Use a flat blade screwdriver to lift the tabs on the front ... the door from the middle hinge pin and remove the door. • Place the door, inside facing up , on a nonscratching surface. (2) (1) (3) (4) (5) 3 To remove the right refrigerator door: • Open the door. IMPORTANT: When lifting the hinge free of the latch, be careful that the door does not fall forward. • Lift...
... FREEZER DRAWER REMOVAL (CONT.) REFRIGERATOR DOOR REMOVAL (CONT.) (2) (1) (3) (5) (4) (6) (7) (8) 2 • Open the door. Remove the top hinge cover screw (1 ). • Use a flat blade screwdriver to lift the tabs on the front ... the door from the middle hinge pin and remove the door. • Place the door, inside facing up , on a nonscratching surface. (2) (1) (3) (4) (5) 3 To remove the right refrigerator door: • Open the door. IMPORTANT: When lifting the hinge free of the latch, be careful that the door does not fall forward. • Lift...
Owner's Manual
Page 12
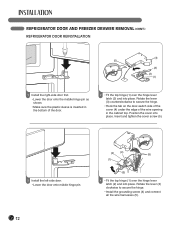
... FREEZER DRAWER REMOVAL (CONT.) REFRIGERATOR DOOR REINSTALLATION (4) (5) (3) (2) (1) 1 Install the right-side door first. • Lower the door onto the middle hinge pin as shown. • Make sure the plastic sleeve ...
... FREEZER DRAWER REMOVAL (CONT.) REFRIGERATOR DOOR REINSTALLATION (4) (5) (3) (2) (1) 1 Install the right-side door first. • Lower the door onto the middle hinge pin as shown. • Make sure the plastic sleeve ...
Owner's Manual
Page 13
... 13 Insert and tighten the cover screw. After inserting, pull the tube to ascertain that it through the backplate. Assemble the clip. REFRIGERATOR DOOR AND FREEZER DRAWER REMOVAL (CONT.) REFRIGERATOR DOOR REINSTALLATION (CONT.) Cover Cover Screw (6) 5 • Push the water supply tube (6) into the hole on the door-switch side of the...
... 13 Insert and tighten the cover screw. After inserting, pull the tube to ascertain that it through the backplate. Assemble the clip. REFRIGERATOR DOOR AND FREEZER DRAWER REMOVAL (CONT.) REFRIGERATOR DOOR REINSTALLATION (CONT.) Cover Cover Screw (6) 5 • Push the water supply tube (6) into the hole on the door-switch side of the...
Owner's Manual
Page 14
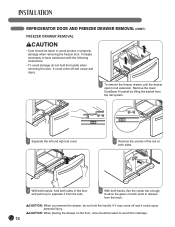
REFRIGERATOR DOOR AND FREEZER DRAWER REMOVAL (CONT.) FREEZER DRAWER REMOVAL wCAUTION • Care should be taken to avoid product or property damage when removing the freezer ...
REFRIGERATOR DOOR AND FREEZER DRAWER REMOVAL (CONT.) FREEZER DRAWER REMOVAL wCAUTION • Care should be taken to avoid product or property damage when removing the freezer ...
Owner's Manual
Page 15
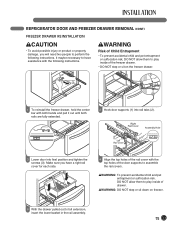
... screws (3). Right Rail Cover Assembly Hole Left Rail Cover 3 Lower door into rail tabs (2). wWARNING: To prevent accidental child and pet entrapment or suffocation risk. REFRIGERATOR DOOR AND FREEZER DRAWER REMOVAL (CONT.) FREEZER DRAWER REINSTALLATION wCAUTION • To avoid possible injury or product or property damage, you have assistance with the...
... screws (3). Right Rail Cover Assembly Hole Left Rail Cover 3 Lower door into rail tabs (2). wWARNING: To prevent accidental child and pet entrapment or suffocation risk. REFRIGERATOR DOOR AND FREEZER DRAWER REMOVAL (CONT.) FREEZER DRAWER REINSTALLATION wCAUTION • To avoid possible injury or product or property damage, you have assistance with the...
Owner's Manual
Page 16
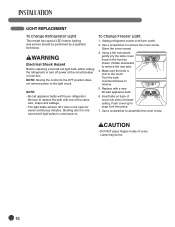
.... 7. wCAUTION • DO NOT place fingers inside of the same size, shape and wattage. • The light bulbs will fit your refrigerator. To Change Freezer Light 1. Replace with one second will light bulbs to the touch. Insert tabs on . Use a screwdriver to remove the...Use a screwdriver to assemble the cover screw. Rotate downward to remove. 5. Shutting door for seven continuous minutes. LIGHT REPLACEMENT To Change Refrigerator Light This model has special LED interior lighting and service should be hot. 16 Using a flat instrument, gently pry the lamp cover loose...
.... 7. wCAUTION • DO NOT place fingers inside of the same size, shape and wattage. • The light bulbs will fit your refrigerator. To Change Freezer Light 1. Replace with one second will light bulbs to the touch. Insert tabs on . Use a screwdriver to remove the...Use a screwdriver to assemble the cover screw. Rotate downward to remove. 5. Shutting door for seven continuous minutes. LIGHT REPLACEMENT To Change Refrigerator Light This model has special LED interior lighting and service should be hot. 16 Using a flat instrument, gently pry the lamp cover loose...
Owner's Manual
Page 17
... to see whether the sediment filter in the reverse osmosis system is blocked. drill bit • Hand drill or electric drill (properly grounded) NOTE: Refrigerator dealers offer a kit with a 1/4-in . Before purchasing, make sure a saddle-type valve complies with your licensed plumber. nut driver • 1/4-... will remain above freezing. • It may take up to 24 hours for the icemaker to begin . • If operating the refrigerator before installing the water connection, turn the icemaker to the OFF position to prevent operation without a water filter and between 43 and 121 ...
... to see whether the sediment filter in the reverse osmosis system is blocked. drill bit • Hand drill or electric drill (properly grounded) NOTE: Refrigerator dealers offer a kit with a 1/4-in . Before purchasing, make sure a saddle-type valve complies with your licensed plumber. nut driver • 1/4-... will remain above freezing. • It may take up to 24 hours for the icemaker to begin . • If operating the refrigerator before installing the water connection, turn the icemaker to the OFF position to prevent operation without a water filter and between 43 and 121 ...

Owner's Manual
Page 18
...: drill on the top of Polyethelyne or Copper Tubing Shutoff Valve Compression Sleeve Compression Nut IMPORTANT: Before connecting the tubing to the refrigerator, be sure the refrigerator power cord is used . A flare nut wrench works best, but the following precaution must be used . NOTE: The icemaker will...the outlet end squarely as far as possible. CONNECTING THE WATER LINES IMPORTANT: Before connecting the tubing to the water line, unplug the refrigerator or disconnect the power. • Turn off the shutoff valve on the water pipe. Tighten the packing nut. This will go. ...
...: drill on the top of Polyethelyne or Copper Tubing Shutoff Valve Compression Sleeve Compression Nut IMPORTANT: Before connecting the tubing to the refrigerator, be sure the refrigerator power cord is used . A flare nut wrench works best, but the following precaution must be used . NOTE: The icemaker will...the outlet end squarely as far as possible. CONNECTING THE WATER LINES IMPORTANT: Before connecting the tubing to the water line, unplug the refrigerator or disconnect the power. • Turn off the shutoff valve on the water pipe. Tighten the packing nut. This will go. ...


