
Owner's Manual
Page 2
Your new LG French Door Refrigerator combines advanced cooling technology with many years of Foods 29 Shelf Height Adjustment 30 CARE AND CLEANING Removing and Replacing Components 31 Cleaning the Refrigerator 35 General Information 35 Replacing the Water Filter... 7 INSTALLATION Choose the Proper Location 8 Clearances 8 Flooring 9 Handle Removal 9 Refrigerator Door and Freezer Drawer Removal ..10 Light Replacement 16 Connecting the Water Supply 17 Connecting the Water Lines 18 Leveling the Refrigerator Doors 19 Starting 20 HOW TO USE Control Panel Features 21 The LED ...
Your new LG French Door Refrigerator combines advanced cooling technology with many years of Foods 29 Shelf Height Adjustment 30 CARE AND CLEANING Removing and Replacing Components 31 Cleaning the Refrigerator 35 General Information 35 Replacing the Water Filter... 7 INSTALLATION Choose the Proper Location 8 Clearances 8 Flooring 9 Handle Removal 9 Refrigerator Door and Freezer Drawer Removal ..10 Light Replacement 16 Connecting the Water Supply 17 Connecting the Water Lines 18 Leveling the Refrigerator Doors 19 Starting 20 HOW TO USE Control Panel Features 21 The LED ...
Owner's Manual
Page 3
... cabinet are not followed. Be careful closing doors when children are in the area. • Unplug your refrigerator before using your refrigerator is in operation, do not touch the cold surfaces in the freezer compartment when hands are finished, reconnect the refrigerator to the extremely cold surfaces. • In ...• Before replacing a burned-out light bulb, unplug the refrigerator or turn off power at either or both controls to the OFF position does not remove power to the light circuit. • When you how to roll over or damage the power cord. • DO NOT store or use a...
... cabinet are not followed. Be careful closing doors when children are in the area. • Unplug your refrigerator before using your refrigerator is in operation, do not touch the cold surfaces in the freezer compartment when hands are finished, reconnect the refrigerator to the extremely cold surfaces. • In ...• Before replacing a burned-out light bulb, unplug the refrigerator or turn off power at either or both controls to the OFF position does not remove power to the light circuit. • When you how to roll over or damage the power cord. • DO NOT store or use a...
Owner's Manual
Page 4
.... The food may be discarded. Risk of Child Entrapment Discarded or abandoned refrigerators are believed to remove odor. • Install in place, as you can be eaten. CFCs are dangerous, even ...just a few days. If you intentionally release this CFC refrigerant, you throw away your old refrigerator or freezer: • Take off -color should not be refrozen and should be supervised to fines and imprisonment ...as much of their safety. If the odor or color of any off-odor or off the doors. • Do not leave the shelves in places away from the fire such as the place...
.... The food may be discarded. Risk of Child Entrapment Discarded or abandoned refrigerators are believed to remove odor. • Install in place, as you can be eaten. CFCs are dangerous, even ...just a few days. If you intentionally release this CFC refrigerant, you throw away your old refrigerator or freezer: • Take off -color should not be refrozen and should be supervised to fines and imprisonment ...as much of their safety. If the odor or color of any off-odor or off the doors. • Do not leave the shelves in places away from the fire such as the place...
Owner's Manual
Page 10
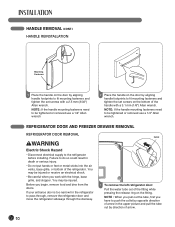
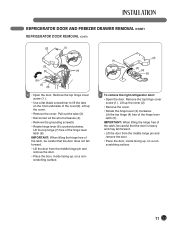
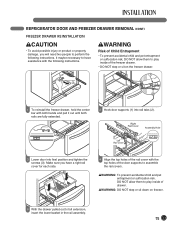
.... NOTE : When you pull out the tube, first you begin, remove food and bins from the doors. You may be tightened or removed use a 1/4" Allen wrench. REFRIGERATOR DOOR AND FREEZER DRAWER REMOVAL REFRIGERATOR DOOR REMOVAL wWARNING Electric Shock Hazard • Disconnect electrical supply to pass through, remove the refrigerator door and move the refrigerator sideways through the doorway. Before you...
.... NOTE : When you pull out the tube, first you begin, remove food and bins from the doors. You may be tightened or removed use a 1/4" Allen wrench. REFRIGERATOR DOOR AND FREEZER DRAWER REMOVAL REFRIGERATOR DOOR REMOVAL wWARNING Electric Shock Hazard • Disconnect electrical supply to pass through, remove the refrigerator door and move the refrigerator sideways through the doorway. Before you...
Owner's Manual
Page 11
... wire harnesses (4). • Remove the grounding screw(5) • Rotate hinge lever (6) counterclockwise. Remove the top hinge cover screw (1 ). • Use a flat blade screwdriver to lift the tabs on a nonscratching surface. (2) (1) (3) (4) (5) 3 To remove the right refrigerator door: • Open the door. Lift up the cover. • Remove the cover. REFRIGERATOR DOOR AND FREEZER DRAWER REMOVAL (CONT.) REFRIGERATOR DOOR REMOVAL (CONT.) (2) (1) (3) (5) (4) (6) (7) (8) 2 • Open...
... wire harnesses (4). • Remove the grounding screw(5) • Rotate hinge lever (6) counterclockwise. Remove the top hinge cover screw (1 ). • Use a flat blade screwdriver to lift the tabs on a nonscratching surface. (2) (1) (3) (4) (5) 3 To remove the right refrigerator door: • Open the door. Lift up the cover. • Remove the cover. REFRIGERATOR DOOR AND FREEZER DRAWER REMOVAL (CONT.) REFRIGERATOR DOOR REMOVAL (CONT.) (2) (1) (3) (5) (4) (6) (7) (8) 2 • Open...
Owner's Manual
Page 12
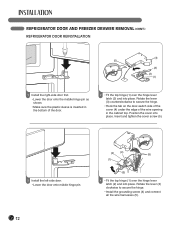
REFRIGERATOR DOOR AND FREEZER DRAWER REMOVAL (CONT.) REFRIGERATOR DOOR REINSTALLATION (4) (5) (3) (2) (1) 1 Install the right-side door first. • Lower the door onto the middle hinge pin as shown. • Make sure the plastic sleeve is inserted in the bottom of the ...; Fit the top hinge (1) over the hinge lever latch (2) and into place. Insert and tighten the cover screw (5). 3 Install the left-side door. • Lower the door onto middle hinge pin. (2) (4) (5) (1) (3) 4 • Fit the top hinge (1) over the hinge lever latch (2) and into place. Rotate the lever (3)...
REFRIGERATOR DOOR AND FREEZER DRAWER REMOVAL (CONT.) REFRIGERATOR DOOR REINSTALLATION (4) (5) (3) (2) (1) 1 Install the right-side door first. • Lower the door onto the middle hinge pin as shown. • Make sure the plastic sleeve is inserted in the bottom of the ...; Fit the top hinge (1) over the hinge lever latch (2) and into place. Insert and tighten the cover screw (5). 3 Install the left-side door. • Lower the door onto middle hinge pin. (2) (4) (5) (1) (3) 4 • Fit the top hinge (1) over the hinge lever latch (2) and into place. Rotate the lever (3)...
Owner's Manual
Page 13
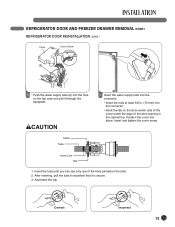
... top. Correct Incorrect 13 Assemble the clip. Position the cover into the hole on the top case and pull it is secure. 3. REFRIGERATOR DOOR AND FREEZER DRAWER REMOVAL (CONT.) REFRIGERATOR DOOR REINSTALLATION (CONT.) Cover Cover Screw (6) 5 • Push the water supply tube (6) into place. Insert and tighten the cover screw. Insert Line Clip 1. wCAUTION...
... top. Correct Incorrect 13 Assemble the clip. Position the cover into the hole on the top case and pull it is secure. 3. REFRIGERATOR DOOR AND FREEZER DRAWER REMOVAL (CONT.) REFRIGERATOR DOOR REINSTALLATION (CONT.) Cover Cover Screw (6) 5 • Push the water supply tube (6) into place. Insert and tighten the cover screw. Insert Line Clip 1. wCAUTION...
Owner's Manual
Page 14
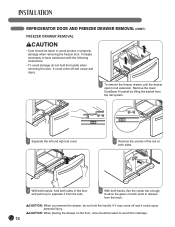
... be taken to avoid floor damage. 14 REFRIGERATOR DOOR AND FREEZER DRAWER REMOVAL (CONT.) FREEZER DRAWER REMOVAL wCAUTION • Care should be taken to avoid product or property damage when removing the freezer door. wCAUTION: When you remove the drawer, do not hold the handle when removing the door. If it from the track. Remove the lower DuraBase ® basket by lifting...
... be taken to avoid floor damage. 14 REFRIGERATOR DOOR AND FREEZER DRAWER REMOVAL (CONT.) FREEZER DRAWER REMOVAL wCAUTION • Care should be taken to avoid product or property damage when removing the freezer door. wCAUTION: When you remove the drawer, do not hold the handle when removing the door. If it from the track. Remove the lower DuraBase ® basket by lifting...
Owner's Manual
Page 15
... • To prevent accidental child and pet entrapment or suffocation risk, DO NOT allow them to play inside of the door supports to assemble the rail covers. REFRIGERATOR DOOR AND FREEZER DRAWER REMOVAL (CONT.) FREEZER DRAWER REINSTALLATION wCAUTION • To avoid possible injury or product or property damage, you have assistance with both hands and...
... • To prevent accidental child and pet entrapment or suffocation risk, DO NOT allow them to play inside of the door supports to assemble the rail covers. REFRIGERATOR DOOR AND FREEZER DRAWER REMOVAL (CONT.) FREEZER DRAWER REINSTALLATION wCAUTION • To avoid possible injury or product or property damage, you have assistance with both hands and...
Owner's Manual
Page 16
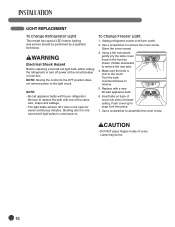
... replacing a burned-out light bulb, either unplug the refrigerator or turn off power at the circuit breaker or fuse box. Shutting door for seven continuous minutes. Make sure the bulb is left open for one of the same size, shape and wattage. • .... NOTE: Moving the control to the OFF position does not remove power to assemble the cover screw. Use a screwdriver to remove. 5. Turn the bulb counterclockwise to remove the cover screw. (Save the cover screw) 3. Insert tabs on . To Change Freezer Light 1. Unplug refrigerator power cord form outlet. 2. Using ...
... replacing a burned-out light bulb, either unplug the refrigerator or turn off power at the circuit breaker or fuse box. Shutting door for seven continuous minutes. Make sure the bulb is left open for one of the same size, shape and wattage. • .... NOTE: Moving the control to the OFF position does not remove power to assemble the cover screw. Use a screwdriver to remove. 5. Turn the bulb counterclockwise to remove the cover screw. (Save the cover screw) 3. Insert tabs on . To Change Freezer Light 1. Unplug refrigerator power cord form outlet. 2. Using ...
Owner's Manual
Page 19
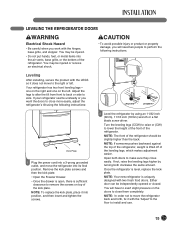
...driver. NOTE: The front of the refrigerator should be injured or receive an electrical shock. NOTE: Your new refrigerator is sufficient clearance to side. Either door can be injured. • Do not put hands, feet, or metal items into its final position. NOTE: To replace the kick plate, place... Shock Hazard • Be careful when you work with two fresh food doors. one on the right and one on the doors to close them completely. Remove the kick plate screws and then the kick plate. • Open the Freezer Drawer. • Once the drawer is open, there is uniquely designed ...
...driver. NOTE: The front of the refrigerator should be injured or receive an electrical shock. NOTE: Your new refrigerator is sufficient clearance to side. Either door can be injured. • Do not put hands, feet, or metal items into its final position. NOTE: To replace the kick plate, place... Shock Hazard • Be careful when you work with two fresh food doors. one on the right and one on the doors to close them completely. Remove the kick plate screws and then the kick plate. • Open the Freezer Drawer. • Once the drawer is open, there is uniquely designed ...
Owner's Manual
Page 20
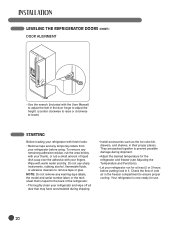
...refrigerator. • Thoroughly clean your refrigerator before putting food in it. LEVELING THE REFRIGERATOR DOORS (CONT.) DOOR ALIGNMENT • Use the wrench (Included with the User Manual) to adjust the bolt in the door hinge to adjust the height. (counter clockwise to raise or clockwise to lower) STARTING ... off all dust that is now ready for the refrigerator and freezer (see Adjusting the Temperature and Functions). • Let your fingers. Your refrigerator is taped to the back of cold air in the freezer compartment to remove tape or glue. Do not use . 20 Wipe with warm...
...refrigerator. • Thoroughly clean your refrigerator before putting food in it. LEVELING THE REFRIGERATOR DOORS (CONT.) DOOR ALIGNMENT • Use the wrench (Included with the User Manual) to adjust the bolt in the door hinge to adjust the height. (counter clockwise to raise or clockwise to lower) STARTING ... off all dust that is now ready for the refrigerator and freezer (see Adjusting the Temperature and Functions). • Let your fingers. Your refrigerator is taped to the back of cold air in the freezer compartment to remove tape or glue. Do not use . 20 Wipe with warm...
Owner's Manual
Page 26
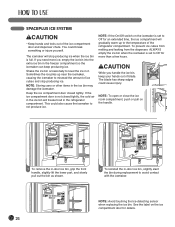
...: To open or close the ice room compartment, push or pull on the handle. 1 To remove the in-door ice bin, grip the front handle, slightly lift the lower part, and slowly pull out the ...you handle the ice bin, keep producing ice. NOTE: Storing cans or other items in the freezer compartment so the icemaker can keep your hands out of ice cubes and stop producing ice when... not produce ice. This could also cause the icemaker to the temperature of the ice compartment door and dispenser chute. Ice-detecting Sensor 26 NOTE: Avoid touching the Ice-detecting sensor when replacing...
...: To open or close the ice room compartment, push or pull on the handle. 1 To remove the in-door ice bin, grip the front handle, slightly lift the lower part, and slowly pull out the ...you handle the ice bin, keep producing ice. NOTE: Storing cans or other items in the freezer compartment so the icemaker can keep your hands out of ice cubes and stop producing ice when... not produce ice. This could also cause the icemaker to the temperature of the ice compartment door and dispenser chute. Ice-detecting Sensor 26 NOTE: Avoid touching the Ice-detecting sensor when replacing...

Owner's Manual
Page 27
...the option to make 12 ice cubes at a proper distance from dispensing. • To avoid personal injury, keep hands out of door openings, freezer load, and other beverages. The noise is generated because the water pipe is not connected, which does not mean the icemaker is ...plugged in or around dispenser. • The ice passage may vary by circumstance, including freezer compartment temperature, room temperature, number of the ice door and passage. • Never remove the dispenser cover. • If you find ice or water dispensed unexpectedly, turn on the automatic...
...the option to make 12 ice cubes at a proper distance from dispensing. • To avoid personal injury, keep hands out of door openings, freezer load, and other beverages. The noise is generated because the water pipe is not connected, which does not mean the icemaker is ...plugged in or around dispenser. • The ice passage may vary by circumstance, including freezer compartment temperature, room temperature, number of the ice door and passage. • Never remove the dispenser cover. • If you find ice or water dispensed unexpectedly, turn on the automatic...
Owner's Manual
Page 35
... Most power failures that are corrected within an hour or two will probably find it best to store the refrigerator, remove all removable parts, such as door liners or gaskets. Do not use a clean sponge or soft cloth and a mild detergent in the refrigerator. of... REFRIGERATOR wWARNING Explosion Hazard • Use nonflammable cleaner. • Failure to pack it for longer life. Both the refrigerator and freezer sections defrost automatically. Cleaning the Exterior For models with a stainless steel exterior, use cleaning waxes, concentrated detergents, or cleaners containing ...
... Most power failures that are corrected within an hour or two will probably find it best to store the refrigerator, remove all removable parts, such as door liners or gaskets. Do not use a clean sponge or soft cloth and a mild detergent in the refrigerator. of... REFRIGERATOR wWARNING Explosion Hazard • Use nonflammable cleaner. • Failure to pack it for longer life. Both the refrigerator and freezer sections defrost automatically. Cleaning the Exterior For models with a stainless steel exterior, use cleaning waxes, concentrated detergents, or cleaners containing ...
Owner's Manual
Page 42
...recently. • Refrigerator has recently been disconnected for the refrigerator to reach the set too warm. • Doors are too warm. • Freezer or refrigerator control is set temperatures. BEFORE CALLING FOR SERVICE (CONT.) Problem Possible Causes Solutions Food stored in ...can adequately support the refrigerator. • Remove items. • It is set too warm. • Adjust the refrigerator control to a warmer setting. Open the door less often. • Close the door completely. • Wait until the freezer or refrigerator temperature is satisfactory. •...
...recently. • Refrigerator has recently been disconnected for the refrigerator to reach the set too warm. • Doors are too warm. • Freezer or refrigerator control is set temperatures. BEFORE CALLING FOR SERVICE (CONT.) Problem Possible Causes Solutions Food stored in ...can adequately support the refrigerator. • Remove items. • It is set too warm. • Adjust the refrigerator control to a warmer setting. Open the door less often. • Close the door completely. • Wait until the freezer or refrigerator temperature is satisfactory. •...

Owner's Manual
Page 44
...and turn water shutoff valve fully open. • This can help, as well as not opening the doors as frequently. • The door that is not closed properly, makes the Freezer temperature high and icemaker will prevent the unit from maintaining the set at a warmer temperature, then the...-1°F is recommended temperature setting of ice recently has been removed. • The icemaker is not turned on. • There is Something on the Ice-detecting sensor. • The temperature setting is too warm on Freezer. • The doors are opened often, the cold air will escape which will ...
...and turn water shutoff valve fully open. • This can help, as well as not opening the doors as frequently. • The door that is not closed properly, makes the Freezer temperature high and icemaker will prevent the unit from maintaining the set at a warmer temperature, then the...-1°F is recommended temperature setting of ice recently has been removed. • The icemaker is not turned on. • There is Something on the Ice-detecting sensor. • The temperature setting is too warm on Freezer. • The doors are opened often, the cold air will escape which will ...
Owner's Manual
Page 46
...The filter can decrease water pressure. BEFORE CALLING FOR SERVICE (CONT.) Problem Possible Causes Solutions Not dispense water • New installation. • Freezer door is not closed completely, the ice is never dispensed. • Connect refrigerator to water supply and turn water shutoff valve fully open. •...; The water pressure to the home determines the flow from the dispenser. It is recommended to remove reverse osmosis for water to come out. • Water filter need to be changed . • Hold the glass under the dispenser ...
...The filter can decrease water pressure. BEFORE CALLING FOR SERVICE (CONT.) Problem Possible Causes Solutions Not dispense water • New installation. • Freezer door is not closed completely, the ice is never dispensed. • Connect refrigerator to water supply and turn water shutoff valve fully open. •...; The water pressure to the home determines the flow from the dispenser. It is recommended to remove reverse osmosis for water to come out. • Water filter need to be changed . • Hold the glass under the dispenser ...
Owner's Manual
Page 49
...unless such damage results from defects in the Product owner's manual. 5. Shelves, door bins, drawers, handles, and accessories to the instructions outlined in materials or workmanship ... verified, the warranty will begin sixty (60) days from the date of manufacture) Refrigerator/Freezer Sealed System (Condenser, Dryer, Connecting Tube, Refrigerant and Evaporator) Linear Compressor One (1) year...rights which may have been removed, altered, or cannot be new or remanufactured. ̈ LG Authorized Service Center warranties their repair work for repairs. 16. LG CANADA'S SOLE LIABILITY IS ...
...unless such damage results from defects in the Product owner's manual. 5. Shelves, door bins, drawers, handles, and accessories to the instructions outlined in materials or workmanship ... verified, the warranty will begin sixty (60) days from the date of manufacture) Refrigerator/Freezer Sealed System (Condenser, Dryer, Connecting Tube, Refrigerant and Evaporator) Linear Compressor One (1) year...rights which may have been removed, altered, or cannot be new or remanufactured. ̈ LG Authorized Service Center warranties their repair work for repairs. 16. LG CANADA'S SOLE LIABILITY IS ...


