
Owner's Manual (English)
Page 2
...23 Setting the Functions 24 In-Door Ice Bin 25 Automatic Icemaker 26 Storing Foods 27 Location of reliable service. Your new LG French Door Refrigerator combines advanced cooling technology with many years of Foods 28 Shelf Height Adjustment 29 CARE AND CLEANING Removing and Replacing Components 30 ... and Specifications 40 WARRANTY Product Registration Information 41 2 THANK YOU! IMPORTANT SAFETY INFORMATION Basic Safety Precautions 3 CFC Disposal 4 How to the LG family. Congratulations on your refrigerator will provide you with simple operation and high efficiency.
...23 Setting the Functions 24 In-Door Ice Bin 25 Automatic Icemaker 26 Storing Foods 27 Location of reliable service. Your new LG French Door Refrigerator combines advanced cooling technology with many years of Foods 28 Shelf Height Adjustment 29 CARE AND CLEANING Removing and Replacing Components 30 ... and Specifications 40 WARRANTY Product Registration Information 41 2 THANK YOU! IMPORTANT SAFETY INFORMATION Basic Safety Precautions 3 CFC Disposal 4 How to the LG family. Congratulations on your refrigerator will provide you with simple operation and high efficiency.

Owner's Manual (English)
Page 3
...heating element that were taped to the front of fire, electric shock, or injury to the extremely cold surfaces. • In refrigerators with automatic icemakers, avoid contact with the moving your product, basic safety precautions should be properly installed in the freezer compartment when ... become frayed or otherwise damaged. All safety messages will be preceded by pulling on the model) to the desired setting. • This refrigerator must be followed, including the following. NOTE: Setting either the plug or connector end. • When moving parts of pinch point areas...
...heating element that were taped to the front of fire, electric shock, or injury to the extremely cold surfaces. • In refrigerators with automatic icemakers, avoid contact with the moving your product, basic safety precautions should be properly installed in the freezer compartment when ... become frayed or otherwise damaged. All safety messages will be preceded by pulling on the model) to the desired setting. • This refrigerator must be followed, including the following. NOTE: Setting either the plug or connector end. • When moving parts of pinch point areas...

Owner's Manual (English)
Page 4
... red meats is affected less than that children may have a cooling system that have thawed completely. Before you throw away your old refrigerator or freezer: • Take off -color should not be refrozen and should be dangerous to help prevent accidents. The food may...their quality as possible to harm stratospheric ozone. CFCs are believed to save as much of Child Entrapment Discarded or abandoned refrigerators are throwing away your old refrigerator, please follow the instructions below 40°F (4°C). ...Thawed ground meats, poultry, or fish that used CFCs (...
... red meats is affected less than that children may have a cooling system that have thawed completely. Before you throw away your old refrigerator or freezer: • Take off -color should not be refrozen and should be dangerous to help prevent accidents. The food may...their quality as possible to harm stratospheric ozone. CFCs are believed to save as much of Child Entrapment Discarded or abandoned refrigerators are throwing away your old refrigerator, please follow the instructions below 40°F (4°C). ...Thawed ground meats, poultry, or fish that used CFCs (...
Owner's Manual (English)
Page 5
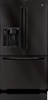
...(ground) prong from overheated wires. Have the wall outlet and the circuit checked by a qualified technician. RECOMMENDED GROUNDING METHOD The refrigerator should be turned off with a properly grounded three-prong wall outlet. This provides the best performance and also prevents overloading house ... which cannot be performed by a qualified electrician to the desired setting. It is your personal responsibility and obligation to use of the refrigerator. Where a standard two-prong wall outlet is encountered, it be a UL-listed (USA), 3-wire grounding-type appliance extension cord ...
...(ground) prong from overheated wires. Have the wall outlet and the circuit checked by a qualified technician. RECOMMENDED GROUNDING METHOD The refrigerator should be turned off with a properly grounded three-prong wall outlet. This provides the best performance and also prevents overloading house ... which cannot be performed by a qualified electrician to the desired setting. It is your personal responsibility and obligation to use of the refrigerator. Where a standard two-prong wall outlet is encountered, it be a UL-listed (USA), 3-wire grounding-type appliance extension cord ...

Owner's Manual (English)
Page 6
...PANEL LED DISPLAY SCREEN Simple electronic controls are user-friendly. 1 The LED screen shows refrigerator and freezer temperatures, displays water filter status, dispenser information, and more shelf space. 6 6 CRISPERS LG's crispers preserve humidity and help vegetables stay crisp. 7 7 AUTO CLOSING HINGE When... you slightly push the door of the refrigerator, it is automatically closed. (The door is activated, the freezer...
...PANEL LED DISPLAY SCREEN Simple electronic controls are user-friendly. 1 The LED screen shows refrigerator and freezer temperatures, displays water filter status, dispenser information, and more shelf space. 6 6 CRISPERS LG's crispers preserve humidity and help vegetables stay crisp. 7 7 AUTO CLOSING HINGE When... you slightly push the door of the refrigerator, it is automatically closed. (The door is activated, the freezer...
Owner's Manual (English)
Page 7
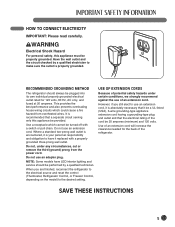
...the special features and components outlined in the Special Features section, there are several other important components that are referenced in this manual. 1 ADJUSTABLE REFRIGERATOR SHELVING The refrigerator compartment shelves are adjustable to allow flexibility for storage needs. 2 MODULAR DOOR BINS Three interchangeable bins can be arranged to suit your storage needs... ice storage bin can be removed to fill ice buckets, coolers, or pitchers. 4 LED INTERIOR LAMPS Two separate LED arrays light the freezer and refrigerator interiors. 5 FIXED DOOR BIN 6 FIXED DOOR BIN 4 1 2 5 6 3 4 7
...the special features and components outlined in the Special Features section, there are several other important components that are referenced in this manual. 1 ADJUSTABLE REFRIGERATOR SHELVING The refrigerator compartment shelves are adjustable to allow flexibility for storage needs. 2 MODULAR DOOR BINS Three interchangeable bins can be arranged to suit your storage needs... ice storage bin can be removed to fill ice buckets, coolers, or pitchers. 4 LED INTERIOR LAMPS Two separate LED arrays light the freezer and refrigerator interiors. 5 FIXED DOOR BIN 6 FIXED DOOR BIN 4 1 2 5 6 3 4 7

Owner's Manual (English)
Page 8
... unit near heat sources, direct sunlight, or moisture. Allow at least 24 in. (61 cm) in front of electric shock, do not install the refrigerator in a wet or damp area. • Select a place where a water supply can be exposed to temperatures below freezing or exposed to outdoor weather ... result in an area where the temperature is compromised and the cost of electricity used increases. • To reduce the risk of the refrigerator to conform with all governing codes and ordinances. CHOOSE THE PROPER LOCATION wWARNING Excessive Weight Hazard Two or more people are required when moving...
... unit near heat sources, direct sunlight, or moisture. Allow at least 24 in. (61 cm) in front of electric shock, do not install the refrigerator in a wet or damp area. • Select a place where a water supply can be exposed to temperatures below freezing or exposed to outdoor weather ... result in an area where the temperature is compromised and the cost of electricity used increases. • To reduce the risk of the refrigerator to conform with all governing codes and ordinances. CHOOSE THE PROPER LOCATION wWARNING Excessive Weight Hazard Two or more people are required when moving...
Owner's Manual (English)
Page 9
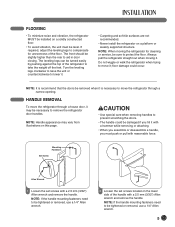
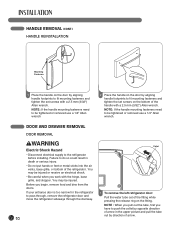
...prevent scratching the doors. • The handle could occur. HANDLE REMOVAL To move it . NOTE: Handle appearance may be necessary to move the refrigerator through a narrow opening. NOTE: It is recommend that the doors be removed when it with a 2.5 mm (3/32") Allen wrench and remove the... handle. FLOORING • To minimize noise and vibration, the refrigerator MUST be installed on a solidly constructed floor. • To avoid vibration, the unit must push or pull with reasonable force. floor damage ...
...prevent scratching the doors. • The handle could occur. HANDLE REMOVAL To move it . NOTE: Handle appearance may be necessary to move the refrigerator through a narrow opening. NOTE: It is recommend that the doors be removed when it with a 2.5 mm (3/32") Allen wrench and remove the... handle. FLOORING • To minimize noise and vibration, the refrigerator MUST be installed on a solidly constructed floor. • To avoid vibration, the unit must push or pull with reasonable force. floor damage ...
Owner's Manual (English)
Page 10
... REMOVAL wWARNING Collet Electric Shock Hazard • Disconnect electrical supply to pass through, remove the refrigerator door and move the refrigerator sideways through the doorway. 1 To remove the left refrigerator door: Pull the water tube out of the refrigerator. You may be tightened or removed use a 1/4" Allen wrench 2 Place the handle on the fitting... fasteners need to fit mounting fasteners and tighten the set screws with a 2.5 mm (3/32") Allen wrench. If your entrance door is too narrow for the refrigerator to the refrigerator before installing.
... REMOVAL wWARNING Collet Electric Shock Hazard • Disconnect electrical supply to pass through, remove the refrigerator door and move the refrigerator sideways through the doorway. 1 To remove the left refrigerator door: Pull the water tube out of the refrigerator. You may be tightened or removed use a 1/4" Allen wrench 2 Place the handle on the fitting... fasteners need to fit mounting fasteners and tighten the set screws with a 2.5 mm (3/32") Allen wrench. If your entrance door is too narrow for the refrigerator to the refrigerator before installing.
Owner's Manual (English)
Page 11
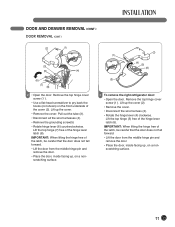
... the door from the middle hinge pin and remove the door. • Place the door, inside facing up , on a nonscratching surface. (2) (1) (4) (5) (6) (3) 3 To remove the right refrigerator door: • Open the door. Pull out the tube (3). • Disconnect all the wire harnesses (4). • Remove the grounding screw(5) • Rotate hinge lever (6) counterclockwise...
... the door from the middle hinge pin and remove the door. • Place the door, inside facing up , on a nonscratching surface. (2) (1) (4) (5) (6) (3) 3 To remove the right refrigerator door: • Open the door. Pull out the tube (3). • Disconnect all the wire harnesses (4). • Remove the grounding screw(5) • Rotate hinge lever (6) counterclockwise...

Owner's Manual (English)
Page 16
.... NOTE: A horizontal pipe will work, but the following precaution must be taken: drill on the lower left rear of the refrigerator to the water line, unplug the refrigerator or disconnect the power. • Turn off the main water supply and open -end wrenches or two adjustable wrenches • ...• If water pressure does not reach 21 psi (1.5kgf/cm2) or falls below, it is necessary to begin . • If operating the refrigerator before you begin producing ice. Consult with local plumbing codes. O.D. (outside faucet may take up to 24 hours for the icemaker to purchase a separate ...
.... NOTE: A horizontal pipe will work, but the following precaution must be taken: drill on the lower left rear of the refrigerator to the water line, unplug the refrigerator or disconnect the power. • Turn off the main water supply and open -end wrenches or two adjustable wrenches • ...• If water pressure does not reach 21 psi (1.5kgf/cm2) or falls below, it is necessary to begin . • If operating the refrigerator before you begin producing ice. Consult with local plumbing codes. O.D. (outside faucet may take up to 24 hours for the icemaker to purchase a separate ...

Owner's Manual (English)
Page 17
... Place the free end of the copper tubing into a container or sink, and turn on the water pipe. It will not begin to the refrigerator, be used . CONNECTING THE WATER LINES (CONT.) • Fasten the shutoff valve to connect the copper tubing. • Slip the compression ...Shutoff Valve Compression Sleeve Compression Nut IMPORTANT: Before connecting the tubing to operate until the water is equipped with a wrench. NOTE: If your refrigerator is clear. IMPORTANT: Tighten any connections that leak. Open the water at the shutoff valve. • Plug in -line water filter should...
... Place the free end of the copper tubing into a container or sink, and turn on the water pipe. It will not begin to the refrigerator, be used . CONNECTING THE WATER LINES (CONT.) • Fasten the shutoff valve to connect the copper tubing. • Slip the compression ...Shutoff Valve Compression Sleeve Compression Nut IMPORTANT: Before connecting the tubing to operate until the water is equipped with a wrench. NOTE: If your refrigerator is clear. IMPORTANT: Tighten any connections that leak. Open the water at the shutoff valve. • Plug in -line water filter should...

Owner's Manual (English)
Page 18
...replace the kick plate, place it with the LEG not to install and use. 18 NOTE: The front of the kick plate. LEVELING THE REFRIGERATOR DOORS wWARNING Electrical Shock Hazard • Be careful when you want the doors to make sure they close them completely. Adjust the legs to alter...be slightly higher than the back. wCAUTION • To avoid possible injury or product or property damage, you will have to close easily. Your refrigerator has two front leveling legs- Open both clockwise the same amount. You will need two people to side. Remove the kick plate screws and ...
...replace the kick plate, place it with the LEG not to install and use. 18 NOTE: The front of the kick plate. LEVELING THE REFRIGERATOR DOORS wWARNING Electrical Shock Hazard • Be careful when you want the doors to make sure they close them completely. Adjust the legs to alter...be slightly higher than the back. wCAUTION • To avoid possible injury or product or property damage, you will have to close easily. Your refrigerator has two front leveling legs- Open both clockwise the same amount. You will need two people to side. Remove the kick plate screws and ...

Owner's Manual (English)
Page 19
... remove any remaining adhesive residue, rub the area briskly with your thumb, or rub a small amount of liquid dish soap over the adhesive with your refrigerator before putting food in it. Do not use . 19 NOTE: Do not remove any warning-type labels, the model and serial number label, or... fluids, or abrasive cleaners to remove tape or glue. Check the flow of cold air in the freezer compartment to ensure proper cooling. LEVELING THE REFRIGERATOR DOORS (CONT.) DOOR ALIGNMENT 1 • Remove the Base Grillie. • Turn the leveling legs (CCW) to raise or (CW) to lower the height of...
... remove any remaining adhesive residue, rub the area briskly with your thumb, or rub a small amount of liquid dish soap over the adhesive with your refrigerator before putting food in it. Do not use . 19 NOTE: Do not remove any warning-type labels, the model and serial number label, or... fluids, or abrasive cleaners to remove tape or glue. Check the flow of cold air in the freezer compartment to ensure proper cooling. LEVELING THE REFRIGERATOR DOORS (CONT.) DOOR ALIGNMENT 1 • Remove the Base Grillie. • Turn the leveling legs (CCW) to raise or (CW) to lower the height of...

Owner's Manual (English)
Page 20
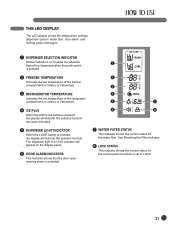
...to lock or unlock all the other function buttons on button functions, see pages 22-24. ICE TYPE FREEZER REFRIGERATOR 4 REFRIGERATOR BUTTON Press the REFRIGERATOR button to adjust the temperature in the freezer compartment. Press this button to about 20 percent. CONTROL PANEL FEATURES...versa. ICE PLUS LIGHT / FILTER ALARM / LOCK 3SECS 6 LIGHT/FILTER BUTTON The LIGHT/FILTER button controls the lamp in the refrigerator compartment. feature, which increases icemaking capabilities up to control the door-open alarm. NOTE: When pressed simultaneously with the FREEZER button...
...to lock or unlock all the other function buttons on button functions, see pages 22-24. ICE TYPE FREEZER REFRIGERATOR 4 REFRIGERATOR BUTTON Press the REFRIGERATOR button to adjust the temperature in the freezer compartment. Press this button to about 20 percent. CONTROL PANEL FEATURES...versa. ICE PLUS LIGHT / FILTER ALARM / LOCK 3SECS 6 LIGHT/FILTER BUTTON The LIGHT/FILTER button controls the lamp in the refrigerator compartment. feature, which increases icemaking capabilities up to control the door-open alarm. NOTE: When pressed simultaneously with the FREEZER button...
Owner's Manual (English)
Page 21
... dispensed when the push switch is pressed. 2 FREEZER TEMPERATURE Indicates the set temperature of the freezer compartment in Celsius or Fahrenheit. 3 REFRIGERATOR TEMPERATURE Indicates the set temperature of the refrigerator compartment in Celsius or Fahrenheit. 4 ICE PLUS When the ICE PLUS button is pressed, the display will indicate the selected function has...
... dispensed when the push switch is pressed. 2 FREEZER TEMPERATURE Indicates the set temperature of the freezer compartment in Celsius or Fahrenheit. 3 REFRIGERATOR TEMPERATURE Indicates the set temperature of the refrigerator compartment in Celsius or Fahrenheit. 4 ICE PLUS When the ICE PLUS button is pressed, the display will indicate the selected function has...
Owner's Manual (English)
Page 22
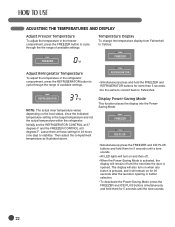
...• Do the same to convert back to stabilize. Display Power-Saving Mode This function places the display into the PowerSaving Mode. REFRIGERATOR NOTE: The actual inner temperature varies depending on and then off. • When the Power-Saving Mode is activated, the display ... since the indicated temperature setting is opened. Temperature Display To change the temperature display from Fahrenheit to Celsius: FREEZER FREEZER Adjust Refrigerator Temperature To adjust the temperature in the freezer compartment, press the FREEZER button to cycle through the range of available settings. ...
...• Do the same to convert back to stabilize. Display Power-Saving Mode This function places the display into the PowerSaving Mode. REFRIGERATOR NOTE: The actual inner temperature varies depending on and then off. • When the Power-Saving Mode is activated, the display ... since the indicated temperature setting is opened. Temperature Display To change the temperature display from Fahrenheit to Celsius: FREEZER FREEZER Adjust Refrigerator Temperature To adjust the temperature in the freezer compartment, press the FREEZER button to cycle through the range of available settings. ...

Owner's Manual (English)
Page 23
... ICE ICE TYPE Press the ICE TYPE button to turn the dispenser light on and off. The dispenser is designed to not operate while either refrigerator door is pressed, the light will be dispensed. NOTE: When operating the Water Button, it near the opening , use it does not work when you...
... ICE ICE TYPE Press the ICE TYPE button to turn the dispenser light on and off. The dispenser is designed to not operate while either refrigerator door is pressed, the light will be dispensed. NOTE: When operating the Water Button, it near the opening , use it does not work when you...

Owner's Manual (English)
Page 24
... that you replace the filter when the water filter indicator light reaches 0 or whenever the water or ice cube taste deteriorates noticeably. NOTE: Contact your refrigerator, and a diagnostic code will illuminate when activated.
... that you replace the filter when the water filter indicator light reaches 0 or whenever the water or ice cube taste deteriorates noticeably. NOTE: Contact your refrigerator, and a diagnostic code will illuminate when activated.

Owner's Manual (English)
Page 25
... set to Off for an extended time, the ice compartment will make a clicking sound when it is not closed tightly, the cold air in the refrigerator compartment. Shake the ice bin occasionally to avoid contact with the icemaker. it . Automatic shutoff Arm To reinstall the in-door ice bin, slightly slant... noted to not produce ice. To remove the in it will gradually warm up near the icemaker, causing the icemaker to the temperature of the refrigerator compartment. See the label on the ice bin door for more ice, empty the ice bin into the extra ice bin in the ice bin...
... set to Off for an extended time, the ice compartment will make a clicking sound when it is not closed tightly, the cold air in the refrigerator compartment. Shake the ice bin occasionally to avoid contact with the icemaker. it . Automatic shutoff Arm To reinstall the in-door ice bin, slightly slant... noted to not produce ice. To remove the in it will gradually warm up near the icemaker, causing the icemaker to the temperature of the refrigerator compartment. See the label on the ice bin door for more ice, empty the ice bin into the extra ice bin in the ice bin...


