Owner's Manual (English)
Page 2
... proper air circulation Multi Flow Door alarm Control Panel features Setting the controls Adjusting control settings Food storage guide Storing frozen food Refrigerator Section Refrigerator shelves Chef Fresh Crisper humidity control Optibin Crisper Crisper cover with lattice on inner surface Design-A-Door Dairy Bin Egg Box Freezer Section Ice Bin ... 2 36 3 - 4 5 - 6 6 7 8 - 14 8 8 8 9 - 11 12 - 13 14 15 - 25 15 15 15 15 16 17 18 18 19 19 20 20 20 21 21 21 21 22 22 22 22 23 - 24 24 - 25 25 26 - 27 26 26 26 26 26 26 26 - 27 27 27 28 29 - 31 32 - 35 2
... proper air circulation Multi Flow Door alarm Control Panel features Setting the controls Adjusting control settings Food storage guide Storing frozen food Refrigerator Section Refrigerator shelves Chef Fresh Crisper humidity control Optibin Crisper Crisper cover with lattice on inner surface Design-A-Door Dairy Bin Egg Box Freezer Section Ice Bin ... 2 36 3 - 4 5 - 6 6 7 8 - 14 8 8 8 9 - 11 12 - 13 14 15 - 25 15 15 15 15 16 17 18 18 19 19 20 20 20 21 21 21 21 22 22 22 22 23 - 24 24 - 25 25 26 - 27 26 26 26 26 26 26 26 - 27 27 27 28 29 - 31 32 - 35 2
Owner's Manual (English)
Page 3
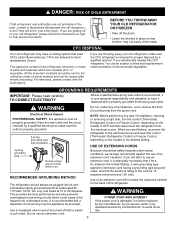
... a day, 7 days per week, 365 days per year) Press the appropriate menu option, and have your product type (Refrigerator), model number, serial number, and ZIP/Postal Code ready. 3 LG Refrigerator / Freezer Warranty Period Product Parts Labor Refrigerator / Freezer 1 year 1 year [In-Home Service (Except Model GR-051)] Sealed System 7 years 1 year [In-Home Service...
... a day, 7 days per week, 365 days per year) Press the appropriate menu option, and have your product type (Refrigerator), model number, serial number, and ZIP/Postal Code ready. 3 LG Refrigerator / Freezer Warranty Period Product Parts Labor Refrigerator / Freezer 1 year 1 year [In-Home Service (Except Model GR-051)] Sealed System 7 years 1 year [In-Home Service...
Owner's Manual (English)
Page 5
...ejector mechanism, or with the heating element that have thawed completely. WARNING To reduce the risk of their quality as described in the refrigerator. DO NOT allow children to Save as much of fire, electric shock, or injury to persons when using this appliance must be ... doors and cabinet are not followed. they are in . Have the wall outlet and the circuit checked by a qualified individual. After your refrigerator before using your product, basic safety precautions should be eaten. The food may break when frozen, causing damage. Use refrozen foods as soon ...
...ejector mechanism, or with the heating element that have thawed completely. WARNING To reduce the risk of their quality as described in the refrigerator. DO NOT allow children to Save as much of fire, electric shock, or injury to persons when using this appliance must be ... doors and cabinet are not followed. they are in . Have the wall outlet and the circuit checked by a qualified individual. After your refrigerator before using your product, basic safety precautions should be eaten. The food may break when frozen, causing damage. Use refrozen foods as soon ...
Owner's Manual (English)
Page 6
... standard two-prong wall outlet is encountered, it replaced with a properly grounded three-prong wall outlet. RECOMMENDED GROUNDING METHOD The refrigerator should be sent to the collection center of your personal responsibility and obligation to have a cooling system that children may have ... This appliance contains fluid (refrigerant, lubricant), is recommended that the electrical rating of the past. If you still elect to use an extension cord. GROUNDING REQUIREMENTS IMPORTANT: Please read carefully. Have the wall outlet and the circuit checked by LG Electronics, to avoid some ...
... standard two-prong wall outlet is encountered, it replaced with a properly grounded three-prong wall outlet. RECOMMENDED GROUNDING METHOD The refrigerator should be sent to the collection center of your personal responsibility and obligation to have a cooling system that children may have ... This appliance contains fluid (refrigerant, lubricant), is recommended that the electrical rating of the past. If you still elect to use an extension cord. GROUNDING REQUIREMENTS IMPORTANT: Please read carefully. Have the wall outlet and the circuit checked by LG Electronics, to avoid some ...
Owner's Manual (English)
Page 7
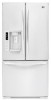
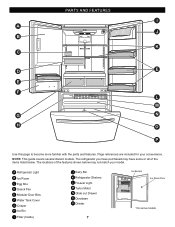
The locations of the items listed below may not match your convenience. PARTS AND FEATURES I Filter (Inside) J Dairy Bin K Refrigerator Shelves L Freezer Light M Turbo Motor N Glide out Drawer O Durabase P Divider 7 Ice Bucket Ice Room Door *On ... or all of the features shown below . Page references are included for your model. NOTE: This guide covers several dierent models. The refrigerator you have purchased may have some models A Refrigerator Light B Ice Room C Egg Box D Snack Pan E Modular Door Bins F Water Tank Cover G Crisper H Ice Bin I A J B K C D E E F L M ...
The locations of the items listed below may not match your convenience. PARTS AND FEATURES I Filter (Inside) J Dairy Bin K Refrigerator Shelves L Freezer Light M Turbo Motor N Glide out Drawer O Durabase P Divider 7 Ice Bucket Ice Room Door *On ... or all of the features shown below . Page references are included for your model. NOTE: This guide covers several dierent models. The refrigerator you have purchased may have some models A Refrigerator Light B Ice Room C Egg Box D Snack Pan E Modular Door Bins F Water Tank Cover G Crisper H Ice Bin I A J B K C D E E F L M ...
Owner's Manual (English)
Page 8
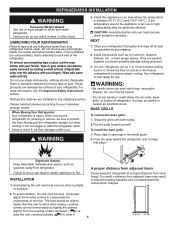
...the temperature around the appliance is heavy. Push the grille toward yourself. A proper distance from adjacent items Please keep the refrigerator at a proper distance from refrigerator. To avoid vibration, the unit must be injured or receive an electrical shock. Leveling screws can be easily removed by tipping... materials and vapors, such as ice cube bin, drawers, shelves, etc., in door closing. Too small a distance from your refrigerator thoroughly and wipe off all dust accumulated during shipment. 3. Do not remove any remaining tape or glue, rub the area briskly with your...
...the temperature around the appliance is heavy. Push the grille toward yourself. A proper distance from adjacent items Please keep the refrigerator at a proper distance from refrigerator. To avoid vibration, the unit must be injured or receive an electrical shock. Leveling screws can be easily removed by tipping... materials and vapors, such as ice cube bin, drawers, shelves, etc., in door closing. Too small a distance from your refrigerator thoroughly and wipe off all dust accumulated during shipment. 3. Do not remove any remaining tape or glue, rub the area briskly with your...
Owner's Manual (English)
Page 9
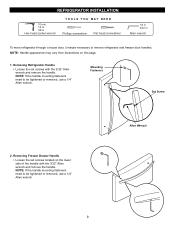
... fasteners need to be tightened or removed, use a 1/4" Allen wrench. NOTE: If the handle mounting fasteners need to remove refrigerator and freezer door handles. Allen Wrench 9 Removing Freezer Drawer Handle • Loosen the set screws with the 3/32" Allen wrench ...MAY NEED Phillips screwdriver Flat head screwdriver 1/4 in 3/32 in Allen wrench To move refrigerator through a house door, it maybe necessary to be tightened or removed, use a 1/4" Allen wrench. Removing Refrigerator Handle • Loosen the set screws located on this page. 1. Mounting Fasteners Set ...
... fasteners need to be tightened or removed, use a 1/4" Allen wrench. NOTE: If the handle mounting fasteners need to remove refrigerator and freezer door handles. Allen Wrench 9 Removing Freezer Drawer Handle • Loosen the set screws with the 3/32" Allen wrench ...MAY NEED Phillips screwdriver Flat head screwdriver 1/4 in 3/32 in Allen wrench To move refrigerator through a house door, it maybe necessary to be tightened or removed, use a 1/4" Allen wrench. Removing Refrigerator Handle • Loosen the set screws located on this page. 1. Mounting Fasteners Set ...
Owner's Manual (English)
Page 10
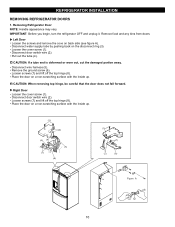
...the tube (4). Loosen screws (7) and lift off the top hinge (8). Right Door Loosen the cover screw (1). REFRIGERATOR INSTALLATION REMOVING REFRIGERATOR DOORS 1. IMPORTANT: Before you begin, turn the refrigerator OFF and unplug it. Disconnect water supply tube by pushing back on back side (see figure A). Loosen the ...cover screw (1). CAUTION: When removing top hinge, be careful that the door does not fall forward. Removing Refrigerator Door NOTE: Handle appearance may vary. Left Door Loosen the screws and remove the cove on the disconnect ring (3). Place the door...
...the tube (4). Loosen screws (7) and lift off the top hinge (8). Right Door Loosen the cover screw (1). REFRIGERATOR INSTALLATION REMOVING REFRIGERATOR DOORS 1. IMPORTANT: Before you begin, turn the refrigerator OFF and unplug it. Disconnect water supply tube by pushing back on back side (see figure A). Loosen the ...cover screw (1). CAUTION: When removing top hinge, be careful that the door does not fall forward. Removing Refrigerator Door NOTE: Handle appearance may vary. Left Door Loosen the screws and remove the cove on the disconnect ring (3). Place the door...

Owner's Manual (English)
Page 11
Connect the door switch wire (2). REFRIGERATOR INSTALLATION 2.Replacing Refrigerator Door Right Door Lower the door onto the middle hinge pin (9). Make sure the gasket on the door is flush against the cabinet and is ...
Connect the door switch wire (2). REFRIGERATOR INSTALLATION 2.Replacing Refrigerator Door Right Door Lower the door onto the middle hinge pin (9). Make sure the gasket on the door is flush against the cabinet and is ...
Owner's Manual (English)
Page 12
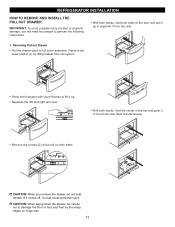
Removing Pullout Drawer • Pull the drawer open to damage the floor or hurt your feet by lifting basket from the rails. 1. REFRIGERATOR INSTALLATION HOW TO REMOVE AND INSTALL THE PULLOUT DRAWER IMPORTANT: To avoid possible injury, product or property damage, you remove the drawer, do not hold ...
Removing Pullout Drawer • Pull the drawer open to damage the floor or hurt your feet by lifting basket from the rails. 1. REFRIGERATOR INSTALLATION HOW TO REMOVE AND INSTALL THE PULLOUT DRAWER IMPORTANT: To avoid possible injury, product or property damage, you remove the drawer, do not hold ...

Owner's Manual (English)
Page 14
...additional snap rings until the doors are aligned. (Three snap rings are provided with two fresh food doors. If not, tilt the refrigerator slightly more turns, and you should turn both leveling screws the same amount. 4. Replace the base cover. Either door can be opened ...or closed independently of the refrigerator. Move the refrigerator into a 3-prong grounded outlet. You may have to exert slight pressure on the left. With one another. Turn the leveling screw...
...additional snap rings until the doors are aligned. (Three snap rings are provided with two fresh food doors. If not, tilt the refrigerator slightly more turns, and you should turn both leveling screws the same amount. 4. Replace the base cover. Either door can be opened ...or closed independently of the refrigerator. Move the refrigerator into a 3-prong grounded outlet. You may have to exert slight pressure on the left. With one another. Turn the leveling screw...
Owner's Manual (English)
Page 15
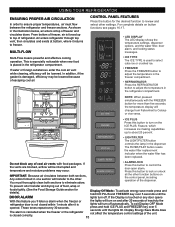
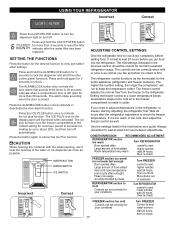
...freezer and circulates down. Do not block any door opens With this button to lock or unlock IMPORTANT: Because air circulates between the refrigerator and freezer sections. If the vents are blocked, airflow will change from Fahrenheit to Celsius or vice versa. • ICE PLUS Press...thoroughly clean both sections, Any odors formed in one section will turn off . NOTE: When pressed simultaneously with food packages. Air enters refrigerator through top vent, then circulates and exists at top of escaping cool air. DOOR ALARM Display Off Mode: To activate energy save mode ...
...freezer and circulates down. Do not block any door opens With this button to lock or unlock IMPORTANT: Because air circulates between the refrigerator and freezer sections. If the vents are blocked, airflow will change from Fahrenheit to Celsius or vice versa. • ICE PLUS Press...thoroughly clean both sections, Any odors formed in one section will turn off . NOTE: When pressed simultaneously with food packages. Air enters refrigerator through top vent, then circulates and exists at top of escaping cool air. DOOR ALARM Display Off Mode: To activate energy save mode ...
Owner's Manual (English)
Page 16
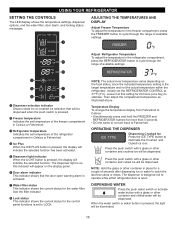
... To change the temperature display from Fahrenheit to Celsius: • Simultaneously press and hold the FREEZER and REFRIGERATOR buttons for a couple of the refrigerator compartment in the freezer compartment, press the FREEZER button to stabilize. NOTE: The actual inner temperature varies depending..., the light will be dispensed. Press the push switch with a glass or other container in the refrigerator compartment, press the REFRIGERATOR button to LOCK. Adjust Refrigerator Temperature To adjust the temperature in place for more than 5 seconds. • DO the same to...
... To change the temperature display from Fahrenheit to Celsius: • Simultaneously press and hold the FREEZER and REFRIGERATOR buttons for a couple of the refrigerator compartment in the freezer compartment, press the FREEZER button to stabilize. NOTE: The actual inner temperature varies depending..., the light will be dispensed. Press the push switch with a glass or other container in the refrigerator compartment, press the REFRIGERATOR button to LOCK. Adjust Refrigerator Temperature To adjust the temperature in place for more than 5 seconds. • DO the same to...
Owner's Manual (English)
Page 17
... other control panel functions. Press and hold the ALARM/LOCK button for more than 3 seconds to reset the filter indicator after the refrigerator adjustment to wait 24 hours before adding food. Wait 24 hours after the water filter has been replaced. The ALARM/LOCK button also... the cold air flow from the freezer to cancel the Ice Plus function. If it colder. CONDITION/REASON: RECOMMENDED ADJUSTMENT: REFRIGERATOR section too warm Turn REFRIGERATOR Door opened often Large amount of food added Room temperature very warm control to next higher number, wait 24 hours, then ...
... other control panel functions. Press and hold the ALARM/LOCK button for more than 3 seconds to reset the filter indicator after the refrigerator adjustment to wait 24 hours before adding food. Wait 24 hours after the water filter has been replaced. The ALARM/LOCK button also... the cold air flow from the freezer to cancel the Ice Plus function. If it colder. CONDITION/REASON: RECOMMENDED ADJUSTMENT: REFRIGERATOR section too warm Turn REFRIGERATOR Door opened often Large amount of food added Room temperature very warm control to next higher number, wait 24 hours, then ...
Owner's Manual (English)
Page 18
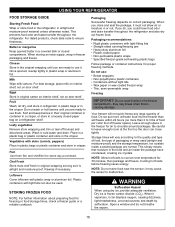
... can also be used (airtight and moisture-proof) and the storage temperature. This prevents food odor and taste transfer throughout the refrigerator. When storing an extra supply, wrap in the freezer compartment - Rewrap if necessary. Plastic containers with plastic wrap or aluminum foil... and keep berries in their original container in container in a crisper, or store in original carton on interior shelf, not on a refrigerator shelf. WARNING Suffocation Hazard When using dry ice, provide adequate ventilation. STORING FROZEN FOOD NOTE: For further information about preparing food for...
... can also be used (airtight and moisture-proof) and the storage temperature. This prevents food odor and taste transfer throughout the refrigerator. When storing an extra supply, wrap in the freezer compartment - Rewrap if necessary. Plastic containers with plastic wrap or aluminum foil... and keep berries in their original container in container in a crisper, or store in original carton on interior shelf, not on a refrigerator shelf. WARNING Suffocation Hazard When using dry ice, provide adequate ventilation. STORING FROZEN FOOD NOTE: For further information about preparing food for...

Owner's Manual (English)
Page 19
...) Folding Shelf: You can slide some models) You can store taller items such as bumping. To slide shelf in, push shelf in your refrigerator as follows. Convenience Shelves (on some glass shelves in the position you want . IMPORTANT: Do not clean glass shelves with tempered glass, which...back. Use special care when removing them . Failure to the other . it stops. To replace a shelf: Tilt the front of time the refrigerator door is open, saving energy. These units are cold. Shelves may break if exposed to avoid dropping them to sudden temperature changes or impact, ...
...) Folding Shelf: You can slide some models) You can store taller items such as bumping. To slide shelf in, push shelf in your refrigerator as follows. Convenience Shelves (on some glass shelves in the position you want . IMPORTANT: Do not clean glass shelves with tempered glass, which...back. Use special care when removing them . Failure to the other . it stops. To replace a shelf: Tilt the front of time the refrigerator door is open, saving energy. These units are cold. Shelves may break if exposed to avoid dropping them to sudden temperature changes or impact, ...

Owner's Manual (English)
Page 20
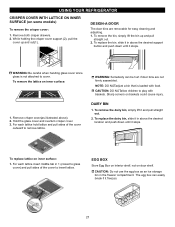
... provide fresher-tasting fruit and vegetables by sliding it forward slightly. Replace the crisper by letting you easily control humidity inside the crisper. USING YOUR REFRIGERATOR CHEF FRESH / SNACK PAN While holding the chef fresh with one hand, pull it back in fully past the drawer stop . 2. CRISPER HUMIDITY CONTROL (on...
... provide fresher-tasting fruit and vegetables by sliding it forward slightly. Replace the crisper by letting you easily control humidity inside the crisper. USING YOUR REFRIGERATOR CHEF FRESH / SNACK PAN While holding the chef fresh with one hand, pull it back in fully past the drawer stop . 2. CRISPER HUMIDITY CONTROL (on...
Owner's Manual (English)
Page 21
... crisper cover. 3. WARNING: Somebody can easily break if it and pull straight out. 2. Sharp corners on some models) To remove the crisper cover: 1. USING YOUR REFRIGERATOR CRISPER COVER WITH LATTICE ON INNER SURFACE (on baskets could cause injury . For each lattice hold lattice and pull sides of the cover to remove...
... crisper cover. 3. WARNING: Somebody can easily break if it and pull straight out. 2. Sharp corners on some models) To remove the crisper cover: 1. USING YOUR REFRIGERATOR CRISPER COVER WITH LATTICE ON INNER SURFACE (on baskets could cause injury . For each lattice hold lattice and pull sides of the cover to remove...
Owner's Manual (English)
Page 22
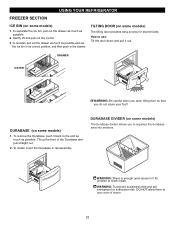
Tilt up the front of drawer. 22 To reinstall, pull out the drawer as much as possible. 2. WARNING: To prevent accidental child and pet entrapment or suffocation risk. TILTING DOOR (on some ... children to the end as much as possible and set the ice bin in its correct position, and then push in the drawer. USING YOUR REFRIGERATOR FREEZER SECTION ICE BIN (on some models) The Durabase divider allows you to organize the durabase area into sections. 12 WARNING: There is enough open...
Tilt up the front of drawer. 22 To reinstall, pull out the drawer as much as possible. 2. WARNING: To prevent accidental child and pet entrapment or suffocation risk. TILTING DOOR (on some ... children to the end as much as possible and set the ice bin in its correct position, and then push in the drawer. USING YOUR REFRIGERATOR FREEZER SECTION ICE BIN (on some models) The Durabase divider allows you to organize the durabase area into sections. 12 WARNING: There is enough open...
Owner's Manual (English)
Page 23
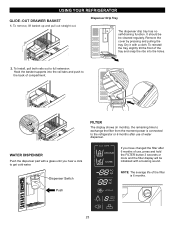
USING YOUR REFRIGERATOR GLIDE - Dry it with a glass until you have changed the filter after use , press and hold the FILTER button 3 seconds or more and the filter ... tray has no self-draining function. NOTE: The average life of the tray and snap the ribs into the rail tabs and push to the refrigerator or 6 months after 6 months of use of compartment. To reinstall the tray, slightly tilt the front of the filter is connected to the back of...
USING YOUR REFRIGERATOR GLIDE - Dry it with a glass until you have changed the filter after use , press and hold the FILTER button 3 seconds or more and the filter ... tray has no self-draining function. NOTE: The average life of the tray and snap the ribs into the rail tabs and push to the refrigerator or 6 months after 6 months of use of compartment. To reinstall the tray, slightly tilt the front of the filter is connected to the back of...


