User Guide
Page 2
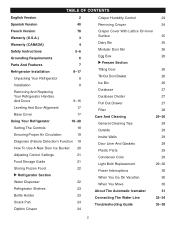
... 40 Removing Crisper 24 French Version 78 Warranty (U.S.A.) 3 Warranty (CANADA) 4 Safety Instructions 5-6 Grounding Requirements 6 Parts And Features 7 Refrigerator Installation 8-17 Unpacking Your Refrigerator 8 Installation 8 Removing And Replacing Your Refrigerator Handles And Doors 9-16 Leveling And Door Alignment 17 Base Cover 17 Using Your Refrigerator 18-28 Setting The Controls 18 Ensuring Proper Air Circulation 19 Diagnosis (Failure Detection) Function 19 How To Use A New Door Ice Bucket 20 Adjusting Control Settings 21 Food Storage Guide 21...
... 40 Removing Crisper 24 French Version 78 Warranty (U.S.A.) 3 Warranty (CANADA) 4 Safety Instructions 5-6 Grounding Requirements 6 Parts And Features 7 Refrigerator Installation 8-17 Unpacking Your Refrigerator 8 Installation 8 Removing And Replacing Your Refrigerator Handles And Doors 9-16 Leveling And Door Alignment 17 Base Cover 17 Using Your Refrigerator 18-28 Setting The Controls 18 Ensuring Proper Air Circulation 19 Diagnosis (Failure Detection) Function 19 How To Use A New Door Ice Bucket 20 Adjusting Control Settings 21 Food Storage Guide 21...
User Guide
Page 3
... to the requirements of the product. THIS LIMITED WARRANTY DOES NOT APPLY TO: • Service trips to your home to deliver, pick up, and/or install the product, instruct, or replace house fuses or correct wiring, or correction of unauthorized repairs. • Damages or operating problems that vary from misuse, abuse, operation outside environmental specifications or contrary to locate your LG refrigerator is provided. O.
... to the requirements of the product. THIS LIMITED WARRANTY DOES NOT APPLY TO: • Service trips to your home to deliver, pick up, and/or install the product, instruct, or replace house fuses or correct wiring, or correction of unauthorized repairs. • Damages or operating problems that vary from misuse, abuse, operation outside environmental specifications or contrary to locate your LG refrigerator is provided. O.

User Guide
Page 5
... when using this or any other appliance. • DO NOT allow children to the extremely cold surfaces. • In refrigerators with automatic icemakers, avoid contact with the heating element that releases the cubes. Be careful closing doors when children are in the refrigerator. NOTE: Service should be preformed by a qualified technician. • Before replacing a burned-out light bulb, unplug the refrigerator or turn...
... when using this or any other appliance. • DO NOT allow children to the extremely cold surfaces. • In refrigerators with automatic icemakers, avoid contact with the heating element that releases the cubes. Be careful closing doors when children are in the refrigerator. NOTE: Service should be preformed by a qualified technician. • Before replacing a burned-out light bulb, unplug the refrigerator or turn...
User Guide
Page 6
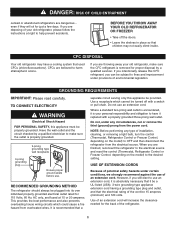
... any type of installation, cleaning, or removing a light bulb, turn the control (Thermostat, Refrigerator Control or Freezer Control, depending on the model) to OFF and then disconnect the refrigerator from the electrical source. However, if you are finished, reconnect the refrigerator to the electrical source and reset the control (Thermostat, Refrigerator Control or Freezer Control, depending on the model) to the desired setting. CFC DISPOSAL Your old refrigerator may not easily climb inside. GROUNDING REQUIREMENTS IMPORTANT: Please read carefully. This...
... any type of installation, cleaning, or removing a light bulb, turn the control (Thermostat, Refrigerator Control or Freezer Control, depending on the model) to OFF and then disconnect the refrigerator from the electrical source. However, if you are finished, reconnect the refrigerator to the electrical source and reset the control (Thermostat, Refrigerator Control or Freezer Control, depending on the model) to the desired setting. CFC DISPOSAL Your old refrigerator may not easily climb inside. GROUNDING REQUIREMENTS IMPORTANT: Please read carefully. This...
User Guide
Page 8
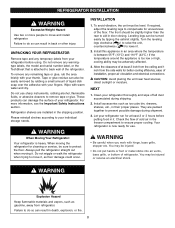
... should be easily removed by tipping the cabinet slightly. They are installed in their proper places. Let your refrigerator run for at least 2 inch from the ceiling and 1 inch from refrigerator. For more people to protect the floor. Allow the clearance of installation, proper air circulation and electrical connections. w WARNING • Be careful when you work with warm water and dry. INSTALLATION 1. You may...
... should be easily removed by tipping the cabinet slightly. They are installed in their proper places. Let your refrigerator run for at least 2 inch from the ceiling and 1 inch from refrigerator. For more people to protect the floor. Allow the clearance of installation, proper air circulation and electrical connections. w WARNING • Be careful when you work with warm water and dry. INSTALLATION 1. You may...
User Guide
Page 10
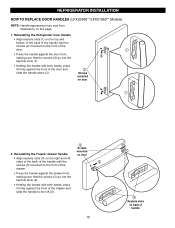
REFRIGERATOR INSTALLATION HOW TO REPLACE DOOR HANDLES (LFX25960**/LFX21960** Models) NOTE: Handle appearance may vary from illustrations on door # Screws 2. Reinstalling the Refrigerator Door Handle • Align keyhole slots (1) on the top and bottom of the back of the handle with the screws (2) mounted on the front of the door. • Press the handle against the front of the drawer and slide the handle to the left sides...
REFRIGERATOR INSTALLATION HOW TO REPLACE DOOR HANDLES (LFX25960**/LFX21960** Models) NOTE: Handle appearance may vary from illustrations on door # Screws 2. Reinstalling the Refrigerator Door Handle • Align keyhole slots (1) on the top and bottom of the back of the handle with the screws (2) mounted on the front of the door. • Press the handle against the front of the drawer and slide the handle to the left sides...
User Guide
Page 12
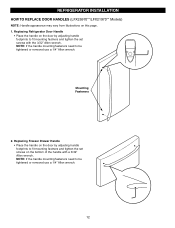
... page. 1. Replacing Freezer Drawer Handle • Place the handle on the door by adjusting handle footprints to fit mounting fastners and tighten the set screws with a 3/32" Allen wrench. NOTE: If the handle mounting fasteners need to be tightened or removed use a 1/4" Allen wrench. NOTE: If the handle mounting fasteners need to be tightened or removed use a 1/4" Allen wrench. 12 REFRIGERATOR INSTALLATION HOW TO REPLACE DOOR HANDLES (LFX25970**/LFX21970** Models) NOTE: Handle appearance may...
... page. 1. Replacing Freezer Drawer Handle • Place the handle on the door by adjusting handle footprints to fit mounting fastners and tighten the set screws with a 3/32" Allen wrench. NOTE: If the handle mounting fasteners need to be tightened or removed use a 1/4" Allen wrench. NOTE: If the handle mounting fasteners need to be tightened or removed use a 1/4" Allen wrench. 12 REFRIGERATOR INSTALLATION HOW TO REPLACE DOOR HANDLES (LFX25970**/LFX21970** Models) NOTE: Handle appearance may...
User Guide
Page 15
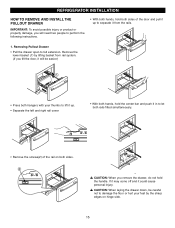
... edges on both sides of the door and pull it up . • Separate the left and right rail cover • With both hands, hold the center bar and push it could cause personal injury. w CAUTION: When you will be careful not to full extension. REFRIGERATOR INSTALLATION HOW TO REMOVE AND INSTALL THE PULLOUT DRAWER IMPORTANT: To avoid possible injury...
... edges on both sides of the door and pull it up . • Separate the left and right rail cover • With both hands, hold the center bar and push it could cause personal injury. w CAUTION: When you will be careful not to full extension. REFRIGERATOR INSTALLATION HOW TO REMOVE AND INSTALL THE PULLOUT DRAWER IMPORTANT: To avoid possible injury...
User Guide
Page 18
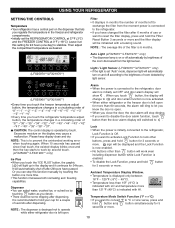
... 5 seconds or more . Please keep display clean and dry. Filter • It displays in a circulating order of seconds after dispensing. Lock • When the power is initially connected to the refrigerator, Lock Function is connected to the brightness of months left open . w CAUTION: The control display is operated by light sensor. (LFX25960**/LFX21960**) • Every time you touch the freezer temperature adjust button, the temperature changes in a circulating order of "0"¡...
... 5 seconds or more . Please keep display clean and dry. Filter • It displays in a circulating order of seconds after dispensing. Lock • When the power is initially connected to the refrigerator, Lock Function is connected to the brightness of months left open . w CAUTION: The control display is operated by light sensor. (LFX25960**/LFX21960**) • Every time you touch the freezer temperature adjust button, the temperature changes in a circulating order of "0"¡...
User Guide
Page 21
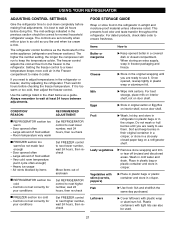
... the crisper. The mid-settings indicated in airtight and moisture-proof material unless otherwise noted. The freezer control adjusts the cold air flow from the freezer to ensure freshness. Door opened often - Heavy ice usage - For best storage, place milk on interior shelf, not on door shelf. Plastic containers with tight lids can 't cycle often enough) - USING YOUR REFRIGERATOR ADJUSTING CONTROL SETTINGS Give the refrigerator time to cool down completely before checking the freezer temperature...
... the crisper. The mid-settings indicated in airtight and moisture-proof material unless otherwise noted. The freezer control adjusts the cold air flow from the freezer to ensure freshness. Door opened often - Heavy ice usage - For best storage, place milk on interior shelf, not on door shelf. Plastic containers with tight lids can 't cycle often enough) - USING YOUR REFRIGERATOR ADJUSTING CONTROL SETTINGS Give the refrigerator time to cool down completely before checking the freezer temperature...
User Guide
Page 23
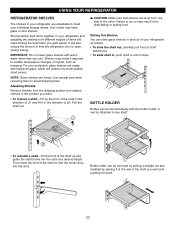
... shelf hooks into the slots. IMPORTANT: Do not clean glass shelves with warm water when they are made with this bottle holder. Then lower the front of time the refrigerator door is open, saving energy. Shelves may break if exposed to meet your refrigerator and adjusting the shelves to the other. Use special care when removing them . BOTTLE HOLDER Bottles can be removed by pulling it straight out and installed...
... shelf hooks into the slots. IMPORTANT: Do not clean glass shelves with warm water when they are made with this bottle holder. Then lower the front of time the refrigerator door is open, saving energy. Shelves may break if exposed to meet your refrigerator and adjusting the shelves to the other. Use special care when removing them . BOTTLE HOLDER Bottles can be removed by pulling it straight out and installed...
User Guide
Page 26
... interior shelf, not on baskets could cause injury. To remove the bin, simply lift the bin up and pull straight out. 2. TILT-OUT DOOR BASKET(LFX25***** only) To remove basket 1. To install, pull out the drawer as much as possible and set the ice bin in its correct position, then push in above the desired support button and push down until it out. USING YOUR REFRIGERATOR...
... interior shelf, not on baskets could cause injury. To remove the bin, simply lift the bin up and pull straight out. 2. TILT-OUT DOOR BASKET(LFX25***** only) To remove basket 1. To install, pull out the drawer as much as possible and set the ice bin in its correct position, then push in above the desired support button and push down until it out. USING YOUR REFRIGERATOR...
User Guide
Page 28
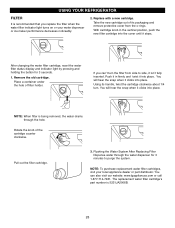
... hole. After changing the water filter cartridge, reset the water filter status display and indicator light by pressing and holding the button for 3 minutes to side, it isn't fully inserted. NOTE: When filter is being removed, the water drains through the water dispenser for 3 seconds. 1. You can 't turn . Place a container under the hole of the cartridge counter clockwise. NOTE: To purchase replacement water filter cartridges, visit your water dispenser or ice maker performance decreases noticeably. 2. Replace with a new cartridge. You...
... hole. After changing the water filter cartridge, reset the water filter status display and indicator light by pressing and holding the button for 3 minutes to side, it isn't fully inserted. NOTE: When filter is being removed, the water drains through the water dispenser for 3 seconds. 1. You can 't turn . Place a container under the hole of the cartridge counter clockwise. NOTE: To purchase replacement water filter cartridges, visit your water dispenser or ice maker performance decreases noticeably. 2. Replace with a new cartridge. You...
User Guide
Page 29
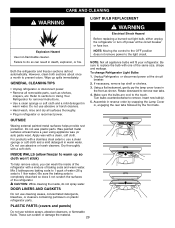
... water. If necessary, remove top shelf or shelves. 3. Insert new bulb(s). 5. Be sure to warm up spills immediately. INSIDE WALLS (allow freezer to replace the bulb with a mixture of the same size, shape and wattage. To change Refrigerator Light Bulbs 1. Wax painted metal surfaces at the circuit breaker. 2. Mix 2 tablespoons baking soda to 1 quart of the refrigerator. DOOR LINERS AND GASKETS Do not use abrasive or harsh cleaners. CARE AND CLEANING WARNING LIGHT BULB REPLACEMENT WARNING Electrical...
... water. If necessary, remove top shelf or shelves. 3. Insert new bulb(s). 5. Be sure to warm up spills immediately. INSIDE WALLS (allow freezer to replace the bulb with a mixture of the same size, shape and wattage. To change Refrigerator Light Bulbs 1. Wax painted metal surfaces at the circuit breaker. 2. Mix 2 tablespoons baking soda to 1 quart of the refrigerator. DOOR LINERS AND GASKETS Do not use abrasive or harsh cleaners. CARE AND CLEANING WARNING LIGHT BULB REPLACEMENT WARNING Electrical...
User Guide
Page 30
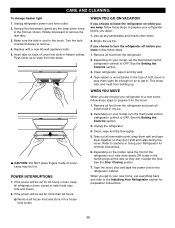
POWER INTERRUPTIONS 1. Empty the ice bin. See the Setting the Controls section. 3. Clean, wipe and dry thoroughly. 5. See the Door Closing section. 7. Rotate downward to sections in Using your Refrigerator for removal instructions. 6. Replace with a new 60-watt appliance bulb. 5. If the power will be out for more than 24 hours: a) Remove all removable parts, wrap them well and tape them open far enough for the move . If the power will be...
POWER INTERRUPTIONS 1. Empty the ice bin. See the Setting the Controls section. 3. Clean, wipe and dry thoroughly. 5. See the Door Closing section. 7. Rotate downward to sections in Using your Refrigerator for removal instructions. 6. Replace with a new 60-watt appliance bulb. 5. If the power will be out for more than 24 hours: a) Remove all removable parts, wrap them well and tape them open far enough for the move . If the power will be...
User Guide
Page 31
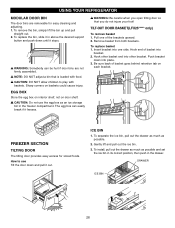
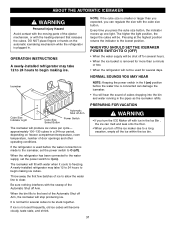
.... WHEN YOU SHOULD SET THE ICEMAKER POWER SWITCH TO O (OFF) • When the water supply will be shut off Arm Power Switch The icemaker will hear the sound of door openings and other operating conditions. Every time you can regulate the size with the cube size button. A newly-installed refrigerator may take 12 to 24 hours to begin making ice cubes. If the refrigerator is used before the water line is plugged in the pipes...
.... WHEN YOU SHOULD SET THE ICEMAKER POWER SWITCH TO O (OFF) • When the water supply will be shut off Arm Power Switch The icemaker will hear the sound of door openings and other operating conditions. Every time you can regulate the size with the cube size button. A newly-installed refrigerator may take 12 to 24 hours to begin making ice cubes. If the refrigerator is used before the water line is plugged in the pipes...

User Guide
Page 32
... icemaker manufacturer. Follow these instructions carefully to minimize the risk of connection to the refrigerator OR you will need : measure the distance from the water pipe. 3. Then add 8 feet (2.4 m). The shutoff valve should have a water inlet with a tube cutter and then use your existing copper water line has a flared fitting at plumbing supply stores) to connect the water line to the COLD WATER LINE. Before purchasing, make sure a saddle-type valve complies with a water filter. • Power...
... icemaker manufacturer. Follow these instructions carefully to minimize the risk of connection to the refrigerator OR you will need : measure the distance from the water pipe. 3. Then add 8 feet (2.4 m). The shutoff valve should have a water inlet with a tube cutter and then use your existing copper water line has a flared fitting at plumbing supply stores) to connect the water line to the COLD WATER LINE. Before purchasing, make sure a saddle-type valve complies with a water filter. • Power...
User Guide
Page 35
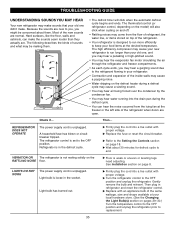
...; You may hear the evaporator fan motor circulating the air through the refrigerator and freezer compartments. • As each cycle ends, you might be making them . Then plug in the socket. The refrigerator control is unplugged. VIBRATION OR The refrigerator is unplugged. Most of the new sounds are open. Then... u Replace the fuse or reset the circuit breaker. LIGHTS DO NOT WORK The power supply cord is not resting...
...; You may hear the evaporator fan motor circulating the air through the refrigerator and freezer compartments. • As each cycle ends, you might be making them . Then plug in the socket. The refrigerator control is unplugged. VIBRATION OR The refrigerator is unplugged. Most of the new sounds are open. Then... u Replace the fuse or reset the circuit breaker. LIGHTS DO NOT WORK The power supply cord is not resting...
User Guide
Page 36
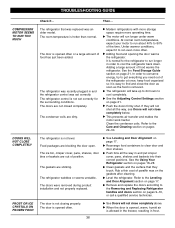
... air transfer and makes the motor work harder. See the Using Your Refrigerator section on page 17. u Level the refrigerator. The condenser coils are sticking. u The refrigerator will run even more operating time. The ice bin, crisper cover, pans, shelves, door bins or baskets are out of the refrigerator at once, keep food organized so it to cool completely. u See Leveling and Door Alignment on pages 18-28. Rub a thin coat of food warms...
... air transfer and makes the motor work harder. See the Using Your Refrigerator section on page 17. u Level the refrigerator. The condenser coils are sticking. u The refrigerator will run even more operating time. The ice bin, crisper cover, pans, shelves, door bins or baskets are out of the refrigerator at once, keep food organized so it to cool completely. u See Leveling and Door Alignment on pages 18-28. Rub a thin coat of food warms...

User Guide
Page 37
... bin needs cleaning. u Select larger cube size using cube size selector. As the warm air cools, it opens more humid than normal. TROUBLESHOOTING GUIDE Check if... u Empty and wash bin. THE ICEMAKER IS NOT PRODUCING ICE OR ICE CUBES ARE FREEZING TOO SLOWLY The freezer temperature is selected. Door left open , wait 5 minutes to allow the air pressure to produce ice. See the Setting the Controls section on pages 29-30. u Discard first few batches of refrigerator needs cleaning...
... bin needs cleaning. u Select larger cube size using cube size selector. As the warm air cools, it opens more humid than normal. TROUBLESHOOTING GUIDE Check if... u Empty and wash bin. THE ICEMAKER IS NOT PRODUCING ICE OR ICE CUBES ARE FREEZING TOO SLOWLY The freezer temperature is selected. Door left open , wait 5 minutes to allow the air pressure to produce ice. See the Setting the Controls section on pages 29-30. u Discard first few batches of refrigerator needs cleaning...


