User Guide
Page 2
... Control 24 Spanish Version 40 Removing Crisper 24 French Version 78 Warranty (U.S.A.) 3 Warranty (CANADA) 4 Safety Instructions 5-6 Grounding Requirements 6 Parts And Features 7 Refrigerator Installation 8-17 Unpacking Your Refrigerator 8 Installation 8 Removing And Replacing Your Refrigerator Handles And Doors 9-16 Leveling And ...And Cleaning 29-30 General Cleaning Tips 29 Outside 29 Inside Walls 29 Door Liner And Gaskets 29 Plastic Parts 29 Condenser Coils 29 Light Bulb Replacement 29-30 Power Interruptions 30 When You Go On Vacation 30 When...
... Control 24 Spanish Version 40 Removing Crisper 24 French Version 78 Warranty (U.S.A.) 3 Warranty (CANADA) 4 Safety Instructions 5-6 Grounding Requirements 6 Parts And Features 7 Refrigerator Installation 8-17 Unpacking Your Refrigerator 8 Installation 8 Removing And Replacing Your Refrigerator Handles And Doors 9-16 Leveling And ...And Cleaning 29-30 General Cleaning Tips 29 Outside 29 Inside Walls 29 Door Liner And Gaskets 29 Plastic Parts 29 Condenser Coils 29 Light Bulb Replacement 29-30 Power Interruptions 30 When You Go On Vacation 30 When...
User Guide
Page 3
...warranty service is used in other rights that result from misuse, abuse, operation outside environmental specifications or contrary to locate your nearest LG Authorized Service Center. (Phones are warranted for other than intended purpose. • Repairs when your home to deliver, pick up...IN LIEU OF ANY OTHER WARRANTY, EXPRESS OR IMPLIED, INCLUDING WITHOUT LIMITATION, ANY WARRANTY OF MERCHANTABILITY OR FITNESS FOR A PARTICULAR PURPOSE. PARTS: Seven years from the Date of God, unauthorized modification or alteration, incorrect electrical current or voltage, or commercial use, or use ...
...warranty service is used in other rights that result from misuse, abuse, operation outside environmental specifications or contrary to locate your nearest LG Authorized Service Center. (Phones are warranted for other than intended purpose. • Repairs when your home to deliver, pick up...IN LIEU OF ANY OTHER WARRANTY, EXPRESS OR IMPLIED, INCLUDING WITHOUT LIMITATION, ANY WARRANTY OF MERCHANTABILITY OR FITNESS FOR A PARTICULAR PURPOSE. PARTS: Seven years from the Date of God, unauthorized modification or alteration, incorrect electrical current or voltage, or commercial use, or use ...
User Guide
Page 4
...3. WARRANTY PERIOD MODEL# : LFX25970**/LFX21970**/LFX25960**/LFX21960** LABOR : 2 Years PARTS : 2 Years SEALED SYSTEM : Labor/ 2 Years, Parts/ 5 Years (Compressor, condenser, and evaporator) HOW SERVICE IS HANDLED : Call 1-888-542-2623 (1-888-LG-CANADA) and choose the appropriate prompt. A copy of incidental or consequential damages ... on how long an implied warranty lasts; or by Internet: http://www.lg.ca To Obtain Nearest Authorized Service Center, Parts Distributor, or Sales Dealer by Internet: http://www.lg.ca 4 Some provinces do not allow the exclusion or limitation of your...
...3. WARRANTY PERIOD MODEL# : LFX25970**/LFX21970**/LFX25960**/LFX21960** LABOR : 2 Years PARTS : 2 Years SEALED SYSTEM : Labor/ 2 Years, Parts/ 5 Years (Compressor, condenser, and evaporator) HOW SERVICE IS HANDLED : Call 1-888-542-2623 (1-888-LG-CANADA) and choose the appropriate prompt. A copy of incidental or consequential damages ... on how long an implied warranty lasts; or by Internet: http://www.lg.ca To Obtain Nearest Authorized Service Center, Parts Distributor, or Sales Dealer by Internet: http://www.lg.ca 4 Some provinces do not allow the exclusion or limitation of your...

User Guide
Page 5
... appliance. • NEVER unplug your refrigerator before cleaning or making any offodor or off power at either the plug or connector end. • When moving parts of the ejector mechanism, or with the Attention Installer Instructions that were taped to persons when using this or any food is plugged in the...
... appliance. • NEVER unplug your refrigerator before cleaning or making any offodor or off power at either the plug or connector end. • When moving parts of the ejector mechanism, or with the Attention Installer Instructions that were taped to persons when using this or any food is plugged in the...
User Guide
Page 7
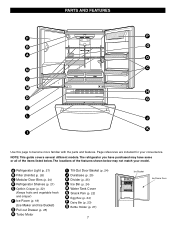
... and Ice Bucket) G Pull out Drawer (p. 25) H Turbo Motor I Use this page to become more familiar with the parts and features. The locations of the items listed below may not match your convenience. PARTS AND FEATURES F P B O A Q N C C M H D G E L J K I Tilt-Out Door Basket (p. 24) J Durabase (p. 25) K Divider (p. 25) L Ice Bin (p. 24) M Water Tank Cover N Snack...
... and Ice Bucket) G Pull out Drawer (p. 25) H Turbo Motor I Use this page to become more familiar with the parts and features. The locations of the items listed below may not match your convenience. PARTS AND FEATURES F P B O A Q N C C M H D G E L J K I Tilt-Out Door Basket (p. 24) J Durabase (p. 25) K Divider (p. 25) L Ice Bin (p. 24) M Water Tank Cover N Snack...
User Guide
Page 20
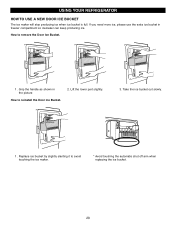
Lift the lower part slightly. 3. If you need more ice, please use the extra ice bucket in the picture How to reinstall the Door Ice Bucket. 2. Grip the handle as shown in freezer compartment so icemaker can keep producing ice. How to avoid touching the ice maker. * Avoid touching the automatic shut off arm when replacing the ice bucket. 20 USING YOUR REFRIGERATOR HOW TO USE A NEW DOOR ICE BUCKET The ice maker will stop producing ice when ice bucket is full. Replace ice bucket by slightly slanting it to remove the Door Ice Bucket. 1 . Take the ice bucket out slowly. 1 .
Lift the lower part slightly. 3. If you need more ice, please use the extra ice bucket in the picture How to reinstall the Door Ice Bucket. 2. Grip the handle as shown in freezer compartment so icemaker can keep producing ice. How to avoid touching the ice maker. * Avoid touching the automatic shut off arm when replacing the ice bucket. 20 USING YOUR REFRIGERATOR HOW TO USE A NEW DOOR ICE BUCKET The ice maker will stop producing ice when ice bucket is full. Replace ice bucket by slightly slanting it to remove the Door Ice Bucket. 1 . Take the ice bucket out slowly. 1 .
User Guide
Page 27
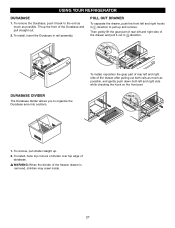
... it out in direction. 12 DURABASE DIVIDER The Durabase divider allows you to organize the Durabase area into sections. 1 32 To install, reposition the gear part of rear left and right side of rear left and right hooks in rail assembly. Then gently lift the gear... after pulling out both rails as much as possible, and gently push down both left and right side while checking the hook on the front part. Hook 1. To install, insert the Durabase in direction to the end as much as possible. PULL OUT DRAWER To separate the drawer, push the front...
... it out in direction. 12 DURABASE DIVIDER The Durabase divider allows you to organize the Durabase area into sections. 1 32 To install, reposition the gear part of rear left and right side of rear left and right hooks in rail assembly. Then gently lift the gear... after pulling out both rails as much as possible, and gently push down both left and right side while checking the hook on the front part. Hook 1. To install, insert the Durabase in direction to the end as much as possible. PULL OUT DRAWER To separate the drawer, push the front...
User Guide
Page 28
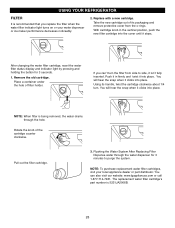
If you replace the filter when the water filter indicator light turns on or your local appliance dealer or part distributor. NOTE: When filter is being removed, the water drains through the water dispenser for 3 seconds. 1. Rotate the knob of filter holder. NOTE: ...7481. You will hear the snap when it clicks into the cover until it into place. You can 't turn . The replacement water filter cartridge's part number is 5231JA2006B. 28 Pull out the filter cartridge. 3. Using its packaging and remove protective cover from side to purge the system. Remove the old...
If you replace the filter when the water filter indicator light turns on or your local appliance dealer or part distributor. NOTE: When filter is being removed, the water drains through the water dispenser for 3 seconds. 1. Rotate the knob of filter holder. NOTE: ...7481. You will hear the snap when it clicks into the cover until it into place. You can 't turn . The replacement water filter cartridge's part number is 5231JA2006B. 28 Pull out the filter cartridge. 3. Using its packaging and remove protective cover from side to purge the system. Remove the old...
User Guide
Page 29
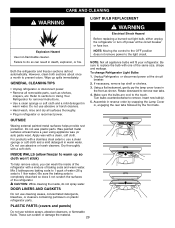
..., use window sprays, abrasive cleansers, or flammable fluids. Do not use cleaning waxes, concentrated detergents, bleaches, or cleaners containing petroleum on plastic refrigerator parts. Dry thoroughly with a clean, soft cloth. Mix 2 tablespoons baking soda to 1 quart of water (26 g soda to the touch. w CAUTION...: While cleaning the inside of the refrigerator with one of the refrigerator. PLASTIC PARTS (covers and panels) Do not use a clean sponge or soft cloth and a mild detergent in , engaging the rear tabs followed by snapping...
..., use window sprays, abrasive cleansers, or flammable fluids. Do not use cleaning waxes, concentrated detergents, bleaches, or cleaners containing petroleum on plastic refrigerator parts. Dry thoroughly with a clean, soft cloth. Mix 2 tablespoons baking soda to 1 quart of water (26 g soda to the touch. w CAUTION...: While cleaning the inside of the refrigerator with one of the refrigerator. PLASTIC PARTS (covers and panels) Do not use a clean sponge or soft cloth and a mild detergent in , engaging the rear tabs followed by snapping...
User Guide
Page 30
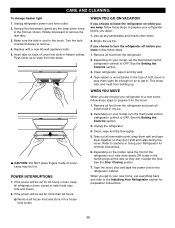
... cover into place. See the Setting the Controls section. 3. Take out all frozen food and store it rolls more than 24 hours: a) Remove all removable parts, wrap them well and tape them open far enough for the move . Depending on while you are away, follow these steps to help foods stay...
... cover into place. See the Setting the Controls section. 3. Take out all frozen food and store it rolls more than 24 hours: a) Remove all removable parts, wrap them well and tape them open far enough for the move . Depending on while you are away, follow these steps to help foods stay...
User Guide
Page 31
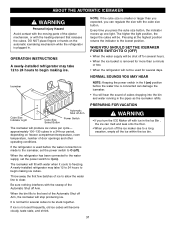
... you press the cube size button, the indicator moves up one light. ABOUT THE AUTOMATIC ICEMAKER WARNING Personal Injury Hazard Avoid contact with the moving parts of the Automatic Shut off Arm. Every time you turn the ICE Maker off Arm Power Switch The icemaker will become cloudy, taste stale, and...
... you press the cube size button, the indicator moves up one light. ABOUT THE AUTOMATIC ICEMAKER WARNING Personal Injury Hazard Avoid contact with the moving parts of the Automatic Shut off Arm. Every time you turn the ICE Maker off Arm Power Switch The icemaker will become cloudy, taste stale, and...

User Guide
Page 32
...; Copper Tubing, 1/4″ outer diameter to connect the refrigerator to the water supply pipe. To determine how much tubing you can cause damage to refrigerator parts and lead to the hot water line. SHUT OFF THE MAIN WATER SUPPLY Turn on models without a water filter and between 20 and 120 p.s.i. Failure...
...; Copper Tubing, 1/4″ outer diameter to connect the refrigerator to the water supply pipe. To determine how much tubing you can cause damage to refrigerator parts and lead to the hot water line. SHUT OFF THE MAIN WATER SUPPLY Turn on models without a water filter and between 20 and 120 p.s.i. Failure...


