Owner's Manual
Page 2
LG Refrigerator / Freezer Warranty Period Product Parts Labor Refrigerator / Freezer 1 year 1 year [In-Home Service (Except Model GR-051)] Sealed System.... 3. so these costs are paid by the owner. Damage to this product. Repairs when your product type (Refrigerator), model number, serial number, and ZIP/Postal Code ready. 1 Proof of purchase is required and must be... of your Sales Receipt must be borne by the consumer. Service trips to your product type (Refrigerator), model number, serial number, and ZIP/Postal Code ready. If the product is installed outside ...
LG Refrigerator / Freezer Warranty Period Product Parts Labor Refrigerator / Freezer 1 year 1 year [In-Home Service (Except Model GR-051)] Sealed System.... 3. so these costs are paid by the owner. Damage to this product. Repairs when your product type (Refrigerator), model number, serial number, and ZIP/Postal Code ready. 1 Proof of purchase is required and must be... of your Sales Receipt must be borne by the consumer. Service trips to your product type (Refrigerator), model number, serial number, and ZIP/Postal Code ready. If the product is installed outside ...

Owner's Manual
Page 4
...1-2 English Version 3 Spanish Version 34 Important Safety Instructions 4-5 Requirements for Ground Connection 5 Parts and Features 6-7 Refrigerator Installation Unpacking Installation Installation of Base Grille Refrigerator Doors: How to remove and reverse For Models with Pull-out Drawer For Models with Swinging Door How to ... 18 18 18 19 19 19-20 20-23 20-21 21 21 Optibin Crispers Crisper cover with interior lattice Fixed Refrigerator Rack Door Racks Dairy Compartment Egg Compartment Freezer Section Ice Bin DuraBase Durabase Divider Glide Out Drawer Tilting Door Wired Durabase...
...1-2 English Version 3 Spanish Version 34 Important Safety Instructions 4-5 Requirements for Ground Connection 5 Parts and Features 6-7 Refrigerator Installation Unpacking Installation Installation of Base Grille Refrigerator Doors: How to remove and reverse For Models with Pull-out Drawer For Models with Swinging Door How to ... 18 18 18 19 19 19-20 20-23 20-21 21 21 Optibin Crispers Crisper cover with interior lattice Fixed Refrigerator Rack Door Racks Dairy Compartment Egg Compartment Freezer Section Ice Bin DuraBase Durabase Divider Glide Out Drawer Tilting Door Wired Durabase...

Owner's Manual
Page 5
...be frozen or consumed. "Partial thawing or refreezing reduces the quality of red meat is operating, avoid touching cold surfaces of the refrigerator. You may be avoided. Indicates a potentially hazardous situation which they "...Ground beef, perishable food or seafood that any other foods...of melted ice cream should be performed by a qualified professional. • Before replacing a burned-out light bulb, unplug the refrigerator or shut down the circuit breaker to potential dangers that have already thawed. WARNING To reduce the risk of the following precaution...
...be frozen or consumed. "Partial thawing or refreezing reduces the quality of red meat is operating, avoid touching cold surfaces of the refrigerator. You may be avoided. Indicates a potentially hazardous situation which they "...Ground beef, perishable food or seafood that any other foods...of melted ice cream should be performed by a qualified professional. • Before replacing a burned-out light bulb, unplug the refrigerator or shut down the circuit breaker to potential dangers that have already thawed. WARNING To reduce the risk of the following precaution...

Owner's Manual
Page 6
... to dispose of your responsibility and obligation to replace twoprong outlets with that of an adequately grounded threeprong outlet. CFC DISPOSAL Your old refrigerator may have supervision or instruction in Canada), that it supports three-pronged plugs and that the electrical current support a minimum of 15...position. When finished, plug the appliance back in them. However, if you must be replaced by our service center or qualified LG technician to fines or prison in accordance with environmental legislation in effect. The use of an extension cable will increase the amount ...
... to dispose of your responsibility and obligation to replace twoprong outlets with that of an adequately grounded threeprong outlet. CFC DISPOSAL Your old refrigerator may have supervision or instruction in Canada), that it supports three-pronged plugs and that the electrical current support a minimum of 15...position. When finished, plug the appliance back in them. However, if you must be replaced by our service center or qualified LG technician to fines or prison in accordance with environmental legislation in effect. The use of an extension cable will increase the amount ...

Owner's Manual
Page 7
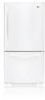
A Digital Sensor Control B Refrigerator Light C Shelves D Frozen Meat Compartment (Chef Fresh/Snack Pan) * E Optibin Crisper Keeps fruits and vegetable fresh and crisp F Ice Bin G Ice Tray (Inside H) * H Durabase I Read ... that of your model. The location of some of the parts may not correspond to familiarize yourself with the parts and features of your new refrigerator. NOTE: This guide covers different models. PARTS AND FEATURES Drawer Model A A J BB C K D E L F M G N H O I Divider J Dairy Compartment K Door Racks L Fixed...
A Digital Sensor Control B Refrigerator Light C Shelves D Frozen Meat Compartment (Chef Fresh/Snack Pan) * E Optibin Crisper Keeps fruits and vegetable fresh and crisp F Ice Bin G Ice Tray (Inside H) * H Durabase I Read ... that of your model. The location of some of the parts may not correspond to familiarize yourself with the parts and features of your new refrigerator. NOTE: This guide covers different models. PARTS AND FEATURES Drawer Model A A J BB C K D E L F M G N H O I Divider J Dairy Compartment K Door Racks L Fixed...

Owner's Manual
Page 8
... have some or all of your new refrigerator. A Digital Sensor Control B Refrigerator Light C Shelves D Frozen Meat Compartment (Chef Fresh/Snack Pan)* E Optibin Crisper Keeps fruits and vegetables fresh and crisp F Ice Tray * G Ice Bin H Wired Durabase I B C J D E K F L G M H N Read ... the parts and features of your model. NOTE: This guide covers different models. Swing Model PARTS AND FEATURES A I Dairy Compartment J Door Racks K Freezer Light L Fixed Refrigerator Rack M Wire Freezer Shelf N Freezer Door Rack * On some models 7
... have some or all of your new refrigerator. A Digital Sensor Control B Refrigerator Light C Shelves D Frozen Meat Compartment (Chef Fresh/Snack Pan)* E Optibin Crisper Keeps fruits and vegetables fresh and crisp F Ice Tray * G Ice Bin H Wired Durabase I B C J D E K F L G M H N Read ... the parts and features of your model. NOTE: This guide covers different models. Swing Model PARTS AND FEATURES A I Dairy Compartment J Door Racks K Freezer Light L Fixed Refrigerator Rack M Wire Freezer Shelf N Freezer Door Rack * On some models 7

Owner's Manual
Page 9
... spacing needs. Verify that feature warnings, the model serial number or the technical label of the product located on the back of your refrigerator (see Figure A). 2.Take off the cover. Align the bottom cover and place in place (see the section on for 2 to ..., or humidity. 2.To avoid vibration, the unit should be leveled. ONCE INSTALLED 1. This may injure yourself. • DO not place your refrigerator on "Important Safety Instructions". Figure B INSTALLATION 1. These are already packed to prevent any stickers that there is extremely heavy. The front should be...
... spacing needs. Verify that feature warnings, the model serial number or the technical label of the product located on the back of your refrigerator (see Figure A). 2.Take off the cover. Align the bottom cover and place in place (see the section on for 2 to ..., or humidity. 2.To avoid vibration, the unit should be leveled. ONCE INSTALLED 1. This may injure yourself. • DO not place your refrigerator on "Important Safety Instructions". Figure B INSTALLATION 1. These are already packed to prevent any stickers that there is extremely heavy. The front should be...

Owner's Manual
Page 10
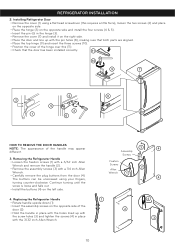
... converting from left -opening type (factory installed) to right-opening type. Remove all food and any adjustable racks from the refrigerator doors. Removing Refrigerator Door • Gently pry the top hinge cover with Pull Out Drawer You may find it more convenient to have the ...doors converted from the left -opening side mode to the right-opening mode). 1. REFRIGERATOR INSTALLATION REFRIGERATOR DOORS: HOW TO REMOVE AND REVERSE (Optional) For models with a flat head screwdriver and remove it . 5 • Remove the four ...
... converting from left -opening type (factory installed) to right-opening type. Remove all food and any adjustable racks from the refrigerator doors. Removing Refrigerator Door • Gently pry the top hinge cover with Pull Out Drawer You may find it more convenient to have the ...doors converted from the left -opening side mode to the right-opening mode). 1. REFRIGERATOR INSTALLATION REFRIGERATOR DOORS: HOW TO REMOVE AND REVERSE (Optional) For models with a flat head screwdriver and remove it . 5 • Remove the four ...
Owner's Manual
Page 11
...4 8 2 5 3 1 6 HOW TO REMOVE THE DOOR HANDLES NOTE: The appearance of the handle may appear different. 3. Replacing the Refrigerator Handle • Rotate handle upside down (1). • Insert the assembly screws on the opposite side of the hinge over this requires a little... pin (6) in place with the 3/32 inch Allen Wrench. 3 4 Assembly Screws Fixation Screws Allen 2 Wrench 1 4 1 4 2 3 10 Removing the Refrigerator Handle • Loosen the fixation screws (1) with a 3/32 inch Allen Wrench and remove the handle (2). • Remove the assembly screws (3) with the pin...
...4 8 2 5 3 1 6 HOW TO REMOVE THE DOOR HANDLES NOTE: The appearance of the handle may appear different. 3. Replacing the Refrigerator Handle • Rotate handle upside down (1). • Insert the assembly screws on the opposite side of the hinge over this requires a little... pin (6) in place with the 3/32 inch Allen Wrench. 3 4 Assembly Screws Fixation Screws Allen 2 Wrench 1 4 1 4 2 3 10 Removing the Refrigerator Handle • Loosen the fixation screws (1) with a 3/32 inch Allen Wrench and remove the handle (2). • Remove the assembly screws (3) with the pin...

Owner's Manual
Page 12
... hangers (2) with your property, please use two people to both sides of the door and pull up . • Separate the left and right rail cover. 2. REFRIGERATOR INSTALLATION HOW TO REMOVE AND INSTALL THE PULL OUT • With both hands, hold the handle. IMPORTANT: To avoid possible injury or damage to the...
... hangers (2) with your property, please use two people to both sides of the door and pull up . • Separate the left and right rail cover. 2. REFRIGERATOR INSTALLATION HOW TO REMOVE AND INSTALL THE PULL OUT • With both hands, hold the handle. IMPORTANT: To avoid possible injury or damage to the...

Owner's Manual
Page 13
Verify the hole's alignment • With the drawer fully extended, insert the lower basket over the front part of the rail assembly and then the back part (4). 4 WARNING: To prevent entrapment risk and accidental child or animal suffocation, DO NOT permit them to play inside of the door supports to mount the cover. Left Rail Right Rail • Align the top holes of the rail cover with the top holes of the drawer. WARNING: DO NOT step or sit on each side. REFRIGERATOR INSTALLATION • Compare the left and right rail covers on the Freezer Door. 12
Verify the hole's alignment • With the drawer fully extended, insert the lower basket over the front part of the rail assembly and then the back part (4). 4 WARNING: To prevent entrapment risk and accidental child or animal suffocation, DO NOT permit them to play inside of the door supports to mount the cover. Left Rail Right Rail • Align the top holes of the rail cover with the top holes of the drawer. WARNING: DO NOT step or sit on each side. REFRIGERATOR INSTALLATION • Compare the left and right rail covers on the Freezer Door. 12

Owner's Manual
Page 14
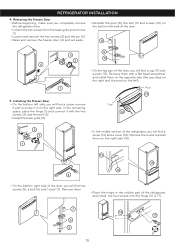
...2 inch putty knife. REVERSING DOOR OPENING DIRECTION FROM LEFT TO RIGHT (when you begin, unplug the refrigerator or disconnect the power source. Removing and Installing the Refrigerator Handles NOTE: To assist in the installation of the handles on the right side, place a piece of... handle so that the screws are : • 1/4 inch socket wrench. • Adjustable Wrench. • 10 mm open from the refrigerator doors. REFRIGERATOR INSTALLATION REFRIGERATOR DOORS: HOW TO REMOVE AND REVERSE (Optional) For Swing models You may require some force). 9 Alignment of 8 4 the keyhole slots ...
...2 inch putty knife. REVERSING DOOR OPENING DIRECTION FROM LEFT TO RIGHT (when you begin, unplug the refrigerator or disconnect the power source. Removing and Installing the Refrigerator Handles NOTE: To assist in the installation of the handles on the right side, place a piece of... handle so that the screws are : • 1/4 inch socket wrench. • Adjustable Wrench. • 10 mm open from the refrigerator doors. REFRIGERATOR INSTALLATION REFRIGERATOR DOORS: HOW TO REMOVE AND REVERSE (Optional) For Swing models You may require some force). 9 Alignment of 8 4 the keyhole slots ...

Owner's Manual
Page 15
... (3) and the cap (4), place them in the opposite side (the cap will be placed in the right side and the pivot on the left side (5). REFRIGERATOR INSTALLATION 2. Removing and Installing the Freezer Handle NOTE: Before beginning, check the handle type of handle. Handle Type 2 3. Handle Type 1 2 1 3...the door has been taken off, remove the screws (6), the bolt (7) and the pivot (8) located below this type of your model. Removing the Refrigerator Door • Gently remove the top hinge cover with a flat head screwdriver. • Loosen the two screws (3), remove the handle (4) and...
... (3) and the cap (4), place them in the opposite side (the cap will be placed in the right side and the pivot on the left side (5). REFRIGERATOR INSTALLATION 2. Removing and Installing the Freezer Handle NOTE: Before beginning, check the handle type of handle. Handle Type 2 3. Handle Type 1 2 1 3...the door has been taken off, remove the screws (6), the bolt (7) and the pivot (8) located below this type of your model. Removing the Refrigerator Door • Gently remove the top hinge cover with a flat head screwdriver. • Loosen the two screws (3), remove the handle (4) and...
Owner's Manual
Page 16
...left side, you will find two screws (5), a bolt (6) and 1 pivot (7). Removing the Freezer Door • Before beginning, make sure you completely remove the refrigerator door. • Loosen the two screws from the base grille and remove (1). • Loosen and remove the two screws (2) and the pin (3). • Raise...Reinstall the pivot (8), the bolt (9) and screws (10) on the right side (15). 13 15 14 4 • On the bottom right side of the refrigerator and install the four screws into the hinge (16 & 17). 7 16 17 6 5 15 In the remaining space, place the hinge (1) and connect it in...
...left side, you will find two screws (5), a bolt (6) and 1 pivot (7). Removing the Freezer Door • Before beginning, make sure you completely remove the refrigerator door. • Loosen the two screws from the base grille and remove (1). • Loosen and remove the two screws (2) and the pin (3). • Raise...Reinstall the pivot (8), the bolt (9) and screws (10) on the right side (15). 13 15 14 4 • On the bottom right side of the refrigerator and install the four screws into the hinge (16 & 17). 7 16 17 6 5 15 In the remaining space, place the hinge (1) and connect it in...

Owner's Manual
Page 17
...8226; Remove the cover (2) and place on them (18). Corners 6. AFTER COMPLETING INSTALLATION 20 Make sure that both doors close correctly. Installing the Refrigerator Door • Insert the door over the axis of the door seals are not folded over the pin (20). To ensure a good seal, ...; Insert the pin into the hinge (19). (Ensure that it is between the pivot and the freezer door). • Replace the washer over . REFRIGERATOR INSTALLATION • Take the freezer door and align the pivot holes up with • Install the hinge (3), assemble the three screws (4) the bolt holes...
...8226; Remove the cover (2) and place on them (18). Corners 6. AFTER COMPLETING INSTALLATION 20 Make sure that both doors close correctly. Installing the Refrigerator Door • Insert the door over the axis of the door seals are not folded over the pin (20). To ensure a good seal, ...; Insert the pin into the hinge (19). (Ensure that it is between the pivot and the freezer door). • Replace the washer over . REFRIGERATOR INSTALLATION • Take the freezer door and align the pivot holes up with • Install the hinge (3), assemble the three screws (4) the bolt holes...

Owner's Manual
Page 18
... uneven, follow the instructions below : 1. Aligning the Doors If the spacing between the doors while tightening the top hinge screws. 3. Plug the refrigerator into its final position. 2.Remove the base grille (Refer to lower it easier to adjust the screws. 4.Open both doors again and check to ... some weight off the top hinge cover. 2.Loosen the screws from the top hinge using a level. 6.Replace the base grille. 17 If your refrigerator seems unstable or if you would like . 4.Replace the top hinge cover. Ensure that you hold the door in place or place a spacer between ...
... uneven, follow the instructions below : 1. Aligning the Doors If the spacing between the doors while tightening the top hinge screws. 3. Plug the refrigerator into its final position. 2.Remove the base grille (Refer to lower it easier to adjust the screws. 4.Open both doors again and check to ... some weight off the top hinge cover. 2.Loosen the screws from the top hinge using a level. 6.Replace the base grille. 17 If your refrigerator seems unstable or if you would like . 4.Replace the top hinge cover. Ensure that you hold the door in place or place a spacer between ...

Owner's Manual
Page 19
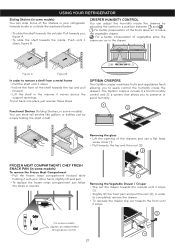
...between both sections to eliminate odors. These tones will be less cold because air flows in normal operation. ADJUSTING THE CONTROLS • Your refrigerator has two controls that allow you wrap or cover foods tightly (See the "Food Storage Guide" section for details). To prevent odor ...speed of food, make sure you to -13 °C) The lower the degree, the colder the freezer compartment will become. USING YOUR REFRIGERATOR ENSURING PROPER AIR CIRCULATION In order to obtain stable temperature, the air must thoroughly clean both sections, any of these settings for 24 hours...
...between both sections to eliminate odors. These tones will be less cold because air flows in normal operation. ADJUSTING THE CONTROLS • Your refrigerator has two controls that allow you wrap or cover foods tightly (See the "Food Storage Guide" section for details). To prevent odor ...speed of food, make sure you to -13 °C) The lower the degree, the colder the freezer compartment will become. USING YOUR REFRIGERATOR ENSURING PROPER AIR CIRCULATION In order to obtain stable temperature, the air must thoroughly clean both sections, any of these settings for 24 hours...

Owner's Manual
Page 20
... Remove any dirty or discolored parts. FOOD STORAGE GUIDE ITEMS HOW TO STORE Storing Fresh Food Wrap or store food in the refrigerator in the refrigerator. Butter or margarine Store opened , tightly rewrap with plastic wrap or aluminum foil. Berries should be used. Rewrap if necessary....freezer compartment to make sure you need to adjust the temperature in a closed halfway and set correctly for normal household refrigerator usage. The refrigerator control functions as well. The freezer control adjusts the cold air flow from the freezer to the next highest number ...
... Remove any dirty or discolored parts. FOOD STORAGE GUIDE ITEMS HOW TO STORE Storing Fresh Food Wrap or store food in the refrigerator in the refrigerator. Butter or margarine Store opened , tightly rewrap with plastic wrap or aluminum foil. Berries should be used. Rewrap if necessary....freezer compartment to make sure you need to adjust the temperature in a closed halfway and set correctly for normal household refrigerator usage. The refrigerator control functions as well. The freezer control adjusts the cold air flow from the freezer to the next highest number ...
Owner's Manual
Page 21
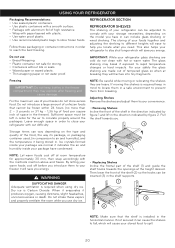
...fall, which will ease to rapid temperature changes or hard impacts. Adjusting Shelves Remove the shelves and adjust them to your refrigerator glass shelving are normal it can include glass shelving or wired shelving. By letting your warm foods cool off at room ...will fracture into tiny fragments. If not secured it indicates the air and humidity inside your package have in the horizontal manner. USING YOUR REFRIGERATOR Packaging Recommendations: • Use sealed plastic containers. • Use plastic containers with a smooth surface. • Package with aluminum foil ...
...fall, which will ease to rapid temperature changes or hard impacts. Adjusting Shelves Remove the shelves and adjust them to your refrigerator glass shelving are normal it can include glass shelving or wired shelving. By letting your warm foods cool off at room ...will fracture into tiny fragments. If not secured it indicates the air and humidity inside your package have in the horizontal manner. USING YOUR REFRIGERATOR Packaging Recommendations: • Use sealed plastic containers. • Use plastic containers with a smooth surface. • Package with aluminum foil ...
Owner's Manual
Page 22
...fresh allowing you , figure A. • To slide the shelf towards the inside: Push until it moves across the support openings. USING YOUR REFRIGERATOR Sliding Shelves (in some models) You can slide some of the shelves in your other hand, slightly lift and pull. • To replace...Folding Shelves, in some models) To remove the Frozen Meat Compartment • Pull the frozen meat compartment forward while holding it with your refrigerator towards inside the drawers by simply folding the shelf in the drawer. For better preservation of vegetables allow air to completely remove the drawer...
...fresh allowing you , figure A. • To slide the shelf towards the inside: Push until it moves across the support openings. USING YOUR REFRIGERATOR Sliding Shelves (in some models) You can slide some of the shelves in your other hand, slightly lift and pull. • To replace...Folding Shelves, in some models) To remove the Frozen Meat Compartment • Pull the frozen meat compartment forward while holding it with your refrigerator towards inside the drawers by simply folding the shelf in the drawer. For better preservation of vegetables allow air to completely remove the drawer...


