Owner's Manual
Page 2
... have your product type (Refrigerator), model number, serial number, and ZIP/Postal Code ready. Service Assistance: Press the appropriate menu option, and have your LG product is used in the U.S. Some States do not allow the exclusion or limitation of defective parts, shall be provided to LG in order to this product. Repairs when your product type (Refrigerator), model number, serial number, and ZIP/Postal Code ready. 1 LG ELECTRONICS SHALL NOT...
... have your product type (Refrigerator), model number, serial number, and ZIP/Postal Code ready. Service Assistance: Press the appropriate menu option, and have your LG product is used in the U.S. Some States do not allow the exclusion or limitation of defective parts, shall be provided to LG in order to this product. Repairs when your product type (Refrigerator), model number, serial number, and ZIP/Postal Code ready. 1 LG ELECTRONICS SHALL NOT...

Owner's Manual
Page 4
...-20 20-23 20-21 21 21 Optibin Crispers Crisper cover with interior lattice Fixed Refrigerator Rack Door Racks Dairy Compartment Egg Compartment Freezer Section Ice Bin DuraBase Durabase Divider Glide Out Drawer Tilting Door Wired Durabase (Swing Models) Freezer Shelf Refrigerator Care and Cleaning Refrigerator Cleaning Outside Inside Walls Door Lining & Gaskets Plastic Parts (Covers and Panel) Back Cover Replacing Refrigerator Lights Power Interruptions When Going on Vacation When Moving About the Automatic Ice Maker Connecting the Water Line Troubleshooting Guide 21 22 22 22-23 23 23 23...
...-20 20-23 20-21 21 21 Optibin Crispers Crisper cover with interior lattice Fixed Refrigerator Rack Door Racks Dairy Compartment Egg Compartment Freezer Section Ice Bin DuraBase Durabase Divider Glide Out Drawer Tilting Door Wired Durabase (Swing Models) Freezer Shelf Refrigerator Care and Cleaning Refrigerator Cleaning Outside Inside Walls Door Lining & Gaskets Plastic Parts (Covers and Panel) Back Cover Replacing Refrigerator Lights Power Interruptions When Going on Vacation When Moving About the Automatic Ice Maker Connecting the Water Line Troubleshooting Guide 21 22 22 22-23 23 23 23...

Owner's Manual
Page 6
... in and adjust the thermostat to utilize an extension cable, it is absolutely necessary that it is listed in the UL (in the United States) or CSA (in Canada), that it must always be disconnected with a switch. The use of 15 A and 120 V. C. REQUIREMENTS FOR GROUND CONNECTION IMPORTANT: Attentively read the following. NOTE: Before installation, cleaning or replacing light bulbs, you...
... in and adjust the thermostat to utilize an extension cable, it is absolutely necessary that it is listed in the UL (in the United States) or CSA (in Canada), that it must always be disconnected with a switch. The use of 15 A and 120 V. C. REQUIREMENTS FOR GROUND CONNECTION IMPORTANT: Attentively read the following. NOTE: Before installation, cleaning or replacing light bulbs, you...

Owner's Manual
Page 8
... models 7 Swing Model PARTS AND FEATURES A I Dairy Compartment J Door Racks K Freezer Light L Fixed Refrigerator Rack M Wire Freezer Shelf N Freezer Door Rack * On some or all of the features and parts listed below. NOTE: This guide covers different models. A Digital Sensor Control B Refrigerator Light C Shelves D Frozen Meat Compartment (Chef Fresh/Snack Pan)* E Optibin Crisper Keeps fruits and vegetables fresh and crisp F Ice Tray * G Ice Bin H Wired Durabase I B C J D E K F L G M H N Read this section to that of your model. The location of some of the parts...
... models 7 Swing Model PARTS AND FEATURES A I Dairy Compartment J Door Racks K Freezer Light L Fixed Refrigerator Rack M Wire Freezer Shelf N Freezer Door Rack * On some or all of the features and parts listed below. NOTE: This guide covers different models. A Digital Sensor Control B Refrigerator Light C Shelves D Frozen Meat Compartment (Chef Fresh/Snack Pan)* E Optibin Crisper Keeps fruits and vegetables fresh and crisp F Ice Tray * G Ice Bin H Wired Durabase I B C J D E K F L G M H N Read this section to that of your model. The location of some of the parts...

Owner's Manual
Page 9
... Safety Instructions". Do not remove any tools in the air vents, the base cover or in position. You may cause injury or electrical shock. To remove adhesive tape residue, rub it . Do not use . Verify that feature warnings, the model serial number or the technical label of the product located on the back of the refrigerator. Your refrigerator is extremely heavy. Remove the shelves and replace them...
... Safety Instructions". Do not remove any tools in the air vents, the base cover or in position. You may cause injury or electrical shock. To remove adhesive tape residue, rub it . Do not use . Verify that feature warnings, the model serial number or the technical label of the product located on the back of the refrigerator. Your refrigerator is extremely heavy. Remove the shelves and replace them...

Owner's Manual
Page 14
... are inside of the keyhole slots of the handle (8). • Grasp the handle with both hands and slide the handle downward (9) (this might require some force). 9 Alignment of 8 4 the keyhole slots with the screws 6 7 5 13 REVERSING DOOR OPENING DIRECTION FROM LEFT TO RIGHT (when you begin, unplug the refrigerator or disconnect the power source. REFRIGERATOR INSTALLATION REFRIGERATOR DOORS: HOW TO REMOVE AND REVERSE (Optional) For Swing models...
... are inside of the keyhole slots of the handle (8). • Grasp the handle with both hands and slide the handle downward (9) (this might require some force). 9 Alignment of 8 4 the keyhole slots with the screws 6 7 5 13 REVERSING DOOR OPENING DIRECTION FROM LEFT TO RIGHT (when you begin, unplug the refrigerator or disconnect the power source. REFRIGERATOR INSTALLATION REFRIGERATOR DOORS: HOW TO REMOVE AND REVERSE (Optional) For Swing models...

Owner's Manual
Page 15
Removing and Installing the Freezer Handle NOTE: Before beginning, check the handle type of handle. REFRIGERATOR INSTALLATION 2. Removing the Refrigerator Door • Gently remove the top hinge cover with a flat head screwdriver. • Loosen the two screws (3), remove the handle (4) and install all on the right side. • Attach the cap and the two screws (that were previously removed) on the left side). • Slightly raise the refrigerator door (5) and remove it. • Once...
Removing and Installing the Freezer Handle NOTE: Before beginning, check the handle type of handle. REFRIGERATOR INSTALLATION 2. Removing the Refrigerator Door • Gently remove the top hinge cover with a flat head screwdriver. • Loosen the two screws (3), remove the handle (4) and install all on the right side. • Attach the cap and the two screws (that were previously removed) on the left side). • Slightly raise the refrigerator door (5) and remove it. • Once...

Owner's Manual
Page 18
... by turning both leveling screws clockwise. Aligning the Doors If the spacing between the doors while tightening the top hinge screws. 3. Plug the refrigerator into its final position. 2.Remove the base grille (Refer to adjust the screws. 4.Open both leveling screws the same amount. 5. This will make sure that the refrigerator is uneven, follow the instructions below : 1. REFRIGERATOR INSTALLATION CLOSING AND ALIGNING THE DOORS Closing the Doors Your refrigerator...
... by turning both leveling screws clockwise. Aligning the Doors If the spacing between the doors while tightening the top hinge screws. 3. Plug the refrigerator into its final position. 2.Remove the base grille (Refer to adjust the screws. 4.Open both leveling screws the same amount. 5. This will make sure that the refrigerator is uneven, follow the instructions below : 1. REFRIGERATOR INSTALLATION CLOSING AND ALIGNING THE DOORS Closing the Doors Your refrigerator...

Owner's Manual
Page 20
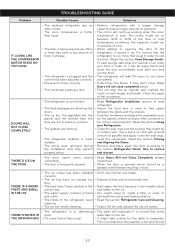
... • Room temperature is too warm or too cold, then adjust the freezer control as well. FREEZER section is too warm/ ice is made too slowly • Opening the door often • Adding a large amount of bad odors, contaminants inside the crisper. Remove any dirty or discolored parts. REFRIGERATOR section is very low (not cycling often enough) • Using ice frequently • Air vents blocked by adjusting the refrigerator first. This...
... • Room temperature is too warm or too cold, then adjust the freezer control as well. FREEZER section is too warm/ ice is made too slowly • Opening the door often • Adding a large amount of bad odors, contaminants inside the crisper. Remove any dirty or discolored parts. REFRIGERATOR section is very low (not cycling often enough) • Using ice frequently • Air vents blocked by adjusting the refrigerator first. This...
Owner's Manual
Page 21
... model you use dry ice. 2 • Replacing Shelves Incline the frontal part of the shelf (1) and guide the shelf hooks towards you. 1 Storage times can cause the shelves to fall, which will ease to spill. 20 If moving or relocating the shelves they will save you need. When it evaporates it indicates the air and humidity inside your package have in can be inserted (3) in the shelf supports. 1 3 2 NOTE: Make...
... model you use dry ice. 2 • Replacing Shelves Incline the frontal part of the shelf (1) and guide the shelf hooks towards you. 1 Storage times can cause the shelves to fall, which will ease to spill. 20 If moving or relocating the shelves they will save you need. When it evaporates it indicates the air and humidity inside your package have in can be inserted (3) in the shelf supports. 1 3 2 NOTE: Make...
Owner's Manual
Page 23
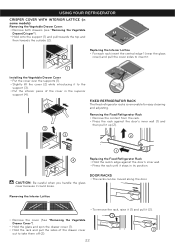
... inferior piece of the drawer cover out to insert it. 1 Installing the Vegetable Drawer Cover • Put the cover over the supports (1). • Slightly lift the cover (2) while introducing it stays in the superior support (4). CAUTION: Be careful when you handle the glass cover because it (2). 1 2 22 USING YOUR REFRIGERATOR CRISPER COVER WITH INTERIOR LATTICE (in some models) Removing the Vegetable Drawer Cover: • Remove both drawers (see "Removing the Vegetable Drawer/Crisper"). • Hold onto the...
... inferior piece of the drawer cover out to insert it. 1 Installing the Vegetable Drawer Cover • Put the cover over the supports (1). • Slightly lift the cover (2) while introducing it stays in the superior support (4). CAUTION: Be careful when you handle the glass cover because it (2). 1 2 22 USING YOUR REFRIGERATOR CRISPER COVER WITH INTERIOR LATTICE (in some models) Removing the Vegetable Drawer Cover: • Remove both drawers (see "Removing the Vegetable Drawer/Crisper"). • Hold onto the...

Owner's Manual
Page 26
... fuse box. REFRIGERATOR CARE AND CLEANING WARNING EXPLOSION HAZARD BACK COVER WARNING ELECTRICAL SHOCK HAZARD Before you begin, either unplug the refrigerator or turn off power at the circuit breaker or fuse box. REPLACING REFRIGERATOR LIGHTS WARNING ELECTRIC SHOCK HAZARD Before replacing a burned-out light bulb, either unplug the refrigerator or turn off , if the door of the refrigerator is left open for seven minutes. Do not use a product specifically design to create...
... fuse box. REFRIGERATOR CARE AND CLEANING WARNING EXPLOSION HAZARD BACK COVER WARNING ELECTRICAL SHOCK HAZARD Before you begin, either unplug the refrigerator or turn off power at the circuit breaker or fuse box. REPLACING REFRIGERATOR LIGHTS WARNING ELECTRIC SHOCK HAZARD Before replacing a burned-out light bulb, either unplug the refrigerator or turn off , if the door of the refrigerator is left open for seven minutes. Do not use a product specifically design to create...

Owner's Manual
Page 27
... as soon as possible. REFRIGERATOR CARE AND CLEANING REMEMBER: In a power failure, a full freezer stays cold longer than a freezer full of baked goods. Replacing the Freezer light • Unplug the refrigerator. • Unlock the cover of the perishable items and freeze the 3 rest. 2.Empty the ice bin. When your refrigerator arrives to your home, put everything back into place and read the section "Refrigerator Installation" in . 1 3 WHEN MOVING...
... as soon as possible. REFRIGERATOR CARE AND CLEANING REMEMBER: In a power failure, a full freezer stays cold longer than a freezer full of baked goods. Replacing the Freezer light • Unplug the refrigerator. • Unlock the cover of the perishable items and freeze the 3 rest. 2.Empty the ice bin. When your refrigerator arrives to your home, put everything back into place and read the section "Refrigerator Installation" in . 1 3 WHEN MOVING...
Owner's Manual
Page 28
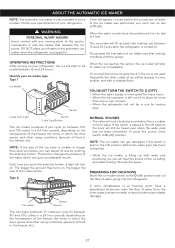
... water connections are performed, turn its dial to make ice immediately. The ice maker will emit a buzzing sound when the ice maker is only included in the automatic ice maker when the refrigerator is turned on . NOTE: If the size of water going into the refrigerator. The bigger the amount that some models. OPERATING INSTRUCTIONS After turning on your fingers in some ice gets stuck. When the ice reaches the sensor, the ice maker will stop...
... water connections are performed, turn its dial to make ice immediately. The ice maker will emit a buzzing sound when the ice maker is only included in the automatic ice maker when the refrigerator is turned on . NOTE: If the size of water going into the refrigerator. The bigger the amount that some models. OPERATING INSTRUCTIONS After turning on your fingers in some ice gets stuck. When the ice reaches the sensor, the ice maker will stop...

Owner's Manual
Page 29
... usage. Air located inside of capacity cup [0,2 liters]): a) Identify if the sediments filter in the inside the water pipes can be located in the cold-water connection point. BEFORE START The water source is necessary, make sure such valve meets local standards and requirements. When connecting to a horizontal pipeline is not guaranteed by the refrigerator or automated ice maker manufacturer. Follow the next instructions carefully to minimize costly water related...
... usage. Air located inside of capacity cup [0,2 liters]): a) Identify if the sediments filter in the inside the water pipes can be located in the cold-water connection point. BEFORE START The water source is necessary, make sure such valve meets local standards and requirements. When connecting to a horizontal pipeline is not guaranteed by the refrigerator or automated ice maker manufacturer. Follow the next instructions carefully to minimize costly water related...

Owner's Manual
Page 32
... the refrigerator before changing the light bulb. the fans will hear a dripping sound caused during the thawing cycle. • During the defrosting cycle the water might produce certain noises that your local store. (Read the section Replacing Refrigerator Lights). 31 Replace the bulb with proper voltage. • Replace the fuse or reset the circuit breaker. • Wait about 30 minutes for your previous refrigerator did not. TROUBLESHOOTING GUIDE UNDERSTANDING...
... the refrigerator before changing the light bulb. the fans will hear a dripping sound caused during the thawing cycle. • During the defrosting cycle the water might produce certain noises that your local store. (Read the section Replacing Refrigerator Lights). 31 Replace the bulb with proper voltage. • Replace the fuse or reset the circuit breaker. • Wait about 30 minutes for your previous refrigerator did not. TROUBLESHOOTING GUIDE UNDERSTANDING...
Owner's Manual
Page 33
... the Doors. THERE´S WATER IN THE DRAINING BIN • The refrigerator is in order to cool the bins. (Read the section Food Storage Guide). Use a piece of cloth with . The motor might need to install a filter in order to eliminate the odors and taste problems. • Read the section Refrigerator Care and Cleaning. • Empty the bin and discard the old ice cubes. mentioned. • The door is frequently opened...
... the Doors. THERE´S WATER IN THE DRAINING BIN • The refrigerator is in order to cool the bins. (Read the section Food Storage Guide). Use a piece of cloth with . The motor might need to install a filter in order to eliminate the odors and taste problems. • Read the section Refrigerator Care and Cleaning. • Empty the bin and discard the old ice cubes. mentioned. • The door is frequently opened...

Owner's Manual
Page 34
... to clean the valve. See the Adjusting the Controls section. • Door left open . If it is cooled down or not plugged. • The freezer temperature is holding the door open . • Check to see if something is warm. • The ice cubes turn off . • The water supply is down it self if the doors are opened the warm and humid air enters. TROUBLESHOOTING GUIDE Problem Possible Causes Solutions THE REFRIGERATOR SEEMS TO MAKE TOO MUCH NOISE...
... to clean the valve. See the Adjusting the Controls section. • Door left open . If it is cooled down or not plugged. • The freezer temperature is holding the door open . • Check to see if something is warm. • The ice cubes turn off . • The water supply is down it self if the doors are opened the warm and humid air enters. TROUBLESHOOTING GUIDE Problem Possible Causes Solutions THE REFRIGERATOR SEEMS TO MAKE TOO MUCH NOISE...

Owner's Manual
Page 2
... product type (Refrigerator), model number, serial number, and ZIP/Postal Code ready. To obtain the nearest Authorized Call 1-800-243-0000 (24 hrs a day, 7 days per week, 365 days per year). This warranty gives you specific legal rights and you . Repairs when your home to deliver and pickup, install, instruct, or replace house fuses or correct house wiring or plumbing, or correction of God. 3. Service...
... product type (Refrigerator), model number, serial number, and ZIP/Postal Code ready. To obtain the nearest Authorized Call 1-800-243-0000 (24 hrs a day, 7 days per week, 365 days per year). This warranty gives you specific legal rights and you . Repairs when your home to deliver and pickup, install, instruct, or replace house fuses or correct house wiring or plumbing, or correction of God. 3. Service...
Specification
Page 2
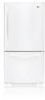
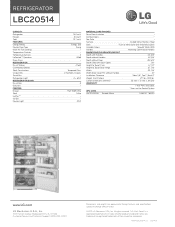
REFRIGERATOR LBC20514 CAPACITY Refrigerator Freezer Total FEATURES Energy Rating Freezer Door Type Multi-Air Flow Cooling Temperature Controls Temperature Sensors LoDecibel™ Operation Door Alarm REFRIGERATOR No. Carton Dimensions (WxHxD) 32 1/8" x 70 1/8" x 34 5/8" WARRANTY 1 Year Parts and Labor, 7 Years on the Sealed System UPC CODE LBC20514SW Smooth White 048231 783910 www.LG.com LG Electronics U.S.A., Inc. 1000 Sylvan Avenue Englewood Cliffs, NJ 07632 Customer Service and Technical Support: (800) 243-0000 Dimensions and weights are trademarks or registered trademarks of ...
REFRIGERATOR LBC20514 CAPACITY Refrigerator Freezer Total FEATURES Energy Rating Freezer Door Type Multi-Air Flow Cooling Temperature Controls Temperature Sensors LoDecibel™ Operation Door Alarm REFRIGERATOR No. Carton Dimensions (WxHxD) 32 1/8" x 70 1/8" x 34 5/8" WARRANTY 1 Year Parts and Labor, 7 Years on the Sealed System UPC CODE LBC20514SW Smooth White 048231 783910 www.LG.com LG Electronics U.S.A., Inc. 1000 Sylvan Avenue Englewood Cliffs, NJ 07632 Customer Service and Technical Support: (800) 243-0000 Dimensions and weights are trademarks or registered trademarks of ...


