Owners Manual
Page 3
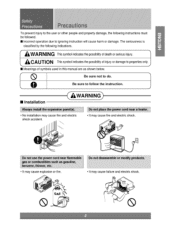
To prevent iniury to the user or other people and pro_rty damage, the following instructions must be followed, • incorrect o,_ration due to ignoring instw_ion will ,cause harm or damage, The seriousness is cla_ifiied by the folio,wing indicator's. [] Installation • No installation may cau_ fire and electric shock accident. • it may cause fire and eie,ctri,c shock * it may _use expiosion or fire. • lit may cause failiure and electdc shock.
To prevent iniury to the user or other people and pro_rty damage, the following instructions must be followed, • incorrect o,_ration due to ignoring instw_ion will ,cause harm or damage, The seriousness is cla_ifiied by the folio,wing indicator's. [] Installation • No installation may cau_ fire and electric shock accident. • it may cause fire and eie,ctri,c shock * it may _use expiosion or fire. • lit may cause failiure and electdc shock.

Owners Manual
Page 4
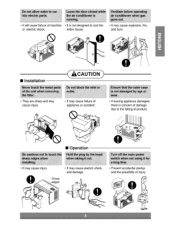
It 'will cause e_ectricshock or fire due to heat gestation. • No groundir,_ may cau_ fire and electric shock. • lit will cause electdc _ock or fire due to heat get.ration. , I!twill! cause ele_dc s_ck or fire due to heat generation_ or electric _ock, • It wil!lcause electric shock or fire due to heat generation. ,. i Operation . cause electdc shock or fire. • It will _use electdc shock. Othe_ise, it may cau_ fire and electlic shock accident. , It may cause etectdc shock (See installation Manual). • _he_ise it wil!
It 'will cause e_ectricshock or fire due to heat gestation. • No groundir,_ may cau_ fire and electric shock. • lit will cause electdc _ock or fire due to heat get.ration. , I!twill! cause ele_dc s_ck or fire due to heat generation_ or electric _ock, • It wil!lcause electric shock or fire due to heat generation. ,. i Operation . cause electdc shock or fire. • It will _use electdc shock. Othe_ise, it may cau_ fire and electlic shock accident. , It may cause etectdc shock (See installation Manual). • _he_ise it wil!
Owners Manual
Page 5
• It will]cause failure of injury,, Sharp • it is not designed to c_] the ,o,relectdc s_ck. entire house, [] Installation _ CAUTION .j_ I Operation • It may cause electric shock aM damage+ • Prevent accidental s,ta_up and the possi_lity of machine • it may cause injury.
• It will]cause failure of injury,, Sharp • it is not designed to c_] the ,o,relectdc s_ck. entire house, [] Installation _ CAUTION .j_ I Operation • It may cause electric shock aM damage+ • Prevent accidental s,ta_up and the possi_lity of machine • it may cause injury.

Owners Manual
Page 7
_ Contact an installation specialist for instaHaSon Piug in _e power plug properly, _Do not share _e same outlet wi_ o_er appliances Do not use an extension _rd Do ...
_ Contact an installation specialist for instaHaSon Piug in _e power plug properly, _Do not share _e same outlet wi_ o_er appliances Do not use an extension _rd Do ...

Owners Manual
Page 11
...; Open the nlet #riile by pulling off the exposed door on the top of the unit (based on installation}, Pui!the tab siightiy to release the fi_ter,Pu!l the filter iL_the same dire,ction as the openingi, ® C:_eanthe fi_terw_lhwarm, soapy water, _e water ...
...; Open the nlet #riile by pulling off the exposed door on the top of the unit (based on installation}, Pui!the tab siightiy to release the fi_ter,Pu!l the filter iL_the same dire,ction as the openingi, ® C:_eanthe fi_terw_lhwarm, soapy water, _e water ...

Owners Manual
Page 12
Install the drain pan to the right corner of the cabinet with a mild _tergent for 20_30 minutes. The air condi#oner empioys a proper drain method _ereby ... the inlet grille; Re-instal_the Air Purifying Fi_er to the original WARNING: Don't touch this paso) Note the cuts of the ,drain pan .You can install the drain pan as _tailed below Take the drain pan which is not supplied) PAN DRAIN HOSE 'iili The Air Purifying fi_er behind _.e air filter...
Install the drain pan to the right corner of the cabinet with a mild _tergent for 20_30 minutes. The air condi#oner empioys a proper drain method _ereby ... the inlet grille; Re-instal_the Air Purifying Fi_er to the original WARNING: Don't touch this paso) Note the cuts of the ,drain pan .You can install the drain pan as _tailed below Take the drain pan which is not supplied) PAN DRAIN HOSE 'iili The Air Purifying fi_er behind _.e air filter...

Owners Manual
Page 14
...cooling efficiency of the air conditioner, CA_ION: AIII sWe louvers of the cabinet must remain exp,_d to the outside of the, structure, install the unit a I_le slanted so the back is slightiy iower than _qefront (about 1/2°'),, This will force condensed water to flow to _e ...a_ut 3,0'"_60°' above the floor ievel ' A!I supporting parts shouid be secured to firm wo_ masonry,,or metai, • This unit is design_ for installation i_qstandard double hung win_ws 'with a_ual opening wi_hs _'om25 '' to 36'", • The top and bottom 'window sash must open sufficiency to allow a clear...
...cooling efficiency of the air conditioner, CA_ION: AIII sWe louvers of the cabinet must remain exp,_d to the outside of the, structure, install the unit a I_le slanted so the back is slightiy iower than _qefront (about 1/2°'),, This will force condensed water to flow to _e ...a_ut 3,0'"_60°' above the floor ievel ' A!I supporting parts shouid be secured to firm wo_ masonry,,or metai, • This unit is design_ for installation i_qstandard double hung win_ws 'with a_ual opening wi_hs _'om25 '' to 36'", • The top and bottom 'window sash must open sufficiency to allow a clear...

Owners Manual
Page 15
... must ope# sufficiently to allow a c_earve_cal opening of i6" from the _om of the I_stali the unit a ii_e sla_ted so the back is installed securely and fi_ly Install the unit where the suniight does not shine directly on the unit, _,e outside of the up_r sash to the outsi_, Instali the unit wi_...
... must ope# sufficiently to allow a c_earve_cal opening of i6" from the _om of the I_stali the unit a ii_e sla_ted so the back is installed securely and fi_ly Install the unit where the suniight does not shine directly on the unit, _,e outside of the up_r sash to the outsi_, Instali the unit wi_...

Owners Manual
Page 16
... a_ut 30"_60°'above the floor _evei,, ' A!I supporting!parts shouid be secured to firm wo_, masonry,,or metai. • This unit is design_ for installation in ,et must open sufficiency to allow a clear veRical opening of 18' from the bosom of the upper sash to _e outside ot the structure...° Install the unit a li_le s_antedso the back is inst_led securely and firmly, !nstaHthe unit where the suniight does not shine direc_y on fne unit C_led air...
... a_ut 30"_60°'above the floor _evei,, ' A!I supporting!parts shouid be secured to firm wo_, masonry,,or metai. • This unit is design_ for installation in ,et must open sufficiency to allow a clear veRical opening of 18' from the bosom of the upper sash to _e outside ot the structure...° Install the unit a li_le s_antedso the back is inst_led securely and firmly, !nstaHthe unit where the suniight does not shine direc_y on fne unit C_led air...

Owners Manual
Page 18
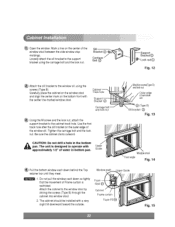
... Fig, 3. '_ Sel,_ the positon th_ will place the Sill Sup_,_ @] near t_e outer most point:ion siil {See Fig, 4) Frame Guide ' Be,careful when you install the cabinet (Frame Guides @ are broke_ easily) A_sch the Sill Suppo_ @ to #'_,ecabinet track ho_eis r,e_ationto the selected posit:ionusing 2 Type A screws in _e window...
... Fig, 3. '_ Sel,_ the positon th_ will place the Sill Sup_,_ @] near t_e outer most point:ion siil {See Fig, 4) Frame Guide ' Be,careful when you install the cabinet (Frame Guides @ are broke_ easily) A_sch the Sill Suppo_ @ to #'_,ecabinet track ho_eis r,e_ationto the selected posit:ionusing 2 Type A screws in _e window...

Owners Manual
Page 20
See ELECTRICAL DATA for a_aching power cord to the cabinet by inseding tile ta_ on the grille into the ta_ on #l_efront of room air conditioner is now completed. Win_w Io,ckir_g bracket @ Fig. 9 O i0), Pull down the inllet grille _d secure it wRh a Type A screw @through the front gdllle, (See Fig, 11) Window installation ,of the cannel Push the grille in until it snaps into piace (See Fi£. ':_ A_ach the Widow L_king Bracket ,@w_:h a Ty_ C _re'w C# (be Fig 9) A_ach the, fro_ grille to el,_trical ouSet.
See ELECTRICAL DATA for a_aching power cord to the cabinet by inseding tile ta_ on the grille into the ta_ on #l_efront of room air conditioner is now completed. Win_w Io,ckir_g bracket @ Fig. 9 O i0), Pull down the inllet grille _d secure it wRh a Type A screw @through the front gdllle, (See Fig, 11) Window installation ,of the cannel Push the grille in until it snaps into piace (See Fi£. ':_ A_ach the Widow L_king Bracket ,@w_:h a Ty_ C _re'w C# (be Fig 9) A_ach the, fro_ grille to el,_trical ouSet.
Owners Manual
Page 22
... unit is rest_cted. Aftach the cabinet t:o_e win_w stool by driving the screws (Type B} _rough the cabinet i_o win®w stool. 2. The cabinet shouid be installed wi_ a very slight tilt @wnward toward _e outside, Cabinet Framecu4ain Do not pull _-_ewin®w sash down so tighfly _at the movement d Frame cu_ain is...
... unit is rest_cted. Aftach the cabinet t:o_e win_w stool by driving the screws (Type B} _rough the cabinet i_o win®w stool. 2. The cabinet shouid be installed wi_ a very slight tilt @wnward toward _e outside, Cabinet Framecu4ain Do not pull _-_ewin®w sash down so tighfly _at the movement d Frame cu_ain is...


