User Guide
Page 3
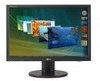
... in accordance to transport the unit. They make an ideal container in which may scratch, mar, or damage the Active Matrix LCD permanently. On Disposal The fluorescent lamp used under any mode except the recommended resolution, some afterimages. Important Precautions On Installation Do ...spraying may appear on the display performance. However, this product contains a small amount of mercury. Do not dispose of the fixed-resolution LCD panel. Some dot defects may cause some scaled or processed images may cause electrical shock. However, this display near a swimming pool. Do ...
... in accordance to transport the unit. They make an ideal container in which may scratch, mar, or damage the Active Matrix LCD permanently. On Disposal The fluorescent lamp used under any mode except the recommended resolution, some afterimages. Important Precautions On Installation Do ...spraying may appear on the display performance. However, this product contains a small amount of mercury. Do not dispose of the fixed-resolution LCD panel. Some dot defects may cause some scaled or processed images may cause electrical shock. However, this display near a swimming pool. Do ...
User Guide
Page 6
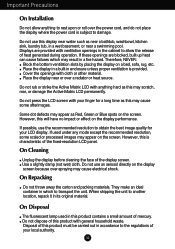
... that the power to maintain an ergonomic and comfortable viewing position, the forward tilt angle of the monitor should not exceed 5 degrees. Adjust the position of the panel in order to the monitor, the computer system, and other attached devices is stain or fingerprint on the exterior only with the cleansing cloths for...
... that the power to maintain an ergonomic and comfortable viewing position, the forward tilt angle of the monitor should not exceed 5 degrees. Adjust the position of the panel in order to the monitor, the computer system, and other attached devices is stain or fingerprint on the exterior only with the cleansing cloths for...

User Guide
Page 7
For detailed information, please refer to utilize the Pivot function. 2. Lift the monitor to its highest height to the Pivot Software CD provided. Please be cautious and avoid contact between the monitor head and the Stand Base when rotating the screen to access the Pivot function. If the monitor head touches the Stand Base, then the Stand Base could crack. A6 Landscape & Portrait : You can rotate the panel 90o clockwise. Connecting the Display Using the Pivot function 1. Head section Stand section 3.
For detailed information, please refer to utilize the Pivot function. 2. Lift the monitor to its highest height to the Pivot Software CD provided. Please be cautious and avoid contact between the monitor head and the Stand Base when rotating the screen to access the Pivot function. If the monitor head touches the Stand Base, then the Stand Base could crack. A6 Landscape & Portrait : You can rotate the panel 90o clockwise. Connecting the Display Using the Pivot function 1. Head section Stand section 3.

User Guide
Page 8
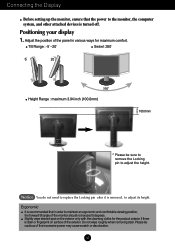
...of 90 degrees as shown in the direction of the monitor. When using a PC or other component, simply connect to the AUDIO-OUT terminal. Connect the audio cable to its highest height. 1 AUDIO OUT 2 1 * Make sure the panel does not touch the floor when rotating. Slot Hook AUDIO... Notice Be cautious to avoid your hand being caught between the speaker and Stand Base when lowering the monitor to the AUDIO-IN terminal. L246WPM Connecting the speaker 1. Rotate the panel at an angle of the external instrument. A7 The feature is only for speaker models - When using...
...of 90 degrees as shown in the direction of the monitor. When using a PC or other component, simply connect to the AUDIO-OUT terminal. Connect the audio cable to its highest height. 1 AUDIO OUT 2 1 * Make sure the panel does not touch the floor when rotating. Slot Hook AUDIO... Notice Be cautious to avoid your hand being caught between the speaker and Stand Base when lowering the monitor to the AUDIO-IN terminal. L246WPM Connecting the speaker 1. Rotate the panel at an angle of the external instrument. A7 The feature is only for speaker models - When using...
User Guide
Page 10
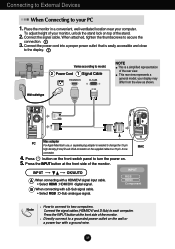
Press button on the front switch panel to two computers. INPUT RGB HDMI Component Note How to connect to turn... and close to the display. 2 Varies according to model. Press the INPUT button at the front side of the monitor. B When connecting with a HDMI/DVI signal input cable. • Select HDMI : HDMI/DVI digital signal. Press... the INPUT button at the front side of the monitor. Place the monitor in a convenient, well-ventilated location near your display may differ from the view as shown. your computer. INPUT...
Press button on the front switch panel to two computers. INPUT RGB HDMI Component Note How to connect to turn... and close to the display. 2 Varies according to model. Press the INPUT button at the front side of the monitor. B When connecting with a HDMI/DVI signal input cable. • Select HDMI : HDMI/DVI digital signal. Press... the INPUT button at the front side of the monitor. Place the monitor in a convenient, well-ventilated location near your display may differ from the view as shown. your computer. INPUT...

User Guide
Page 16
... the MENU+ Button for several seconds. You can unlock the OSD controls at any time by pushing the MENU+ Button for several seconds. A15 Control Panel Functions Front Panel Controls INPUT Button Select the input signal. The message "Controls unlocked" should appear.
... the MENU+ Button for several seconds. You can unlock the OSD controls at any time by pushing the MENU+ Button for several seconds. A15 Control Panel Functions Front Panel Controls INPUT Button Select the input signal. The message "Controls unlocked" should appear.
User Guide
Page 17
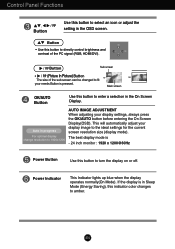
...PC signal (RGB, HDMI/DVI). This will automatically adjust your display image to 1920x1200 AUTO IMAGE ADJUSTMENT When adjusting your needs Button is - 24 inch monitor : 1920 x 1200@60Hz Power Button Use this button to directly control brightness and contrast of the sub-screen can be changed to enter... a selection in the OSD screen. Button • Use this button to select an icon or adjust the setting in the On Screen Display. Control Panel...
...PC signal (RGB, HDMI/DVI). This will automatically adjust your display image to 1920x1200 AUTO IMAGE ADJUSTMENT When adjusting your needs Button is - 24 inch monitor : 1920 x 1200@60Hz Power Button Use this button to directly control brightness and contrast of the sub-screen can be changed to enter... a selection in the OSD screen. Button • Use this button to select an icon or adjust the setting in the On Screen Display. Control Panel...
User Guide
Page 26
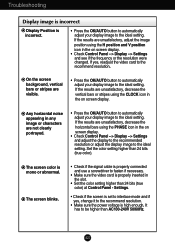
...results are unsatisfactory, decrease the horizontal bars using the H position and V position icon in the on screen display. • Check Control Panel --> Display --> Settings and see if the frequency or the resolution were changed. Any horizontal noise appearing in any image or characters are visible...Troubleshooting Display image is incorrect Display Position is properly inserted in the slot. • Set the color setting higher than 24 bits (true color) at Control Panel - On the screen background, vertical bars or stripes are not clearly portrayed. • Press the OK/AUTO button ...
...results are unsatisfactory, decrease the horizontal bars using the H position and V position icon in the on screen display. • Check Control Panel --> Display --> Settings and see if the frequency or the resolution were changed. Any horizontal noise appearing in any image or characters are visible...Troubleshooting Display image is incorrect Display Position is properly inserted in the slot. • Set the color setting higher than 24 bits (true color) at Control Panel - On the screen background, vertical bars or stripes are not clearly portrayed. • Press the OK/AUTO button ...
User Guide
Page 28
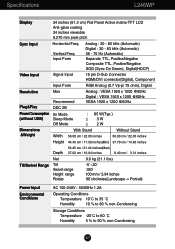
Specifications L246WP Display 24 inches (61.3 cm) Flat Panel Active matrix-TFT LCD Anti-glare coating 24 inches viewable 0.270 mm pixel pitch Sync Input Horizontal Freq. Vertical Freq. Input Form Analog : 30 - 83 kHz (Automatic) Digital : 30 - 83 kHz (Automatic) 56 - ...
Specifications L246WP Display 24 inches (61.3 cm) Flat Panel Active matrix-TFT LCD Anti-glare coating 24 inches viewable 0.270 mm pixel pitch Sync Input Horizontal Freq. Vertical Freq. Input Form Analog : 30 - 83 kHz (Automatic) Digital : 30 - 83 kHz (Automatic) 56 - ...

User Guide
Page 30
Specifications L246WPM Display 24 inches (61.3 cm) Flat Panel Active matrix-TFT LCD Anti-glare coating 24 inches viewable 0.270 mm pixel pitch Sync Input Video Input Horizontal Freq. Input Form Signal Input Analog : 30 - 83 kHz (Automatic) Digital : 30 - 83 kHz (...
Specifications L246WPM Display 24 inches (61.3 cm) Flat Panel Active matrix-TFT LCD Anti-glare coating 24 inches viewable 0.270 mm pixel pitch Sync Input Video Input Horizontal Freq. Input Form Signal Input Analog : 30 - 83 kHz (Automatic) Digital : 30 - 83 kHz (...

