
Owner's Manual (English)
Page 2
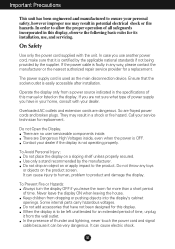
...ON when leaving the house. Do not add accessories that have in your home, consult with the unit. If the power cable is used as the main disconnection device. The power supply cord is faulty in any toys or objects on or apply impact to the product. So are dangerous. There ... properly secured. In order to allow the proper operation of time. In case you are Dangerous High Voltages inside . On Safety Use only the power cord supplied with your dealer. Do not Open the Display. Do not throw any way, please contact the manufacturer or the nearest authorized repair service...
...ON when leaving the house. Do not add accessories that have in your home, consult with the unit. If the power cable is used as the main disconnection device. The power supply cord is faulty in any toys or objects on or apply impact to the product. So are dangerous. There ... properly secured. In order to allow the proper operation of time. In case you are Dangerous High Voltages inside . On Safety Use only the power cord supplied with your dealer. Do not Open the Display. Do not throw any way, please contact the manufacturer or the nearest authorized repair service...
Owner's Manual (English)
Page 3
... out in a fire hazard. Cover the openings with anything to rest upon or roll over the power cord, and do not place the display where the power cord is provided. Do not dispose of this is the power cord and this will have no impact or effect on the display performance. Use a slightly... damp (not wet) cloth. Main power breaker is characteristic of the fixed-resolution LCD panel. However, this product with general household waste. Important Precautions On Installation Do not allow the release ...
... out in a fire hazard. Cover the openings with anything to rest upon or roll over the power cord, and do not place the display where the power cord is provided. Do not dispose of this is the power cord and this will have no impact or effect on the display performance. Use a slightly... damp (not wet) cloth. Main power breaker is characteristic of the fixed-resolution LCD panel. However, this product with general household waste. Important Precautions On Installation Do not allow the release ...
Owner's Manual (English)
Page 4
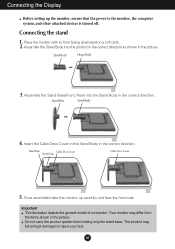
... Body in the picture. Stand Base Cable Deco Cover Stand Body Cable Deco Cover 5. Once assembled take the monitor up the monitor, ensure that the power to the monitor, the computer system, and other attached devices is turned off.
... Body in the picture. Stand Base Cable Deco Cover Stand Body Cable Deco Cover 5. Once assembled take the monitor up the monitor, ensure that the power to the monitor, the computer system, and other attached devices is turned off.
Owner's Manual (English)
Page 6
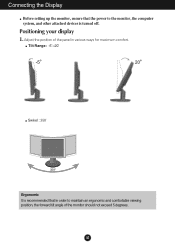
Positioning your display 1. Tilt Range: -5˚~20˚ Swivel : 358˚ 358 Ergonomic It is turned off. A5 Connecting the Display Before setting up the monitor, ensure that in various ways for maximum comfort. Adjust the position of the panel in order to the monitor, the computer system, and other attached devices is recommended that the power to maintain an ergonomic and comfortable viewing position, the forward tilt angle of the monitor should not exceed 5 degrees.
Positioning your display 1. Tilt Range: -5˚~20˚ Swivel : 358˚ 358 Ergonomic It is turned off. A5 Connecting the Display Before setting up the monitor, ensure that in various ways for maximum comfort. Adjust the position of the panel in order to the monitor, the computer system, and other attached devices is recommended that the power to maintain an ergonomic and comfortable viewing position, the forward tilt angle of the monitor should not exceed 5 degrees.

Owner's Manual (English)
Page 7
... signals. Connect the cable as shown in the correct direction. 3. Insert the Cable Deco Cover in the Stand Body in the picture. When monitor power is turned on, the 'Self Image Setting Function' is needed to change the 15 pin high density (3 row) D-sub VGA connector on the ... the OSD adjustment menu. A Connect DVI Cable B Connect Dsub Cable (PC) C Connect Dsub Cable (Mac) Power Cord Signal Cable Analog signal Digital signal D-sub DVI Wall-outlet type Fix the power cord & signal cable as below sketch map form 1 to optimal settings for the first time, this option initializes ...
... signals. Connect the cable as shown in the correct direction. 3. Insert the Cable Deco Cover in the Stand Body in the picture. When monitor power is turned on, the 'Self Image Setting Function' is needed to change the 15 pin high density (3 row) D-sub VGA connector on the ... the OSD adjustment menu. A Connect DVI Cable B Connect Dsub Cable (PC) C Connect Dsub Cable (Mac) Power Cord Signal Cable Analog signal Digital signal D-sub DVI Wall-outlet type Fix the power cord & signal cable as below sketch map form 1 to optimal settings for the first time, this option initializes ...
Owner's Manual (English)
Page 9
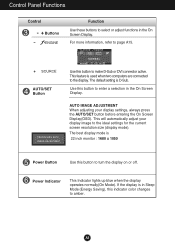
... before entering the On Screen Display(OSD). For more information, refer to page A15. + AUTO/SET Button Use this button to amber. Power Indicator This Indicator lights up blue when the display operates normally(On Mode). The best display mode is used when two computers are connected to... turn the display on or off. This feature is 22 inch monitor : 1680 x 1050 Power Button Use this indicator color changes to enter a selection in Sleep Mode (Energy Saving), this button to the display. If the display is D-Sub...
... before entering the On Screen Display(OSD). For more information, refer to page A15. + AUTO/SET Button Use this button to amber. Power Indicator This Indicator lights up blue when the display operates normally(On Mode). The best display mode is used when two computers are connected to... turn the display on or off. This feature is 22 inch monitor : 1680 x 1050 Power Button Use this indicator color changes to enter a selection in Sleep Mode (Energy Saving), this button to the display. If the display is D-Sub...
Owner's Manual (English)
Page 11
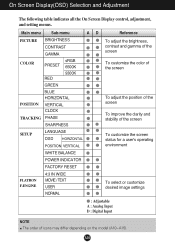
... improve the clarity and stability of the screen SETUP LANGUAGE OSD HORIZONTAL POSITION VERTICAL To customize the screen status for a user's operating environment WHITE BALANCE POWER INDICATOR FACTORY RESET FLATRON F-ENGINE 4:3 IN WIDE MOVIE / TEXT USER NORMAL To select or customize desired image settings : Adjustable A : Analog Input D : Digital Input NOTE The...
... improve the clarity and stability of the screen SETUP LANGUAGE OSD HORIZONTAL POSITION VERTICAL To customize the screen status for a user's operating environment WHITE BALANCE POWER INDICATOR FACTORY RESET FLATRON F-ENGINE 4:3 IN WIDE MOVIE / TEXT USER NORMAL To select or customize desired image settings : Adjustable A : Analog Input D : Digital Input NOTE The...
Owner's Manual (English)
Page 15
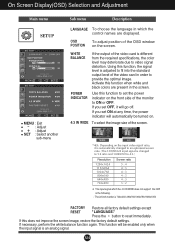
...FACTORY RESET Restore all factory default settings except "LANGUAGE." - If necessary, perform the white balance function again. A14 If you set the power indicator on the front side of the monitor to ON or OFF. The 22 inch monitor is adjusted to fit into the standard output level... 4 : 3 720x480 3 : 2 ❈ The input signal which the control names are present in the screen. Using this function to set ON at any time, the power indicator will be turned on. 4:3 IN WIDE To select the image size of the OSD window POSITION on the input video signal ratio, it will...
...FACTORY RESET Restore all factory default settings except "LANGUAGE." - If necessary, perform the white balance function again. A14 If you set the power indicator on the front side of the monitor to ON or OFF. The 22 inch monitor is adjusted to fit into the standard output level... 4 : 3 720x480 3 : 2 ❈ The input signal which the control names are present in the screen. Using this function to set ON at any time, the power indicator will be turned on. 4:3 IN WIDE To select the image size of the OSD window POSITION on the input video signal ratio, it will...
Owner's Manual (English)
Page 17
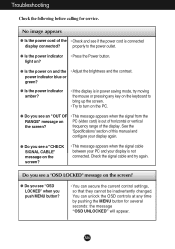
...current control settings, so that they cannot be inadvertently changed. See the 'Specifications' section of the display. light on? ● Is the power on the screen? • This message appears when the signal cable between your PC and your display again. ● Do you push MENU...the OSD controls at any key on the keyboard to bring up the screen. • Try to the power outlet. ● Is the power indicator • Press the Power button. A16 frequency range of this manual and configure your display is connected display connected? Troubleshooting Check the ...
...current control settings, so that they cannot be inadvertently changed. See the 'Specifications' section of the display. light on? ● Is the power on the screen? • This message appears when the signal cable between your PC and your display again. ● Do you push MENU...the OSD controls at any key on the keyboard to bring up the screen. • Try to the power outlet. ● Is the power indicator • Press the Power button. A16 frequency range of this manual and configure your display is connected display connected? Troubleshooting Check the ...

Owner's Manual (English)
Page 20
Vertical Freq. A19 Specifications Display Sync Input Video Input Resolution Plug&Play Power Consumption (without notice. D connector (Digital) RGB Analog (0.7 Vp-p/ 75 ohm), Digital Max Recommend Analog : VESA 1680 x 1050 @60 Hz Digital : VESA 1680 x 1050 @60 Hz ...-outlet type or PC-outlet type NOTE Information in this document is subject to change without speaker) Dimensions &Weight Tilt Range Swivel Range Power Input Environmental Conditions Stand Base Power cord 22 inches (55.8 cm) Flat Panel Active matrix-TFT LCD Anti-Glare coating 22 inches viewable 0.282*0.282 mm pixel pitch...
Vertical Freq. A19 Specifications Display Sync Input Video Input Resolution Plug&Play Power Consumption (without notice. D connector (Digital) RGB Analog (0.7 Vp-p/ 75 ohm), Digital Max Recommend Analog : VESA 1680 x 1050 @60 Hz Digital : VESA 1680 x 1050 @60 Hz ...-outlet type or PC-outlet type NOTE Information in this document is subject to change without speaker) Dimensions &Weight Tilt Range Swivel Range Power Input Environmental Conditions Stand Base Power cord 22 inches (55.8 cm) Flat Panel Active matrix-TFT LCD Anti-Glare coating 22 inches viewable 0.282*0.282 mm pixel pitch...


