User Manual
Page 4
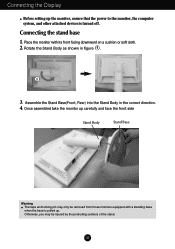
... the Stand Body as shown in the correct direction. 4. Once assembled take the monitor up carefully and face the front side Stand Body Stand Base Warning The tape and locking pin may be removed from those monitors equipped with its front facing downward on a cushion or soft cloth. 2. Place ...the monitor with a standing base when the base is pulled up the monitor, ensure that the power to the monitor, the computer system, and other attached devices ...
... the Stand Body as shown in the correct direction. 4. Once assembled take the monitor up carefully and face the front side Stand Body Stand Base Warning The tape and locking pin may be removed from those monitors equipped with its front facing downward on a cushion or soft cloth. 2. Place ...the monitor with a standing base when the base is pulled up the monitor, ensure that the power to the monitor, the computer system, and other attached devices ...

User Manual
Page 5
Do not carry the product upside down holding only the stand base. The product may differ from stand body. Important This illustration depicts the general model of connection. Connecting the Display Disassembling the stand 1. Place the monitor face Down on aflat surface. 2. Pushing Latch inside, Take the stand base from the items shown in the picture. A4 Your monitor may fall and get damaged or injure your foot. Put a cushion or soft cloth on the cushion or soft cloth. 3.
Do not carry the product upside down holding only the stand base. The product may differ from stand body. Important This illustration depicts the general model of connection. Connecting the Display Disassembling the stand 1. Place the monitor face Down on aflat surface. 2. Pushing Latch inside, Take the stand base from the items shown in the picture. A4 Your monitor may fall and get damaged or injure your foot. Put a cushion or soft cloth on the cushion or soft cloth. 3.
User Manual
Page 6
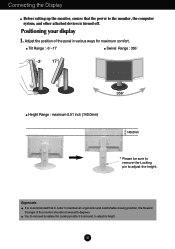
... computer system, and other attached devices is removed, to maintain an ergonomic and comfortable viewing position, the forward tilt angle of the monitor should not exceed 5 degrees. Tilt Range : -3˚~17˚ Swivel Range : 356˚ Height Range : maximum 5.51 inch (140.0mm) 140.0mm * Please be sure ... replace the Locking pin after it is turned off. A5 You do not need to adjust the height. Connecting the Display Before setting up the monitor, ensure that in various ways for maximum comfort.
... computer system, and other attached devices is removed, to maintain an ergonomic and comfortable viewing position, the forward tilt angle of the monitor should not exceed 5 degrees. Tilt Range : -3˚~17˚ Swivel Range : 356˚ Height Range : maximum 5.51 inch (140.0mm) 140.0mm * Please be sure ... replace the Locking pin after it is turned off. A5 You do not need to adjust the height. Connecting the Display Before setting up the monitor, ensure that in various ways for maximum comfort.
User Manual
Page 7
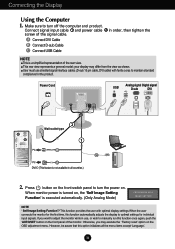
...items except 'Language'. This rear view represents a general model; If you may differ from the view as shown. Otherwise, you want to adjust the monitor while in order, then tighten the screw of the rear view. User must use , or wish to manually run this function once again, push ... and power cable 2 in use shielded signal interface cables (D-sub 15 pin cable, DVI cable) with optimal display settings.When the user connects the monitor for the first time, this option initializes all countries.) 2. your display may execute the ' Factory reset' option on the front panel of the...
...items except 'Language'. This rear view represents a general model; If you may differ from the view as shown. Otherwise, you want to adjust the monitor while in order, then tighten the screw of the rear view. User must use , or wish to manually run this function once again, push ... and power cable 2 in use shielded signal interface cables (D-sub 15 pin cable, DVI cable) with optimal display settings.When the user connects the monitor for the first time, this option initializes all countries.) 2. your display may execute the ' Factory reset' option on the front panel of the...

User Manual
Page 8
... multi screens A7 One USB Upstream port AC-IN D-SUB DVI-D Two USB Downstream ports Connect to rotate, and plug the USB cable into the monitor. 2. Fit the USB cable into the cable holder as possible follow the arrow) the cable holder, and open it. 3. Use USB programs Connecting ...the USB(Universal Serial Bus) Cable 1. Elevate the monitor as far as in the diagram, press(follow the arrow to downstream connectors of desktop or laptop computers, mouse, memory stick or USB hard disk...
... multi screens A7 One USB Upstream port AC-IN D-SUB DVI-D Two USB Downstream ports Connect to rotate, and plug the USB cable into the monitor. 2. Fit the USB cable into the cable holder as possible follow the arrow) the cable holder, and open it. 3. Use USB programs Connecting ...the USB(Universal Serial Bus) Cable 1. Elevate the monitor as far as in the diagram, press(follow the arrow to downstream connectors of desktop or laptop computers, mouse, memory stick or USB hard disk...

User Manual
Page 9
... 98, ME, NT, Vista, Macintosh, Linux Operating Systems (O/S) are not supported.) 1. System Requirements In order to make sure your computer. "LG USB Easy Connection" driver installation automatically starts. Connect the USB cable as shown below. 1 2 3 4 5 6 If your computer fails to... meet those requirements, update the operating systems at the back of the monitor to meet the system requirements, the warning message "DisplayLink Core Software" will not operate properly. Install "LG USB Easy Connection" program as the instruction message says, fully remove the USB ...
... 98, ME, NT, Vista, Macintosh, Linux Operating Systems (O/S) are not supported.) 1. System Requirements In order to make sure your computer. "LG USB Easy Connection" driver installation automatically starts. Connect the USB cable as shown below. 1 2 3 4 5 6 If your computer fails to... meet those requirements, update the operating systems at the back of the monitor to meet the system requirements, the warning message "DisplayLink Core Software" will not operate properly. Install "LG USB Easy Connection" program as the instruction message says, fully remove the USB ...

User Manual
Page 10
... as Screen Resolution, Color Quality, Screen Rotation, Extend To, Extend and Mirror. When the installation of "LG USB Easy Connection" program is an input USB signal, you can rotate the panel 90o clockwise. Lift the monitor to its highest height to access the Pivot function. Head section Stand section 3. When rotating the...
... as Screen Resolution, Color Quality, Screen Rotation, Extend To, Extend and Mirror. When the installation of "LG USB Easy Connection" program is an input USB signal, you can rotate the panel 90o clockwise. Lift the monitor to its highest height to access the Pivot function. Head section Stand section 3. When rotating the...

User Manual
Page 11
...to five are possible with parallel connection. With the USB cable unconnected, you can set "LG USB Easy Connection" program separately for the purpose of USB dual monitors. 2 Select No. 3 USB monitor and use "LG USB Easy Connection" features. A10 Does not support DOS game (StarCraft) and other 3D ...information on USB, visit the following web site.(http://www.usb.org) 'LG USB Easy Connection' program may be changed without notice for each monitor. 1 In case of product improvement. NOTE In a monitor to monitor connection, with one USB up to a sub screen. When using multiple USB...
...to five are possible with parallel connection. With the USB cable unconnected, you can set "LG USB Easy Connection" program separately for the purpose of USB dual monitors. 2 Select No. 3 USB monitor and use "LG USB Easy Connection" features. A10 Does not support DOS game (StarCraft) and other 3D ...information on USB, visit the following web site.(http://www.usb.org) 'LG USB Easy Connection' program may be changed without notice for each monitor. 1 In case of product improvement. NOTE In a monitor to monitor connection, with one USB up to a sub screen. When using multiple USB...

User Manual
Page 16
Press the MENU Button, then the main menu of selecting and adjusting an item using the OSD system. On Screen Display(OSD) Selection and Adjustment You were introduced to the procedure of the OSD appears. Menu Name PICTURE Icons Sub-menus Button Tip MENU : Exit - + : Adjust (Decrease/Increase) SET : Enter : Select another sub-menu NOTE OSD (On Screen Display) menu languages on the Menu. A15 Listed below are the icons, icon names, and icon descriptions of the all items shown on the monitor may differ from the manual.
Press the MENU Button, then the main menu of selecting and adjusting an item using the OSD system. On Screen Display(OSD) Selection and Adjustment You were introduced to the procedure of the OSD appears. Menu Name PICTURE Icons Sub-menus Button Tip MENU : Exit - + : Adjust (Decrease/Increase) SET : Enter : Select another sub-menu NOTE OSD (On Screen Display) menu languages on the Menu. A15 Listed below are the icons, icon names, and icon descriptions of the all items shown on the monitor may differ from the manual.
User Manual
Page 17
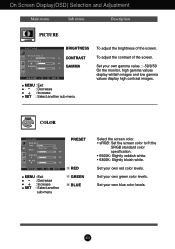
... MENU : Exit - : Decrease + : Increase SET : Select another sub-menu To adjust the brightness of the screen. Set your own gamma value. : -50/0/50 On the monitor, high gamma values display whitish images and low gamma values display high contrast images. On Screen Display(OSD) Selection and Adjustment Main menu Sub menu...
... MENU : Exit - : Decrease + : Increase SET : Select another sub-menu To adjust the brightness of the screen. Set your own gamma value. : -50/0/50 On the monitor, high gamma values display whitish images and low gamma values display high contrast images. On Screen Display(OSD) Selection and Adjustment Main menu Sub menu...

User Manual
Page 19
... "LANGUAGE." Using this does not improve the screen image, restore the factory default settings. This function will be turned on the front side of the monitor to ON or OFF. OSD To adjust position of the OSD window POSITION on the input video signal ratio, it will automatically be enabled only...
... "LANGUAGE." Using this does not improve the screen image, restore the factory default settings. This function will be turned on the front side of the monitor to ON or OFF. OSD To adjust position of the OSD window POSITION on the input video signal ratio, it will automatically be enabled only...

User Manual
Page 20
Screen when applied Screen when not applied Main menu MENU : Exit - , + : Move SET : Select Sub menu Description MOVIE This feature lets you touch the the monitor. You can manually adjust brightness, ACE or RCM. MOVIE: For animation images in videos or movies. To adjust the USER sub-menu function, Press the ...
Screen when applied Screen when not applied Main menu MENU : Exit - , + : Move SET : Select Sub menu Description MOVIE This feature lets you touch the the monitor. You can manually adjust brightness, ACE or RCM. MOVIE: For animation images in videos or movies. To adjust the USER sub-menu function, Press the ...

User Manual
Page 23
... in the slot. • Set the color setting higher than 24 bits (true color) at Control Panel - A22 Have you see an "Unrecognized monitor, Plug&Play (VESA DDC) monitor found" message? • Make sure to install the display driver from our web site: http://www.lge.com. Settings. G The screen blinks. •...
... in the slot. • Set the color setting higher than 24 bits (true color) at Control Panel - A22 Have you see an "Unrecognized monitor, Plug&Play (VESA DDC) monitor found" message? • Make sure to install the display driver from our web site: http://www.lge.com. Settings. G The screen blinks. •...

User Manual
Page 27
A26 Separate the stand using a screwdriver as shown in the picture. .3 Install the Wall mount plate. Installing the Wall mount plate This monitor satisfies the specifications of the Wall mount plate or the interchange device. 1. Please refer to a locking cable that can be purchased separately at most computer ... its front facing downward on a soft cloth. 2. Wall mount plate(Separate purchase) This is stand-type or wall mount type and is purchased. Place the monitor with Wall mount plate.
A26 Separate the stand using a screwdriver as shown in the picture. .3 Install the Wall mount plate. Installing the Wall mount plate This monitor satisfies the specifications of the Wall mount plate or the interchange device. 1. Please refer to a locking cable that can be purchased separately at most computer ... its front facing downward on a soft cloth. 2. Wall mount plate(Separate purchase) This is stand-type or wall mount type and is purchased. Place the monitor with Wall mount plate.


