
Owner's Manual (English)
Page 2
...certified by the applicable national standards if not being provided by the manufacturer. Call your service technician for more than a short period of power supply you leave the room for replacement. To Prevent Fire or Hazards: Always turn the display OFF if you have not been designed ...for its installation, use, and servicing. The power supply cord is not operating properly. They may result in potential electrical shock or fire hazards. Use only a stand recommended by the supplier....
...certified by the applicable national standards if not being provided by the manufacturer. Call your service technician for more than a short period of power supply you leave the room for replacement. To Prevent Fire or Hazards: Always turn the display OFF if you have not been designed ...for its installation, use, and servicing. The power supply cord is not operating properly. They may result in potential electrical shock or fire hazards. Use only a stand recommended by the supplier....
Owner's Manual (English)
Page 3
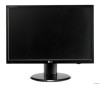
... fixed-resolution LCD panel. Displays are blocked, built-up heat can cause failures which to rest upon or roll over the power cord, and do not place the display where the power cord is provided. If these openings are provided with ventilation openings in this may result in a wet basement, or near...
... fixed-resolution LCD panel. Displays are blocked, built-up heat can cause failures which to rest upon or roll over the power cord, and do not place the display where the power cord is provided. If these openings are provided with ventilation openings in this may result in a wet basement, or near...

Owner's Manual (English)
Page 4
... the picture. Do not carry the product upside down holding only the stand base. Once assembled take the monitor up the monitor, ensure that the power to the monitor, the computer system, and other attached devices is connected to the base. 4. Place the monitor with its front facing downward on a soft...
... the picture. Do not carry the product upside down holding only the stand base. Once assembled take the monitor up the monitor, ensure that the power to the monitor, the computer system, and other attached devices is connected to the base. 4. Place the monitor with its front facing downward on a soft...

Owner's Manual (English)
Page 6
Positioning your display 1. Tilt Range : -5˚~15˚ Swivel : 355˚ Ergonomic It is recommended that the power to maintain an ergonomic and comfortable viewing position, the forward tilt angle of the monitor should not exceed 5 degrees. A5 Connecting the Display Before setting up the monitor, ensure that in various ways for maximum comfort. Adjust the position of the panel in order to the monitor, the computer system, and other attached devices is turned off.
Positioning your display 1. Tilt Range : -5˚~15˚ Swivel : 355˚ Ergonomic It is recommended that the power to maintain an ergonomic and comfortable viewing position, the forward tilt angle of the monitor should not exceed 5 degrees. A5 Connecting the Display Before setting up the monitor, ensure that in various ways for maximum comfort. Adjust the position of the panel in order to the monitor, the computer system, and other attached devices is turned off.

Owner's Manual (English)
Page 7
.... A6 Connect the cable as below sketch map form 1 to adjust the monitor while in all the menu items except 'Language'. When monitor power is needed to change the 15 pin high density (3 row) D-sub VGA connector on . This function provides the user with optimal display settings... on the front panel of the monitor. A Connect DVI Cable B Connect Dsub Cable (PC) C Connect Dsub Cable (Mac) Analog signal Digital signal Power Cord D-sub DVI Wall-outlet type PC-outlet type B DVI-D(This feature is executed automatically. (Only Analog Mode) NOTE ' Self Image Setting Function'? ...
.... A6 Connect the cable as below sketch map form 1 to adjust the monitor while in all the menu items except 'Language'. When monitor power is needed to change the 15 pin high density (3 row) D-sub VGA connector on . This function provides the user with optimal display settings... on the front panel of the monitor. A Connect DVI Cable B Connect Dsub Cable (PC) C Connect Dsub Cable (Mac) Analog signal Digital signal Power Cord D-sub DVI Wall-outlet type PC-outlet type B DVI-D(This feature is executed automatically. (Only Analog Mode) NOTE ' Self Image Setting Function'? ...

Owner's Manual (English)
Page 9
...button to enter a selection in the On Screen Display. The default setting is - 19 inch monitor : 1440 x 900 - 20.1 inch monitor : 1680 x 1050 Power Button Use this indicator color changes to amber. The best display mode is D-Sub. AUTO/SET Button Use this button to make D-Sub or DVI ...connector active. Power Indicator This Indicator lights up blue when the display operates normally(On Mode). A8 For more information, refer to the ideal settings for the current...
...button to enter a selection in the On Screen Display. The default setting is - 19 inch monitor : 1440 x 900 - 20.1 inch monitor : 1680 x 1050 Power Button Use this indicator color changes to amber. The best display mode is D-Sub. AUTO/SET Button Use this button to make D-Sub or DVI ...connector active. Power Indicator This Indicator lights up blue when the display operates normally(On Mode). A8 For more information, refer to the ideal settings for the current...

Owner's Manual (English)
Page 11
... the position of the screen To improve the clarity and stability of the screen To customize the screen status for a user's operating environment WHITE BALANCE POWER INDICATOR FLATRON F-ENGINE FACTORY RESET MOVIE / TEXT USER NORMAL To select or customize desired image settings : Adjustable A : Analog Input D : Digital Input NOTE The order of...
... the position of the screen To improve the clarity and stability of the screen To customize the screen status for a user's operating environment WHITE BALANCE POWER INDICATOR FLATRON F-ENGINE FACTORY RESET MOVIE / TEXT USER NORMAL To select or customize desired image settings : Adjustable A : Analog Input D : Digital Input NOTE The order of...

Owner's Manual (English)
Page 14
...the screen background. Using this function when white and black colors are displayed. If this function to set ON at any time, the power indicator will also change. SETUP WHITE BALANCE If the output of the video card is adjusted to fit into the standard output level ...OSD) Selection and Adjustment Main menu Sub menu Description TRACKING TRACKING CLOCK To minimize any horizontal noise and clear or sharpen the image of characters. POWER ME+-NU : : : Exit Adjust Adjust INDICATOR SET : Select another sub-menu SETUP SETUP LANGUAGE To choose the language in which the ...
...the screen background. Using this function when white and black colors are displayed. If this function to set ON at any time, the power indicator will also change. SETUP WHITE BALANCE If the output of the video card is adjusted to fit into the standard output level ...OSD) Selection and Adjustment Main menu Sub menu Description TRACKING TRACKING CLOCK To minimize any horizontal noise and clear or sharpen the image of characters. POWER ME+-NU : : : Exit Adjust Adjust INDICATOR SET : Select another sub-menu SETUP SETUP LANGUAGE To choose the language in which the ...

Owner's Manual (English)
Page 16
...8226; Adjust the brightness and the contrast. You can secure the current control settings, so that they cannot be inadvertently changed. power indicator blue or green? G Is the power on PC (video card) is out of this manual and configure your display is connected display connected? G Do you see ...button? • You can unlock the OSD controls at any key on the keyboard to bring up the screen. • Try to the power outlet. Troubleshooting Check the following before calling for several seconds: the message "OSD UNLOCKED" will appear. Check the signal cable and try moving ...
...8226; Adjust the brightness and the contrast. You can secure the current control settings, so that they cannot be inadvertently changed. power indicator blue or green? G Is the power on PC (video card) is out of this manual and configure your display is connected display connected? G Do you see ...button? • You can unlock the OSD controls at any key on the keyboard to bring up the screen. • Try to the power outlet. Troubleshooting Check the following before calling for several seconds: the message "OSD UNLOCKED" will appear. Check the signal cable and try moving ...

Owner's Manual (English)
Page 19
... Sync Input Video Input Resolution Plug&Play Power Consumption Dimensions & Weight Tilt Range Power Input Environmental Conditions Stand Base Power cord 19 inches (48.14 cm) Flat Panel Active matrix-TFT LCD Glare coating(L196WTG), Anti-Glare coating(L196WTQ) 19 inches viewable 0.285*0.285 mm pixel pitch Horizontal Freq. A18 D Connector (Digital) RGB Analog...
... Sync Input Video Input Resolution Plug&Play Power Consumption Dimensions & Weight Tilt Range Power Input Environmental Conditions Stand Base Power cord 19 inches (48.14 cm) Flat Panel Active matrix-TFT LCD Glare coating(L196WTG), Anti-Glare coating(L196WTQ) 19 inches viewable 0.285*0.285 mm pixel pitch Horizontal Freq. A18 D Connector (Digital) RGB Analog...

Owner's Manual (English)
Page 20
Specifications L206WTG/L206WTQ Display Sync Input Video Input Resolution Plug&Play Power Consumption Dimensions & Weight Tilt Range Power Input Environmental Conditions Stand Base Power cord 20.1 inches (51.11 cm) Flat Panel Active matrix-TFT LCD Glare coating(L206WTG), Anti-Glare coating(L206WTQ) 20.1 inches viewable 0.258*0.258 mm ...
Specifications L206WTG/L206WTQ Display Sync Input Video Input Resolution Plug&Play Power Consumption Dimensions & Weight Tilt Range Power Input Environmental Conditions Stand Base Power cord 20.1 inches (51.11 cm) Flat Panel Active matrix-TFT LCD Glare coating(L206WTG), Anti-Glare coating(L206WTQ) 20.1 inches viewable 0.258*0.258 mm ...


