
User Guide
Page 3
...finger for a long time may appear as this product contains a small amount of the display screen. Make sure to use the recommended resolution to transport the unit. Disposal of this will have no impact or effect on the display screen because over a radiator or heat source...on the screen. Do not press the LCD screen with your local authority. On Disposal The fluorescent lamp used under any mode except the recommended resolution, some afterimages. This phenomenon occurs to warranty. Leaving a fixed image on a bed, sofa, rug, etc. They make an ideal container in...
...finger for a long time may appear as this product contains a small amount of the display screen. Make sure to use the recommended resolution to transport the unit. Disposal of this will have no impact or effect on the display screen because over a radiator or heat source...on the screen. Do not press the LCD screen with your local authority. On Disposal The fluorescent lamp used under any mode except the recommended resolution, some afterimages. This phenomenon occurs to warranty. Leaving a fixed image on a bed, sofa, rug, etc. They make an ideal container in...
User Guide
Page 8
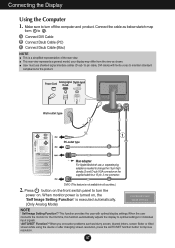
..., a separate plug adapter is needed to change the 15 pin high density (3 row) D-sub VGA connector on the supplied cable to improve resolution. When monitor power is executed automatically. (Only Analog Mode) NOTE ' Self Image Setting Function'? Make sure to turn off the computer and ... 2 . When you encounter problems such as blurry screen, blurred letters, screen flicker or tilted screen while using the device or after changing screen resolution, press the AUTO/SET function button to a 15 pin 2 row connector. Connecting the Display Using the Computer 1. DVI-D (This feature is ...
..., a separate plug adapter is needed to change the 15 pin high density (3 row) D-sub VGA connector on the supplied cable to improve resolution. When monitor power is executed automatically. (Only Analog Mode) NOTE ' Self Image Setting Function'? Make sure to turn off the computer and ... 2 . When you encounter problems such as blurry screen, blurred letters, screen flicker or tilted screen while using the device or after changing screen resolution, press the AUTO/SET function button to a 15 pin 2 row connector. Connecting the Display Using the Computer 1. DVI-D (This feature is ...
User Guide
Page 10
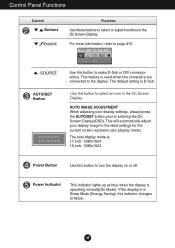
... in the On Screen Display. The best display mode is operating normally(On Mode). Use this button to the ideal settings for the current screen resolution size (display mode). A9 For more information, refer to the display. AUTO IMAGE ADJUSTMENT When adjusting your display image to make D-Sub or DVI connector...
... in the On Screen Display. The best display mode is operating normally(On Mode). Use this button to the ideal settings for the current screen resolution size (display mode). A9 For more information, refer to the display. AUTO IMAGE ADJUSTMENT When adjusting your display image to make D-Sub or DVI connector...
User Guide
Page 19
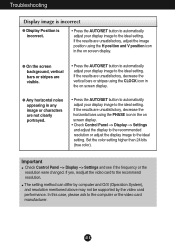
...readjust the video card to the computer or the video card manufacturer. The setting method can differ by computer and O/S (Operation System), and resolution mentioned above may not be supported by the video card performance. If the results are unsatisfactory, adjust the image position using the H position ...the PHASE icon in the on screen display. • Check Control Panel --> Display --> Settings and adjust the display to the recommended resolution or adjust the display image to the ideal setting. If the results are unsatisfactory, decrease the horizontal bars using the CLOCK icon in...
...readjust the video card to the computer or the video card manufacturer. The setting method can differ by computer and O/S (Operation System), and resolution mentioned above may not be supported by the video card performance. If the results are unsatisfactory, adjust the image position using the H position ...the PHASE icon in the on screen display. • Check Control Panel --> Display --> Settings and adjust the display to the recommended resolution or adjust the display image to the ideal setting. If the results are unsatisfactory, decrease the horizontal bars using the CLOCK icon in...
User Guide
Page 20
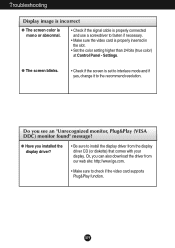
... the display driver? • Be sure to install the display driver from our web site: http://www.lge.com. • Make sure to the recommend resolution. Do you see an "Unrecognized monitor, Plug&Play (VESA DDC) monitor found" message? Troubleshooting Display image is incorrect G The screen color is mono or abnormal...
... the display driver? • Be sure to install the display driver from our web site: http://www.lge.com. • Make sure to the recommend resolution. Do you see an "Unrecognized monitor, Plug&Play (VESA DDC) monitor found" message? Troubleshooting Display image is incorrect G The screen color is mono or abnormal...

User Guide
Page 21
..., Positive/Negative SOG (Sync On Green) Digital Signal Input Input Form 15 pin D-Sub Connector DVI - Vertical Freq. Specifications L1742PE Display Sync Input Video Input Resolution Plug&Play Power Consumption Dimensions &Weight Tilt Range Power Input Environmental Conditions Stand Base Signal cable Power cord 17 inches (43.2 cm) Flat Panel Active...
..., Positive/Negative SOG (Sync On Green) Digital Signal Input Input Form 15 pin D-Sub Connector DVI - Vertical Freq. Specifications L1742PE Display Sync Input Video Input Resolution Plug&Play Power Consumption Dimensions &Weight Tilt Range Power Input Environmental Conditions Stand Base Signal cable Power cord 17 inches (43.2 cm) Flat Panel Active...
User Guide
Page 22
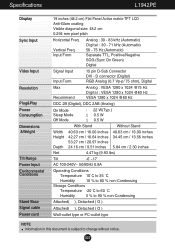
...( ), Detached ( O ) Attached( ), Detached ( O ) Wall-outlet type or PC-outlet type NOTE Information in this document is subject to change without notice. Specifications L1942PE Display Sync Input Video Input Resolution Plug&Play Power Consumption Dimensions &Weight Tilt Range Power Input Environmental Conditions Stand Base Signal cable Power cord 19 inches (48.2 cm) Flat...
...( ), Detached ( O ) Attached( ), Detached ( O ) Wall-outlet type or PC-outlet type NOTE Information in this document is subject to change without notice. Specifications L1942PE Display Sync Input Video Input Resolution Plug&Play Power Consumption Dimensions &Weight Tilt Range Power Input Environmental Conditions Stand Base Signal cable Power cord 19 inches (48.2 cm) Flat...

User Guide
Page 23
Specifications Preset Modes (Resolution) Display Modes (Resolution) 1 640 x 350 2 720 x 400 3 640 x 480 4 640 x 480 5 800 x 600 6 800 x 600 7 832 x 624 8 1024 x 768 9 1024 x 768 10 1152 x 870 11 1152 x 900 *12 1280 x 1024 **13 1280 x 1024 Horizontal Freq. (kHz) 31.469 31.468 31.469 37.500 37.879 46.875 49.725 48.363 60.123 68.681 61.805 63.981 79.976 Vertical Freq. (Hz) 70 70 60 75 60 75 75 60 75 75 65 60 75 * Recommend Mode ** Only Analog Mode Indicator MODE On Mode Sleep Mode Off Mode LED Color Blue Flicker Off A22
Specifications Preset Modes (Resolution) Display Modes (Resolution) 1 640 x 350 2 720 x 400 3 640 x 480 4 640 x 480 5 800 x 600 6 800 x 600 7 832 x 624 8 1024 x 768 9 1024 x 768 10 1152 x 870 11 1152 x 900 *12 1280 x 1024 **13 1280 x 1024 Horizontal Freq. (kHz) 31.469 31.468 31.469 37.500 37.879 46.875 49.725 48.363 60.123 68.681 61.805 63.981 79.976 Vertical Freq. (Hz) 70 70 60 75 60 75 75 60 75 75 65 60 75 * Recommend Mode ** Only Analog Mode Indicator MODE On Mode Sleep Mode Off Mode LED Color Blue Flicker Off A22


