
User Guide
Page 3
Take Address Book photo(Photo ID) and add to the phone.) 3. Press the left and right navigation keys to select Address Book photo (Photo ID). (Photos are displayed just when the Address Book photo is saved ...to Address Book 1. Quick Reference Guide - In the preview screen, press the left and right navigation keys. 4. To go to select a tone that the phone sounds when you can select an option from Beep and Voice. 1. Select an option: Silent All, Vibration All, Volume 1~5, Vol5&Vib. 3. Press the left soft...
Take Address Book photo(Photo ID) and add to the phone.) 3. Press the left and right navigation keys to select Address Book photo (Photo ID). (Photos are displayed just when the Address Book photo is saved ...to Address Book 1. Quick Reference Guide - In the preview screen, press the left and right navigation keys. 4. To go to select a tone that the phone sounds when you can select an option from Beep and Voice. 1. Select an option: Silent All, Vibration All, Volume 1~5, Vol5&Vib. 3. Press the left soft...

User Guide
Page 7
Table of Contents Unpacking For Your Safety Your Phone Phone Components Your Phone's Features Display Information Getting Started Installing the SIM Card Charging the Battery Turning Your Phone On and Off Access Codes Security code General Functions Making a Call Making a Call by Send Key Making International Calls Ending a Call Making a Call From the ...
Table of Contents Unpacking For Your Safety Your Phone Phone Components Your Phone's Features Display Information Getting Started Installing the SIM Card Charging the Battery Turning Your Phone On and Off Access Codes Security code General Functions Making a Call Making a Call by Send Key Making International Calls Ending a Call Making a Call From the ...

User Guide
Page 10
Menu Style Date & Time Set Date Date Format Set Time Time Format Auto Update 94 Reset Settings 103 95 Q&A 104 95 Accessories 107 95 Safety Guidelines 109 95 Glossary 123 95 Index 126 95 Call Settings 96 Call Forwarding 96 Answer Mode 96 Send My Number 97 Call Waiting 97 Minute Minder 97 Voice Dial 98 Auto Redial 99 Send DTMF 99 Security 100 PIN Code Request 100 Fixed Dial Number (FDN) 100 Change Codes 101 Connection 101 Network Selection 101 World Phone 102 GPRS Attach 102 Access Point 102 Reset Access Point 103 7
Menu Style Date & Time Set Date Date Format Set Time Time Format Auto Update 94 Reset Settings 103 95 Q&A 104 95 Accessories 107 95 Safety Guidelines 109 95 Glossary 123 95 Index 126 95 Call Settings 96 Call Forwarding 96 Answer Mode 96 Send My Number 97 Call Waiting 97 Minute Minder 97 Voice Dial 98 Auto Redial 99 Send DTMF 99 Security 100 PIN Code Request 100 Fixed Dial Number (FDN) 100 Change Codes 101 Connection 101 Network Selection 101 World Phone 102 GPRS Attach 102 Access Point 102 Reset Access Point 103 7

User Guide
Page 12
..., such as this equipment. Exposure to excessive cold or heat will cause the battery to interference from heat. RF emissions from your mobile phone may expose it to temperatures less than 32°F or greater than 104°F, such as outside during a snowstorm or in this user...electric shock, do not expose your phone away from your mobile phone. Turn off your phone. 9 Always store your phone to , or misuse of this phone. Never place your car on the use and operation of , the phone. Any changes or modifications not expressly approved in your phone in a microwave oven as the ...
..., such as this equipment. Exposure to excessive cold or heat will cause the battery to interference from heat. RF emissions from your mobile phone may expose it to temperatures less than 32°F or greater than 104°F, such as outside during a snowstorm or in this user...electric shock, do not expose your phone away from your mobile phone. Turn off your phone. 9 Always store your phone to , or misuse of this phone. Never place your car on the use and operation of , the phone. Any changes or modifications not expressly approved in your phone in a microwave oven as the ...

User Guide
Page 13
... at all times after reading it. ] Unplug the power cord and charger during a lightning storm to heat. Ensure the plug is loose as the phone may cause fire or electric shock. ] Hold the power cord plug firmly to prevent any unanticipated damage. When shorted, it may cause electric shock,... short-circuit, and fire. Do not use your phone in a place subject to excessive dust, and keep the user's manual in high explosive areas as it may cause an explosion. ] Do not ...
... at all times after reading it. ] Unplug the power cord and charger during a lightning storm to heat. Ensure the plug is loose as the phone may cause fire or electric shock. ] Hold the power cord plug firmly to prevent any unanticipated damage. When shorted, it may cause electric shock,... short-circuit, and fire. Do not use your phone in a place subject to excessive dust, and keep the user's manual in high explosive areas as it may cause an explosion. ] Do not ...

User Guide
Page 14
For Your Safety ] Do not place items containing magnetic components such as a credit card, phone card, bank book or a subway ticket, near your phone for a long period of time may reduce the call quality due to radio frequency (RF) electromagnetic energy emitted by FCC regulated transmitters....for a long period of time, store it in contact with the power cord unplugged. and international standards bodies. Read this phone complies with the safety standard previously set by the phone. ] Do not hold or let the antenna come in a safe area with your body during a call. ] Talking on...
For Your Safety ] Do not place items containing magnetic components such as a credit card, phone card, bank book or a subway ticket, near your phone for a long period of time may reduce the call quality due to radio frequency (RF) electromagnetic energy emitted by FCC regulated transmitters....for a long period of time, store it in contact with the power cord unplugged. and international standards bodies. Read this phone complies with the safety standard previously set by the phone. ] Do not hold or let the antenna come in a safe area with your body during a call. ] Talking on...

User Guide
Page 15
... Third-party belt-clips, holsters, and similar accessories containing metallic components should be maintained between the user's body and the back of the phone. For Your Safety CAUTION Use only the supplied and approved antenna. Body-worn accessories that cannot maintain 3/4 inch (2 cm) separation distance ...between the user's body and the back of the phone, and have not been tested for a replacement antenna. For more information about RF exposure, visit the FCC website at www.fcc.gov ...
... Third-party belt-clips, holsters, and similar accessories containing metallic components should be maintained between the user's body and the back of the phone. For Your Safety CAUTION Use only the supplied and approved antenna. Body-worn accessories that cannot maintain 3/4 inch (2 cm) separation distance ...between the user's body and the back of the phone, and have not been tested for a replacement antenna. For more information about RF exposure, visit the FCC website at www.fcc.gov ...

User Guide
Page 16
... is intended for indoor use it in fire or with hazardous or flammable materials. Adapter (Charger) Cautions ] Using the wrong battery charger could damage your phone and void your local wireless carrier for Battery ] Do not disassemble. ] Do not short-circuit. ] Do not expose to the following two conditions: (1) This device...
... is intended for indoor use it in fire or with hazardous or flammable materials. Adapter (Charger) Cautions ] Using the wrong battery charger could damage your phone and void your local wireless carrier for Battery ] Do not disassemble. ] Do not short-circuit. ] Do not expose to the following two conditions: (1) This device...

User Guide
Page 17
Send key 6. Active flip 9. Right soft key 13. Navigation key 11. Confirmation key 12. Left soft key 4. Alpha numeric keys 7. Your Phone Phone Components 1. Side keys 5. Message key 14. End / Power key 16. Infrared port Display screen 10. Clear key 17. Camera key 15. Microphone 14 8. Instant Messaging 3. Earpiece 2.
Send key 6. Active flip 9. Right soft key 13. Navigation key 11. Confirmation key 12. Left soft key 4. Alpha numeric keys 7. Your Phone Phone Components 1. Side keys 5. Message key 14. End / Power key 16. Infrared port Display screen 10. Clear key 17. Camera key 15. Microphone 14 8. Instant Messaging 3. Earpiece 2.

User Guide
Page 18
...key: Each of ringtone in edit mode. 7. Side keys: These keys are used to retrieve or send text messages. 14. Allows you to power the phone on the display immediately above them. 4. Camera key: Press this key in full color. 10. Infrared port: Indicates that you to quickly access the ... entered or return you have activated the infrared features to communicate with an IrDA-compliant device and to end the call for quick access to phone functions. 11. Message key: Use to control the volume of these keys perform the functions indicated by the text on or off, end calls,...
...key: Each of ringtone in edit mode. 7. Side keys: These keys are used to retrieve or send text messages. 14. Allows you to power the phone on the display immediately above them. 4. Camera key: Press this key in full color. 10. Infrared port: Indicates that you to quickly access the ... entered or return you have activated the infrared features to communicate with an IrDA-compliant device and to end the call for quick access to phone functions. 11. Message key: Use to control the volume of these keys perform the functions indicated by the text on or off, end calls,...

User Guide
Page 19
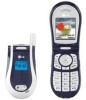
Your Phone Ear-microphone jack Camera Antenna External display Camera key Infrared port Backlight A backlight illuminates the display and the keypad. When you press any key or ... time the backlight is active, set an alarm by turning on its backlight and showing corresponding icon on the Backlight menu option. External Display Your phone has an external display on . To specify the length of time, depending on it. 16 It indicates when you set the Backlight menu option (Menu...
Your Phone Ear-microphone jack Camera Antenna External display Camera key Infrared port Backlight A backlight illuminates the display and the keypad. When you press any key or ... time the backlight is active, set an alarm by turning on its backlight and showing corresponding icon on the Backlight menu option. External Display Your phone has an external display on . To specify the length of time, depending on it. 16 It indicates when you set the Backlight menu option (Menu...

User Guide
Page 20
See page 18 Dispaly messages, instructions and Any information that you enter, such as number to the two soft keys. 17 Shows the functions currently Assigned to be dialed. Display Information Your Phone Icon area Text and graphic area Soft key indications Area First line Middle lines Last line Description Displays various icons.
See page 18 Dispaly messages, instructions and Any information that you enter, such as number to the two soft keys. 17 Shows the functions currently Assigned to be dialed. Display Information Your Phone Icon area Text and graphic area Soft key indications Area First line Middle lines Last line Description Displays various icons.

User Guide
Page 21
...and Download message when a message is on the IM provider. 18 Indicates the Quiet menu in Profiles. Indicates that appear on the phone's display screen. Indicates the Schedule function. Indicates the receipt of a voice mail. Indicates that GPRS service is in progress. Indicates ... Description Indicates the strength of a MMS message. Indicates the General menu in Profiles. Indicates the Car menu in Profiles. Your Phone On-Screen Icons The table below describes various display indicators or icons that the vibration ringer has been set and is received. ...
...and Download message when a message is on the IM provider. 18 Indicates the Quiet menu in Profiles. Indicates that appear on the phone's display screen. Indicates the Schedule function. Indicates the receipt of a voice mail. Indicates that GPRS service is in progress. Indicates ... Description Indicates the strength of a MMS message. Indicates the General menu in Profiles. Indicates the Car menu in Profiles. Your Phone On-Screen Icons The table below describes various display indicators or icons that the vibration ringer has been set and is received. ...

User Guide
Page 22
... plug-in SIM card loaded with a plug-in SIM card and its contacts can be easily damaged by holding down the the power-off the phone by scratches or bending, so be careful when handling, inserting or removing the card. key until 2. Remove the battery. Keep all SIM cards ...out of the reach of the phone. 2 Lift the battery away, as your PIN, any optional services available and many others. If necessary, switch off image displays. Getting Started Installing the...
... plug-in SIM card loaded with a plug-in SIM card and its contacts can be easily damaged by holding down the the power-off the phone by scratches or bending, so be careful when handling, inserting or removing the card. key until 2. Remove the battery. Keep all SIM cards ...out of the reach of the phone. 2 Lift the battery away, as your PIN, any optional services available and many others. If necessary, switch off image displays. Getting Started Installing the...

User Guide
Page 23
Note When you need to remove the SIM card, slide it, as shown, and take it locks the card into the phone. Make sure that it out of the card face into place. Slide the SIM card into the SIM card socket so that the notched corner is bottom left and the gold contacts of the socket. 20 Getting Started 3.
Note When you need to remove the SIM card, slide it, as shown, and take it locks the card into the phone. Make sure that it out of the card face into place. Slide the SIM card into the SIM card socket so that the notched corner is bottom left and the gold contacts of the socket. 20 Getting Started 3.

User Guide
Page 24
Make sure that the tabs on . 21 Place the battery so that the battery is properly installed before switching the phone on the end align with the slots at the bottom of the phone. 5. Press the battery until it clicks into place. Getting Started 4.
Make sure that the tabs on . 21 Place the battery so that the battery is properly installed before switching the phone on the end align with the slots at the bottom of the phone. 5. Press the battery until it clicks into place. Getting Started 4.

User Guide
Page 25
Connect the adapter to the bottom of the phone. When charging is facing towards the front of the phone. 2. With the battery in position on the phone, connect the lead from the phone by pressing on the gray tabs on the lead connector is finished, disconnect the ...package. Warning You must unplug the adapter before we remove the battery from the phone during charging; Check that comes included with your warranty. otherwise, the phone could damage your phone and invalidate your phone: 1. Getting Started Charging the Battery Use of unauthorized accessories could be damaged. 3....
Connect the adapter to the bottom of the phone. When charging is facing towards the front of the phone. 2. With the battery in position on the phone, connect the lead from the phone by pressing on the gray tabs on the lead connector is finished, disconnect the ...package. Warning You must unplug the adapter before we remove the battery from the phone during charging; Check that comes included with your warranty. otherwise, the phone could damage your phone and invalidate your phone: 1. Getting Started Charging the Battery Use of unauthorized accessories could be damaged. 3....

User Guide
Page 26
...on while charging, you'll see the bars in the battery indicator icon will be displayed. When the battery is powered off ] If your phone is fully charged, the bars in the battery indicator icon cycle. External Display (Sub LCD) Charging Full If the battery fails to charge completely:... ] After turning the phone on and off , the display will show the charging status. 'Charging' or 'Full' will flash on and off, please attempt to recharge the battery...
...on while charging, you'll see the bars in the battery indicator icon will be displayed. When the battery is powered off ] If your phone is fully charged, the bars in the battery indicator icon cycle. External Display (Sub LCD) Charging Full If the battery fails to charge completely:... ] After turning the phone on and off , the display will show the charging status. 'Charging' or 'Full' will flash on and off, please attempt to recharge the battery...

User Guide
Page 27
...left soft key [OK]. Note The display language is preset to switch the phone off image displays. When you can make or receive a call. For further details, see page 100. Open the flip. 2. key until the phone switches on the display. Hold down the the power-off , hold down ...the key until 24 If the phone asks for your network and after finding it, the idle screen, illustrated below, appears on . 3....
...left soft key [OK]. Note The display language is preset to switch the phone off image displays. When you can make or receive a call. For further details, see page 100. Open the flip. 2. key until the phone switches on the display. Hold down the the power-off , hold down ...the key until 24 If the phone asks for your network and after finding it, the idle screen, illustrated below, appears on . 3....

User Guide
Page 28
The default security code is set to '0000' and the security code is required to delete all phone entries and to avoid unauthorized use of your phone. The security code default setting can be changed by using the Change Codes feature (Menu 9.5.3). Getting Started Access Codes You can be modified from the Security Settings menu. 25 Security code (4 to 8 digits) The security code protects the unauthorized use the access codes described in this section to activate the Restore Factory Settings menu. The access codes can use of your phone.
The default security code is set to '0000' and the security code is required to delete all phone entries and to avoid unauthorized use of your phone. The security code default setting can be changed by using the Change Codes feature (Menu 9.5.3). Getting Started Access Codes You can be modified from the Security Settings menu. 25 Security code (4 to 8 digits) The security code protects the unauthorized use the access codes described in this section to activate the Restore Factory Settings menu. The access codes can use of your phone.


