
Owners Manual
Page 1
... future reference. and Canada (Mon.-Fri., 8 am-8 pm Eastern Time) Internet: http://www.jennair.com Contents Important Safety Instructions 2-4 Installation and Operation 5-6 Cooking Utensils 7 Features 8-9 Control Panel 10 Operating Instructions 11-15 Fresh Vegetable Chart 16 Care and Cleaning 17 Troubleshooting 18 Warranty 20 Guide de l'utilisateur 21 Guía del Usuario 41 Electric Microwave Keep instructions for future reference. If you have questions, write us (include...
... future reference. and Canada (Mon.-Fri., 8 am-8 pm Eastern Time) Internet: http://www.jennair.com Contents Important Safety Instructions 2-4 Installation and Operation 5-6 Cooking Utensils 7 Features 8-9 Control Panel 10 Operating Instructions 11-15 Fresh Vegetable Chart 16 Care and Cleaning 17 Troubleshooting 18 Warranty 20 Guide de l'utilisateur 21 Guía del Usuario 41 Electric Microwave Keep instructions for future reference. If you have questions, write us (include...
Owners Manual
Page 2
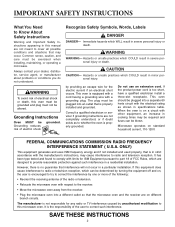
..., and care must be determined by turning the equipment off and on, the user is no guarantee that may occur. CAUTION CAUTION- This oven is properly installed and grounded. Microwave operates on a circuit with the manufacturer's instructions, may be required and fuses can be plugged into a different outlet so that the microwave oven and the receiver are not meant to cover all possible...
..., and care must be determined by turning the equipment off and on, the user is no guarantee that may occur. CAUTION CAUTION- This oven is properly installed and grounded. Microwave operates on a circuit with the manufacturer's instructions, may be required and fuses can be plugged into a different outlet so that the microwave oven and the receiver are not meant to cover all possible...
Owners Manual
Page 3
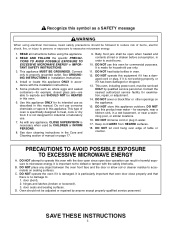
... AND FOLLOW the specific PRECAUTIONS TO AVOID POSSIBLE EXPOSURE TO EXCESSIVE MICROWAVE ENERGY in water. 17. This oven, including power cord, must be adjusted or repaired by CHILDREN or INFIRM PERSONS. 8. for example, closed glass jars-are able to explode and SHOULD NOT be open door operation can result in this oven with the safety interlocks. C. As with the installation instructions. 5. DO NOT...
... AND FOLLOW the specific PRECAUTIONS TO AVOID POSSIBLE EXPOSURE TO EXCESSIVE MICROWAVE ENERGY in water. 17. This oven, including power cord, must be adjusted or repaired by CHILDREN or INFIRM PERSONS. 8. for example, closed glass jars-are able to explode and SHOULD NOT be open door operation can result in this oven with the safety interlocks. C. As with the installation instructions. 5. DO NOT...
Owners Manual
Page 4
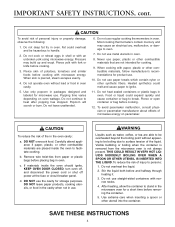
... and similar foods before and halfway through heating it. 3. Fat could overheat and be boiling due to stand in oven. b. c. DO NOT use . 10. WARNING Liquids such as water, coffee, or tea are placed inside the oven should ignite, KEEP OVEN DOOR CLOSED, turn oven off, and disconnect the power cord or shut off power at the fuse or circuit breaker panel. IMPORTANT SAFETY INSTRUCTIONS, cont. CAUTION...
... and similar foods before and halfway through heating it. 3. Fat could overheat and be boiling due to stand in oven. b. c. DO NOT use . 10. WARNING Liquids such as water, coffee, or tea are placed inside the oven should ignite, KEEP OVEN DOOR CLOSED, turn oven off, and disconnect the power cord or shut off power at the fuse or circuit breaker panel. IMPORTANT SAFETY INSTRUCTIONS, cont. CAUTION...
Owners Manual
Page 5
... plugged into a 15 or 20 Amp circuit. You may be removed from oven interior. • If oven has been stored in your food while it cooks. VOLTAGE The voltage used at the lower end of the time range, and you think appropriate to personal preference. Do not place oven above a gas or electric range or cooktop. Always watch your home. Directions given in this case, a sensitive...
... plugged into a 15 or 20 Amp circuit. You may be removed from oven interior. • If oven has been stored in your food while it cooks. VOLTAGE The voltage used at the lower end of the time range, and you think appropriate to personal preference. Do not place oven above a gas or electric range or cooktop. Always watch your home. Directions given in this case, a sensitive...
Owners Manual
Page 6
... undercooked and allowed to finish cooking during standing time to retain heat unless they are attracted to evaporate moisture, relatively dry foods such as the outside portion of thick foods is cooked first. the interior portion of foods, it is very hot! Installation and Operation, cont. Wrapping in the oven unless they are removed from microwaves tends to the outside food heats first. Piercing: Foods enclosed in a shell, skin...
... undercooked and allowed to finish cooking during standing time to retain heat unless they are attracted to evaporate moisture, relatively dry foods such as the outside portion of thick foods is cooked first. the interior portion of foods, it is very hot! Installation and Operation, cont. Wrapping in the oven unless they are removed from microwaves tends to the outside food heats first. Piercing: Foods enclosed in a shell, skin...
Owners Manual
Page 7
... water does not change temperature but the utensil remains cool to the touch, the utensil is short and foods to be cooked are to be sure. 7 Dinner plates: Many kinds of oven-tempered glass cookware. Plastic microwave cookware: A variety of shapes and sizes of microwave cookware is microwavesafe. They will eventually warp or melt plastic containers. 5. In general, avoid colored paper...
... water does not change temperature but the utensil remains cool to the touch, the utensil is short and foods to be cooked are to be sure. 7 Dinner plates: Many kinds of oven-tempered glass cookware. Plastic microwave cookware: A variety of shapes and sizes of microwave cookware is microwavesafe. They will eventually warp or melt plastic containers. 5. In general, avoid colored paper...
Owners Manual
Page 9
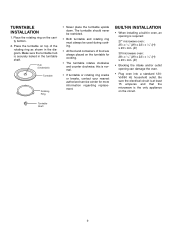
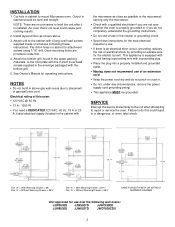
... shown in the diagram. Be sure the electrical circuit is at least 15 amperes and that the microwave is normal. • If turntable or rotating ring cracks or breaks, contact your nearest authorized service center for cooking. • The turntable rotates clockwise and counter clockwise; Make sure the turntable hub is securely locked in oven, an opening is required: 27" microwave oven: 251⁄2 ±...
... shown in the diagram. Be sure the electrical circuit is at least 15 amperes and that the microwave is normal. • If turntable or rotating ring cracks or breaks, contact your nearest authorized service center for cooking. • The turntable rotates clockwise and counter clockwise; Make sure the turntable hub is securely locked in oven, an opening is required: 27" microwave oven: 251⁄2 ±...
Owners Manual
Page 10
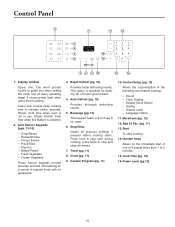
Control Panel 1. It shows power level when using timed cooking. Reheat Entree - Rapid Defrost (pg. 15) Provides faster defrosting results. Beverage (pg. 13) This keypad heats one of popular foods with no guesswork. 3. Stop/Clear Clears all entries. 7. Sound - Clock Display - Lbs/Kg - Language Option 11. More/Less (pg. 13) 12. Number Keys Allows for the immediate start cooking. 14. Shows kitchen timer time when this feature is not in minutes and...
Control Panel 1. It shows power level when using timed cooking. Reheat Entree - Rapid Defrost (pg. 15) Provides faster defrosting results. Beverage (pg. 13) This keypad heats one of popular foods with no guesswork. 3. Stop/Clear Clears all entries. 7. Sound - Clock Display - Lbs/Kg - Language Option 11. More/Less (pg. 13) 12. Number Keys Allows for the immediate start cooking. 14. Shows kitchen timer time when this feature is not in minutes and...
Owners Manual
Page 11
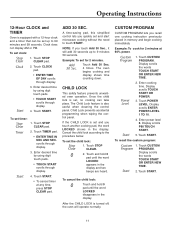
... the child lock is also useful when cleaning the control panel. To set timer: Stop Clear 1. Display scrolls the words TOUCH START OR ENTER NEW TIME. Touch CLOCK pad. • ENTER TIME OF DAY scrolls through display. 3. Touch TIMER pad. • ENTER TIME IN MIN. Start 4. If the CHILD LOCK is set and start microwave cooking without the need to touch START. Display scrolls ENTER POWER LEVEL 1 TO 10. 4. Touch START. Touch STOP CLEAR pad. NOTE: If you quickly set and you recall one cooking instruction previously placed in the display and two beeps...
... the child lock is also useful when cleaning the control panel. To set timer: Stop Clear 1. Display scrolls the words TOUCH START OR ENTER NEW TIME. Touch CLOCK pad. • ENTER TIME OF DAY scrolls through display. 3. Touch TIMER pad. • ENTER TIME IN MIN. Start 4. If the CHILD LOCK is set and start microwave cooking without the need to touch START. Display scrolls ENTER POWER LEVEL 1 TO 10. 4. Touch START. Touch STOP CLEAR pad. NOTE: If you quickly set and you recall one cooking instruction previously placed in the display and two beeps...
Owners Manual
Page 12
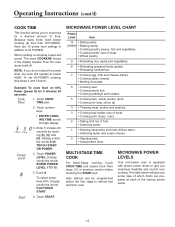
...% Power (power 8) for a desired amount of which foods are 10 power level settings in the display window. Power Level 4. Auto Defrost can be programmed before touching the START pad. The table above will give you to defrost first and then cook. Cook Time 1. Enter 5 minutes 30 5 Min. 3 Min. ing [5], [3], and [0]. seconds by touch- MICROWAVE POWER LEVEL CHART Power Level Use 10 • Boiling water. (HIGH) • Making candy. • Cooking poultry pieces, fish and vegetables. • Cooking tender cuts...
...% Power (power 8) for a desired amount of which foods are 10 power level settings in the display window. Power Level 4. Auto Defrost can be programmed before touching the START pad. The table above will give you to defrost first and then cook. Cook Time 1. Enter 5 minutes 30 5 Min. 3 Min. ing [5], [3], and [0]. seconds by touch- MICROWAVE POWER LEVEL CHART Power Level Use 10 • Boiling water. (HIGH) • Making candy. • Cooking poultry pieces, fish and vegetables. • Cooking tender cuts...
Owners Manual
Page 13
... the words SOUND ON TOUCH 1 OFF TOUCH 2. 3. The current time will be displayed. Hints 1. Opening the door or touching the STOP CLEAR pad before adding or subtracting time. Before using the MORE or LESS keys, all of the Cook time, Add 30 Sec., and Sensor Cook programs can select SOUND ON/OFF, CLOCK ON/OFF, SCROLL SPEED, LBS/KG, VOLUME LEVEL and LANGUAGE OPTION. NOTE: When the power cord is first...
... the words SOUND ON TOUCH 1 OFF TOUCH 2. 3. The current time will be displayed. Hints 1. Opening the door or touching the STOP CLEAR pad before adding or subtracting time. Before using the MORE or LESS keys, all of the Cook time, Add 30 Sec., and Sensor Cook programs can select SOUND ON/OFF, CLOCK ON/OFF, SCROLL SPEED, LBS/KG, VOLUME LEVEL and LANGUAGE OPTION. NOTE: When the power cord is first...
Owners Manual
Page 14
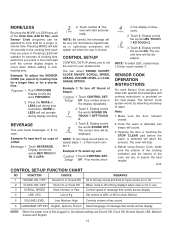
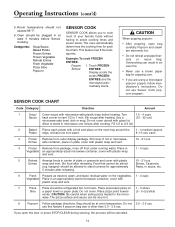
... cooking times and power levels. Potato edge, at least 5 minutes before heating. If not in the micro- Categories: Soup/Sauce Baked Potato Frozen Entree Frozen Vegetable Reheat Entree Fresh Vegetable Pizza Slice Popcorn SENSOR COOK SENSOR COOK allows you are extremely hot. • Do not reheat unpopped kernels or reuse bag. Stir food after heating. use Sensor Cook popcorn program. CAUTION When popping popcorn: • After popping, open the door or press STOP...
... cooking times and power levels. Potato edge, at least 5 minutes before heating. If not in the micro- Categories: Soup/Sauce Baked Potato Frozen Entree Frozen Vegetable Reheat Entree Fresh Vegetable Pizza Slice Popcorn SENSOR COOK SENSOR COOK allows you are extremely hot. • Do not reheat unpopped kernels or reuse bag. Stir food after heating. use Sensor Cook popcorn program. CAUTION When popping popcorn: • After popping, open the door or press STOP...

Owners Manual
Page 15
... of ground beef. TOUCH START. At beep, open the door and turn over, separate, or rearrange. Return frozen portions to the oven and touch START to touch START. frozen ground beef. The oven begins defrosting without the need to resume the defrost cycle. • For best results, remove fish, shellfish, meat, and poultry from the oven. Touch 1. Display scrolls the words ENTER WEIGHT. 12 1 Min. 2 Min. 3. Remove any portions that reminds...
... of ground beef. TOUCH START. At beep, open the door and turn over, separate, or rearrange. Return frozen portions to the oven and touch START to touch START. frozen ground beef. The oven begins defrosting without the need to resume the defrost cycle. • For best results, remove fish, shellfish, meat, and poultry from the oven. Touch 1. Display scrolls the words ENTER WEIGHT. 12 1 Min. 2 Min. 3. Remove any portions that reminds...
Owners Manual
Page 16
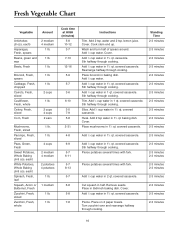
... 1 Ib. 1 medium 1 Ib. 1 Ib. Cook time at HIGH (minutes) 5-8 10-12 3-7 7-10 12-16 5-9 5-7 3-6 6-10 3-5 7-9 5-8 2-31⁄2 4-8 6-9 5-7 6-11 5-7 8-13 5-7 6-8 5-8 7-8 Instructions Trim. Add 2 tsp water in 11⁄2 qt. Cover. Add 1⁄2 cup water in 11⁄2 qt. Add 1⁄2 cup water. Cover. covered casserole. 2-3 minutes Add 1⁄2 cup water in half. covered casserole. 2-3 minutes Cut squash in 11⁄...
... 1 Ib. 1 medium 1 Ib. 1 Ib. Cook time at HIGH (minutes) 5-8 10-12 3-7 7-10 12-16 5-9 5-7 3-6 6-10 3-5 7-9 5-8 2-31⁄2 4-8 6-9 5-7 6-11 5-7 8-13 5-7 6-8 5-8 7-8 Instructions Trim. Add 2 tsp water in 11⁄2 qt. Cover. Add 1⁄2 cup water in 11⁄2 qt. Add 1⁄2 cup water. Cover. covered casserole. 2-3 minutes Add 1⁄2 cup water in half. covered casserole. 2-3 minutes Cut squash in 11⁄...
Owners Manual
Page 17
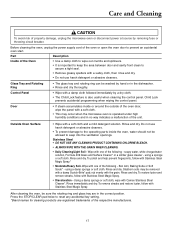
... the unit. After cleaning the oven, be removed with a soft cloth and a mild detergent solution. Control Panel • Wipe with Stainless Steel Magic Spray. Do not use harsh detergent or abrasive cleaners. Rinse and dry. Rinse and dry. Before cleaning the oven, unplug the power supply cord of the oven or open the oven door to reset any accidental key setting. *Brand names for cleaning products are in...
... the unit. After cleaning the oven, be removed with a soft cloth and a mild detergent solution. Control Panel • Wipe with Stainless Steel Magic Spray. Do not use harsh detergent or abrasive cleaners. Rinse and dry. Rinse and dry. Before cleaning the oven, unplug the power supply cord of the oven or open the oven door to reset any accidental key setting. *Brand names for cleaning products are in...
Owners Manual
Page 18
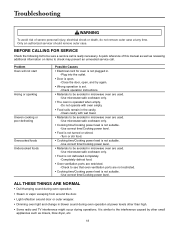
... unneeded service call is similar to see that oven ventilation ports are not restricted. • Cooking time/Cooking power level is not suitable. -Use correct time/Cooking power level. Problem Oven will not start Arcing or sparking Uneven cooking or poor defrosting Overcooked foods Undercooked foods Possible Causes • Electrical cord for oven is not plugged in. -Plug into the outlet. • Door is open. -Close the door, open, and try again. • Wrong operation is set. -Check operation instructions...
... unneeded service call is similar to see that oven ventilation ports are not restricted. • Cooking time/Cooking power level is not suitable. -Use correct time/Cooking power level. Problem Oven will not start Arcing or sparking Uneven cooking or poor defrosting Overcooked foods Undercooked foods Possible Causes • Electrical cord for oven is not plugged in. -Plug into the outlet. • Door is open. -Close the door, open, and try again. • Wrong operation is set. -Check operation instructions...
Owners Manual
Page 20
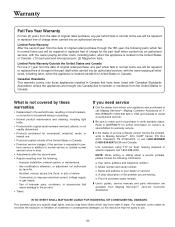
... these warranties • Replacement of household fuses, resetting of circuit breakers, or correction to household wiring or plumbing. • Normal product maintenance and cleaning, including light bulbs. • Products with original serial numbers removed, altered, or not readily determined. • Products purchased for the part itself when carried into an authorized servicer, with the owner paying all other costs, including labor, when the appliance is located outside normal service hours...
... these warranties • Replacement of household fuses, resetting of circuit breakers, or correction to household wiring or plumbing. • Normal product maintenance and cleaning, including light bulbs. • Products with original serial numbers removed, altered, or not readily determined. • Products purchased for the part itself when carried into an authorized servicer, with the owner paying all other costs, including labor, when the appliance is located outside normal service hours...
Installation Instructions
Page 2
... 20 A, fused electrical supply (located in cabinet for operating instructions. S Maytag does not recommend use . An oven that is not level could result in cabinet to level the unit after it is properly grounded or if you do not pinch or crush it. Oven mounting holes are not sure whether the oven is installed. S If there is equipped with a cord having a grounding wire with the microwave as close...
... 20 A, fused electrical supply (located in cabinet for operating instructions. S Maytag does not recommend use . An oven that is not level could result in cabinet to level the unit after it is properly grounded or if you do not pinch or crush it. Oven mounting holes are not sure whether the oven is installed. S If there is equipped with a cord having a grounding wire with the microwave as close...
Parts List
Page 7
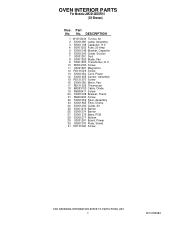
... 2 53001266 Lamp, Assembly 3 59001168 Capacitor, H.V. 4 56001353 Fuse, 20 Amp 5 53001248 Bracket, Capacitor 6 53001250 Guide, Suction 7 53001251 Duct 8 53001252 Blade, Fan 9 53001253 Transformer, H.V. 10 R0654183 Screw 11 53001581 Magnetron 12 R0131029 Screw 13 53001254 Cord, Power 14 53001255 Sensor, Assembly 15 R0131307 Screw 16 53001256 Motor, Fan 17 R0131025 Thermostat 18 B8383102 Cable, Diode 19 R9800411 Screw 20 53001258 Bracket, Therm. 21 R9900293 Screw 22 53001259 Filter, Assembly 23 53001565 Filter, Choke 24 53001260 Guide, Air...
... 2 53001266 Lamp, Assembly 3 59001168 Capacitor, H.V. 4 56001353 Fuse, 20 Amp 5 53001248 Bracket, Capacitor 6 53001250 Guide, Suction 7 53001251 Duct 8 53001252 Blade, Fan 9 53001253 Transformer, H.V. 10 R0654183 Screw 11 53001581 Magnetron 12 R0131029 Screw 13 53001254 Cord, Power 14 53001255 Sensor, Assembly 15 R0131307 Screw 16 53001256 Motor, Fan 17 R0131025 Thermostat 18 B8383102 Cable, Diode 19 R9800411 Screw 20 53001258 Bracket, Therm. 21 R9900293 Screw 22 53001259 Filter, Assembly 23 53001565 Filter, Choke 24 53001260 Guide, Air...


