
Owners Manual
Page 2
... KEY SETTING 22 TROUBLESHOOTING 24 SPECIFICATIONS 24 IPS237L 25 IPS277L 26 Preset Modes (Resolution) 26 Indicator 27 Proper posture 27 Proper posture for using the Monitor set 5 - Attaching the Stand Base 6 - Mounting on a table 7 - D-SUB connection 9 - Menu Settings 14 -PICTURE 15 -COLOR 16 -DISPLAY 16 -VOLUME 17 -OTHERS 18 MY KEY Setting 19 FUNC. Detaching the Stand Base 6 - HDMI connection 10 Connecting to a PC 9 - 2 TABLE OF CONTENTS Contents ENEGNLGISH 3 ASSEMBLING AND PREPAR- Using the cable holder 9 USING THE MONITOR SET 9 Connecting to...
... KEY SETTING 22 TROUBLESHOOTING 24 SPECIFICATIONS 24 IPS237L 25 IPS277L 26 Preset Modes (Resolution) 26 Indicator 27 Proper posture 27 Proper posture for using the Monitor set 5 - Attaching the Stand Base 6 - Mounting on a table 7 - D-SUB connection 9 - Menu Settings 14 -PICTURE 15 -COLOR 16 -DISPLAY 16 -VOLUME 17 -OTHERS 18 MY KEY Setting 19 FUNC. Detaching the Stand Base 6 - HDMI connection 10 Connecting to a PC 9 - 2 TABLE OF CONTENTS Contents ENEGNLGISH 3 ASSEMBLING AND PREPAR- Using the cable holder 9 USING THE MONITOR SET 9 Connecting to...
Owners Manual
Page 4
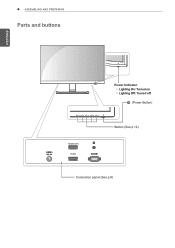
ENEGNLGISH 4 ASSEMBLING AND PREPARING Parts and buttons Power Indicator yyLighting On: Turned on yyLighting Off: Turned off (Power Button) Button (See p.12) Connection panel (See p.9)
ENEGNLGISH 4 ASSEMBLING AND PREPARING Parts and buttons Power Indicator yyLighting On: Turned on yyLighting Off: Turned off (Power Button) Button (See p.12) Connection panel (See p.9)
Owners Manual
Page 6
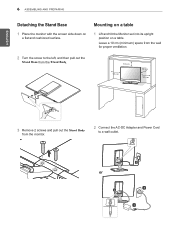
ENEGNLGISH 6 ASSEMBLING AND PREPARING Detaching the Stand Base 1 Place the monitor with the screen side down on a table. Mounting on a table 1 Lift and tilt the Monitor set into its upright position on a flat and cushioned surface. or Leave a 10 cm (minimum) space from the wall for proper ventilation. 2 Turn the screw to the left, and then pull out the Stand Base from the Stand Body. 10 cm 10 cm 10 cm 10 cm 3 Remove 2 screws and pull out the Stand Body from the monitor. 2 Connect the AC-DC Adapter and Power Cord to a wall outlet.
ENEGNLGISH 6 ASSEMBLING AND PREPARING Detaching the Stand Base 1 Place the monitor with the screen side down on a table. Mounting on a table 1 Lift and tilt the Monitor set into its upright position on a flat and cushioned surface. or Leave a 10 cm (minimum) space from the wall for proper ventilation. 2 Turn the screw to the left, and then pull out the Stand Base from the Stand Body. 10 cm 10 cm 10 cm 10 cm 3 Remove 2 screws and pull out the Stand Body from the monitor. 2 Connect the AC-DC Adapter and Power Cord to a wall outlet.

Owners Manual
Page 8
... security system cable between the Monitor set and a table. NOTE Tilt from most electronics stores. Front Rear For more information of installation and using, refer to suit your fingers. NOTE The Kensington security system is located at the back of the Monitor set. Do not touch or press the screen when adjusting the angle of the monitor. You can detach from stand base and...
... security system cable between the Monitor set and a table. NOTE Tilt from most electronics stores. Front Rear For more information of installation and using, refer to suit your fingers. NOTE The Kensington security system is located at the back of the Monitor set. Do not touch or press the screen when adjusting the angle of the monitor. You can detach from stand base and...

Owners Manual
Page 9
.../MHL HDMI connection Transmits the digital video and audio signals from your PC or A/V to a PC and turn on the supplied cable to the Monitor set. NOTE yyIf you use , a separate plug adapter is needed to change the 15 pin high density (3 row) D-SUB VGA connector on , without device configuration or user intervention. D-SUB connection Transmits analog video from your PC to a 15 pin 2 row connector. HDMI1 HDMI2/MHL HDMI1 NOTE yyWhen using a D-Sub signal input cable connector...
.../MHL HDMI connection Transmits the digital video and audio signals from your PC or A/V to a PC and turn on the supplied cable to the Monitor set. NOTE yyIf you use , a separate plug adapter is needed to change the 15 pin high density (3 row) D-SUB VGA connector on , without device configuration or user intervention. D-SUB connection Transmits analog video from your PC to a 15 pin 2 row connector. HDMI1 HDMI2/MHL HDMI1 NOTE yyWhen using a D-Sub signal input cable connector...
Owners Manual
Page 11
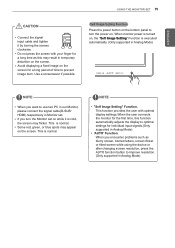
... user connects the monitor for the first time, this may result in Analog Mode) Use a screensaver if possible. Self Image Setting Function Press the power button on while it by turning the screws clockwise. This is normal. This is normal. When you turn the power on the screen. yyAvoid displaying a fixed image on the screen. ENEGNLGISH USING THE MONITOR SET 11 CAUTION yyConnect the signal input cable and tighten it is cold, the screen may flicker. yySome red, green...
... user connects the monitor for the first time, this may result in Analog Mode) Use a screensaver if possible. Self Image Setting Function Press the power button on while it by turning the screws clockwise. This is normal. This is normal. When you turn the power on the screen. yyAvoid displaying a fixed image on the screen. ENEGNLGISH USING THE MONITOR SET 11 CAUTION yyConnect the signal input cable and tighten it is cold, the screen may flicker. yySome red, green...

Owners Manual
Page 12
... Monitor set Buttons Button (Power Button) Description Accesses the main menus.(See p.13) OSD LOCKED/ UNLOCKED This function allows you want. • When only one signal is connected, it is running properly (On Mode). The default setting is in Analog Mode) The best display mode 1920 x 1080 You can choose the input signal. • When two input signals are connected, you can unlock the OSD controls at any time by pressing the buttons on the bottom of the menu...
... Monitor set Buttons Button (Power Button) Description Accesses the main menus.(See p.13) OSD LOCKED/ UNLOCKED This function allows you want. • When only one signal is connected, it is running properly (On Mode). The default setting is in Analog Mode) The best display mode 1920 x 1080 You can choose the input signal. • When two input signals are connected, you can unlock the OSD controls at any time by pressing the buttons on the bottom of the menu...

Owners Manual
Page 13
...factory default settings. MENU BRIGHTNESS CONTRAST WIDE/ORIGINAL Analog ● ● HDMI ● ● Description To adjust the brightness, contrast of the screen WIDE Switch to full screen mode according to reset immediately. RESET ● ● ORIGINAL Change the input image signal ratio to leave the OSD menu. BLACK LEVEL OVER SCAN RESPONSE TIME ● COLOR GAMMA COLOR TEMP ● SIX COLOR COLOR RESET DISPLAY HORIZONTAL VERTICAL ● CLOCK PHASE ● VOLUME OTHERS LANGUAGE POWER INDICATOR ● AUTOMATIC STANDBY ● BUTTON SOUND...
...factory default settings. MENU BRIGHTNESS CONTRAST WIDE/ORIGINAL Analog ● ● HDMI ● ● Description To adjust the brightness, contrast of the screen WIDE Switch to full screen mode according to reset immediately. RESET ● ● ORIGINAL Change the input image signal ratio to leave the OSD menu. BLACK LEVEL OVER SCAN RESPONSE TIME ● COLOR GAMMA COLOR TEMP ● SIX COLOR COLOR RESET DISPLAY HORIZONTAL VERTICAL ● CLOCK PHASE ● VOLUME OTHERS LANGUAGE POWER INDICATOR ● AUTOMATIC STANDBY ● BUTTON SOUND...

Owners Manual
Page 14
MENU > NEXT MENU > PICTURE SHARPNESS BLACK LEVEL OVER SCAN RESPONSE TIME Description To adjust the clearness of the screen. You can set a response time for displayed pictures based on the speed of the screen. If you select'HIGH', the screen will be bright and if you select 'LOW', the screen will be dark.(only for HDMI input) * Offset?As the criteria for video signal, it is explained below. For...
MENU > NEXT MENU > PICTURE SHARPNESS BLACK LEVEL OVER SCAN RESPONSE TIME Description To adjust the clearness of the screen. You can set a response time for displayed pictures based on the speed of the screen. If you select'HIGH', the screen will be bright and if you select 'LOW', the screen will be dark.(only for HDMI input) * Offset?As the criteria for video signal, it is explained below. For...
Owners Manual
Page 15
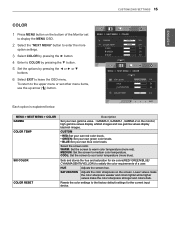
... red). COOL: Set the screen to medium color temperature. SATURATION Adjusts the color sharpness on the monitor, high gamma values display whitish images and low gamma values display blackish images. Sets and stores the hue and saturation for the current input device. Resets the color settings to the factory default settings for six colors(RED/ GREEN/BLUE/ CYAN/MAGENTA/YELLOW) to satisfy the color requirements of the Monitor set other menu items, use the up arrow ( ) button. CUSTOMIZING SETTINGS 15...
... red). COOL: Set the screen to medium color temperature. SATURATION Adjusts the color sharpness on the monitor, high gamma values display whitish images and low gamma values display blackish images. Sets and stores the hue and saturation for the current input device. Resets the color settings to the factory default settings for six colors(RED/ GREEN/BLUE/ CYAN/MAGENTA/YELLOW) to satisfy the color requirements of the Monitor set other menu items, use the up arrow ( ) button. CUSTOMIZING SETTINGS 15...
Owners Manual
Page 16
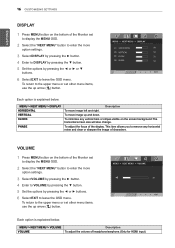
... image left and right. MENU > NEXT MENU > VOLUME Description VOLUME To adjust the volume of the display. MENU > NEXT MENU > DISPLAY HORIZONTAL VERTICAL CLOCK PHASE Description To move image up and down. To adjust the focus of headphone/earphone.(Only for HDMI input) To return to remove any vertical bars or stripes visible on the bottom of the Monitor set to display the MENU OSD. 2 Select the "NEXT MENU" button to enter the more option settings. 3 Select DISPLAY...
... image left and right. MENU > NEXT MENU > VOLUME Description VOLUME To adjust the volume of the display. MENU > NEXT MENU > DISPLAY HORIZONTAL VERTICAL CLOCK PHASE Description To move image up and down. To adjust the focus of headphone/earphone.(Only for HDMI input) To return to remove any vertical bars or stripes visible on the bottom of the Monitor set to display the MENU OSD. 2 Select the "NEXT MENU" button to enter the more option settings. 3 Select DISPLAY...

Owners Manual
Page 17
... at any button on the monitor set for a certain period, the monitor set OFF, it will automatically switch to standby mode. MENU > NEXT MENU > OTHERS LANGUAGE POWER INDICATOR AUTOMATIC STANDBY BUTTON SOUND Description To choose the language in below . DC power On/Off MENU OSD On FUNC. The Buzzer sound operates in which the control names are displayed. If you set will go off the Buzzer sound. To select or turn off . If...
... at any button on the monitor set for a certain period, the monitor set OFF, it will automatically switch to standby mode. MENU > NEXT MENU > OTHERS LANGUAGE POWER INDICATOR AUTOMATIC STANDBY BUTTON SOUND Description To choose the language in below . DC power On/Off MENU OSD On FUNC. The Buzzer sound operates in which the control names are displayed. If you set will go off the Buzzer sound. To select or turn off . If...
Owners Manual
Page 19
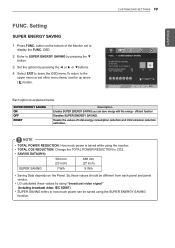
... the OSD menu.To return to the upper menu or set to SUPER ENERGY SAVING by pressing the ▼ button. 3 Set the options by using the SUPER ENERGY SAVING function. CUSTOMIZING SETTINGS 19 Each option is saved while using the monitor. SUPER ENERGY SAVING ON OFF RESET Description Enables SUPER ENERGY SAVING you can be different from each panel and panel vendor. yySAVING DATA(W/h) 584 mm (23 inch) 686...
... the OSD menu.To return to the upper menu or set to SUPER ENERGY SAVING by pressing the ▼ button. 3 Set the options by using the SUPER ENERGY SAVING function. CUSTOMIZING SETTINGS 19 Each option is saved while using the monitor. SUPER ENERGY SAVING ON OFF RESET Description Enables SUPER ENERGY SAVING you can be different from each panel and panel vendor. yySAVING DATA(W/h) 584 mm (23 inch) 686...
Owners Manual
Page 20
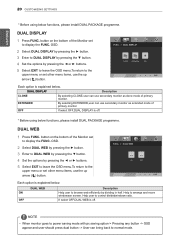
... set other menu items, use secondary monitor as extended mode of primary monitor. button on the bottom of the Monitor set to display the FUNC. DUAL DISPLAY 1 Press FUNC. button on the bottom of the Monitor set to display the FUNC. ON OFF DUAL WEB Description Help user to normal mode. NOTE yyWhen monitor goes to power saving mode with pc saving option-> Pressing any button -> OSD appear and user should press dual button -> User can use the up arrow ( ) button. Help user...
... set other menu items, use secondary monitor as extended mode of primary monitor. button on the bottom of the Monitor set to display the FUNC. DUAL DISPLAY 1 Press FUNC. button on the bottom of the Monitor set to display the FUNC. ON OFF DUAL WEB Description Help user to normal mode. NOTE yyWhen monitor goes to power saving mode with pc saving option-> Pressing any button -> OSD appear and user should press dual button -> User can use the up arrow ( ) button. Help user...

Owners Manual
Page 21
... option is changed, it set to OFF, the monitor gets back to the upper menu or set before. TRUE COLOR FINDER ON OFF Description It enable the calibration result that applied to display the FUNC. button on the bottom of the Monitor set to calibrate the monitor. yyWhen the input port is explained below . yyPlease refer to the help manual of the True Color Finder. OSD. 2 Select TRUE COLOR FINDER...
... option is changed, it set to OFF, the monitor gets back to the upper menu or set before. TRUE COLOR FINDER ON OFF Description It enable the calibration result that applied to display the FUNC. button on the bottom of the Monitor set to calibrate the monitor. yyWhen the input port is explained below . yyPlease refer to the help manual of the True Color Finder. OSD. 2 Select TRUE COLOR FINDER...
Owners Manual
Page 22
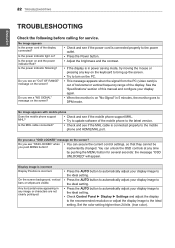
... update software of the display connected? Any horizontal noise appearing in 5 minutes, the monitor goes to the ideal setting. Do you push MENU button? yy Check and see if the power cord is incorrect. Set the color setting higher than 24 bits (true color). Is the power indicator light on the screen? Do you see if the mobile phone support MHL. Do you see "OSD LOCKED" when yy You can unlock the OSD controls at any image...
... update software of the display connected? Any horizontal noise appearing in 5 minutes, the monitor goes to the ideal setting. Do you push MENU button? yy Check and see if the power cord is incorrect. Set the color setting higher than 24 bits (true color). Is the power indicator light on the screen? Do you see if the mobile phone support MHL. Do you see "OSD LOCKED" when yy You can unlock the OSD controls at any image...

Owners Manual
Page 23
... screen may not be flickering. yy Check if the signal cable is HDMI 1080i 60/50 Hz, the screen may be supported by computer and O/S (Operation System), and resolution mentioned above may be dimmed, truncated or biased. Make sure to fasten if necessary. ENEGNLGISH TROUBLESHOOTING 23 CAUTION yyCheck Control Panel ► Display ► Settings and see an "Unrecognized monitor, Plug&Play (VESA DDC) monitor found" message? yyIf the recommended resolution (optimal resolution...
... screen may not be flickering. yy Check if the signal cable is HDMI 1080i 60/50 Hz, the screen may be supported by computer and O/S (Operation System), and resolution mentioned above may be dimmed, truncated or biased. Make sure to fasten if necessary. ENEGNLGISH TROUBLESHOOTING 23 CAUTION yyCheck Control Panel ► Display ► Settings and see an "Unrecognized monitor, Plug&Play (VESA DDC) monitor found" message? yyIf the recommended resolution (optimal resolution...

Owners Manual
Page 24
... due to 61Hz(HDMI) Input Form Separate Sync. 24 SPECIFICATIONS ENEGNLGISH SPECIFICATIONS IPS237L Display Sync Input Video Input Resolution Plug & Play Power Consumption Power Input AC-DC Adapter Dimensions (Width x Height x Depth) Weight Tilt Range Environmental conditions Stand Base Power cord Screen Type 58.4 cm (23 inch) Flat Panel Active matrix-TFT LCDAntiGlare coating Visible diagonal size: 58.4 cm Pixel Pitch 0.265 mm x 0.265 mm (Pixel Pitch) Horizontal Frequency 30 kHz to 83 kHz (Automatic) Vertical Frequency 56Hz to 75Hz (D-SUB) 56Hz to upgrade of product functions...
... due to 61Hz(HDMI) Input Form Separate Sync. 24 SPECIFICATIONS ENEGNLGISH SPECIFICATIONS IPS237L Display Sync Input Video Input Resolution Plug & Play Power Consumption Power Input AC-DC Adapter Dimensions (Width x Height x Depth) Weight Tilt Range Environmental conditions Stand Base Power cord Screen Type 58.4 cm (23 inch) Flat Panel Active matrix-TFT LCDAntiGlare coating Visible diagonal size: 58.4 cm Pixel Pitch 0.265 mm x 0.265 mm (Pixel Pitch) Horizontal Frequency 30 kHz to 83 kHz (Automatic) Vertical Frequency 56Hz to 75Hz (D-SUB) 56Hz to upgrade of product functions...

Owners Manual
Page 25
... IPS277L Display Sync Input Video Input Resolution Plug & Play Power Consumption Power Input AC-DC Adapter Dimensions (Width x Height x Depth) Weight Tilt Range Environmental conditions Stand Base Power cord Screen Type 68.6 cm (27 inch) Flat Panel Active matrix-TFT LCDAntiGlare coating Visible diagonal size: 68.6 cm Pixel Pitch 0.3114 mm x 0.3114 mm (Pixel Pitch) Horizontal Frequency 30 kHz to 83 kHz (Automatic) Vertical Frequency 56Hz to 75Hz (D-SUB) 56Hz to upgrade of product functions. HDMI Signal Input 15 pin D-SUB Connector / HDMI Connector Input Form RGB Analog (0.7 Vp...
... IPS277L Display Sync Input Video Input Resolution Plug & Play Power Consumption Power Input AC-DC Adapter Dimensions (Width x Height x Depth) Weight Tilt Range Environmental conditions Stand Base Power cord Screen Type 68.6 cm (27 inch) Flat Panel Active matrix-TFT LCDAntiGlare coating Visible diagonal size: 68.6 cm Pixel Pitch 0.3114 mm x 0.3114 mm (Pixel Pitch) Horizontal Frequency 30 kHz to 83 kHz (Automatic) Vertical Frequency 56Hz to 75Hz (D-SUB) 56Hz to upgrade of product functions. HDMI Signal Input 15 pin D-SUB Connector / HDMI Connector Input Form RGB Analog (0.7 Vp...

Owners Manual
Page 27
ENEGNLGISH Proper posture Proper posture for using the Monitor set and your arms bent at the optimal viewing angle. Place your hands gently on the keyboard, keeping your posture to allow you to avoid it reflecting light. Adjust the location of the Monitor set to view images at the elbows and horizontally outright. Proper posture 27 Adjust the Monitor set .
ENEGNLGISH Proper posture Proper posture for using the Monitor set and your arms bent at the optimal viewing angle. Place your hands gently on the keyboard, keeping your posture to allow you to avoid it reflecting light. Adjust the location of the Monitor set to view images at the elbows and horizontally outright. Proper posture 27 Adjust the Monitor set .


