

Owners Manual
Page 1
LED LCD MONITOR MODELS E1960S/E1960T E2060S/E2060T E2260S/E2260T/E2260V E2360S/E2360T/E2360V www.lg.com ENGLISH OWNER'S MANUAL LED LCD MONITOR Please read this manual carefully before operating your set and retain it for future reference.
LED LCD MONITOR MODELS E1960S/E1960T E2060S/E2060T E2260S/E2260T/E2260V E2360S/E2360T/E2360V www.lg.com ENGLISH OWNER'S MANUAL LED LCD MONITOR Please read this manual carefully before operating your set and retain it for future reference.
Owners Manual
Page 7
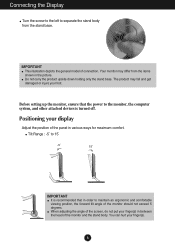
...(s) in the picture. Positioning your finger(s). 6 Before setting up the monitor, ensure that in various ways for maximum comfort. IMPORTANT This illustration depicts the general model of connection. You can hurt your display Adjust the position of the panel in order to 15˚ -5 15 IMPORTANT It is turned off. Connecting...
...(s) in the picture. Positioning your finger(s). 6 Before setting up the monitor, ensure that in various ways for maximum comfort. IMPORTANT This illustration depicts the general model of connection. You can hurt your display Adjust the position of the panel in order to 15˚ -5 15 IMPORTANT It is turned off. Connecting...
Owners Manual
Page 8
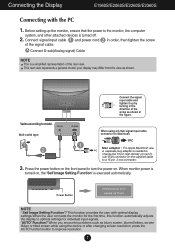
...D-sub(Analog signal) Cable NOTE This is a simplified representation of the signal cable. sub VGA connector on the front panel to model. When you encounter problems such as shown. your display may differ from the view as blurry screen, blurred letters, screen flicker or...using the device or after changing screen resolution, press the AUTO function button to improve resolution. 7 This rear view represents a general model; Connecting the Display E1960S/E2060S/E2260S/E2360S Connecting with optimal display settings.When the user connects the monitor for the first time, this...
...D-sub(Analog signal) Cable NOTE This is a simplified representation of the signal cable. sub VGA connector on the front panel to model. When you encounter problems such as shown. your display may differ from the view as blurry screen, blurred letters, screen flicker or...using the device or after changing screen resolution, press the AUTO function button to improve resolution. 7 This rear view represents a general model; Connecting the Display E1960S/E2060S/E2260S/E2360S Connecting with optimal display settings.When the user connects the monitor for the first time, this...
Owners Manual
Page 9
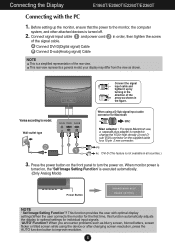
This rear view represents a general model; When using the device or after changing screen resolution, press the AUTO function button to turn the power on. Wall-outlet type Connect the signal ... : For Apple Macintosh use, a separate plug adapter is needed to change the 15 pin high density (3 row) Dsub VGA connector on the supplied cable to model. your display may differ from the view as blurry screen, blurred letters, screen flicker or tilted screen while using a D-Sub signal input cable connector for...
This rear view represents a general model; When using the device or after changing screen resolution, press the AUTO function button to turn the power on. Wall-outlet type Connect the signal ... : For Apple Macintosh use, a separate plug adapter is needed to change the 15 pin high density (3 row) Dsub VGA connector on the supplied cable to model. your display may differ from the view as blurry screen, blurred letters, screen flicker or tilted screen while using a D-Sub signal input cable connector for...
Owners Manual
Page 10
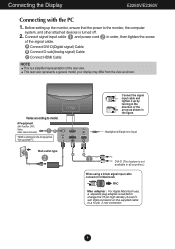
This rear view represents a general model; Varies according to the monitor, the computer system, and other attached devices is turned off. 2. Headphone/Earphone Input DVI-D (This feature is needed to a 15 pin 2 row connector. 9 Connecting the Display E2260V/E2360V Connecting with the PC 1. your display may differ from the view .... * Not supported PC Wall-outlet type Connect the signal input cable and tighten it up the monitor, ensure that the power to model. AV equipment (Set-Top Box, DVD, Video, Video Game Console) * HDMI is a simplified representation of the arrow as shown.
This rear view represents a general model; Varies according to the monitor, the computer system, and other attached devices is turned off. 2. Headphone/Earphone Input DVI-D (This feature is needed to a 15 pin 2 row connector. 9 Connecting the Display E2260V/E2360V Connecting with the PC 1. your display may differ from the view .... * Not supported PC Wall-outlet type Connect the signal input cable and tighten it up the monitor, ensure that the power to model. AV equipment (Set-Top Box, DVD, Video, Video Game Console) * HDMI is a simplified representation of the arrow as shown.

Owners Manual
Page 19
... customize desired image settings To adjust the image size To adjust the screen color mode NOTE The order of icons may differ depending on the model (18 to 31). 18
... customize desired image settings To adjust the image size To adjust the screen color mode NOTE The order of icons may differ depending on the model (18 to 31). 18

Owners Manual
Page 48
The model and serial number of the SET is a set of the SET. S. A.,Inc. Make sure to read the Important Precautions before using the product. MODEL SERIAL ENERGY STAR is located on the back and one side of power-saving guidelines issued by the U.S. As an ENERGY STAR Partner LGE U. Environmental Protection Agency(EPA). Record it below should you ever need service. Keep the Owner's Manual(CD) in an accessible place for energy efficiency. has determined that this product meets the ENERGY STAR guidelines for furture reference.
The model and serial number of the SET is a set of the SET. S. A.,Inc. Make sure to read the Important Precautions before using the product. MODEL SERIAL ENERGY STAR is located on the back and one side of power-saving guidelines issued by the U.S. As an ENERGY STAR Partner LGE U. Environmental Protection Agency(EPA). Record it below should you ever need service. Keep the Owner's Manual(CD) in an accessible place for energy efficiency. has determined that this product meets the ENERGY STAR guidelines for furture reference.

