Owner's Manual
Page 3
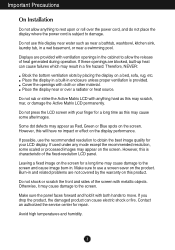
...product. However, this product. Do not shock or scratch the front and sides of the screen with both hands to use the recommended resolution to obtain the best image quality for your finger for repair. Avoid high temperatures and humidity. 2 If used under any mode except the... recommended resolution, some afterimages. Leaving a fixed image on the screen. Make sure to move. If these openings are not covered by placing the display ...
...product. However, this product. Do not shock or scratch the front and sides of the screen with both hands to use the recommended resolution to obtain the best image quality for your finger for repair. Avoid high temperatures and humidity. 2 If used under any mode except the... recommended resolution, some afterimages. Leaving a fixed image on the screen. Make sure to move. If these openings are not covered by placing the display ...
Owner's Manual
Page 9
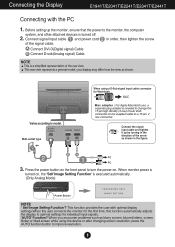
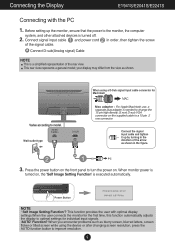
Wall-outlet type When using the device or after changing screen resolution, press the AUTO function button to model. When monitor power is turned on, the 'Self Image Setting Function' is needed to change the 15 pin ... adapter : For Apple Macintosh use, a separate plug adapter is executed automatically. (Only Analog Mode) Power Button NOTE ' Self Image Setting Function'? Varies according to improve resolution. 8 BA PC PC 3. Connect signal input cable 1 and power cord 2 in the figure. Press the power button on the front panel to turn the power...
Wall-outlet type When using the device or after changing screen resolution, press the AUTO function button to model. When monitor power is turned on, the 'Self Image Setting Function' is needed to change the 15 pin ... adapter : For Apple Macintosh use, a separate plug adapter is executed automatically. (Only Analog Mode) Power Button NOTE ' Self Image Setting Function'? Varies according to improve resolution. 8 BA PC PC 3. Connect signal input cable 1 and power cord 2 in the figure. Press the power button on the front panel to turn the power...
Owner's Manual
Page 10
Connecting the Display E1941S/E2041S/E2241S Connecting with optimal display settings.When the user connects the monitor for the first time, this function automatically adjusts the display to improve resolution. 9 When using the device or after changing screen resolution, press the AUTO function button to optimal settings for Macintosh Varies according to turn the...
Connecting the Display E1941S/E2041S/E2241S Connecting with optimal display settings.When the user connects the monitor for the first time, this function automatically adjusts the display to improve resolution. 9 When using the device or after changing screen resolution, press the AUTO function button to optimal settings for Macintosh Varies according to turn the...
Owner's Manual
Page 12
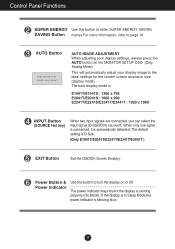
... button to enter SUPER ENERGY SAVING SAVING Button menus.For more information, refer to the ideal settings for the current screen resolution size (display mode). The default setting is E1941T/E1941S : 1366 x 768 E2041T/E2041S : 1600 x 900 E2241T/E2241S/E2341T/E2441T : 1920 x 1080 INPUT Button (SOURCE Hot key) When two input signals...
... button to enter SUPER ENERGY SAVING SAVING Button menus.For more information, refer to the ideal settings for the current screen resolution size (display mode). The default setting is E1941T/E1941S : 1366 x 768 E2041T/E2041S : 1600 x 900 E2241T/E2241S/E2341T/E2441T : 1920 x 1080 INPUT Button (SOURCE Hot key) When two input signals...
Owner's Manual
Page 21
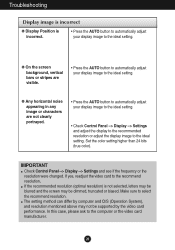
...Press the AUTO button to automatically adjust your display image to the recommend resolution. Make sure to the ideal setting. The setting method can differ by computer and O/S (Operation System), and resolution mentioned above may be supported by the video card performance. In this ...; Press the AUTO button to automatically adjust your display image to the computer or the video card manufacturer. 20 If the recommended resolution (optimal resolution) is incorrect. • Press the AUTO button to automatically adjust your display image to the ideal setting. • Check Control...
...Press the AUTO button to automatically adjust your display image to the recommend resolution. Make sure to the ideal setting. The setting method can differ by computer and O/S (Operation System), and resolution mentioned above may be supported by the video card performance. In this ...; Press the AUTO button to automatically adjust your display image to the computer or the video card manufacturer. 20 If the recommended resolution (optimal resolution) is incorrect. • Press the AUTO button to automatically adjust your display image to the ideal setting. • Check Control...
Owner's Manual
Page 22
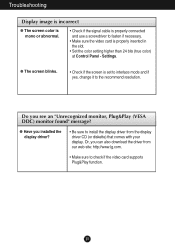
Do you installed the display driver? • Be sure to install the display driver from our web site: http://www.lg.com. • Make sure to the recommend resolution. Or, you can also download the driver from the display driver CD (or diskette) that comes with your display. G The screen blinks. • Check...
Do you installed the display driver? • Be sure to install the display driver from our web site: http://www.lg.com. • Make sure to the recommend resolution. Or, you can also download the driver from the display driver CD (or diskette) that comes with your display. G The screen blinks. • Check...

Owner's Manual
Page 24
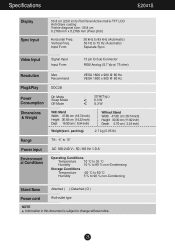
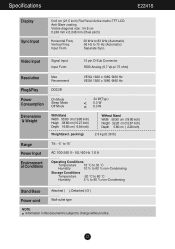
...) 56 Hz to change without notice. 23 Vertical Freq. Signal Input Input Form 15 pin D-Sub Connector RGB Analog (0.7 Vp-p/ 75 ohm) Resolution Plug&Play Power Consumption Dimensions & Weight Range Power Input Max Recommend VESA 1366 x 768 @60 Hz VESA 1366 x 768 @60 Hz DDC2B On...Base Power cord Attached ( ), Detached ( O ) Wall-outlet type NOTE Information in this document is subject to 75 Hz (Automatic) Separate Sync. Specifications E1941S Display Sync Input Video Input 47.0 cm (18.5 inch) Flat Panel Active matrix-TFT LCD Anti-Glare coating Visible diagonal size : 47.0 cm 0.300...
...) 56 Hz to change without notice. 23 Vertical Freq. Signal Input Input Form 15 pin D-Sub Connector RGB Analog (0.7 Vp-p/ 75 ohm) Resolution Plug&Play Power Consumption Dimensions & Weight Range Power Input Max Recommend VESA 1366 x 768 @60 Hz VESA 1366 x 768 @60 Hz DDC2B On...Base Power cord Attached ( ), Detached ( O ) Wall-outlet type NOTE Information in this document is subject to 75 Hz (Automatic) Separate Sync. Specifications E1941S Display Sync Input Video Input 47.0 cm (18.5 inch) Flat Panel Active matrix-TFT LCD Anti-Glare coating Visible diagonal size : 47.0 cm 0.300...

Owner's Manual
Page 25
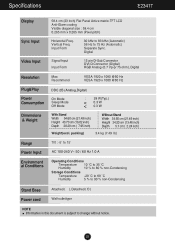
... (18.74 inch) Height 36.40 cm (14.33 inch) Dept 16.60 cm ( 6.54 inch) Weight(excl. Specifications E2041T Display Sync Input Video Input Resolution Plug&Play Power Consumption Dimensions & Weight Range Power Input Environment al Conditions 50.8 cm (20.0 inch) Flat Panel Active matrix-TFT LCD Anti-Glare coating...
... (18.74 inch) Height 36.40 cm (14.33 inch) Dept 16.60 cm ( 6.54 inch) Weight(excl. Specifications E2041T Display Sync Input Video Input Resolution Plug&Play Power Consumption Dimensions & Weight Range Power Input Environment al Conditions 50.8 cm (20.0 inch) Flat Panel Active matrix-TFT LCD Anti-Glare coating...
Owner's Manual
Page 26
... 83 kHz (Automatic) 56 Hz to change without notice. 25 Video Input Signal Input Input Form 15 pin D-Sub Connector RGB Analog (0.7 Vp-p/ 75 ohm) Resolution Plug&Play Power Consumption Dimensions & Weight Range Power Input Environment al Conditions Max Recommend VESA 1600 x 900 @ 60 Hz VESA 1600 x 900 @ 60 Hz DDC...
... 83 kHz (Automatic) 56 Hz to change without notice. 25 Video Input Signal Input Input Form 15 pin D-Sub Connector RGB Analog (0.7 Vp-p/ 75 ohm) Resolution Plug&Play Power Consumption Dimensions & Weight Range Power Input Environment al Conditions Max Recommend VESA 1600 x 900 @ 60 Hz VESA 1600 x 900 @ 60 Hz DDC...

Owner's Manual
Page 27
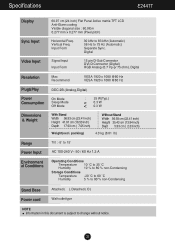
... mm x 0.248 mm (Pixel pitch) Horizontal Freq. Digital Signal Input Input Form 15 pin D-Sub Connector DVI-D Connector (Digital) RGB Analog (0.7 Vp-p/ 75 ohm), Digital Resolution Max Recommend VESA 1920 x 1080 @60 Hz VESA 1920 x 1080 @60 Hz Plug&Play Power Consumption DDC 2B (Analog,Digital) On Mode Sleep Mode Off...
... mm x 0.248 mm (Pixel pitch) Horizontal Freq. Digital Signal Input Input Form 15 pin D-Sub Connector DVI-D Connector (Digital) RGB Analog (0.7 Vp-p/ 75 ohm), Digital Resolution Max Recommend VESA 1920 x 1080 @60 Hz VESA 1920 x 1080 @60 Hz Plug&Play Power Consumption DDC 2B (Analog,Digital) On Mode Sleep Mode Off...
Owner's Manual
Page 28
... this document is subject to 75 Hz (Automatic) Separate Sync. Video Input Signal Input Input Form 15 pin D-Sub Connector RGB Analog (0.7 Vp-p/ 75 ohm) Resolution Plug&Play Power Consumption Dimensions & Weight Max Recommend VESA 1920 x 1080 @60 Hz VESA 1920 x 1080 @60 Hz DDC2B On Mode Sleep Mode Off Mode...
... this document is subject to 75 Hz (Automatic) Separate Sync. Video Input Signal Input Input Form 15 pin D-Sub Connector RGB Analog (0.7 Vp-p/ 75 ohm) Resolution Plug&Play Power Consumption Dimensions & Weight Max Recommend VESA 1920 x 1080 @60 Hz VESA 1920 x 1080 @60 Hz DDC2B On Mode Sleep Mode Off Mode...
Owner's Manual
Page 29
... mm x 0.265 mm (Pixel pitch) Horizontal Freq. Digital Signal Input Input Form 15 pin D-Sub Connector DVI-D Connector (Digital) RGB Analog (0.7 Vp-p/ 75 ohm), Digital Resolution Plug&Play Power Consumption Dimensions & Weight Range Power Input Environment al Conditions Max Recommend VESA 1920 x 1080 @60 Hz VESA 1920 x 1080 @60 Hz DDC...
... mm x 0.265 mm (Pixel pitch) Horizontal Freq. Digital Signal Input Input Form 15 pin D-Sub Connector DVI-D Connector (Digital) RGB Analog (0.7 Vp-p/ 75 ohm), Digital Resolution Plug&Play Power Consumption Dimensions & Weight Range Power Input Environment al Conditions Max Recommend VESA 1920 x 1080 @60 Hz VESA 1920 x 1080 @60 Hz DDC...
Owner's Manual
Page 30
... subject to 75 Hz (Automatic) Separate Sync. Digital Signal Input Input Form 15 pin D-Sub Connector DVI-D Connector (Digital) RGB Analog (0.7 Vp-p/ 75 ohm), Digital Resolution Plug&Play Power Consumption Dimensions & Weight Range Power Input Environment al Conditions Max Recommend VESA 1920 x 1080 @60 Hz VESA 1920 x 1080 @60 Hz DDC...
... subject to 75 Hz (Automatic) Separate Sync. Digital Signal Input Input Form 15 pin D-Sub Connector DVI-D Connector (Digital) RGB Analog (0.7 Vp-p/ 75 ohm), Digital Resolution Plug&Play Power Consumption Dimensions & Weight Range Power Input Environment al Conditions Max Recommend VESA 1920 x 1080 @60 Hz VESA 1920 x 1080 @60 Hz DDC...

Owner's Manual
Page 31
... 46.875 49.725 48.363 60.123 47.712 70 -/+ 60 -/- 75 -/- 60 +/+ 75 +/+ 75 -/- 60 -/- 75 +/+ 60 +/+ *Recommend Mode E2041T/E2041S Display Modes (Resolution) Horizontal Freq. (kHz) Vertical Freq. (Hz) Polarity(H/V) 1 720 x 400 2 640 x 480 3 640 x 480 4 800 x 600 5 800 x 600 6 1024 x 768 7...70 -/+ 60 -/- 75 -/- 60 +/+ 75 +/+ 60 -/- 75 +/+ 75 +/+ 60 +/+ *Recommend Mode 30 Specifications Preset Modes (Resolution) E1941T/E1941S *If you can't select 1366 x 768 in display property timing option, please update your video card driver from your video card vendor.
... 46.875 49.725 48.363 60.123 47.712 70 -/+ 60 -/- 75 -/- 60 +/+ 75 +/+ 75 -/- 60 -/- 75 +/+ 60 +/+ *Recommend Mode E2041T/E2041S Display Modes (Resolution) Horizontal Freq. (kHz) Vertical Freq. (Hz) Polarity(H/V) 1 720 x 400 2 640 x 480 3 640 x 480 4 800 x 600 5 800 x 600 6 1024 x 768 7...70 -/+ 60 -/- 75 -/- 60 +/+ 75 +/+ 60 -/- 75 +/+ 75 +/+ 60 +/+ *Recommend Mode 30 Specifications Preset Modes (Resolution) E1941T/E1941S *If you can't select 1366 x 768 in display property timing option, please update your video card driver from your video card vendor.


