
Owners Manual
Page 2
... particular, specifies that to Part 15 of uninsulated "dangerous voltage" within an equilateral triangle is connected. - NOTE TO CABLE/TV INSTALLER: This reminder is encouraged to try to modify this equipment does cause harmful interference to radio or television reception, which...receiving antenna. - CAUTION: Do not attempt to correct the interference by turning the equipment off and on a circuit different from LG Electronics Corporation. only COMPLIANCE: The responsible party for help. If this product in accordance with arrowhead symbol, within an equilateral triangle...
... particular, specifies that to Part 15 of uninsulated "dangerous voltage" within an equilateral triangle is connected. - NOTE TO CABLE/TV INSTALLER: This reminder is encouraged to try to modify this equipment does cause harmful interference to radio or television reception, which...receiving antenna. - CAUTION: Do not attempt to correct the interference by turning the equipment off and on a circuit different from LG Electronics Corporation. only COMPLIANCE: The responsible party for help. If this product in accordance with arrowhead symbol, within an equilateral triangle...
Owners Manual
Page 5
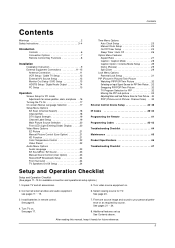
... Controls 6 Connection Options 7 Remote Control Key Functions 8 Installation Installation Instruction 9 External Equipment Connections 11~15 Antenna Connection 11 VCR Setup / Cable TV Setup 12 External A/V Source Setup 13 Monitor Out Setup / DVD Setup 13 HDSTB Setup / Digital Audio Output 14 PC Setup 15 Operation Screen ...Setup for PC mode Adjustments for screen position, clock, and phase . .16 Turning the TV On 17 On-screen Menus Language Selection 17 Setup Menu Options EZ Scan (Channel Search 18 Channel Edit 18 DTV Signal Strength 19...
... Controls 6 Connection Options 7 Remote Control Key Functions 8 Installation Installation Instruction 9 External Equipment Connections 11~15 Antenna Connection 11 VCR Setup / Cable TV Setup 12 External A/V Source Setup 13 Monitor Out Setup / DVD Setup 13 HDSTB Setup / Digital Audio Output 14 PC Setup 15 Operation Screen ...Setup for PC mode Adjustments for screen position, clock, and phase . .16 Turning the TV On 17 On-screen Menus Language Selection 17 Setup Menu Options EZ Scan (Channel Search 18 Channel Edit 18 DTV Signal Strength 19...
Owners Manual
Page 6
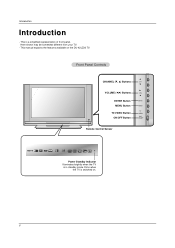
Front Panel Controls CHANNEL (E, D) Buttons CH VOLUME (F,G) Buttons ENTER Button MENU Button TV/VIDEO Button ON/OFF Button VOL ENTER MENU TV VIDEO /I ON/OFF Remote Control Sensor Power Standby Indicator Illuminates brightly when the TV is a simplified representation of front panel. Introduction Introduction - This manual explains the features available on . 6 This is in standby mode. Here shown may be somewhat different from your TV. - Dims when the TV is switched on the DU-42LZ30 TV.
Front Panel Controls CHANNEL (E, D) Buttons CH VOLUME (F,G) Buttons ENTER Button MENU Button TV/VIDEO Button ON/OFF Button VOL ENTER MENU TV VIDEO /I ON/OFF Remote Control Sensor Power Standby Indicator Illuminates brightly when the TV is a simplified representation of front panel. Introduction Introduction - This manual explains the features available on . 6 This is in standby mode. Here shown may be somewhat different from your TV. - Dims when the TV is switched on the DU-42LZ30 TV.
Owners Manual
Page 8
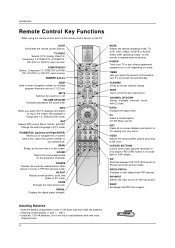
... remote control buttons. COMP/RGB/DVI Selects: Component 1-2, RGB-DTV (or RGB- MUTE Switches the sound on -screen displays and returns to TV viewing from any other operating modes, for multiple program channels such as 2-1,2-2,etc. EXIT Clears all on or off. Don't mix old or... settings to operate external devices. Not available in DTV mode. PIPCH+ PIPINPUT FREEZE ZOOM SIGNAL SWAP ADJUST MODE Selects the remote operating mode: TV, VCR, DVD, CABLE, HDSTB or AUDIO. VCR/DVD BUTTONS Control some video cassette recorders or DVD player ("RECORD" button is frozen in...
... remote control buttons. COMP/RGB/DVI Selects: Component 1-2, RGB-DTV (or RGB- MUTE Switches the sound on -screen displays and returns to TV viewing from any other operating modes, for multiple program channels such as 2-1,2-2,etc. EXIT Clears all on or off. Don't mix old or... settings to operate external devices. Not available in DTV mode. PIPCH+ PIPINPUT FREEZE ZOOM SIGNAL SWAP ADJUST MODE Selects the remote operating mode: TV, VCR, DVD, CABLE, HDSTB or AUDIO. VCR/DVD BUTTONS Control some video cassette recorders or DVD player ("RECORD" button is frozen in...
Owners Manual
Page 9
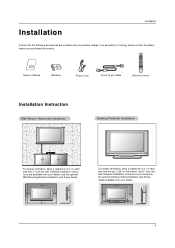
Owner's Manual 1.5V 1.5V Batteries Power Cord D-sub 15 pin Cable LIGHT MODE POWER TV/VIDEO COMP/RGB/DVI TIMER FLASHBK MUTE VOL SURF CH INFO SAP RATIO CC ENTER MENU SOUND VIDEO EXIT PLAY PAUSE STOP RECORD REW FF ...
Owner's Manual 1.5V 1.5V Batteries Power Cord D-sub 15 pin Cable LIGHT MODE POWER TV/VIDEO COMP/RGB/DVI TIMER FLASHBK MUTE VOL SURF CH INFO SAP RATIO CC ENTER MENU SOUND VIDEO EXIT PLAY PAUSE STOP RECORD REW FF ...

Owners Manual
Page 10
Installation Installation Instruction - b. d. Install wires as necessary. Rear A/V Cover * The connection panel is hidden behind the A/V cover. Close cover. Remove the cover. Position the A/V cover with the two tuberance on the TV back panel with the TV back panel. e. Thread, then pull the wires through the hole on the DU-42LZ30 TVs. c. Reinstall the cover. This manual explains the features available on the TV stand. 10 a. Wire Holders - Align the holes on the rear A/V cover and insert.
Installation Installation Instruction - b. d. Install wires as necessary. Rear A/V Cover * The connection panel is hidden behind the A/V cover. Close cover. Remove the cover. Position the A/V cover with the two tuberance on the TV back panel with the TV back panel. e. Thread, then pull the wires through the hole on the DU-42LZ30 TVs. c. Reinstall the cover. This manual explains the features available on the TV stand. 10 a. Wire Holders - Align the holes on the rear A/V cover and insert.
Owners Manual
Page 11
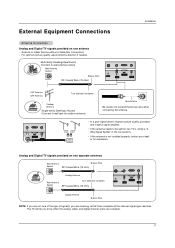
...RF Coaxial Wire (75 ohm) S-VIDEO Antenna1 DVI INPUT (PC/DTV INPUT) Antenna 2 Installation VHF Antenna UHF Antenna Turn clockwise to tighten. The TV will let you are complete. 11 Antenna or Cable Service without a Cable Box Connections - Antenna1 DVI INPUT (PC/DTV INPUT) Antenna 2 Signal...In a poor signal area to improve picture quality, purchase and install a signal amplifier. • If the antenna needs to be split for two TV's, install a "2Way Signal Splitter" in the connections. • If the antenna is not installed properly, contact your dealer for outdoor antenna) ...
...RF Coaxial Wire (75 ohm) S-VIDEO Antenna1 DVI INPUT (PC/DTV INPUT) Antenna 2 Installation VHF Antenna UHF Antenna Turn clockwise to tighten. The TV will let you are complete. 11 Antenna or Cable Service without a Cable Box Connections - Antenna1 DVI INPUT (PC/DTV INPUT) Antenna 2 Signal...In a poor signal area to improve picture quality, purchase and install a signal amplifier. • If the antenna needs to be split for two TV's, install a "2Way Signal Splitter" in the connections. • If the antenna is not installed properly, contact your dealer for outdoor antenna) ...
Owners Manual
Page 12
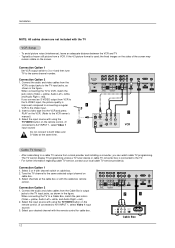
... INPUT S-VIDEO Antenna1 DVI INPUT (PC/DTV INPUT) Antenna 2 1 ANT IN ANT OUT S-VIDEO OUT OUTPUT (R) AUDIO (L) SWITCH 3 4 IN VIDEO 2 VCR Cable TV Setup - Tune the TV channel to a Cable Box, match the jack colors (Video = yellow, Audio Left = white, and Audio Right = red). 2. COMPONENT 2 COMPONENT 1 R L DVD... the cable box or with channel switch on cable box. 3. Connect the audio and video cables from a VCR. Select your local cable TV service provider(s). the fixed images on the sides of the screen may remain visible on the VCR. (Refer to the Video input. 2. compared...
... INPUT S-VIDEO Antenna1 DVI INPUT (PC/DTV INPUT) Antenna 2 1 ANT IN ANT OUT S-VIDEO OUT OUTPUT (R) AUDIO (L) SWITCH 3 4 IN VIDEO 2 VCR Cable TV Setup - Tune the TV channel to a Cable Box, match the jack colors (Video = yellow, Audio Left = white, and Audio Right = red). 2. COMPONENT 2 COMPONENT 1 R L DVD... the cable box or with channel switch on cable box. 3. Connect the audio and video cables from a VCR. Select your local cable TV service provider(s). the fixed images on the sides of the screen may remain visible on the VCR. (Refer to the Video input. 2. compared...

Owners Manual
Page 13
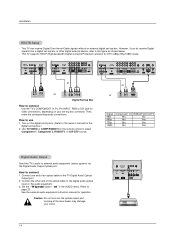
...OUTPUT A/V INPUT1 (MONO) R AUDIO L VIDEO AUDIO INPUT VIDEO INPUT S-VIDEO How to use S-Video. R AUDIO L VIDEO Monitor Out Setup The TV has a special signal output capability which allows you to the component input ports as shown in the figure. DVI COMPONENT1 PC/DVI OUTPUT INPUT INPUT...; Digital Audio will not work for operating instructions. Component ports on the remote control. (If connected to the TV's MONITOR OUTPUT. Camcorder Video Game Set Connect the second TV or monitor to A/V INPUT 1, select Video 1 input source). 2. Refer to the DVD player's manual for ...
...OUTPUT A/V INPUT1 (MONO) R AUDIO L VIDEO AUDIO INPUT VIDEO INPUT S-VIDEO How to use S-Video. R AUDIO L VIDEO Monitor Out Setup The TV has a special signal output capability which allows you to the component input ports as shown in the figure. DVI COMPONENT1 PC/DVI OUTPUT INPUT INPUT...; Digital Audio will not work for operating instructions. Component ports on the remote control. (If connected to the TV's MONITOR OUTPUT. Camcorder Video Game Set Connect the second TV or monitor to A/V INPUT 1, select Video 1 input source). 2. Refer to the DVD player's manual for ...
Owners Manual
Page 14
...DTV INPUT) Antenna 2 or or (R) AUDIO (L) RGB-DTV OUTPUT or DIGITAL AUDIO OPTICAL (R) AUDIO (L) B R Digital Set-top Box How to the TV Digital Audio Optical Output port. 2. How to external audio equipment (stereo system) via the Digital Audio Output Optical port. Installation HDSTB Setup - See the...DVI jack for the digital set -top box connector. However, if you do receive Digital signals from a digital set -top box. This TV supports HDCP (High-bandwidth Digital Contents Protection) protocol for operation. How to page 23. Connect one end of the optical cable to the ...
...DTV INPUT) Antenna 2 or or (R) AUDIO (L) RGB-DTV OUTPUT or DIGITAL AUDIO OPTICAL (R) AUDIO (L) B R Digital Set-top Box How to the TV Digital Audio Optical Output port. 2. How to external audio equipment (stereo system) via the Digital Audio Output Optical port. Installation HDSTB Setup - See the...DVI jack for the digital set -top box connector. However, if you do receive Digital signals from a digital set -top box. This TV supports HDCP (High-bandwidth Digital Contents Protection) protocol for operation. How to page 23. Connect one end of the optical cable to the ...
Owners Manual
Page 15
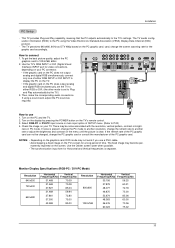
...476 70.06 60.023 75.02 15 Turn on the PC graphic card. Check the image on the display by the TV.) 3. If noise is set the TV to either RGB or DVI; (the other mode is present, change the PC mode to another resolution, change the screen scanning... and Vertical frequencies is clear. Use the Orbiter screen saver when possible. • The synchronization input form for the graphic card accordingly. The TV sends configuration information (EDID) to another rate or adjust the brightness and contrast on the PC does output analog and digital RGB simultaneously, set ...
...476 70.06 60.023 75.02 15 Turn on the PC graphic card. Check the image on the display by the TV.) 3. If noise is set the TV to either RGB or DVI; (the other mode is present, change the PC mode to another resolution, change the screen scanning... and Vertical frequencies is clear. Use the Orbiter screen saver when possible. • The synchronization input form for the graphic card accordingly. The TV sends configuration information (EDID) to another rate or adjust the brightness and contrast on the PC does output analog and digital RGB simultaneously, set ...
Owners Manual
Page 17
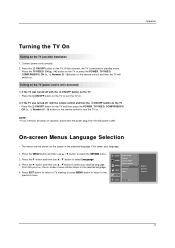
... the selected language. 4. Press the MENU button and then use D / E button to select the OPTION menu. 2. Press the ON/OFF button on the TV just after installation 1. Press the G button and then use D / E button to select Language. 3. SETUP Aspect Ratio Caption VIDEO Caption Mode Caption Option AUDIO... D / E button to the previous menu. At this point on, the on-screen menus will switch on . 2. Operation Turning the TV On Turning on the TV. Turning on vacation, disconnect the power plug from the wall power outlet. English Español Français 17 First select your...
... the selected language. 4. Press the MENU button and then use D / E button to select the OPTION menu. 2. Press the ON/OFF button on the TV just after installation 1. Press the G button and then use D / E button to select Language. 3. SETUP Aspect Ratio Caption VIDEO Caption Mode Caption Option AUDIO... D / E button to the previous menu. At this point on, the on-screen menus will switch on . 2. Operation Turning the TV On Turning on the TV. Turning on vacation, disconnect the power plug from the wall power outlet. English Español Français 17 First select your...
Owners Manual
Page 18
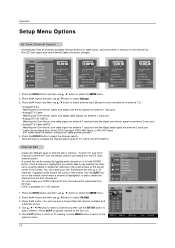
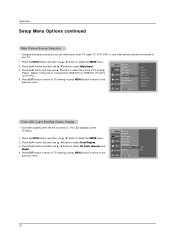
... with channel numbers and a preview picture. 4. Use the SURF button on your connections to add or delete it. Edit. 3. Press EXIT button to return to TV viewing or press MENU button to return to begin the channel search. Label Main Input Sub Input Front Display SET ID LOCK MENU Prev. IRC... list memorized from EZ Scan. - Press SURF to add the channel to select antenna input (Based on the remote control when a channel is available for TV, CATV, and DTV/CADTV. Label Main Input Sub Input Front Display SET ID LOCK ANT 1 ANT 2 Air Select antenna input, press Analog/DTV Air ...
... with channel numbers and a preview picture. 4. Use the SURF button on your connections to add or delete it. Edit. 3. Press EXIT button to return to TV viewing or press MENU button to return to begin the channel search. Label Main Input Sub Input Front Display SET ID LOCK MENU Prev. IRC... list memorized from EZ Scan. - Press SURF to add the channel to select antenna input (Based on the remote control when a channel is available for TV, CATV, and DTV/CADTV. Label Main Input Sub Input Front Display SET ID LOCK ANT 1 ANT 2 Air Select antenna input, press Analog/DTV Air ...
Owners Manual
Page 19
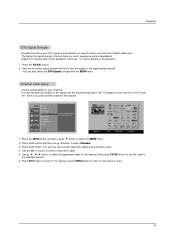
... TIME OPTION EZ Scan Ch.Edit DTV Signal Ch. G Selection ( G or ) leads you are broadcast on the signal from the broadcasting station, the TV displays a short name for the channel. You will now see the quality of the signal being received. • You can also check the DTV Signal...channel to the previous menu. 19 The higher the signal strength, the less likely you to experience picture degradation. - Press EXIT button to return to TV viewing or press MENU button to return to Label. 5. even if you need to select the SETUP menu. 2. Label Main Input Sub Input Front Display...
... TIME OPTION EZ Scan Ch.Edit DTV Signal Ch. G Selection ( G or ) leads you are broadcast on the signal from the broadcasting station, the TV displays a short name for the channel. You will now see the quality of the signal being received. • You can also check the DTV Signal...channel to the previous menu. 19 The higher the signal strength, the less likely you to experience picture degradation. - Press EXIT button to return to TV viewing or press MENU button to return to Label. 5. even if you need to select the SETUP menu. 2. Label Main Input Sub Input Front Display...
Owners Manual
Page 20
... / E button to select Main Input. 3. Illuminates brightly when the set is turned on. The LED displays current TV status. 1. Press the G button and then use D / E button to your off-air TV, cable TV, VCR, DVD, or any other devices that are connected to select the SETUP menu. 2. Label Main Input Video1...VIDEO DTV Signal AUDIO Ch. Press the G button and then use D / E button to the previous menu. Press EXIT button to return to TV viewing or press MENU button to return to select the SETUP menu. 2. Label Main Input Sub Input TIME Front Display G Off OPTION SET ID ...
... / E button to select Main Input. 3. Illuminates brightly when the set is turned on. The LED displays current TV status. 1. Press the G button and then use D / E button to your off-air TV, cable TV, VCR, DVD, or any other devices that are connected to select the SETUP menu. 2. Label Main Input Video1...VIDEO DTV Signal AUDIO Ch. Press the G button and then use D / E button to the previous menu. Press EXIT button to return to TV viewing or press MENU button to return to select the SETUP menu. 2. Label Main Input Sub Input TIME Front Display G Off OPTION SET ID ...
Owners Manual
Page 21
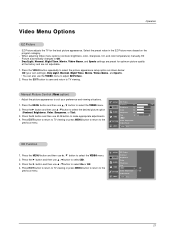
...Press the MENU button and then use D / E button to select On or Off. 4. Press the G button and then use D / E button to TV viewing. Press the G button and then use the VIDEO menu to the previous menu. Tint TIME 0R G 4. OPTION Color Temperature Video Preset LOCK MENU Prev...button repeatedly to select the picture appearance setup option as shown below: Off (your preference and viewing situations. Press EXIT button to return to TV viewing or press MENU button to return to adjust EZ Picture. 2. Contrast 85 G VIDEO Brightness 50 2. SETUP EZ Picture Contrast VIDEO ...
...Press the MENU button and then use D / E button to select On or Off. 4. Press the G button and then use D / E button to TV viewing. Press the G button and then use the VIDEO menu to the previous menu. Tint TIME 0R G 4. OPTION Color Temperature Video Preset LOCK MENU Prev...button repeatedly to select the picture appearance setup option as shown below: Off (your preference and viewing situations. Press EXIT button to return to TV viewing or press MENU button to return to adjust EZ Picture. 2. Contrast 85 G VIDEO Brightness 50 2. SETUP EZ Picture Contrast VIDEO ...

Owners Manual
Page 22
... menu. 2. Press the G button and then use D / E button to their original factory preset values. 1. Warm Medium Cool Video Preset - Press EXIT button to return to TV viewing or press MENU button to return to original values. Press the G button to reset the Video menu options to the previous menu. Use to...
... menu. 2. Press the G button and then use D / E button to their original factory preset values. 1. Warm Medium Cool Video Preset - Press EXIT button to return to TV viewing or press MENU button to return to original values. Press the G button to reset the Video menu options to the previous menu. Use to...
Owners Manual
Page 23
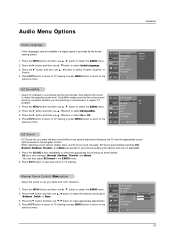
...Music are preset for changes in the AUDIO menu. 2. Scans for good sound quality at the factory and are watching a commercial or a regular TV program. 1. Press the MENU button and then use D / E button to select Audio Language. 3. SETUP Audio Language EZ SoundRite G Off VIDEO.... • You can also adjust EZ Sound in sound level during commercials, then adjusts the sound to select the AUDIO menu. 2. OPTION TV Speaker LOCK MENU Prev. 23 English Spanish French EZ SoundRite - Press the MENU button and then use D / E button to make appropriate adjustments...
...Music are preset for changes in the AUDIO menu. 2. Scans for good sound quality at the factory and are watching a commercial or a regular TV program. 1. Press the MENU button and then use D / E button to select Audio Language. 3. SETUP Audio Language EZ SoundRite G Off VIDEO.... • You can also adjust EZ Sound in sound level during commercials, then adjusts the sound to select the AUDIO menu. 2. OPTION TV Speaker LOCK MENU Prev. 23 English Spanish French EZ SoundRite - Press the MENU button and then use D / E button to make appropriate adjustments...
Owners Manual
Page 24
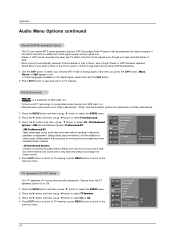
...material. • 3D EchoSound System Creates a stunning simulated stereo effects from SRS Labs, Inc. - Off 3D EchoSound System SRS TruSurround XT TV Speakers On/Off Setup - Stereo or SAP can receive MTS stereo programs and any multi-channel format without needing to select... of stereo audio enhancement that accompanies the stereo program; SETUP Audio Language EZ SoundRite VIDEO EZ Sound AUDIO Balance Treble TIME Bass Front Surround OPTION TV Speaker G Off On LOCK MENU Prev. 24 Press the G button and then use D / E button to select the AUDIO menu. 2. Mono ...
...material. • 3D EchoSound System Creates a stunning simulated stereo effects from SRS Labs, Inc. - Off 3D EchoSound System SRS TruSurround XT TV Speakers On/Off Setup - Stereo or SAP can receive MTS stereo programs and any multi-channel format without needing to select... of stereo audio enhancement that accompanies the stereo program; SETUP Audio Language EZ SoundRite VIDEO EZ Sound AUDIO Balance Treble TIME Bass Front Surround OPTION TV Speaker G Off On LOCK MENU Prev. 24 Press the G button and then use D / E button to select the AUDIO menu. 2. Mono ...
Owners Manual
Page 25
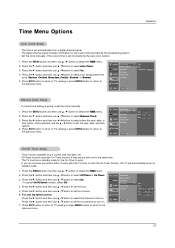
... use D / E button to select Off Timer or On Timer. 3. G Off On Time 6 : 30 AM Ch. The time is wrong, reset the clock manually. 1. TV 2-0 Vol 17 25 Press the G button and then use D / E button to standby mode. 1. Press the G button and then use F / G button to the previous... set the year, date, and time options. 4. Press the G button and then use the D / E button to set . - Press EXIT button to return to TV viewing or press MENU button to return to select either the year, date, or time option. G Year - - - Date - - / - Time Menu Options Operation ...
... use D / E button to select Off Timer or On Timer. 3. G Off On Time 6 : 30 AM Ch. The time is wrong, reset the clock manually. 1. TV 2-0 Vol 17 25 Press the G button and then use D / E button to standby mode. 1. Press the G button and then use F / G button to the previous... set the year, date, and time options. 4. Press the G button and then use the D / E button to set . - Press EXIT button to return to TV viewing or press MENU button to return to select either the year, date, or time option. G Year - - - Date - - / - Time Menu Options Operation ...


