
Owners Manual
Page 1
LCD Colour Television OWNER'S MANUAL MODELS: DU-30LZ30 DU-37LZ30 DU-42LZ30 Please read this information to your set . See the label attached on the back cover and quote this manual carefully before operating your dealer when you require service. Record model number and serial number of the set . Retain it for future reference. P/NO : 3828TUL275D(0406-REV00) Printed in Korea Internet Home Page : http://www.lge.com http://www.lg.ca
LCD Colour Television OWNER'S MANUAL MODELS: DU-30LZ30 DU-37LZ30 DU-42LZ30 Please read this information to your set . See the label attached on the back cover and quote this manual carefully before operating your dealer when you require service. Record model number and serial number of the set . Retain it for future reference. P/NO : 3828TUL275D(0406-REV00) Printed in Korea Internet Home Page : http://www.lge.com http://www.lg.ca
Owners Manual
Page 5
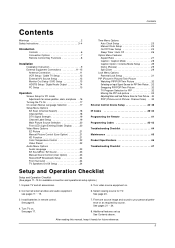
...required by source. see pages 11 ~ 15. 6. See page 8. 4. Turn TV on . 2. Connect all accessories. 5. See page 17. 7. After reading this manual, keep it handy for TV. Additional features set up See Contents above. See pages 21 ~ 24. 8. See page 20. 3 Install batteries in -Picture)/Twin ...Label Setup 19 Main Picture Source Selection 20 Front LED (Light Emitting Diode) Display . . . . .20 Video Menu Options EZ Picture 21 Manual Picture Control (User Option 21 XD Function 21 Color Temperature Control 22 Video Preset 22 Audio Menu Options Audio Language 23 EZ SoundRite / EZ ...
...required by source. see pages 11 ~ 15. 6. See page 8. 4. Turn TV on . 2. Connect all accessories. 5. See page 17. 7. After reading this manual, keep it handy for TV. Additional features set up See Contents above. See pages 21 ~ 24. 8. See page 20. 3 Install batteries in -Picture)/Twin ...Label Setup 19 Main Picture Source Selection 20 Front LED (Light Emitting Diode) Display . . . . .20 Video Menu Options EZ Picture 21 Manual Picture Control (User Option 21 XD Function 21 Color Temperature Control 22 Video Preset 22 Audio Menu Options Audio Language 23 EZ SoundRite / EZ ...
Owners Manual
Page 6
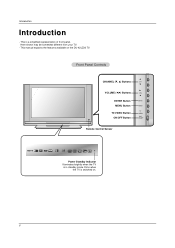
Here shown may be somewhat different from your TV. - Dims when the TV is switched on the DU-42LZ30 TV. This is in standby mode. This manual explains the features available on . 6 Introduction Introduction - Front Panel Controls CHANNEL (E, D) Buttons CH VOLUME (F,G) Buttons ENTER Button MENU Button TV/VIDEO Button ON/OFF Button VOL ENTER MENU TV VIDEO /I ON/OFF Remote Control Sensor Power Standby Indicator Illuminates brightly when the TV is a simplified representation of front panel.
Here shown may be somewhat different from your TV. - Dims when the TV is switched on the DU-42LZ30 TV. This is in standby mode. This manual explains the features available on . 6 Introduction Introduction - Front Panel Controls CHANNEL (E, D) Buttons CH VOLUME (F,G) Buttons ENTER Button MENU Button TV/VIDEO Button ON/OFF Button VOL ENTER MENU TV VIDEO /I ON/OFF Remote Control Sensor Power Standby Indicator Illuminates brightly when the TV is a simplified representation of front panel.
Owners Manual
Page 9
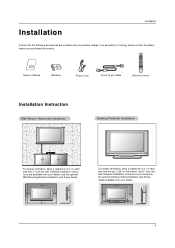
Detailed installation instructions are included in the optional Desktop Stand Installation and Setup Guide available from your dealer. 4 inches 2 inches 4 inches 4 inches 9 Owner's Manual 1.5V 1.5V Batteries Power Cord D-sub 15 pin Cable LIGHT MODE POWER TV/VIDEO COMP/RGB/DVI TIMER FLASHBK MUTE VOL SURF CH INFO SAP ...
Detailed installation instructions are included in the optional Desktop Stand Installation and Setup Guide available from your dealer. 4 inches 2 inches 4 inches 4 inches 9 Owner's Manual 1.5V 1.5V Batteries Power Cord D-sub 15 pin Cable LIGHT MODE POWER TV/VIDEO COMP/RGB/DVI TIMER FLASHBK MUTE VOL SURF CH INFO SAP ...

Owners Manual
Page 10
Rear A/V Cover * The connection panel is hidden behind the A/V cover. Align the holes on the TV back panel with the TV back panel. Thread, then pull the wires through the hole on the rear A/V cover and insert. a. b. Close cover. Installation Installation Instruction - c. Wire Holders - Remove the cover. This manual explains the features available on the DU-42LZ30 TVs. Position the A/V cover with the two tuberance on the TV stand. 10 Install wires as necessary. Reinstall the cover. d. e.
Rear A/V Cover * The connection panel is hidden behind the A/V cover. Align the holes on the TV back panel with the TV back panel. Thread, then pull the wires through the hole on the rear A/V cover and insert. a. b. Close cover. Installation Installation Instruction - c. Wire Holders - Remove the cover. This manual explains the features available on the DU-42LZ30 TVs. Position the A/V cover with the two tuberance on the TV stand. 10 Install wires as necessary. Reinstall the cover. d. e.
Owners Manual
Page 12
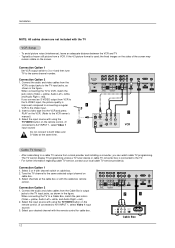
... colors (Video = yellow, Audio Left = white, and Audio Right = red). 2. Connect the audio and video cables from the VCR's output jacks to the VCR owner's manual.) 3. Connect the audio and video cables from the Cable Box's output jacks to A/V INPUT 1, select Video 1 input source) 3. RGB INPUT (PC/DTV INPUT) COMPONENT 2 COMPONENT...
... colors (Video = yellow, Audio Left = white, and Audio Right = red). 2. Connect the audio and video cables from the VCR's output jacks to the VCR owner's manual.) 3. Connect the audio and video cables from the Cable Box's output jacks to A/V INPUT 1, select Video 1 input source) 3. RGB INPUT (PC/DTV INPUT) COMPONENT 2 COMPONENT...

Owners Manual
Page 13
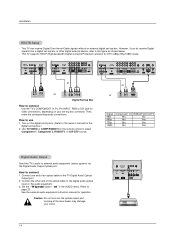
...- Select the input source with using the TV/VIDEO button on DVD player Y Pb Pr Y B-Y R-Y Y Cb Cr Y PB PR 13 Refer to the DVD player's manual for further details regarding that device's input settings. COMPONENT 2 COMPONENT 1 R L DVD /DTV INPUT MONITOR OUTPUT A/V INPUT1 (MONO) R AUDIO L VIDEO AUDIO INPUT VIDEO INPUT S-VIDEO How...
...- Select the input source with using the TV/VIDEO button on DVD player Y Pb Pr Y B-Y R-Y Y Cb Cr Y PB PR 13 Refer to the DVD player's manual for further details regarding that device's input settings. COMPONENT 2 COMPONENT 1 R L DVD /DTV INPUT MONITOR OUTPUT A/V INPUT1 (MONO) R AUDIO L VIDEO AUDIO INPUT VIDEO INPUT S-VIDEO How...
Owners Manual
Page 14
...,DVI-DTV Yes No Yes Yes Yes Yes Yes Yes Digital Audio Output Send the TV's audio to use 1. See the external audio equipment instruction manual for DTV (480p,720p,1080i) mode. How to page 23. Looking at the laser beam may damage your set -top box. Connect one end of... the optical cable to the digital audio optical input on the digital set-top box. (Refer to the owner's manual for video connections, depending on the remote control to the TV Digital Audio Optical Output port. 2. Off" in the AUDIO menu. Set the " TV Speaker...
...,DVI-DTV Yes No Yes Yes Yes Yes Yes Yes Digital Audio Output Send the TV's audio to use 1. See the external audio equipment instruction manual for DTV (480p,720p,1080i) mode. How to page 23. Looking at the laser beam may damage your set -top box. Connect one end of... the optical cable to the digital audio optical input on the digital set-top box. (Refer to the owner's manual for video connections, depending on the remote control to the TV Digital Audio Optical Output port. 2. Off" in the AUDIO menu. Set the " TV Speaker...

Owners Manual
Page 16
You can manually adjust picture position and minimize image shaking for PC mode - POSITION G CLOCK PHASE RESET Adjust Close D F G E Initializing (Reset to make appropriate adjustments. • The PHASE ...
You can manually adjust picture position and minimize image shaking for PC mode - POSITION G CLOCK PHASE RESET Adjust Close D F G E Initializing (Reset to make appropriate adjustments. • The PHASE ...
Owners Manual
Page 21
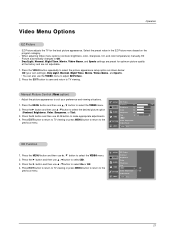
When adjusting Video menu options (contrast, brightness, color, sharpness, tint, and color temperature) manually, EZ Picture automatically changes to TV viewing. Tint TIME 0R G 4. Press the EXIT button to save and return to Off. - Press the ... LOCK MENU Prev. SETUP EZ Picture Contrast VIDEO Brightness AUDIO Color Sharpness Tint TIME G Off OPTION Color Temperature On Video Preset LOCK MENU Prev. 21 Manual Picture Control (User option) - AUDIO Sharpness 50 3. Press the G button and then use F / G button to select XD. 3. Press the MENU button and ...
When adjusting Video menu options (contrast, brightness, color, sharpness, tint, and color temperature) manually, EZ Picture automatically changes to TV viewing. Tint TIME 0R G 4. Press the EXIT button to save and return to Off. - Press the ... LOCK MENU Prev. SETUP EZ Picture Contrast VIDEO Brightness AUDIO Color Sharpness Tint TIME G Off OPTION Color Temperature On Video Preset LOCK MENU Prev. 21 Manual Picture Control (User option) - AUDIO Sharpness 50 3. Press the G button and then use F / G button to select XD. 3. Press the MENU button and ...
Owners Manual
Page 23
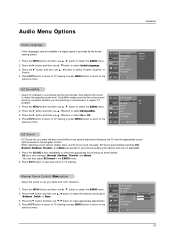
...you are preset for changes in the AUDIO menu. 2. Normal, Stadium, Theater, and Music are watching a commercial or a regular TV program. 1. Manual Sound Control (User option) - Press the G button and then use D / E button to make appropriate adjustments. Audio Menu Options Operation Audio Language... then use D / E button to select Audio Language. 3. When adjusting sound options (treble, bass, and front surround) manually, EZ Sound automatically switches Off. - Other languages may be available if a digital signal is provided by the broadcasting station. 1.
...you are preset for changes in the AUDIO menu. 2. Normal, Stadium, Theater, and Music are watching a commercial or a regular TV program. 1. Manual Sound Control (User option) - Press the G button and then use D / E button to make appropriate adjustments. Audio Menu Options Operation Audio Language... then use D / E button to select Audio Language. 3. When adjusting sound options (treble, bass, and front surround) manually, EZ Sound automatically switches Off. - Other languages may be available if a digital signal is provided by the broadcasting station. 1.
Owners Manual
Page 25
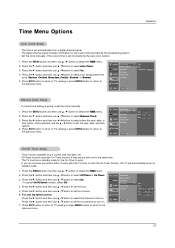
...Press the G button and then use D / E button to select On. 4. If current time setting is set the minutes. 6. SETUP VIDEO AUDIO TIME Auto Clock Manual Clock Off Timer On Timer Sleep Timer Auto Off OPTION LOCK MENU Prev. Press the G button and then use D / E button to select On. • To...25 Press EXIT button to return to TV viewing or press MENU button to return to the previous menu. G Off On Time Zone Eastern Manual Clock Setup - Time Menu Options Operation Auto Clock Setup - The digital channel signal includes information for the On-Timer to set the sound ...
...Press the G button and then use D / E button to select On. 4. If current time setting is set the minutes. 6. SETUP VIDEO AUDIO TIME Auto Clock Manual Clock Off Timer On Timer Sleep Timer Auto Off OPTION LOCK MENU Prev. Press the G button and then use D / E button to select On. • To...25 Press EXIT button to return to TV viewing or press MENU button to return to the previous menu. G Off On Time Zone Eastern Manual Clock Setup - Time Menu Options Operation Auto Clock Setup - The digital channel signal includes information for the On-Timer to set the sound ...
Owners Manual
Page 26
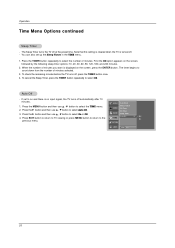
... to on the screen, followed by the following sleep timer options: 10, 20, 30, 60, 90, 120, 180, and 240 minutes. 2. SETUP VIDEO Auto Clock Manual Clock Off Timer AUDIO On Timer Sleep Timer TIME Auto Off G Off On OPTION LOCK MENU Prev. 26 You can also set to select On...
... to on the screen, followed by the following sleep timer options: 10, 20, 30, 60, 90, 120, 180, and 240 minutes. 2. SETUP VIDEO Auto Clock Manual Clock Off Timer AUDIO On Timer Sleep Timer TIME Auto Off G Off On OPTION LOCK MENU Prev. 26 You can also set to select On...


