

Owners Manual
Page 2
... CABLE/TV INSTALLER: This reminder is intended to alert the user to the presence of important operating and maintenance (servicing) instructions in a particular installation. This equipment generates, uses and can be determined by turning the equipment off and on a circuit different from LG Electronics ...no guarantee that the cable ground shall be of sufficient magnitude to modify this product. Consult the dealer or an experienced radio/TV technician for a Class B digital device, pursuant to Part 15 of electric shock to provide reasonable protection against harmful interference in...
... CABLE/TV INSTALLER: This reminder is intended to alert the user to the presence of important operating and maintenance (servicing) instructions in a particular installation. This equipment generates, uses and can be determined by turning the equipment off and on a circuit different from LG Electronics ...no guarantee that the cable ground shall be of sufficient magnitude to modify this product. Consult the dealer or an experienced radio/TV technician for a Class B digital device, pursuant to Part 15 of electric shock to provide reasonable protection against harmful interference in...
Owners Manual
Page 5
... p a n d• C he c• k 1i 1s1t Setup and Operation Checklist (See pages 11-15 for screen position, clock, and phase Turning the TV On On-screen Menus Language Selection ......... Connect all accessories. 5. See page 17. 6. See page 8. 4. Setup Menu Options EZ Scan (Channel Search Channel Edit...23 EZ SoundRite / EZ Sound 23 Manual Sound Control (User Option) ........ 23 Stereo/SAP Broadcasts Setup 24 Front Surround 24 TV Speakers On/Off Setup 24 Time Menu Options Auto Clock Setup 25 Manual Clock Setup 25 On/Off Timer Setup 25 Sleep Timer...
... p a n d• C he c• k 1i 1s1t Setup and Operation Checklist (See pages 11-15 for screen position, clock, and phase Turning the TV On On-screen Menus Language Selection ......... Connect all accessories. 5. See page 17. 6. See page 8. 4. Setup Menu Options EZ Scan (Channel Search Channel Edit...23 EZ SoundRite / EZ Sound 23 Manual Sound Control (User Option) ........ 23 Stereo/SAP Broadcasts Setup 24 Front Surround 24 TV Speakers On/Off Setup 24 Time Menu Options Auto Clock Setup 25 Manual Clock Setup 25 On/Off Timer Setup 25 Sleep Timer...

Owners Manual
Page 6
Here shown may be somewhat different from your TV. - i O_;tO;_ : i!iiiiiiiiiiiiiiiiiiiiiiil ............ "_ Remote Control Sensor Power Standby Indicator Illuminates brightly when the TV is a simplified representation of front panel. This manual explains the features available on . This is in standby mode. i L r CHANNEL (_r A) Buttons-- Dims when the TV is switched on the DU-42LZ30 TV. iiiiiiiiiiiiiiiiiiiiiiiiiiiiiiiiiiiiiiiiiiiiil;! VOLUME (_,1_) Buttons-- I EN_R;;;;;;;; Introduction - i 4 ENTER Button -MENU Button -- TVNIDEO ButtonON/OFF Button-
Here shown may be somewhat different from your TV. - i O_;tO;_ : i!iiiiiiiiiiiiiiiiiiiiiiil ............ "_ Remote Control Sensor Power Standby Indicator Illuminates brightly when the TV is a simplified representation of front panel. This manual explains the features available on . This is in standby mode. i L r CHANNEL (_r A) Buttons-- Dims when the TV is switched on the DU-42LZ30 TV. iiiiiiiiiiiiiiiiiiiiiiiiiiiiiiiiiiiiiiiiiiiiil;! VOLUME (_,1_) Buttons-- I EN_R;;;;;;;; Introduction - i 4 ENTER Button -MENU Button -- TVNIDEO ButtonON/OFF Button-

Owners Manual
Page 8
...channel list. FREEZE Freezes the currently-viewed picture. SURF Use to enter a program number for DVD player). EXIT Clears all on the TV. PIPCH-/PIPCH+ Changes to operate external devices. with EZ scan. Replace cover. SIGNAL Displays the digital signal strength. Select other programmed...• Open the battery compartment cover on -screen menus and adjust the system settings to the last channel viewed. POWER Turns your TV turns itself off . PIP INPUT Selects the input source for the program's character. VOLUME UP/DOWN Increases/decreases the sound level. ...
...channel list. FREEZE Freezes the currently-viewed picture. SURF Use to enter a program number for DVD player). EXIT Clears all on the TV. PIPCH-/PIPCH+ Changes to operate external devices. with EZ scan. Replace cover. SIGNAL Displays the digital signal strength. Select other programmed...• Open the battery compartment cover on -screen menus and adjust the system settings to the last channel viewed. POWER Turns your TV turns itself off . PIP INPUT Selects the input source for the program's character. VOLUME UP/DOWN Increases/decreases the sound level. ...

Owners Manual
Page 10
a. b. Align the holes on the TV back panel with the TV back panel. Thread, then pull the wires through the hole on the rear A/V cover and insert. Reinstall the cover. Install wires as necessary. Remove the cover. d. Close cover. - Position the A/V cover with the two tuberance on the TV stand. 10 This manual explains the features available on the DU-42LZ30 TVs. * The connection panel is hidden behind the A/V cover. c. Installation Ins ta IIat io n Inst ruct ion - e.
a. b. Align the holes on the TV back panel with the TV back panel. Thread, then pull the wires through the hole on the rear A/V cover and insert. Reinstall the cover. Install wires as necessary. Remove the cover. d. Close cover. - Position the A/V cover with the two tuberance on the TV stand. 10 This manual explains the features available on the DU-42LZ30 TVs. * The connection panel is hidden behind the A/V cover. c. Installation Ins ta IIat io n Inst ruct ion - e.

Owners Manual
Page 11
.... j_ _ _ % _ Outdoor Antenna _%_ Single-family Dwellings/Houses Connect to wall jack for assistance. If the antenna needs to tighten. The TV will let you are complete. 11 f Multi-family Dwellings/Apartments /F_ "*,,_(,Connect to wall antenna socket) I H_t[_ Wa,Antenna _ h;;_ j ...clockwise to tighten, Socket RF Coaxial Wire (75 ohm) I I .I Equi pm e nt Co nnect i ons Installation Analog and Digital TV signals provided on one antenna Antenna or Cable Service without a Cable Box Connections For optimum picture quality, adjust antenna direction if needed. Ext erna...
.... j_ _ _ % _ Outdoor Antenna _%_ Single-family Dwellings/Houses Connect to wall jack for assistance. If the antenna needs to tighten. The TV will let you are complete. 11 f Multi-family Dwellings/Apartments /F_ "*,,_(,Connect to wall antenna socket) I H_t[_ Wa,Antenna _ h;;_ j ...clockwise to tighten, Socket RF Coaxial Wire (75 ohm) I I .I Equi pm e nt Co nnect i ons Installation Analog and Digital TV signals provided on one antenna Antenna or Cable Service without a Cable Box Connections For optimum picture quality, adjust antenna direction if needed. Ext erna...
Owners Manual
Page 12
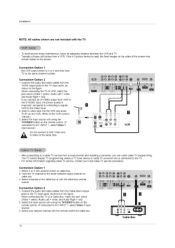
... not connect to both Video and S-Video at the cable box or with the remote control for cable box. [] Cable Box 12 When connecting the TV to VCR, match the jack colors (Video = yellow, Audio Left = white, and Audio Right = red). Installation NOTE: All cables shown are ...images on the sides of the screen may remain visible on the remote control. (If connected to the same channel number. The TV cannot display TV programming unless a TV tuner device or cable TV converter box is connected to the Video input. 2. Connection Option 1 1. Connection Option 2 1. Select the input source with ...
... not connect to both Video and S-Video at the cable box or with the remote control for cable box. [] Cable Box 12 When connecting the TV to VCR, match the jack colors (Video = yellow, Audio Left = white, and Audio Right = red). Installation NOTE: All cables shown are ...images on the sides of the screen may remain visible on the remote control. (If connected to the same channel number. The TV cannot display TV programming unless a TV tuner device or cable TV converter box is connected to the Video input. 2. Connection Option 1 1. Connection Option 2 1. Select the input source with ...
Owners Manual
Page 13
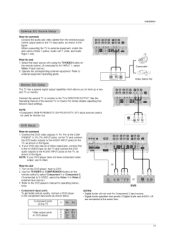
...Audio will not work for operating instructions. Installation How to connect Connect the audio and video cables from the external equipment's output jacks to the TV input jacks, as shown in the figure. How to S-VIDEO, select the Video 1 or Video 2 external input source.) 3. Connect the DVD... video outputs (Y, PB, PR) to the COMPONENT (Y, PB, PR) INPUT jacks on the TV and connect the DVD audio outputs to the AUDIO INPUT jacks on the DVD player, insert a DVD. 2. Component ports on the remote control to select...
...Audio will not work for operating instructions. Installation How to connect Connect the audio and video cables from the external equipment's output jacks to the TV input jacks, as shown in the figure. How to S-VIDEO, select the Video 1 or Video 2 external input source.) 3. Connect the DVD... video outputs (Y, PB, PR) to the COMPONENT (Y, PB, PR) INPUT jacks on the TV and connect the DVD audio outputs to the AUDIO INPUT jacks on the DVD player, insert a DVD. 2. Component ports on the remote control to select...
Owners Manual
Page 14
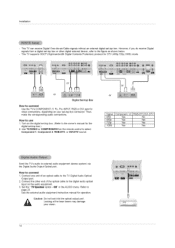
...) via the Digital Audio Output Optical port. However, if you do receive Digital signals from a digital set -top box.) 2. Set the" TV Speaker option - Refer to connect Use the TV's COMPONENT (Y, P& PR) INPUT, RGB or DVI jack for the digital set -top box or other end of an optical cable to select... Component 1, Component 2, RGB-DTV, or DVI-DTV source. Installation This TV can receive Digital Over-the-air/Cable signals without an external digital set -top box connector. or Digital Set-top Box How to page 23...
...) via the Digital Audio Output Optical port. However, if you do receive Digital signals from a digital set -top box.) 2. Set the" TV Speaker option - Refer to connect Use the TV's COMPONENT (Y, P& PR) INPUT, RGB or DVI jack for the digital set -top box or other end of an optical cable to select... Component 1, Component 2, RGB-DTV, or DVI-DTV source. Installation This TV can receive Digital Over-the-air/Cable signals without an external digital set -top box connector. or Digital Set-top Box How to page 23...
Owners Manual
Page 15
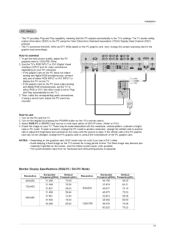
... The synchronization input form for Horizontal and Vertical frequencies is set to 1024x768, 60Hz. 2. The fixed image may not work if you use 1. The TV perceives 640x480, 60Hz as required. Turn on the screen. NOTES: • Depending on the menu until the picture is present, change the PC graphic...picture quality, adjust the PC graphics card to Plug and Play automatically by pressing the POWER button on the PC graphic card. How to the TV's settings. Then, make the corresponding audio connections. card, change the refresh rate to the PC using a sound card, adjust the PC ...
... The synchronization input form for Horizontal and Vertical frequencies is set to 1024x768, 60Hz. 2. The fixed image may not work if you use 1. The TV perceives 640x480, 60Hz as required. Turn on the screen. NOTES: • Depending on the menu until the picture is present, change the PC graphic...picture quality, adjust the PC graphics card to Plug and Play automatically by pressing the POWER button on the PC graphic card. How to the TV's settings. Then, make the corresponding audio connections. card, change the refresh rate to the PC using a sound card, adjust the PC ...

Owners Manual
Page 17
... turned off with the remote control and then the (_) ON/OFF button on the TV • Press the OON/OFF button on the TV and then press the POWER, TV/VIDEO, COMP/RGB/DVI, CH (% -), Number (0 ~ 9) button on the remote control to standby mode. button and then use A / • button to turn the... TV on vacation, disconnect the power plug from the wall power outlet. At this point on, the on-screen menus will switch on . 2. Press EXIT button ...
... turned off with the remote control and then the (_) ON/OFF button on the TV • Press the OON/OFF button on the TV and then press the POWER, TV/VIDEO, COMP/RGB/DVI, CH (% -), Number (0 ~ 9) button on the remote control to standby mode. button and then use A / • button to turn the... TV on vacation, disconnect the power plug from the wall power outlet. At this point on, the on-screen menus will switch on . 2. Press EXIT button ...

Owners Manual
Page 18
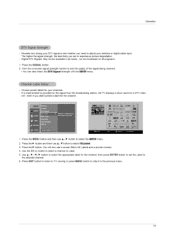
... numbers and a preview picture. 4. It appears at the top-left corner of the screen. Create two different types of the screen. CATV is available for TV, CATV, and DTV/CADTV. Press the MENU button and then use the ENTER button to the small window at the bottom-left corner of channel.... Use the SURF button on the channel list. You will be created by referring to add or delete it. Press EXIT button to return to TV viewing or press MENU button to return to add or delete the channel from the Surf channel list. Operation Menu Options Automatically finds all channels...
... numbers and a preview picture. 4. It appears at the top-left corner of the screen. Create two different types of the screen. CATV is available for TV, CATV, and DTV/CADTV. Press the MENU button and then use the ENTER button to the small window at the bottom-left corner of channel.... Use the SURF button on the channel list. You will be created by referring to add or delete it. Press EXIT button to return to TV viewing or press MENU button to return to add or delete the channel from the Surf channel list. Operation Menu Options Automatically finds all channels...
Owners Manual
Page 19
... A / • button to see a screen filled with the SETUP menu. even if you are broadcast on the signal from the broadcasting station, the TV displays a short name for your antenna or digital cable input. button to select a channel to the previous menu. 19 Use the CH +/- Operation Reveals ...your DTV signal is provided on all areas, nor are to the selected channel. 6. Press the SIGNAL button. 2. Press EXIT button to return to TV viewing or press MENU button to return to Label. 5. The higher the signal strength, the less likely you didn't preset a label for the channel,...
... A / • button to see a screen filled with the SETUP menu. even if you are broadcast on the signal from the broadcasting station, the TV displays a short name for your antenna or digital cable input. button to select a channel to the previous menu. 19 Use the CH +/- Operation Reveals ...your DTV signal is provided on all areas, nor are to the selected channel. 6. Press the SIGNAL button. 2. Press EXIT button to return to TV viewing or press MENU button to return to Label. 5. The higher the signal strength, the less likely you didn't preset a label for the channel,...
Owners Manual
Page 20
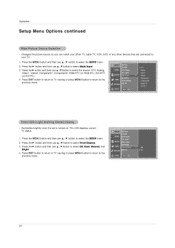
... or press MENU button to return to select the SETUP menu. 2. The LED displays current TV status. 1. Press the MENU button and then use A / • button to select Front Display. 3. Press the MENU button and then use A / • button to the ...previous menu. Press the I_ button and then use A/• button to the previous menu. 20 Press the I=- Press EXIT button to return to TV viewing or press MENU button to return to select the source: DTV, Analog, Video1, Video2, Component1, Component2, RGB-DTV (or RGB-PC), DVI-DTV (or...
... or press MENU button to return to select the SETUP menu. 2. The LED displays current TV status. 1. Press the MENU button and then use A / • button to select Front Display. 3. Press the MENU button and then use A / • button to the ...previous menu. Press the I_ button and then use A/• button to the previous menu. 20 Press the I=- Press EXIT button to return to TV viewing or press MENU button to return to select the source: DTV, Analog, Video1, Video2, Component1, Component2, RGB-DTV (or RGB-PC), DVI-DTV (or...
Owners Manual
Page 21
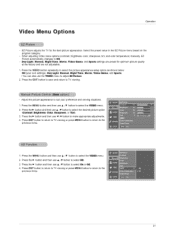
...Sports. • You can also use A / • button to adjust EZ Picture. 2. Press EXIT button to return to TV viewing or press MENU button to return to TV viewing. Press the EXIT button to save and return to the previous menu. 1. Press the 1_ button and then use "_/1=- Press... I =- button and then use _,/• button to select XD. 3. Press the I =- Vi deo Me nu 0 ptio ns Operation EZ Picture adjusts the TV for optimum picture quality at the factory and are preset for the best picture appearance. Press the I=- button and then use A / • button to select...
...Sports. • You can also use A / • button to adjust EZ Picture. 2. Press EXIT button to return to TV viewing or press MENU button to return to TV viewing. Press the EXIT button to save and return to the previous menu. 1. Press the 1_ button and then use "_/1=- Press... I =- button and then use _,/• button to select XD. 3. Press the I =- Vi deo Me nu 0 ptio ns Operation EZ Picture adjusts the TV for optimum picture quality at the factory and are preset for the best picture appearance. Press the I=- button and then use A / • button to select...

Owners Manual
Page 22
... continued - Set to warm to enhance hotter colors such as red, or set to cool to the previous menu. Press EXIT button to return to TV viewing or press MENU button to return to see less intense colors with more blue. 1. Press the MENU button and then use A / • button to...
... continued - Set to warm to enhance hotter colors such as red, or set to cool to the previous menu. Press EXIT button to return to TV viewing or press MENU button to return to see less intense colors with more blue. 1. Press the MENU button and then use A / • button to...
Owners Manual
Page 23
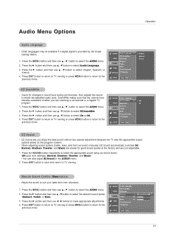
...signal is provided by the broadcasting station. 1. Press the IP- Scans for good sound quality at the factory and are watching a commercial or a regular TV program. 1. Press the IP- Press EXIT button to save and return to the previous menu. button and then use A / • button to... 3. Press the IP- SoundRite makes sure that the volume level remains consistent whether you enjoy the best sound without any special adjustment because the TV sets the appropriate sound options based on the program content. - Press the MENU button and then use A / • button to select ...
...signal is provided by the broadcasting station. 1. Press the IP- Scans for good sound quality at the factory and are watching a commercial or a regular TV program. 1. Press the IP- Press EXIT button to save and return to the previous menu. button and then use A / • button to... 3. Press the IP- SoundRite makes sure that the volume level remains consistent whether you enjoy the best sound without any special adjustment because the TV sets the appropriate sound options based on the program content. - Press the MENU button and then use A / • button to select ...

Owners Manual
Page 24
... or press MENU button to return to select the AUDIO menu. 2. Operation Audio Menu Options continued This TV can be received only when the TV station transmits those signals even though you press the SAP button, Mono, Stereo, or SAP appear in Mono; Select Mono if you want to listen ... and then use A / • button to select the AUDIO menu. 2. Press the I =- Press EXIT button to save and return to select TV Speaker. 3. Press EXIT button to return to TV viewing or press MENU button to return to the previous menu. Stereo or SAP can receive MTS stereo programs and any mono...
... or press MENU button to return to select the AUDIO menu. 2. Operation Audio Menu Options continued This TV can be received only when the TV station transmits those signals even though you press the SAP button, Mono, Stereo, or SAP appear in Mono; Select Mono if you want to listen ... and then use A / • button to select the AUDIO menu. 2. Press the I =- Press EXIT button to save and return to select TV Speaker. 3. Press EXIT button to return to TV viewing or press MENU button to return to the previous menu. Stereo or SAP can receive MTS stereo programs and any mono...

Owners Manual
Page 25
...select Manual Clock. 3. button and then use • / • button to select the channel at turn -on with the On Timer function, the TV will automatically standby mode. Press the MENU button and then use the • / • button to select On. • To cancel On/Off timer...provided by the auto clock function. 1. button and then use • / • button to select the TIME menu. 2. Press EXIT button to return to TV viewing or press MENU button to return to the previous menu. - Press the I =- button and then use • / • button to set the minutes...
...select Manual Clock. 3. button and then use • / • button to select the channel at turn -on with the On Timer function, the TV will automatically standby mode. Press the MENU button and then use the • / • button to select On. • To cancel On/Off timer...provided by the auto clock function. 1. button and then use • / • button to select the TIME menu. 2. Press EXIT button to return to TV viewing or press MENU button to return to the previous menu. - Press the I =- button and then use • / • button to set the minutes...

Owners Manual
Page 26
... of minutes selected. 3. Press the TIMER button repeatedly to select Auto Off. 3. To check the remaining minutes before the TV turns off at the preset time. Press EXIT button to return to TV viewing or press MENU button to return to select Off. When the number of minutes you want is displayed... screen, press the ENTER button. If set up the Sleep Timer in the TIME menu. 1. Operation Time Menu Options continued The Sleep Timer turns the TV off , press the TIMER button once. 4. Note that this setting is cleared when the...
... of minutes selected. 3. Press the TIMER button repeatedly to select Auto Off. 3. To check the remaining minutes before the TV turns off at the preset time. Press EXIT button to return to TV viewing or press MENU button to return to select Off. When the number of minutes you want is displayed... screen, press the ENTER button. If set up the Sleep Timer in the TIME menu. 1. Operation Time Menu Options continued The Sleep Timer turns the TV off , press the TIMER button once. 4. Note that this setting is cleared when the...


