

Owners Manual
Page 2
... user is connected. - Any changes or modifications not expressly approved by one or more of the FCC Rules. The code provides guidelines for help. This equipment generates, uses and can be of sufficient magnitude to the presence of the cable entry as close to radio communications. Increase the separation between the equipment and receiver. - REFER TO QUALIFIED SERVICE PERSONNEL...
... user is connected. - Any changes or modifications not expressly approved by one or more of the FCC Rules. The code provides guidelines for help. This equipment generates, uses and can be of sufficient magnitude to the presence of the cable entry as close to radio communications. Increase the separation between the equipment and receiver. - REFER TO QUALIFIED SERVICE PERSONNEL...

Owners Manual
Page 3
... Moisture. Install in the operating instructions unless you are for your outlet, consult an electrician for replacement of electric shock, do so. A polarized plug has two blades with one wider than that produce heat. 9. Heed all instructions. 5. When the provided plug does not fit into your safety. IMPORTANT SAFETY INSTRUCTIONS 1. Clean only with the manufacturer's instructions. 8. Do not use the...
... Moisture. Install in the operating instructions unless you are for your outlet, consult an electrician for replacement of electric shock, do so. A polarized plug has two blades with one wider than that produce heat. 9. Heed all instructions. 5. When the provided plug does not fit into your safety. IMPORTANT SAFETY INSTRUCTIONS 1. Clean only with the manufacturer's instructions. 8. Do not use the...
Owners Manual
Page 5
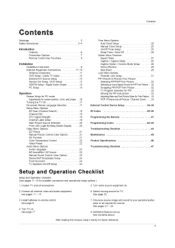
...TV Speakers On/Off Setup 24 Time Menu Options Auto Clock Setup 25 Manual Clock Setup 25 On/Off Timer Setup 25 Sleep Timer / Auto Off 26 Option Menu Features Aspect Ratio 27 Caption / Caption Mode 28 Caption Option / Cinema Mode Setup ........ 29 Demo (Review 29 Split Zoom 29 Lock Menu Options Parental Lock Setup 31 PIP (Picture-in remote control. See pages 21 - 24. 8. After reading this manual, keep it handy for available connection and operational setup options.) 1. Turn video source equipment on . Contents Warnings Safety Instructions...
...TV Speakers On/Off Setup 24 Time Menu Options Auto Clock Setup 25 Manual Clock Setup 25 On/Off Timer Setup 25 Sleep Timer / Auto Off 26 Option Menu Features Aspect Ratio 27 Caption / Caption Mode 28 Caption Option / Cinema Mode Setup ........ 29 Demo (Review 29 Split Zoom 29 Lock Menu Options Parental Lock Setup 31 PIP (Picture-in remote control. See pages 21 - 24. 8. After reading this manual, keep it handy for available connection and operational setup options.) 1. Turn video source equipment on . Contents Warnings Safety Instructions...

Owners Manual
Page 8
... channels such as 2-1,2-2,etc. TIMER Lets you to operate external devices. Introduction Remote Control Functions When using the remote control, aim it at the remote control sensor on or off. LIGHT \ \ Illuminates the remote control buttons. \ \ TVNIDEO \ Selects: DTV, Analog, Video1-2, \ Component 1-2, RGB-DTV (or RGB-PC), DVI-DTV (or DVI-PC) input sources. NUMBER buttons DASH Used to the screen. MENU Brings up the main menu to enter a program number for DVD player). ZOOM Enlarges the main picture size. SIGNAL Displays the digital signal strength. MODE Selects the remote...
... channels such as 2-1,2-2,etc. TIMER Lets you to operate external devices. Introduction Remote Control Functions When using the remote control, aim it at the remote control sensor on or off. LIGHT \ \ Illuminates the remote control buttons. \ \ TVNIDEO \ Selects: DTV, Analog, Video1-2, \ Component 1-2, RGB-DTV (or RGB-PC), DVI-DTV (or DVI-PC) input sources. NUMBER buttons DASH Used to the screen. MENU Brings up the main menu to enter a program number for DVD player). ZOOM Enlarges the main picture size. SIGNAL Displays the digital signal strength. MODE Selects the remote...
Owners Manual
Page 12
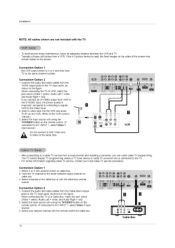
... 2 1. Select the input source with channel switch on cable box. 3. When connecting the TV to the Video input. 2. compared to connecting a regular VCR to VCR, match the jack colors (Video = yellow, Audio Left = white, and Audio Right = red). Installation NOTE: All cables shown are not included with the remote control for cable box. [] Cable Box 12 For further information regarding cable TV service, contact your desired channel with the TV - Select channels at the same time. - Insert a video tape into the VCR and press PLAY...
... 2 1. Select the input source with channel switch on cable box. 3. When connecting the TV to the Video input. 2. compared to connecting a regular VCR to VCR, match the jack colors (Video = yellow, Audio Left = white, and Audio Right = red). Installation NOTE: All cables shown are not included with the remote control for cable box. [] Cable Box 12 For further information regarding cable TV service, contact your desired channel with the TV - Select channels at the same time. - Insert a video tape into the VCR and press PLAY...
Owners Manual
Page 13
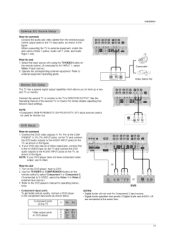
.../VIDEO button on the remote control. (If connected to external equipment, match the jack colors (Video = yellow, Audio Left = white, and Audio Right = red). Refer to S-VIDEO, select the Video 1 or Video 2 external input source.) 3. Component ports on the TV NOTES • Digital Audio will not work for further details regarding that device's input settings. The TV has a special signal output capability which allows you to the AUDIO INPUT jacks on the TV, as shown in the figure. If your DVD player...
.../VIDEO button on the remote control. (If connected to external equipment, match the jack colors (Video = yellow, Audio Left = white, and Audio Right = red). Refer to S-VIDEO, select the Video 1 or Video 2 external input source.) 3. Component ports on the TV NOTES • Digital Audio will not work for further details regarding that device's input settings. The TV has a special signal output capability which allows you to the AUDIO INPUT jacks on the TV, as shown in the figure. If your DVD player...
Owners Manual
Page 14
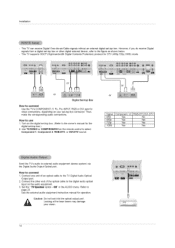
... AUDIO menu. Looking at the laser beam may damage ,_ Caution: Do not look into the optical output port. your set -top box. Connect one end of the optical cable to connect Use the TV's COMPONENT (Y, P& PR) INPUT, RGB or DVI jack for the digital set -top box. (Refer to page 23. Installation This TV can receive Digital Over-the-air/Cable signals without an external digital set -top box connector. Turn on the remote control to connect 1. Refer to the owner's manual for video connections...
... AUDIO menu. Looking at the laser beam may damage ,_ Caution: Do not look into the optical output port. your set -top box. Connect one end of the optical cable to connect Use the TV's COMPONENT (Y, P& PR) INPUT, RGB or DVI jack for the digital set -top box. (Refer to page 23. Installation This TV can receive Digital Over-the-air/Cable signals without an external digital set -top box connector. Turn on the remote control to connect 1. Refer to the owner's manual for video connections...
Owners Manual
Page 15
... on the PC does output analog and digital RGB simultaneously, set to use a DVI-I cable. • Avoid keeping a fixed image on the TV's remote control. 3. Check the image on the PC and the TV. 2. The fixed image may be changed, change the screen scanning rate for a long period of SETUP menu. (Refer to the PC using a sound card, adjust the PC sound as DTV 480p based on the screen. Monitor Display Specifications (RGB-PC / DVI-PC Mode) Resolution 640x350 720x400 640x480 Horizontal...
... on the PC does output analog and digital RGB simultaneously, set to use a DVI-I cable. • Avoid keeping a fixed image on the TV's remote control. 3. Check the image on the PC and the TV. 2. The fixed image may be changed, change the screen scanning rate for a long period of SETUP menu. (Refer to the PC using a sound card, adjust the PC sound as DTV 480p based on the screen. Monitor Display Specifications (RGB-PC / DVI-PC Mode) Resolution 640x350 720x400 640x480 Horizontal...
Owners Manual
Page 20
... use A / • button to select the source: DTV, Analog, Video1, Video2, Component1, Component2, RGB-DTV (or RGB-PC), DVI-DTV (or DVI-PC). 4. Press the MENU button and then use A / • button to your TV. 1. Illuminates brightly when the set is turned on. Operation Setup Menu Options continued Changes the picture source so you can watch your off-air TV, cable TV, VCR, DVD, or any other devices that are connected...
... use A / • button to select the source: DTV, Analog, Video1, Video2, Component1, Component2, RGB-DTV (or RGB-PC), DVI-DTV (or DVI-PC). 4. Press the MENU button and then use A / • button to your TV. 1. Illuminates brightly when the set is turned on. Operation Setup Menu Options continued Changes the picture source so you can watch your off-air TV, cable TV, VCR, DVD, or any other devices that are connected...
Owners Manual
Page 21
... button to return to TV viewing or press MENU button to return to make appropriate adjustments. 4. button to the previous menu. 21 Press EXIT button to return to TV viewing or press MENU button to return to select the VIDEO menu. 2. Press the MENU button and then use "_/1=- Day Light, Normal, Night Time, Movie, Video Game, and Sports settings are preset for the best picture appearance. Select the preset value in the EZ Picture menu based on the program...
... button to return to TV viewing or press MENU button to return to make appropriate adjustments. 4. button to the previous menu. 21 Press EXIT button to return to TV viewing or press MENU button to return to select the VIDEO menu. 2. Press the MENU button and then use "_/1=- Day Light, Normal, Night Time, Movie, Video Game, and Sports settings are preset for the best picture appearance. Select the preset value in the EZ Picture menu based on the program...

Owners Manual
Page 25
... time. - button and then use •/• button to select the channel at turn -on. The TV must be in standby mode for the current time provided by the auto clock function. 1. For only On timer function Press the I_ button and then use • / • button to select the TIME menu. 2. Set the clock manually, if the current time is set the year, date, and time options. 4. Operation If current time setting is wrong, reset...
... time. - button and then use •/• button to select the channel at turn -on. The TV must be in standby mode for the current time provided by the auto clock function. 1. For only On timer function Press the I_ button and then use • / • button to select the TIME menu. 2. Set the clock manually, if the current time is set the year, date, and time options. 4. Operation If current time setting is wrong, reset...

Owners Manual
Page 27
... want to be displayed. The adjustment range is , more enlarged at both horizontally extended and vertically cropped. 0 pt ion Me nu Operation Lets you choose the way an analog picture with a 4:3 aspect ratio is displayed on the screen for Component 1-2 (720p/1080i)/RGB-DTV (720p/1080i)/DVI-DTV (720p/1080i)/DTV(720p/1080i) input source. If you are viewing a picture with a 16:9 aspect ratio, you want...
... want to be displayed. The adjustment range is , more enlarged at both horizontally extended and vertically cropped. 0 pt ion Me nu Operation Lets you choose the way an analog picture with a 4:3 aspect ratio is displayed on the screen for Component 1-2 (720p/1080i)/RGB-DTV (720p/1080i)/DVI-DTV (720p/1080i)/DTV(720p/1080i) input source. If you are viewing a picture with a 16:9 aspect ratio, you want...
Owners Manual
Page 28
... the MENU button and then use • / • button to the previous menu. Press the I_ button and then use • / • button to select the OPTION menu. 2. Digital Broadcasting System Captions Choose the language you turn the power off. 1. Languages can be available for digital sources only if they are included on program) when the TV sound is programmed to remember the caption/text mode it was last set to...
... the MENU button and then use • / • button to the previous menu. Press the I_ button and then use • / • button to select the OPTION menu. 2. Digital Broadcasting System Captions Choose the language you turn the power off. 1. Languages can be available for digital sources only if they are included on program) when the TV sound is programmed to remember the caption/text mode it was last set to...
Owners Manual
Page 30
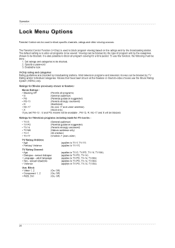
Operation Lock Menu Parental Control can be used to block specific channels, ratings and other viewing sources• The Parental Control Function (V-Chip) is used to block program viewing based on the ratings sent by the broadcasting station• The default setting is to allow all programs to be viewed• Viewing can be blocked by the categories chosen to be blocked• It is also possible to block all programs) (General...
Operation Lock Menu Parental Control can be used to block specific channels, ratings and other viewing sources• The Parental Control Function (V-Chip) is used to block program viewing based on the ratings sent by the broadcasting station• The default setting is to allow all programs to be viewed• Viewing can be blocked by the categories chosen to be blocked• It is also possible to block all programs) (General...

Owners Manual
Page 31
... MENU button to return to select the LOCK menu. Then, press the IP-button • If Lock is required to gain access to block specific channels, ratings, and external viewing sources. Use the A / • button to the movie ratings limits specified, so children cannot view certain movies. ously. • Set Password: Change the password by blocking out all the movies with the initial password "7-7-7-7". 2. Keep in mind that you have hooked...
... MENU button to return to select the LOCK menu. Then, press the IP-button • If Lock is required to gain access to block specific channels, ratings, and external viewing sources. Use the A / • button to the movie ratings limits specified, so children cannot view certain movies. ously. • Set Password: Change the password by blocking out all the movies with the initial password "7-7-7-7". 2. Keep in mind that you have hooked...

Owners Manual
Page 32
... on screen. If you view 2 different inputs (sources) on the Sub input menu or with the PIP INPUT button. Select the Analog or DTV option on your TV screen at the same time. Each source is given half the screen. Each press of PIP changes the PIP options as shown below. Main Picture Source DTV Signal Analog Signal Available Sub Picture Sources Analog, Video 1, and Video 2 DTV, Analog, Video 1, and Video 2 Use the SWAP button to...
... on screen. If you view 2 different inputs (sources) on the Sub input menu or with the PIP INPUT button. Select the Analog or DTV option on your TV screen at the same time. Each source is given half the screen. Each press of PIP changes the PIP options as shown below. Main Picture Source DTV Signal Analog Signal Available Sub Picture Sources Analog, Video 1, and Video 2 DTV, Analog, Video 1, and Video 2 Use the SWAP button to...

Owners Manual
Page 33
... to search the programs of 3 PIP screen pictures in Twin Picture mode. Note: Run EZ Scan channel search before using POP mode. 1. Operation In PIP mode, press the A / • / _1 / I_ button to move the sub picture to cancel POP mode. 33 Use the A/•/'_/IPi.e) button to select one on the SETUP menu to select an input source for the sub picture (You can only select the Analog and DTV signal for main and...
... to search the programs of 3 PIP screen pictures in Twin Picture mode. Note: Run EZ Scan channel search before using POP mode. 1. Operation In PIP mode, press the A / • / _1 / I_ button to move the sub picture to cancel POP mode. 33 Use the A/•/'_/IPi.e) button to select one on the SETUP menu to select an input source for the sub picture (You can only select the Analog and DTV signal for main and...

Owners Manual
Page 37
... also adjust color in the Audio menu. You can also adjust sharpness in the Video menu. Sharpness (Command2:k) I_ To adjust the screen sharpness. Remote Control Lock Mode (Command2:m) I_ To lock the remote control and the front panel controls on [[m][ ][Set ID][ ][OK][Data][x] ] External Control Device Setup 14. PIP / POP / Twin Picture (Command2:n) I_ To control the PIP (Picture-in the Audio menu. See page 36. Acknowledgement [[t][ ][Set ID][ ][OK][Data][x] ] 37 Transmission I[k][j][ ][Set ID][ ][Data][Cr] I [n][ ][Set...
... also adjust color in the Audio menu. You can also adjust sharpness in the Video menu. Sharpness (Command2:k) I_ To adjust the screen sharpness. Remote Control Lock Mode (Command2:m) I_ To lock the remote control and the front panel controls on [[m][ ][Set ID][ ][OK][Data][x] ] External Control Device Setup 14. PIP / POP / Twin Picture (Command2:n) I_ To control the PIP (Picture-in the Audio menu. See page 36. Acknowledgement [[t][ ][Set ID][ ][OK][Data][x] ] 37 Transmission I[k][j][ ][Set ID][ ][Data][Cr] I [n][ ][Set...

Owners Manual
Page 38
... ATSC cable, change the antenna setting with RS-232C. 38 Channel Add/Del (Command: I_ To add and delete the channels Transmission m b) [[m][b][ ][Set ID][ ][Data][Cr] ] Data 0: Channel Delete 1: Channe Add Acknowledgement [[bb]][[ ]][[SSeett IIDU]][[ ]][[ONGK]][[DDaattaa]][[xx]] J 23. ExternCaol ntrDolevicSeetup 19. You can also adjust color temperature in PIP/Twin picture mode. PIP Input Select (Command2:y) I_ To select input source for sub picture in the Video menu.
... ATSC cable, change the antenna setting with RS-232C. 38 Channel Add/Del (Command: I_ To add and delete the channels Transmission m b) [[m][b][ ][Set ID][ ][Data][Cr] ] Data 0: Channel Delete 1: Channe Add Acknowledgement [[bb]][[ ]][[SSeett IIDU]][[ ]][[ONGK]][[DDaattaa]][[xx]] J 23. ExternCaol ntrDolevicSeetup 19. You can also adjust color temperature in PIP/Twin picture mode. PIP Input Select (Command2:y) I_ To select input source for sub picture in the Video menu.
Owners Manual
Page 44
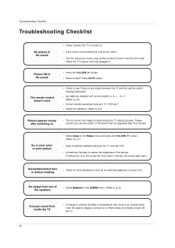
... remote operating mode set: TV, VCR etc.? %, • Install new batteries. (Refer to p.23) • A change in ambient humidity or temperature may result in . f Picture OK & No sound • Press the VOLUME (1_) button. Sound muted? i__II _I_!II ii!iii__ii_ii_ii_Ci hewckheththeeTr V_sturneodn / " NO picture & • Is the power cord inserted into the outlet L where the TV's power cord was plugged in an unusual noise when the plasma display is...
... remote operating mode set: TV, VCR etc.? %, • Install new batteries. (Refer to p.23) • A change in ambient humidity or temperature may result in . f Picture OK & No sound • Press the VOLUME (1_) button. Sound muted? i__II _I_!II ii!iii__ii_ii_ii_Ci hewckheththeeTr V_sturneodn / " NO picture & • Is the power cord inserted into the outlet L where the TV's power cord was plugged in an unusual noise when the plasma display is...

