
Owner's Manual
Page 4
... the recommendations in this dryer is effective for warranty period from the date of its mechanical or electrical parts if they are defective in this manual, LG will need the complete model and serial numbers when requesting information. For your dryer is needed to prevent ...shock, or to obtain warranty service. Serial No. You will repair or replace any of purchase, if this manual must be followed. Part 1 IMPORTANT WARRANTY AND SAFETY INSTRUCTIONS SEEKING WARRANTY ASSISTANCE Warranty Service. WARNING! Model No. Warranty service is available by contacting your appliance, ...
... the recommendations in this dryer is effective for warranty period from the date of its mechanical or electrical parts if they are defective in this manual, LG will need the complete model and serial numbers when requesting information. For your dryer is needed to prevent ...shock, or to obtain warranty service. Serial No. You will repair or replace any of purchase, if this manual must be followed. Part 1 IMPORTANT WARRANTY AND SAFETY INSTRUCTIONS SEEKING WARRANTY ASSISTANCE Warranty Service. WARNING! Model No. Warranty service is available by contacting your appliance, ...
Owner's Manual
Page 5
.... Check with cooking oils may contribute to the weather. 7) Do not tamper with controls. 8) Do not repair or replace any part of the appliance or attempt any risk of electric shock. Part 1 IMPORTANT WARRANTY AND SAFETY INSTRUCTIONS IMPORTANT SAFETY INSTRUCTIONS ! Items contaminated with a qualified electrician or service person if you are in...
.... Check with cooking oils may contribute to the weather. 7) Do not tamper with controls. 8) Do not repair or replace any part of the appliance or attempt any risk of electric shock. Part 1 IMPORTANT WARRANTY AND SAFETY INSTRUCTIONS IMPORTANT SAFETY INSTRUCTIONS ! Items contaminated with a qualified electrician or service person if you are in...
Owner's Manual
Page 6
Part 1 IMPORTANT WARRANTY AND SAFETY INSTRUCTIONS ! Do not dry any articles that has ever had any kind of oil on them, including cooking oil. • Articles ...
Part 1 IMPORTANT WARRANTY AND SAFETY INSTRUCTIONS ! Do not dry any articles that has ever had any kind of oil on them, including cooking oil. • Articles ...
Owner's Manual
Page 7
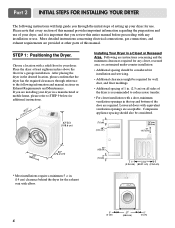
STEP 1: Positioning the Dryer. Place the dryer at other parts of setting up your dryer for use. If you through reference to the following instructions will help guide you are installing your dryer in a manufactured ... of this entire manual before proceeding with elbow. 24"2 (155 cm2) 3" (7.6 cm) 1" 31.5" 1" (2.54 cm) (80.01 cm) (2.54 cm) 0" (0 cm) 27" (68.6 cm) 0" (0 cm) 6 Part 2 INITIAL STEPS FOR INSTALLING YOUR DRYER The following information and manual sections on all sides of the door are required.
STEP 1: Positioning the Dryer. Place the dryer at other parts of setting up your dryer for use. If you through reference to the following instructions will help guide you are installing your dryer in a manufactured ... of this entire manual before proceeding with elbow. 24"2 (155 cm2) 3" (7.6 cm) 1" 31.5" 1" (2.54 cm) (80.01 cm) (2.54 cm) 0" (0 cm) 27" (68.6 cm) 0" (0 cm) 6 Part 2 INITIAL STEPS FOR INSTALLING YOUR DRYER The following information and manual sections on all sides of the door are required.

Owner's Manual
Page 8
... not exceed 2.5 cm (1 inch). Follow these procedures to reverse the direction in position, adjust the leveling legs of the dryer from left or the right. Part 2 INITIAL STEPS FOR INSTALLING YOUR DRYER Once in which your door opens: 1 2 3 7
... not exceed 2.5 cm (1 inch). Follow these procedures to reverse the direction in position, adjust the leveling legs of the dryer from left or the right. Part 2 INITIAL STEPS FOR INSTALLING YOUR DRYER Once in which your door opens: 1 2 3 7
Owner's Manual
Page 9
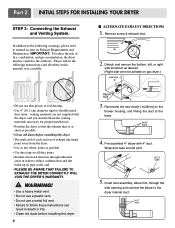
Part 2 INITIAL STEPS FOR INSTALLING YOUR DRYER STEP 3: Connecting the Exhaust and Venting System. IMPORTANT: To reduce the risk of exhaust duct must be vented to ...
Part 2 INITIAL STEPS FOR INSTALLING YOUR DRYER STEP 3: Connecting the Exhaust and Venting System. IMPORTANT: To reduce the risk of exhaust duct must be vented to ...
Owner's Manual
Page 10
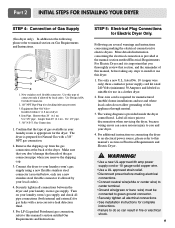
... a clothes dryer. 2. Four-wire cord is important that you thoroughly review that the type of this dryer. 1. Installed within 6' (1.8 m) of Gas Supply (Gas dryer only). Part 2 INITIAL STEPS FOR INSTALLING YOUR DRYER STEP 4: Connection of dryer 4.
... a clothes dryer. 2. Four-wire cord is important that you thoroughly review that the type of this dryer. 1. Installed within 6' (1.8 m) of Gas Supply (Gas dryer only). Part 2 INITIAL STEPS FOR INSTALLING YOUR DRYER STEP 4: Connection of dryer 4.
Owner's Manual
Page 11
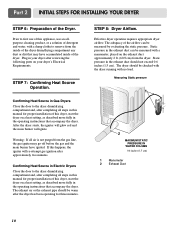
... gas line, the gas igniter may have ignited. STEP 8: Dryer Airflow. Warning: If all steps in your dryer after approximately two minutes. Part 2 INITIAL STEPS FOR INSTALLING YOUR DRYER STEP 6: Preparation of this happens, the igniter will ignite. Plug in this manual for three minutes. ... pressure. After the dryer starts, the igniter will glow red and the main burner will re-attempt gas ignition after reviewing the following parts on a heat setting, as described more fully in Electric Dryers Close the door to first use an allpurpose cleaning product, or a ...
... gas line, the gas igniter may have ignited. STEP 8: Dryer Airflow. Warning: If all steps in your dryer after approximately two minutes. Part 2 INITIAL STEPS FOR INSTALLING YOUR DRYER STEP 6: Preparation of this happens, the igniter will ignite. Plug in this manual for three minutes. ... pressure. After the dryer starts, the igniter will glow red and the main burner will re-attempt gas ignition after reviewing the following parts on a heat setting, as described more fully in Electric Dryers Close the door to first use an allpurpose cleaning product, or a ...
Owner's Manual
Page 12
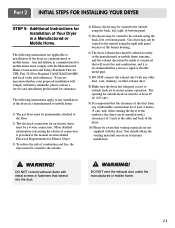
... securely to the manufactured or mobile home structure, and the exhaust duct must be a 4-wire connection. The following instructions are not supplied with the dryer. Part 2 INITIAL STEPS FOR INSTALLING YOUR DRYER STEP 9: Additional Instructions for Installation of Your Dryer in a manufactured or mobile home: 1) The gas dryer must be ...electrical connection for an electric dryer must be made of a material that will comply with the Manufactured Home Construction and Safety Standards Title 24 CFR, Part 32-80 or Standard CAN/CSA0Z240 MH and local codes and ordinances. WARNING!
... securely to the manufactured or mobile home structure, and the exhaust duct must be a 4-wire connection. The following instructions are not supplied with the dryer. Part 2 INITIAL STEPS FOR INSTALLING YOUR DRYER STEP 9: Additional Instructions for Installation of Your Dryer in a manufactured or mobile home: 1) The gas dryer must be ...electrical connection for an electric dryer must be made of a material that will comply with the Manufactured Home Construction and Safety Standards Title 24 CFR, Part 32-80 or Standard CAN/CSA0Z240 MH and local codes and ordinances. WARNING!
Owner's Manual
Page 13
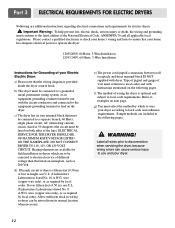
... to the latest edition of different voltage than that the wiring diagram is fifteen feet (4.50 m) or less in length, use U.L. (Underwriters Laboratories) listed No. 8 A.W.G. Part 3 ELECTRICAL REQUIREMENTS FOR ELECTRIC DRYERS Following are additional instructions regarding electrical connections and requirements for field installation in dryers which to wire your dryer. 12...
... to the latest edition of different voltage than that the wiring diagram is fifteen feet (4.50 m) or less in length, use U.L. (Underwriters Laboratories) listed No. 8 A.W.G. Part 3 ELECTRICAL REQUIREMENTS FOR ELECTRIC DRYERS Following are additional instructions regarding electrical connections and requirements for field installation in dryers which to wire your dryer. 12...

Owner's Manual
Page 14
... home has a 3-wire receptacle (NEMA type 10-30R) and you will be using a UL listed, 120/240 volt minimum, 30 amp, dryer power supply cord. Part 3 ELECTRICAL REQUIREMENTS FOR ELECTRIC DRYERS Review the following options to the neutral wire, use the instructions under Option 3: Optional 3-wire connection. 13
... home has a 3-wire receptacle (NEMA type 10-30R) and you will be using a UL listed, 120/240 volt minimum, 30 amp, dryer power supply cord. Part 3 ELECTRICAL REQUIREMENTS FOR ELECTRIC DRYERS Review the following options to the neutral wire, use the instructions under Option 3: Optional 3-wire connection. 13
Owner's Manual
Page 15
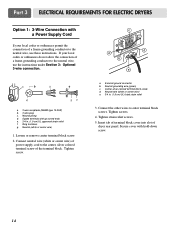
Neutral prong d. Spade terminals with hold-down screw. 14 a. Neutral wire (white or center wire) e. 3/4 in . (1.9 cm) UL approved strain relief f. Tighten screws. 4. Part 3 ELECTRICAL REQUIREMENTS FOR ELECTRIC DRYERS Option 1: 3-Wire Connection with a Power Supply Cord lf your local codes or ordinances do not allow the connection of a frame-...
Neutral prong d. Spade terminals with hold-down screw. 14 a. Neutral wire (white or center wire) e. 3/4 in . (1.9 cm) UL approved strain relief f. Tighten screws. 4. Part 3 ELECTRICAL REQUIREMENTS FOR ELECTRIC DRYERS Option 1: 3-Wire Connection with a Power Supply Cord lf your local codes or ordinances do not allow the connection of a frame-...
Owner's Manual
Page 16
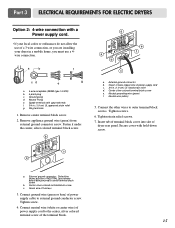
... relief d. Ring terminals 1. Secure cover with hold-down screw. Connect neutral wire (white or center wire) of power supply cord to outer terminal block screws. Part 3 ELECTRICAL REQUIREMENTS FOR ELECTRIC DRYERS Option 2: 4-wire connection with a Power supply cord. • lf your local codes or ordinances do not allow the use a 4wire...
... relief d. Ring terminals 1. Secure cover with hold-down screw. Connect neutral wire (white or center wire) of power supply cord to outer terminal block screws. Part 3 ELECTRICAL REQUIREMENTS FOR ELECTRIC DRYERS Option 2: 4-wire connection with a Power supply cord. • lf your local codes or ordinances do not allow the use a 4wire...
Owner's Manual
Page 17
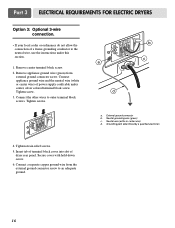
... copper ground wire from external ground connector screw. Remove center terminal block screw. 2. Insert tab of terminal block cover into slot of dryer rear panel. Part 3 ELECTRICAL REQUIREMENTS FOR ELECTRIC DRYERS Option 3: Optional 3-wire connection. • If your local codes or ordinances do not allow the connection of a frame-grounding conductor...
... copper ground wire from external ground connector screw. Remove center terminal block screw. 2. Insert tab of terminal block cover into slot of dryer rear panel. Part 3 ELECTRICAL REQUIREMENTS FOR ELECTRIC DRYERS Option 3: Optional 3-wire connection. • If your local codes or ordinances do not allow the connection of a frame-grounding conductor...
Owner's Manual
Page 18
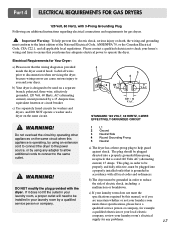
... your laundry room meets these specifications, please have a qualified service person or company, for example a qualified electrician or your local electric company, review your dryer. Part 4 ELECTRICAL REQUIREMENTS FOR GAS DRYERS 120 Volt, 60 Hertz, with the dryer. WARNING! The plug should be grounded in your laundry room by operating other...
... your laundry room meets these specifications, please have a qualified service person or company, for example a qualified electrician or your local electric company, review your dryer. Part 4 ELECTRICAL REQUIREMENTS FOR GAS DRYERS 120 Volt, 60 Hertz, with the dryer. WARNING! The plug should be grounded in your laundry room by operating other...
Owner's Manual
Page 19
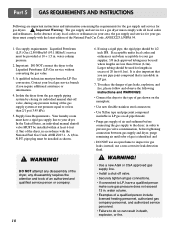
... a shut-off valve, during any pressure testing of the gas supply system at 10 + 1.5 in your gas dryer must perform the LP Gas conversion. WARNING! Part 5 GAS REQUIREMENTS AND INSTRUCTIONS Following are less than 2/1 psi (3.45 kPa). 5.
... a shut-off valve, during any pressure testing of the gas supply system at 10 + 1.5 in your gas dryer must perform the LP Gas conversion. WARNING! Part 5 GAS REQUIREMENTS AND INSTRUCTIONS Following are less than 2/1 psi (3.45 kPa). 5.
Owner's Manual
Page 20
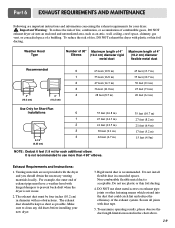
....7 m) 35 feet (10.7 m) 30 feet (9.1 m) 25 feet (7.6 m) 20 feet (6.1 m) 35 feet (10.7 m) 27 feet (8.2 m) 21 feet (6.4 m) 17 feet (5.2 m) 15 feet (4.5m) Exhaust Requirements and Instructions: 1. Part 6 EXHAUST REQUIREMENTS AND MAINTENANCE Following are not provided with the dryer and you should be four inches (10.2 cm) in diameter with no obstructions. To...
....7 m) 35 feet (10.7 m) 30 feet (9.1 m) 25 feet (7.6 m) 20 feet (6.1 m) 35 feet (10.7 m) 27 feet (8.2 m) 21 feet (6.4 m) 17 feet (5.2 m) 15 feet (4.5m) Exhaust Requirements and Instructions: 1. Part 6 EXHAUST REQUIREMENTS AND MAINTENANCE Following are not provided with the dryer and you should be four inches (10.2 cm) in diameter with no obstructions. To...
Owner's Manual
Page 21
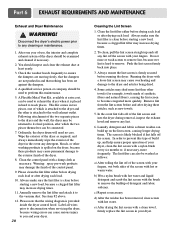
... necessary, more quickly. After one of detergent and fabric softener. Clean the control panel with hot water. In the event lint falls off the screen. Part 6 EXHAUST REQUIREMENTS AND MAINTENANCE Exhaust and Dryer Maintenance ! Always make sure the lint filter is attached to the dryer and articles being dried. 4. Label all...
... necessary, more quickly. After one of detergent and fabric softener. Clean the control panel with hot water. In the event lint falls off the screen. Part 6 EXHAUST REQUIREMENTS AND MAINTENANCE Exhaust and Dryer Maintenance ! Always make sure the lint filter is attached to the dryer and articles being dried. 4. Label all...
Owner's Manual
Page 22
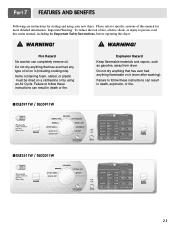
..., or fire. Fire Hazard No washer can result in death or fire. Explosion Hazard Keep flammable materials and vapors, such as gasoline, away from dryer. Part 7 FEATURES AND BENEFITS Following are instructions for more detailed information. Do not dry anything flammable on it (including cooking oils).
..., or fire. Fire Hazard No washer can result in death or fire. Explosion Hazard Keep flammable materials and vapors, such as gasoline, away from dryer. Part 7 FEATURES AND BENEFITS Following are instructions for more detailed information. Do not dry anything flammable on it (including cooking oils).
Owner's Manual
Page 23
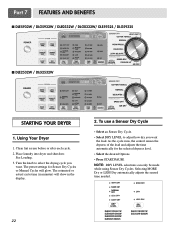
... Manual Cycles will show in the display. 2. Using Your Dryer 1. Selecting MORE Dry or LESS Dry automatically adjusts the sensed time needed. Part 7 FEATURES AND BENEFITS I DLE5932W / DLG5932W / DLE0332W / DLG0332W/ DLE5932S / DLG5932S I DLE2532W / DLG2532W STARTING YOUR DRYER 1. See Loading. 3. Clean lint screen before or after each cycle. 2. The estimated or actual cycle...
... Manual Cycles will show in the display. 2. Using Your Dryer 1. Selecting MORE Dry or LESS Dry automatically adjusts the sensed time needed. Part 7 FEATURES AND BENEFITS I DLE5932W / DLG5932W / DLE0332W / DLG0332W/ DLE5932S / DLG5932S I DLE2532W / DLG2532W STARTING YOUR DRYER 1. See Loading. 3. Clean lint screen before or after each cycle. 2. The estimated or actual cycle...


