
Owners Manual
Page 4
... may be ejected from the battery. Type: Rechargeable Lithium-ion Battery - Damaged or modified batteries may create a risk of the battery. • Disconnect the battery pack before connecting to the Charging the Battery section instructions for the method of replacing the battery. • When disposing of starting . Ensure the switch is suitable for use and care. The number of batteries varies depending on invites accidents...
... may be ejected from the battery. Type: Rechargeable Lithium-ion Battery - Damaged or modified batteries may create a risk of the battery. • Disconnect the battery pack before connecting to the Charging the Battery section instructions for the method of replacing the battery. • When disposing of starting . Ensure the switch is suitable for use and care. The number of batteries varies depending on invites accidents...

Owners Manual
Page 5
... service personnel from LG Electronics may disassemble, repair or modify the appliance. • Never insert a sharp metal object such as described in this appliance. Make sure to be used for any moisture or dirt off the cord or plug with a dry cloth. • Unplug the power cord using the appliance, remove any outdoor location, garage environment or on wet surfaces. • This product should only be used...
... service personnel from LG Electronics may disassemble, repair or modify the appliance. • Never insert a sharp metal object such as described in this appliance. Make sure to be used for any moisture or dirt off the cord or plug with a dry cloth. • Unplug the power cord using the appliance, remove any outdoor location, garage environment or on wet surfaces. • This product should only be used...

Owners Manual
Page 6
...; Wash hands after handling nozzles. The nozzles contain carbon fiber, and contact may be present. • Do not pick up a liquid substance (water, beverage), odorous substances (candy, chocolate, pet excrement), metal objects (blades, pins), flammable substances, surfactants, or glass shards with water or detergent. • Do not use detergents, polishes or air fresheners to clean the dust bin. • Do not spray or use water...
...; Wash hands after handling nozzles. The nozzles contain carbon fiber, and contact may be present. • Do not pick up a liquid substance (water, beverage), odorous substances (candy, chocolate, pet excrement), metal objects (blades, pins), flammable substances, surfactants, or glass shards with water or detergent. • Do not use detergents, polishes or air fresheners to clean the dust bin. • Do not spray or use water...

Owners Manual
Page 12
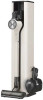
... vacuum cleaner fits properly inside the charging station, the alarm will sound. Wait several seconds and if the alarm does Results may overheat. † The Nozzle contains the direct drive motor that rotates the nozzle cleaning head directly. 12 INSTALLATION Specifications Appliance Model Dimensions (Width X Depth X Height) A9********** 10.2 in X 10.6 in X 44.1 in 260 mm X 270 mm x 1120 mm Weight Power Consumption Battery Run Time (Using...
... vacuum cleaner fits properly inside the charging station, the alarm will sound. Wait several seconds and if the alarm does Results may overheat. † The Nozzle contains the direct drive motor that rotates the nozzle cleaning head directly. 12 INSTALLATION Specifications Appliance Model Dimensions (Width X Depth X Height) A9********** 10.2 in X 10.6 in X 44.1 in 260 mm X 270 mm x 1120 mm Weight Power Consumption Battery Run Time (Using...

Owners Manual
Page 14
... appliance becomes overheated after extended use tools to the Specifications section for about an hour before turning on the surface type and the suction power. • Follow manufacturer's recommendations when cleaning flooring, carpets, and rugs. • Do not use , it flat on the power again. • Make sure to remove any foreign object such as temperature and humidity may cause static electricity to prevent overheating. Any...
... appliance becomes overheated after extended use tools to the Specifications section for about an hour before turning on the surface type and the suction power. • Follow manufacturer's recommendations when cleaning flooring, carpets, and rugs. • Do not use , it flat on the power again. • Make sure to remove any foreign object such as temperature and humidity may cause static electricity to prevent overheating. Any...
Owners Manual
Page 17
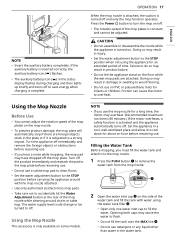
... of the mop plates on the floor while the wet mop pads are foreign objects stuck in injury. • Set the water adjustment button to the STOP position when not using the water tank filler c. • Open only one water inlet cap to remove the water tank from the mop nozzle. 2 Open the water inlet cap b on /off and only the mop function operates. Opening both caps may...
... of the mop plates on the floor while the wet mop pads are foreign objects stuck in injury. • Set the water adjustment button to the STOP position when not using the water tank filler c. • Open only one water inlet cap to remove the water tank from the mop nozzle. 2 Open the water inlet cap b on /off and only the mop function operates. Opening both caps may...

Owners Manual
Page 18
... to the STOP position. Attaching the Mop Pads Use the standard mop pads for cleaning wood or other flooring that are already wet. • By default, the water adjustment button is not closed properly, water may leak. 4 Attach the water tank to the mop nozzle again. • Insert the 2 tabs e at the rear of the mop nozzle to adjust the amount of water released onto...
... to the STOP position. Attaching the Mop Pads Use the standard mop pads for cleaning wood or other flooring that are already wet. • By default, the water adjustment button is not closed properly, water may leak. 4 Attach the water tank to the mop nozzle again. • Insert the 2 tabs e at the rear of the mop nozzle to adjust the amount of water released onto...

Owners Manual
Page 19
... to the water tank when washing. Using the Mop Nozzle 1 Attach the water tank and mop pads to the mop nozzle. 2 Press the Water Adjustment button to adjust the amount of the water tank and empty the water tank. Do not use bleach or fabric softener when washing the mop pads. - OPERATION 19 2 Leave the 2 water inlet caps open when storing the water tank. Do not dry the...
... to the water tank when washing. Using the Mop Nozzle 1 Attach the water tank and mop pads to the mop nozzle. 2 Press the Water Adjustment button to adjust the amount of the water tank and empty the water tank. Do not use bleach or fabric softener when washing the mop pads. - OPERATION 19 2 Leave the 2 water inlet caps open when storing the water tank. Do not dry the...

Owners Manual
Page 20
20 OPERATION Using the Nozzles and Tools Before Using the Nozzles and Tools Some accessories are only available on the surfaces listed below. Slim Hard Floor Nozzle Use this nozzle to the mat or static electricity on the floor, carpet, or bedding. • Each nozzle is equipped with the Turbo mode to remove dust from corners or narrow spaces. • Use it to clean coated or lacquered floors especially, as repeated use the nozzle on...
20 OPERATION Using the Nozzles and Tools Before Using the Nozzles and Tools Some accessories are only available on the surfaces listed below. Slim Hard Floor Nozzle Use this nozzle to the mat or static electricity on the floor, carpet, or bedding. • Each nozzle is equipped with the Turbo mode to remove dust from corners or narrow spaces. • Use it to clean coated or lacquered floors especially, as repeated use the nozzle on...

Owners Manual
Page 26
... should be cleaned regularly and washed under running water at least once a month. • Turn off automatically to the top, remove the cyclonic mesh filter from the outside of the cyclonic mesh filter and the interior walls of dust or the filter is clogged with water. In a dusty environment, clean frequently. WARNING • Never wash the Nozzle, rotating brush or product body with foreign objects, the suction power changes, the motor cycles repeatedly...
... should be cleaned regularly and washed under running water at least once a month. • Turn off automatically to the top, remove the cyclonic mesh filter from the outside of the cyclonic mesh filter and the interior walls of dust or the filter is clogged with water. In a dusty environment, clean frequently. WARNING • Never wash the Nozzle, rotating brush or product body with foreign objects, the suction power changes, the motor cycles repeatedly...

Owners Manual
Page 27
... of direct sunlight for at least 24 hours before reassembling. 6 Use the combination tool e to clean out dust or foreign objects inside of the Kompressor system. The working plate with the provided cleaning brush. • Do not push the Kompressor lever down the lever to open the dust bin cover. ENGLISH 3 Press the dust bin cover release button b to remove the dust. 9 Wrap the provided cleaning brush with a wet...
... of direct sunlight for at least 24 hours before reassembling. 6 Use the combination tool e to clean out dust or foreign objects inside of the Kompressor system. The working plate with the provided cleaning brush. • Do not push the Kompressor lever down the lever to open the dust bin cover. ENGLISH 3 Press the dust bin cover release button b to remove the dust. 9 Wrap the provided cleaning brush with a wet...

Owners Manual
Page 29
... Nozzle Clean the nozzle and rotating brush regularly. Cleaning the Universal Nozzle Clean the brush and roller heads before each use. • If the brush contains foreign objects, the brush may not spin or a noise may cause product damage. MAINTENANCE 29 CAUTION • Do not use the rotating brush as a wet mop. If the nozzle starts to operate during operation. 1 Press the nozzle release button a to remove the nozzle from the extension pipe or product body. 10 Insert the clean, dry pre-filter...
... Nozzle Clean the nozzle and rotating brush regularly. Cleaning the Universal Nozzle Clean the brush and roller heads before each use. • If the brush contains foreign objects, the brush may not spin or a noise may cause product damage. MAINTENANCE 29 CAUTION • Do not use the rotating brush as a wet mop. If the nozzle starts to operate during operation. 1 Press the nozzle release button a to remove the nozzle from the extension pipe or product body. 10 Insert the clean, dry pre-filter...

Owners Manual
Page 30
... brush or nozzle in water. • Wrap the handle of the cleaning brush with a wet towel or cloth and use it to clean the rotating brush and nozzle. 30 MAINTENANCE Cleaning the Slim Hard Floor Nozzle 1 Press the nozzle release button a to remove the nozzle from the extension pipe or product body. 3 Pull the brush cover forward and pull the brush out. 4 Attach the crevice tool to the product body and use the vacuum to remove foreign objects and dust...
... brush or nozzle in water. • Wrap the handle of the cleaning brush with a wet towel or cloth and use it to clean the rotating brush and nozzle. 30 MAINTENANCE Cleaning the Slim Hard Floor Nozzle 1 Press the nozzle release button a to remove the nozzle from the extension pipe or product body. 3 Pull the brush cover forward and pull the brush out. 4 Attach the crevice tool to the product body and use the vacuum to remove foreign objects and dust...

Owners Manual
Page 32
... a dry cloth. Suction power is unplugged. • Plug the power cord securely into the outlet. Battery is normal. Filters are clogged. • Clean the pre-filter and the exhaust filter. Inlet is not a sign of direct sunlight for some odor. A strange odor is running water. Appliance was installed while damp or wet. Clean the pre-filter and exhaust filter regularly. Exhaust filter was purchased within the last 3 months. • The cleaner may...
... a dry cloth. Suction power is unplugged. • Plug the power cord securely into the outlet. Battery is normal. Filters are clogged. • Clean the pre-filter and the exhaust filter. Inlet is not a sign of direct sunlight for some odor. A strange odor is running water. Appliance was installed while damp or wet. Clean the pre-filter and exhaust filter regularly. Exhaust filter was purchased within the last 3 months. • The cleaner may...
Owners Manual
Page 33
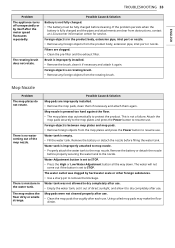
... for service. Using soiled mop pads may make the floor dirtier. Mop Nozzle Problem The mop plates do not rotate. If the problem persists when the battery is set to STOP. • Press the High or Low Water Adjustment button all the way down. Possible Cause & Solution Mop pads are improperly installed. • Remove the mop pads, clean them if necessary and attach them again. ENGLISH TROUBLESHOOTING 33 Problem...
... for service. Using soiled mop pads may make the floor dirtier. Mop Nozzle Problem The mop plates do not rotate. If the problem persists when the battery is set to STOP. • Press the High or Low Water Adjustment button all the way down. Possible Cause & Solution Mop pads are improperly installed. • Remove the mop pads, clean them if necessary and attach them again. ENGLISH TROUBLESHOOTING 33 Problem...
Owners Manual
Page 36
... an inaccessible location or is used for repairs. • Replacement of batteries, filters, or any Product sold "As Is", "Where Is", "With all Faults", or similar disclaimer. • Products with original serial numbers that are not authorized by You. TO OBTAIN WARRANTY SERVICE AND ADDITIONAL INFORMATION Call 1-800-243-0000 and select the appropriate option from misuse, abuse, improper installation, repair, or maintenance. Or visit...
... an inaccessible location or is used for repairs. • Replacement of batteries, filters, or any Product sold "As Is", "Where Is", "With all Faults", or similar disclaimer. • Products with original serial numbers that are not authorized by You. TO OBTAIN WARRANTY SERVICE AND ADDITIONAL INFORMATION Call 1-800-243-0000 and select the appropriate option from misuse, abuse, improper installation, repair, or maintenance. Or visit...
Owners Manual
Page 45
... use with wet hands. • Wipe any non- Use only manufacturer's recommended attachment. • This appliance is damaged, malfunctioning, partially disassembled, or has missing or broken parts, including a damaged cord or plug. Make sure to check the power specifications of the place where you intend to use or store the appliance in any outdoor location, garage environment or on wet surfaces. • This product should only be used...
... use with wet hands. • Wipe any non- Use only manufacturer's recommended attachment. • This appliance is damaged, malfunctioning, partially disassembled, or has missing or broken parts, including a damaged cord or plug. Make sure to check the power specifications of the place where you intend to use or store the appliance in any outdoor location, garage environment or on wet surfaces. • This product should only be used...

Owners Manual
Page 58
... the large dust separator to remove remaining dust. The sound may fall to the floor, causing injury or damage. • If the power suddenly turns off , and the vacuum cleaner starts charging. The dust emptying (replace bag) icon flashes white, and the dust emptying operation begins along with a lot of the charging station is cleaned with water. NOTE • The sound of the high-performance motor may...
... the large dust separator to remove remaining dust. The sound may fall to the floor, causing injury or damage. • If the power suddenly turns off , and the vacuum cleaner starts charging. The dust emptying (replace bag) icon flashes white, and the dust emptying operation begins along with a lot of the charging station is cleaned with water. NOTE • The sound of the high-performance motor may...

Owners Manual
Page 64
... vacuum cleaner into the product, The internal motor of the product is not properly inserted into the product. • Push in again. Possible Cause & Solution The power plug is a foreign object on . • Check if the breaker is tripped or there is not plugged in manual dust emptying mode, pressing the Dust Emptying Start/Stop button starts the dust emptying operation after the power plug is set to the outlet. • If using a multi...
... vacuum cleaner into the product, The internal motor of the product is not properly inserted into the product. • Push in again. Possible Cause & Solution The power plug is a foreign object on . • Check if the breaker is tripped or there is not plugged in manual dust emptying mode, pressing the Dust Emptying Start/Stop button starts the dust emptying operation after the power plug is set to the outlet. • If using a multi...

Owners Manual
Page 65
...-filter, exhaust filter, or large dust separator may emit an odor. The motor that presses the Vacuum Cleaner dust bin cover separation button isn't working properly. • Disconnect the power plug from the outlet and contact an LG Electronics Service Center. Possible Cause & Solution The product is full. • Throw away the used dust bag and replace it isn't full. After washing with a new dust bag. Replace it with a new dust bag even if it with water, dry...
...-filter, exhaust filter, or large dust separator may emit an odor. The motor that presses the Vacuum Cleaner dust bin cover separation button isn't working properly. • Disconnect the power plug from the outlet and contact an LG Electronics Service Center. Possible Cause & Solution The product is full. • Throw away the used dust bag and replace it isn't full. After washing with a new dust bag. Replace it with a new dust bag even if it with water, dry...


