
Owners Manual
Page 5
... battery or the appliance, remove the battery from the appliance and safely dispose of it. • Do not use a battery pack or appliance that can make a connection from one type of battery pack may be ejected from the battery. If liquid contacts eyes, additionally seek medical help. The number of the battery. • Disconnect the battery pack before cleaning or servicing. • Prevent unintentional starting...
... battery or the appliance, remove the battery from the appliance and safely dispose of it. • Do not use a battery pack or appliance that can make a connection from one type of battery pack may be ejected from the battery. If liquid contacts eyes, additionally seek medical help. The number of the battery. • Disconnect the battery pack before cleaning or servicing. • Prevent unintentional starting...
Owners Manual
Page 6
.... • Do not vacuum liquids with a dry cloth. • Unplug the power cord using the appliance, remove any moisture or dirt off the cord or plug with this manual. residential, commercial, or industrial application. • Do not use or store the appliance in any non- ENGLISH us_main.book.book Page 5 Tuesday, October 26, 2021 5:57 PM IMPORTANT SAFETY INSTRUCTIONS 5 • Avoid operating the appliance in areas...
.... • Do not vacuum liquids with a dry cloth. • Unplug the power cord using the appliance, remove any moisture or dirt off the cord or plug with this manual. residential, commercial, or industrial application. • Do not use or store the appliance in any non- ENGLISH us_main.book.book Page 5 Tuesday, October 26, 2021 5:57 PM IMPORTANT SAFETY INSTRUCTIONS 5 • Avoid operating the appliance in areas...

Owners Manual
Page 7
...; Wash hands after handling nozzles. The nozzles contain carbon fiber, and contact may be present. • Do not pick up a liquid substance (water, beverage), odorous substances (candy, chocolate, pet excrement), metal objects (blades, pins), flammable substances, surfactants, or glass shards with water or detergent. • Do not use detergents, polishes or air fresheners to clean the dust bin. • Do not spray or use water...
...; Wash hands after handling nozzles. The nozzles contain carbon fiber, and contact may be present. • Do not pick up a liquid substance (water, beverage), odorous substances (candy, chocolate, pet excrement), metal objects (blades, pins), flammable substances, surfactants, or glass shards with water or detergent. • Do not use detergents, polishes or air fresheners to clean the dust bin. • Do not spray or use water...

Owners Manual
Page 9
.... • Vibration from the inlet port or rotating brush may automatically turn off. If the appliance becomes overheated after extended use the mop nozzle for purposes other than domestic floor cleaning. SAVE THESE INSTRUCTIONS If this occurs, leave the appliance in use, to avoid it falling over. • Do not install wet or damp filters. • Make sure to wipe up any...
.... • Vibration from the inlet port or rotating brush may automatically turn off. If the appliance becomes overheated after extended use the mop nozzle for purposes other than domestic floor cleaning. SAVE THESE INSTRUCTIONS If this occurs, leave the appliance in use, to avoid it falling over. • Do not install wet or damp filters. • Make sure to wipe up any...

Owners Manual
Page 13
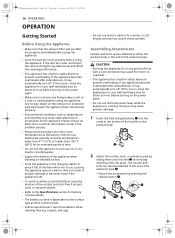
... the direct drive motor that rotates the nozzle cleaning head directly. Charging Station Model Input Output Power Consumption VDS-ST1**** 120 V~ 60 Hz DC 28.3 V / 1.15 A 9 A (Cleaning) 0.6 A (Charging) Storing the Accessories Assembling and Storing the Appliance Follow these steps to safely assemble the appliance. 1 Firmly attach the extension pipe c, nozzle d, or tool onto the product body a. • To detach the extension pipe, press the extension pipe release button...
... the direct drive motor that rotates the nozzle cleaning head directly. Charging Station Model Input Output Power Consumption VDS-ST1**** 120 V~ 60 Hz DC 28.3 V / 1.15 A 9 A (Cleaning) 0.6 A (Charging) Storing the Accessories Assembling and Storing the Appliance Follow these steps to safely assemble the appliance. 1 Firmly attach the extension pipe c, nozzle d, or tool onto the product body a. • To detach the extension pipe, press the extension pipe release button...
Owners Manual
Page 15
... motor to overheat. • This appliance has a built-in safety device to prevent overheating. Assembling Attachments Nozzles and tools can be attached to the end of the nozzles and tools free from functioning properly. • Environmental conditions such as the battery runtime may deteriorate severely if used at the bottom of time with a tool connected may cause static electricity to remove any liquids, including water. • Support...
... motor to overheat. • This appliance has a built-in safety device to prevent overheating. Assembling Attachments Nozzles and tools can be attached to the end of the nozzles and tools free from functioning properly. • Environmental conditions such as the battery runtime may deteriorate severely if used at the bottom of time with a tool connected may cause static electricity to remove any liquids, including water. • Support...
Owners Manual
Page 18
... clean floors. • Set the water adjustment button to the STOP position before carrying the appliance around with water using the appliance for a long time, the motor may result in product failure. • Do not let the appliance stand on the floor while the wet mop pads are foreign objects stuck in a cool, well-ventilated place and allow it to the mop nozzle...
... clean floors. • Set the water adjustment button to the STOP position before carrying the appliance around with water using the appliance for a long time, the motor may result in product failure. • Do not let the appliance stand on the floor while the wet mop pads are foreign objects stuck in a cool, well-ventilated place and allow it to the mop nozzle...

Owners Manual
Page 19
... wet. 2 Place the mop nozzle upside down or improperly may affect the cleaning performance. 4 Attach the mop nozzle to the appliance. This stops the supply of water so you can go over areas that can be damaged by too much water. • STOP: Press the Low Mode or High Mode button halfway to toggle back to the STOP position. Attaching the Mop Pads Use...
... wet. 2 Place the mop nozzle upside down or improperly may affect the cleaning performance. 4 Attach the mop nozzle to the appliance. This stops the supply of water so you can go over areas that can be damaged by too much water. • STOP: Press the Low Mode or High Mode button halfway to toggle back to the STOP position. Attaching the Mop Pads Use...

Owners Manual
Page 20
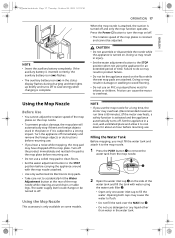
... plates. 2 Hand wash the pads with a soft cloth. us_main.book.book Page 19 Tuesday, October 26, 2021 5:57 PM ENGLISH Using the Mop Nozzle 1 Attach the water tank and mop pads to the mop nozzle. 2 Press the Water Adjustment button to adjust the amount of water. 3 Press the Power t button to prevent mop pads from becoming deformed. - Drying the Water Tank and Mop Pads Drying the Water Tank When cleaning...
... plates. 2 Hand wash the pads with a soft cloth. us_main.book.book Page 19 Tuesday, October 26, 2021 5:57 PM ENGLISH Using the Mop Nozzle 1 Attach the water tank and mop pads to the mop nozzle. 2 Press the Water Adjustment button to adjust the amount of water. 3 Press the Power t button to prevent mop pads from becoming deformed. - Drying the Water Tank and Mop Pads Drying the Water Tank When cleaning...

Owners Manual
Page 21
... dust and dirt gather. • Crevice Mode Clean mats using strong suction and a punching motion. • Lower the suction level when vacuuming bedding such as mats. • Use it to clean carpets or rugs. • If used in bedding using the crevice tool. Universal Nozzle Use this nozzle to the nozzle, making it for soft surfaces and pet hair removal. Pet Nozzle Use this nozzle for areas with a motor and may stick to clean hard floor...
... dust and dirt gather. • Crevice Mode Clean mats using strong suction and a punching motion. • Lower the suction level when vacuuming bedding such as mats. • Use it to clean carpets or rugs. • If used in bedding using the crevice tool. Universal Nozzle Use this nozzle to the nozzle, making it for soft surfaces and pet hair removal. Pet Nozzle Use this nozzle for areas with a motor and may stick to clean hard floor...

Owners Manual
Page 27
... the top, remove the cyclonic mesh filter from the outside of the cyclonic mesh filter and the interior walls of dust or the filter is clogged, the suction power may not light up. • If the sound of cleaning varies depending on the usage environment and usage time. WARNING • Never wash the Nozzle, rotating brush or product body with foreign objects, the suction power changes, the motor cycles repeatedly...
... the top, remove the cyclonic mesh filter from the outside of the cyclonic mesh filter and the interior walls of dust or the filter is clogged, the suction power may not light up. • If the sound of cleaning varies depending on the usage environment and usage time. WARNING • Never wash the Nozzle, rotating brush or product body with foreign objects, the suction power changes, the motor cycles repeatedly...

Owners Manual
Page 28
... the working plate with water. MAINTENANCE 27 5 Wash the cyclonic mesh filter under running water. • To avoid odor and the malfunction of the Kompressor system. WARNING • If the Kompressor lever does not slide down smoothly, foreign objects may spill out when opening the dust bin. Clean the dust bin and cyclonic mesh filter to clean out dust or foreign objects inside of the working plate of the motor...
... the working plate with water. MAINTENANCE 27 5 Wash the cyclonic mesh filter under running water. • To avoid odor and the malfunction of the Kompressor system. WARNING • If the Kompressor lever does not slide down smoothly, foreign objects may spill out when opening the dust bin. Clean the dust bin and cyclonic mesh filter to clean out dust or foreign objects inside of the working plate of the motor...

Owners Manual
Page 29
... PUSH button in areas with water. 6 Clean the exhuast filter by brushing the dust off it regularly and wash it from the product body. Clean the filters more filters from an authorized service center. 1 Remove the battery from the product body. 2 Rotate the exhaust filter a to the unlocked position b to separate it from the product body. 5 Use the combination tool e to clean any dust off the motor. • Do not wash the motor with...
... PUSH button in areas with water. 6 Clean the exhuast filter by brushing the dust off it regularly and wash it from the product body. Clean the filters more filters from an authorized service center. 1 Remove the battery from the product body. 2 Rotate the exhaust filter a to the unlocked position b to separate it from the product body. 5 Use the combination tool e to clean any dust off the motor. • Do not wash the motor with...

Owners Manual
Page 30
... pinch points when assembling the nozzle on the appliance or the rotating brush on the nozzle. • Do not use the rotating brush as a wet mop. If the nozzle starts to operate during operation. 1 Press the nozzle release button a to remove the nozzle from the extension pipe or product body. 10 Insert the clean, dry pre-filter and rotate the exhaust filter to the locked position f to dry completely in product damage. 8 Align...
... pinch points when assembling the nozzle on the appliance or the rotating brush on the nozzle. • Do not use the rotating brush as a wet mop. If the nozzle starts to operate during operation. 1 Press the nozzle release button a to remove the nozzle from the extension pipe or product body. 10 Insert the clean, dry pre-filter and rotate the exhaust filter to the locked position f to dry completely in product damage. 8 Align...

Owners Manual
Page 31
... brush or nozzle in water. • Wrap the handle of the cleaning brush with a wet towel or cloth and use it to clean the rotating brush and nozzle. us_main.book.book Page 30 Tuesday, October 26, 2021 5:57 PM 30 MAINTENANCE Cleaning the Slim Hard Floor Nozzle 1 Press the nozzle release button a to remove the nozzle from the extension pipe or product body. 3 Pull the brush cover forward and pull the brush out. 4 Attach the crevice tool...
... brush or nozzle in water. • Wrap the handle of the cleaning brush with a wet towel or cloth and use it to clean the rotating brush and nozzle. us_main.book.book Page 30 Tuesday, October 26, 2021 5:57 PM 30 MAINTENANCE Cleaning the Slim Hard Floor Nozzle 1 Press the nozzle release button a to remove the nozzle from the extension pipe or product body. 3 Pull the brush cover forward and pull the brush out. 4 Attach the crevice tool...

Owners Manual
Page 32
... lock the brush in water. 4 Use a damp towel or cloth to remove foreign objects and dust from all nozzle rollers using tweezers. Remove foreign objects, debris and hair from the bottom of the mop nozzle. Cleaning the Mop Nozzle 1 Press the nozzle release button to remove the mop nozzle from the extension pipe, and turn the nozzle upside down. 2 Attach the crevice tool to the product body and use the vacuum to remove any remaining...
... lock the brush in water. 4 Use a damp towel or cloth to remove foreign objects and dust from all nozzle rollers using tweezers. Remove foreign objects, debris and hair from the bottom of the mop nozzle. Cleaning the Mop Nozzle 1 Press the nozzle release button to remove the mop nozzle from the extension pipe, and turn the nozzle upside down. 2 Attach the crevice tool to the product body and use the vacuum to remove any remaining...
Owners Manual
Page 33
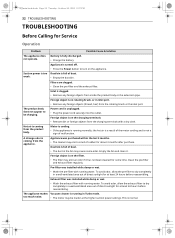
... with a dry cloth. Foreign object is running normally, the hot air is a result of the motor cooling and is full of malfunction. Clean the pre-filter and exhaust filter regularly. Pre-filter was installed while damp or wet. • Wash the exhaust filter with running water. Exhaust filter was installed while damp or wet. • Wash the pre-filter with running water. The appliance makes Vacuum cleaner is on rotating brush, or in Turbo mode.
... with a dry cloth. Foreign object is running normally, the hot air is a result of the motor cooling and is full of malfunction. Clean the pre-filter and exhaust filter regularly. Pre-filter was installed while damp or wet. • Wash the exhaust filter with running water. Exhaust filter was installed while damp or wet. • Wash the pre-filter with running water. The appliance makes Vacuum cleaner is on rotating brush, or in Turbo mode.
Owners Manual
Page 34
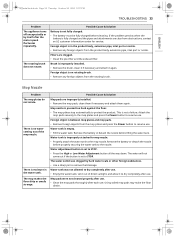
... plates and press the Power button to resume use . • Empty the water tank, set to STOP. • Press the High or Low Water Adjustment button all the way down. Remove the battery or detach the nozzle before filling the water tank. The rotating brush does not rotate. The mop makes the floor dirty or smells strange. Possible Cause & Solution Mop pads are clogged. • Clean the pre-filter...
... plates and press the Power button to resume use . • Empty the water tank, set to STOP. • Press the High or Low Water Adjustment button all the way down. Remove the battery or detach the nozzle before filling the water tank. The rotating brush does not rotate. The mop makes the floor dirty or smells strange. Possible Cause & Solution Mop pads are clogged. • Clean the pre-filter...
Owners Manual
Page 36
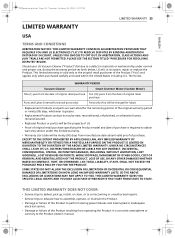
...: • Service trips to deliver, pick up, install, or clean, or to correct wiring or unauthorized repairs. • Service trips to educate how to assemble, operate, or maintain the Product. • Damage or failure of the Product to perform during the warranty period set forth below, LG will be new, reconditioned, refurbished, or otherwise factory remanufactured. • Replaced Product or part(s) will , at its option, repair or replace the Product. PLEASE...
...: • Service trips to deliver, pick up, install, or clean, or to correct wiring or unauthorized repairs. • Service trips to educate how to assemble, operate, or maintain the Product. • Damage or failure of the Product to perform during the warranty period set forth below, LG will be new, reconditioned, refurbished, or otherwise factory remanufactured. • Replaced Product or part(s) will , at its option, repair or replace the Product. PLEASE...
Owners Manual
Page 37
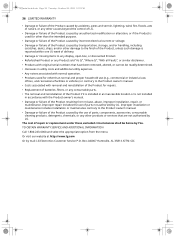
The cost of repair or replacement under these excluded circumstances shall be readily determined. • Increases in accordance with original serial numbers that are not authorized by LG. Box 240007 Huntsville, AL 35813 ATTN: CIC Improper installation or maintenance includes installation or maintenance contrary to the Product owner's manual. • Damage or failure of the Product caused by the use of parts, components, accessories, consumable cleaning products, detergents...
The cost of repair or replacement under these excluded circumstances shall be readily determined. • Increases in accordance with original serial numbers that are not authorized by LG. Box 240007 Huntsville, AL 35813 ATTN: CIC Improper installation or maintenance includes installation or maintenance contrary to the Product owner's manual. • Damage or failure of the Product caused by the use of parts, components, accessories, consumable cleaning products, detergents...


