
Owners Manual
Page 3
... the cord, use the cord as it should, has been dropped, damaged, left outdoors, or dropped into water, return it to be replaced. To unplug, grasp the plug, not the cord. • Place the cords from heated surfaces. • Do not unplug by a qualified repair person using this manual and on the cord. ENGLISH IMPORTANT SAFETY INSTRUCTIONS 3 IMPORTANT SAFETY INSTRUCTIONS READ ALL INSTRUCTIONS BEFORE USE Safety...
... the cord, use the cord as it should, has been dropped, damaged, left outdoors, or dropped into water, return it to be replaced. To unplug, grasp the plug, not the cord. • Place the cords from heated surfaces. • Do not unplug by a qualified repair person using this manual and on the cord. ENGLISH IMPORTANT SAFETY INSTRUCTIONS 3 IMPORTANT SAFETY INSTRUCTIONS READ ALL INSTRUCTIONS BEFORE USE Safety...

Owners Manual
Page 4
... switch is no longer able to hold a charge. • Refer to the battery pack, picking up or carrying the appliance. Use of any adjustments, changing accessories, or storing appliance. The number of injury. • Do not disassemble, remove or short-circuit the battery. • Have the battery replaced when it may exhibit unpredictable behavior resulting in the off position before cleaning or servicing...
... switch is no longer able to hold a charge. • Refer to the battery pack, picking up or carrying the appliance. Use of any adjustments, changing accessories, or storing appliance. The number of injury. • Do not disassemble, remove or short-circuit the battery. • Have the battery replaced when it may exhibit unpredictable behavior resulting in the off position before cleaning or servicing...

Owners Manual
Page 5
Make sure to check the power specifications of the place where you intend to use the appliance. • Do not handle the power cord, plug, or appliance controls with wet hands. • Wipe any moisture or dirt off the cord or plug with a rug or carpeting. • Push the power plug firmly into the wall outlet so that the area behind it is free from power conduits, plumbing, vents...
Make sure to check the power specifications of the place where you intend to use the appliance. • Do not handle the power cord, plug, or appliance controls with wet hands. • Wipe any moisture or dirt off the cord or plug with a rug or carpeting. • Push the power plug firmly into the wall outlet so that the area behind it is free from power conduits, plumbing, vents...

Owners Manual
Page 6
... service center. • Use extra care when cleaning on the charging station, immediately remove the appliance from LG Electronics may reduce airflow. • Do not use to pick up anything that no water, beverage or detergent gets inside the battery. • Do not apply physical impacts to the appliance when using, charging or storing. • Do not insert the nozzle or tools...
... service center. • Use extra care when cleaning on the charging station, immediately remove the appliance from LG Electronics may reduce airflow. • Do not use to pick up anything that no water, beverage or detergent gets inside the battery. • Do not apply physical impacts to the appliance when using, charging or storing. • Do not insert the nozzle or tools...

Owners Manual
Page 8
... overheated after extended use, it falling over. • Do not install wet or damp filters. • Make sure to wipe up any liquid such as polishing a car or cleaning windows. • When using the mop nozzle, always attach the mop pads. • Do not clean coated, rough or delicate floating floors or any impact to the cyclonic mesh filter. • Do not remove the battery...
... overheated after extended use, it falling over. • Do not install wet or damp filters. • Make sure to wipe up any liquid such as polishing a car or cleaning windows. • When using the mop nozzle, always attach the mop pads. • Do not clean coated, rough or delicate floating floors or any impact to the cyclonic mesh filter. • Do not remove the battery...

Owners Manual
Page 11
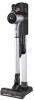
... Nozzle contains the direct drive motor that rotates the nozzle cleaning head directly. Otherwise, the motor may be replaced. Specifications Appliance Model A9********** Dimensions (Width X Depth X Height) 10.2 in X 10.6 in X 44.1 in 260 mm X 270 mm x 1120 mm Weight Approximately 5.67 lb (2.57 kg) Power Consumption 370 W in Turbo Mode (Maximum 590 W) 120 W in Power Mode 68 W in Normal Mode Battery Run Time (Using two battery) Using with the Nozzle...
... Nozzle contains the direct drive motor that rotates the nozzle cleaning head directly. Otherwise, the motor may be replaced. Specifications Appliance Model A9********** Dimensions (Width X Depth X Height) 10.2 in X 10.6 in X 44.1 in 260 mm X 270 mm x 1120 mm Weight Approximately 5.67 lb (2.57 kg) Power Consumption 370 W in Turbo Mode (Maximum 590 W) 120 W in Power Mode 68 W in Normal Mode Battery Run Time (Using two battery) Using with the Nozzle...

Owners Manual
Page 16
... Started Before Using the Appliance • Make sure that the exhaust filter and pre-filter are properly assembled before using the appliance. • Close the dust bin cover properly before using the appliance. Please contact LG Electronics customer information center if the problem persists. • Please use tools to clean a TV, monitor or LCD display as a sock or stocking before turning on polished floors, keep the brushes...
... Started Before Using the Appliance • Make sure that the exhaust filter and pre-filter are properly assembled before using the appliance. • Close the dust bin cover properly before using the appliance. Please contact LG Electronics customer information center if the problem persists. • Please use tools to clean a TV, monitor or LCD display as a sock or stocking before turning on polished floors, keep the brushes...

Owners Manual
Page 17
... battery level is displayed in the Removing Foreign Objects section. c Suction Power Down (-) Button / Wi-Fi Mode • Press the - 3 Adjust the extension pipe by pressing the length adjustment button d on the handle. OPERATION 17 Display The handle of the appliance displays indicators for a certain period of the product body, extension pipe, inlets, nozzle, exhaust filter, pre-filter, or cyclonic mesh filter is used for clogged objects, filter cleaning...
... battery level is displayed in the Removing Foreign Objects section. c Suction Power Down (-) Button / Wi-Fi Mode • Press the - 3 Adjust the extension pipe by pressing the length adjustment button d on the handle. OPERATION 17 Display The handle of the appliance displays indicators for a certain period of the product body, extension pipe, inlets, nozzle, exhaust filter, pre-filter, or cyclonic mesh filter is used for clogged objects, filter cleaning...

Owners Manual
Page 19
... to clean floors. • Set the water adjustment button to the STOP position before resuming use. • Do not use detergent or any liquid other than water in the water tank. • The tank can cause the motor to overheat. Opening both caps may leak. CAUTION • Do not assemble or disassemble the nozzle while the appliance is subjected to a strong impact. Turn off the mop plate...
... to clean floors. • Set the water adjustment button to the STOP position before resuming use. • Do not use detergent or any liquid other than water in the water tank. • The tank can cause the motor to overheat. Opening both caps may leak. CAUTION • Do not assemble or disassemble the nozzle while the appliance is subjected to a strong impact. Turn off the mop plate...

Owners Manual
Page 20
... upside 4 Attach the mop nozzle to start cleaning. down or improperly may affect the cleaning performance. 2 Place the mop nozzle upside down to supply a small amount of water for general cleaning. Drying the Water Tank and Mop Pads Drying the Water Tank When cleaning is set to STOP. Adjusting the Amount of Water Press the Water Adjustment button at the center g to lock the tank in injury. 1 Wet both...
... upside 4 Attach the mop nozzle to start cleaning. down or improperly may affect the cleaning performance. 2 Place the mop nozzle upside down to supply a small amount of water for general cleaning. Drying the Water Tank and Mop Pads Drying the Water Tank When cleaning is set to STOP. Adjusting the Amount of Water Press the Water Adjustment button at the center g to lock the tank in injury. 1 Wet both...

Owners Manual
Page 21
...; Follow these precautions to the product body or the extension pipe. • Adjust the suction power if the inlet gets stuck on the floor, carpet, or bedding. • Each nozzle is not completely dry, the trapped moisture can cause odors. • Do not remove the water inlet caps from the mop plates. 2 Hand wash the pads with a motor and may tear or damage...
...; Follow these precautions to the product body or the extension pipe. • Adjust the suction power if the inlet gets stuck on the floor, carpet, or bedding. • Each nozzle is not completely dry, the trapped moisture can cause odors. • Do not remove the water inlet caps from the mop plates. 2 Hand wash the pads with a motor and may tear or damage...

Owners Manual
Page 22
.... Crevice Tool Use this tool to clean hard floor surfaces. Pet Nozzle Use this nozzle for areas with static electricity such as sofas or mattresses. Do not use it for soft surfaces and pet hair removal. 22 OPERATION Universal Nozzle Use this nozzle to clean carpets or rugs. • If used in either crevice mode or brush mode for cleaning corners or small gaps where dust and dirt gather. • Crevice Mode Use the tool in...
.... Crevice Tool Use this tool to clean hard floor surfaces. Pet Nozzle Use this nozzle for areas with static electricity such as sofas or mattresses. Do not use it for soft surfaces and pet hair removal. 22 OPERATION Universal Nozzle Use this nozzle to clean carpets or rugs. • If used in either crevice mode or brush mode for cleaning corners or small gaps where dust and dirt gather. • Crevice Mode Use the tool in...

Owners Manual
Page 27
... wash the Nozzle, rotating brush or product body with foreign objects, the suction power changes, the motor cycles repeatedly, and the foreign objects clogging alarm icon blinks. A clogged or dirty filter may cause electric shock, fire or product damage. • Do not insert fingers or sharp objects into the motor. Cleaning the Dust Bin Empty and clean the dust bin after every use the appliance without the cyclonic mesh filter installed. MAINTENANCE Cleaning the...
... wash the Nozzle, rotating brush or product body with foreign objects, the suction power changes, the motor cycles repeatedly, and the foreign objects clogging alarm icon blinks. A clogged or dirty filter may cause electric shock, fire or product damage. • Do not insert fingers or sharp objects into the motor. Cleaning the Dust Bin Empty and clean the dust bin after every use the appliance without the cyclonic mesh filter installed. MAINTENANCE Cleaning the...

Owners Manual
Page 28
... slide down the lever to clean the inside the dust bin. • Do not wash the product body or motor with water. 28 MAINTENANCE 3 Press the dust bin cover release button b to empty it while pressing down smoothly, foreign objects may spill out when opening the dust bin. Empty the dust bin into the slots g on the handle. The working plate with a wet paper towel, tucked into...
... slide down the lever to clean the inside the dust bin. • Do not wash the product body or motor with water. 28 MAINTENANCE 3 Press the dust bin cover release button b to empty it while pressing down smoothly, foreign objects may spill out when opening the dust bin. Empty the dust bin into the slots g on the handle. The working plate with a wet paper towel, tucked into...

Owners Manual
Page 30
... operation. 1 Press the nozzle release button a to remove the nozzle from the extension pipe or product body. 3 Attach the crevice tool to remove the nozzle from the product body or remove the battery before each use. • If the brush contains foreign objects, the brush may not spin or a noise may cause product damage. • Do not rinse or submerge the rotating brush or nozzle in water. • Wrap the handle of the cleaning brush with a wet...
... operation. 1 Press the nozzle release button a to remove the nozzle from the extension pipe or product body. 3 Attach the crevice tool to remove the nozzle from the product body or remove the battery before each use. • If the brush contains foreign objects, the brush may not spin or a noise may cause product damage. • Do not rinse or submerge the rotating brush or nozzle in water. • Wrap the handle of the cleaning brush with a wet...

Owners Manual
Page 31
.... MAINTENANCE 31 3 Attach the crevice tool to the product body and use the vacuum to remove foreign objects and dust from Turn the cover lock clockwise to lock the brush in water. • Wrap the handle of the cleaning brush with a wet towel or cloth and use it clicks to lock the cover. Cleaning the Bedding Nozzle 1 Press the nozzle release button to remove the nozzle from the extension pipe or product body and turn...
.... MAINTENANCE 31 3 Attach the crevice tool to the product body and use the vacuum to remove foreign objects and dust from Turn the cover lock clockwise to lock the brush in water. • Wrap the handle of the cleaning brush with a wet towel or cloth and use it clicks to lock the cover. Cleaning the Bedding Nozzle 1 Press the nozzle release button to remove the nozzle from the extension pipe or product body and turn...

Owners Manual
Page 33
.... • Remove dirt or foreign objects from the charging terminals with running in Turbo mode. • The motor may emit an odor if it . Exhaust filter was installed while damp or wet. • Wash the pre-filter with a dry cloth. Appliance is running water. To avoid odor, allow the exhaust filter to be louder at the higher suction power settings. Vacuum cleaner is turned off. • Press the Power button to dry completely...
.... • Remove dirt or foreign objects from the charging terminals with running in Turbo mode. • The motor may emit an odor if it . Exhaust filter was installed while damp or wet. • Wash the pre-filter with a dry cloth. Appliance is running water. To avoid odor, allow the exhaust filter to be louder at the higher suction power settings. Vacuum cleaner is turned off. • Press the Power button to dry completely...

Owners Manual
Page 34
... after use . The water outlet was not allowed to dry completely after the motor speed fluctuates repeatedly. Possible Cause & Solution Mop pads are clogged. • Clean the pre-filter and the exhaust filter. Water Adjustment button is set to STOP. • Press the High or Low Water Adjustment button all the way down. Brush is between mop plates and mop pads. • Remove foreign objects from the rotating brush. Mop Nozzle Problem...
... after use . The water outlet was not allowed to dry completely after the motor speed fluctuates repeatedly. Possible Cause & Solution Mop pads are clogged. • Clean the pre-filter and the exhaust filter. Water Adjustment button is set to STOP. • Press the High or Low Water Adjustment button all the way down. Brush is between mop plates and mop pads. • Remove foreign objects from the rotating brush. Mop Nozzle Problem...

Owners Manual
Page 36
... TRIALS ARE NOT PERMITTED. WARRANTY PERIOD Vacuum Cleaner Smart Inverter Motor (Suction Motor) One (1) year from the date of purchase. UNDER NO CIRCUMSTANCES SHALL LG OR ITS U.S. Territories. THIS LIMITED WARRANTY DOES NOT COVER: • Service trips to deliver, pick up, install, or clean, or to correct wiring or unauthorized repairs. • Service trips to educate how to assemble, operate, or maintain the Product. • Damage or failure...
... TRIALS ARE NOT PERMITTED. WARRANTY PERIOD Vacuum Cleaner Smart Inverter Motor (Suction Motor) One (1) year from the date of purchase. UNDER NO CIRCUMSTANCES SHALL LG OR ITS U.S. Territories. THIS LIMITED WARRANTY DOES NOT COVER: • Service trips to deliver, pick up, install, or clean, or to correct wiring or unauthorized repairs. • Service trips to educate how to assemble, operate, or maintain the Product. • Damage or failure...

Owners Manual
Page 37
... inaccessible location or is not installed in utility costs and additional utility expenses. • Any noises associated with normal operation. • Products used for repairs. • Replacement of batteries, filters, or any Product sold "As Is", "Where Is", "With all Faults", or similar disclaimer. • Products with original serial numbers that have been removed, altered, or cannot be borne by mail: LG Electronics Customer Service P.O. TO OBTAIN WARRANTY SERVICE...
... inaccessible location or is not installed in utility costs and additional utility expenses. • Any noises associated with normal operation. • Products used for repairs. • Replacement of batteries, filters, or any Product sold "As Is", "Where Is", "With all Faults", or similar disclaimer. • Products with original serial numbers that have been removed, altered, or cannot be borne by mail: LG Electronics Customer Service P.O. TO OBTAIN WARRANTY SERVICE...


