
Owners Manual
Page 3
... other appliances out of the product is not working as it should, has been dropped, damaged, left outdoors, or dropped into water, return it to be cleaned. • Have servicing performed by pulling on the appliance. • Do not use the cord as a toy. Always read and follow instructions. The cord must be used by the cord, use the appliance with or...
... other appliances out of the product is not working as it should, has been dropped, damaged, left outdoors, or dropped into water, return it to be cleaned. • Have servicing performed by pulling on the appliance. • Do not use the cord as a toy. Always read and follow instructions. The cord must be used by the cord, use the appliance with or...
Owners Manual
Page 4
... the Battery section instructions for the method of replacing the battery. • When disposing of injury and fire. • Recharge only with the charger specified by LG Electronics. • Use appliances only with specifically designated battery packs. Type: Rechargeable Lithium-ion Battery - If this appliance. Use of starting . If contact accidentally occurs, flush with other appliances. • Unplug the power cord and remove the battery if...
... the Battery section instructions for the method of replacing the battery. • When disposing of injury and fire. • Recharge only with the charger specified by LG Electronics. • Use appliances only with specifically designated battery packs. Type: Rechargeable Lithium-ion Battery - If this appliance. Use of starting . If contact accidentally occurs, flush with other appliances. • Unplug the power cord and remove the battery if...
Owners Manual
Page 5
... store or install the appliance where it is damaged, malfunctioning, partially disassembled, or has missing or broken parts, including a damaged cord or plug. Operation • Use only as this appliance. residential, commercial, or industrial application. • Do not use and contact an LG Electronics customer information center. It is not to be used for instructions before resuming use. • If the product makes a strange noise or...
... store or install the appliance where it is damaged, malfunctioning, partially disassembled, or has missing or broken parts, including a damaged cord or plug. Operation • Use only as this appliance. residential, commercial, or industrial application. • Do not use and contact an LG Electronics customer information center. It is not to be used for instructions before resuming use. • If the product makes a strange noise or...

Owners Manual
Page 6
... disassemble, repair or modify the appliance. • Never insert a sharp metal object such as cigarettes, matches, or hot ashes. • Do not use the appliance without the dust bin and filters in place. Maintenance • Make sure to unplug the power cord when cleaning or maintaining the charging station. • Do not wash the inlet port or the dust bin with water...
... disassemble, repair or modify the appliance. • Never insert a sharp metal object such as cigarettes, matches, or hot ashes. • Do not use the appliance without the dust bin and filters in place. Maintenance • Make sure to unplug the power cord when cleaning or maintaining the charging station. • Do not wash the inlet port or the dust bin with water...

Owners Manual
Page 8
... not put any impact to the cyclonic mesh filter. • Do not remove the battery during operation. If the appliance becomes overheated after extended use, it falling over. • Do not install wet or damp filters. • Make sure to wipe up any liquid such as water or oil or pet excrement from the floor before turning on the power again. • Do not subject...
... not put any impact to the cyclonic mesh filter. • Do not remove the battery during operation. If the appliance becomes overheated after extended use, it falling over. • Do not install wet or damp filters. • Make sure to wipe up any liquid such as water or oil or pet excrement from the floor before turning on the power again. • Do not subject...
Owners Manual
Page 10
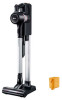
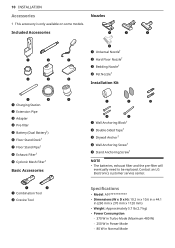
... need to be replaced. Specifications • Model: A91 Dimensions (W x D x H): 10.2 in x 10.6 in x 44.1 in (260 mm x 270 mm x 1120 mm) • Weight: Approximately 5.7 lb (2.7 kg) • Power Consumption - 370 W in Turbo Mode (Maximum 480 W) - 250 W in Power Mode - 80 W in Normal Mode 10 INSTALLATION Accessories † This accessory is only available on some models. Contact an LG Electronics customer service...
... need to be replaced. Specifications • Model: A91 Dimensions (W x D x H): 10.2 in x 10.6 in x 44.1 in (260 mm x 270 mm x 1120 mm) • Weight: Approximately 5.7 lb (2.7 kg) • Power Consumption - 370 W in Turbo Mode (Maximum 480 W) - 250 W in Power Mode - 80 W in Normal Mode 10 INSTALLATION Accessories † This accessory is only available on some models. Contact an LG Electronics customer service...

Owners Manual
Page 11
... (using a fully charged battery according to 50 minutes in Normal Mode (with the Tool) • Charger Adapter - Model: ADC-30FSA-30 29430EPCU - Up to 11 minutes in Turbo Mode - INSTALLATION 11 ENGLISH Results may be different depending on actual use . † The Nozzle contains the direct drive motor that rotates the nozzle cleaning head directly. Input: 100 V - 240 V~ 50/60 Hz, 0.8 A - Up to 6 minutes in Power...
... (using a fully charged battery according to 50 minutes in Normal Mode (with the Tool) • Charger Adapter - Model: ADC-30FSA-30 29430EPCU - Up to 11 minutes in Turbo Mode - INSTALLATION 11 ENGLISH Results may be different depending on actual use . † The Nozzle contains the direct drive motor that rotates the nozzle cleaning head directly. Input: 100 V - 240 V~ 50/60 Hz, 0.8 A - Up to 6 minutes in Power...

Owners Manual
Page 14
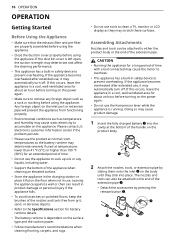
... on the charging station. • See Charging the Battery for charging or storage. 1 Connect the power adapter to safely assemble the appliance. 1 Firmly attach the extension pipe c, nozzle d, or tool onto the product body a. • To detach the extension pipe, press the extension pipe release button b. Compact Installation For safety and convenience, install the charging station using the self-standing or wall-mounted...
... on the charging station. • See Charging the Battery for charging or storage. 1 Connect the power adapter to safely assemble the appliance. 1 Firmly attach the extension pipe c, nozzle d, or tool onto the product body a. • To detach the extension pipe, press the extension pipe release button b. Compact Installation For safety and convenience, install the charging station using the self-standing or wall-mounted...
Owners Manual
Page 16
... the appliance is left open, the suction strength may cause static electricity to prevent overheating. CAUTION • Running the appliance for a long period of time with a tool connected may cause product damage. 1 Insert the fully charged battery a into place. 16 OPERATION OPERATION Getting Started Before Using the Appliance • Make sure that the exhaust filter and pre-filter are properly assembled before using the appliance. •...
... the appliance is left open, the suction strength may cause static electricity to prevent overheating. CAUTION • Running the appliance for a long period of time with a tool connected may cause product damage. 1 Insert the fully charged battery a into place. 16 OPERATION OPERATION Getting Started Before Using the Appliance • Make sure that the exhaust filter and pre-filter are properly assembled before using the appliance. •...
Owners Manual
Page 17
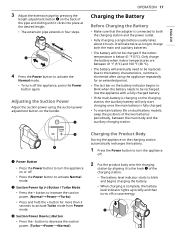
..., the battery level indicator lights up briefly and then turns off to save energy. Only charge the battery when indoor temperatures are between the main body and the auxiliary charging station. b Suction Power Up (+) Button / Turbo Mode • Press the + button to increase the suction power. (Normal~Power~Turbo) • Press and hold the + button for an extended period. • The last bar on the...
..., the battery level indicator lights up briefly and then turns off to save energy. Only charge the battery when indoor temperatures are between the main body and the auxiliary charging station. b Suction Power Up (+) Button / Turbo Mode • Press the + button to increase the suction power. (Normal~Power~Turbo) • Press and hold the + button for an extended period. • The last bar on the...
Owners Manual
Page 18
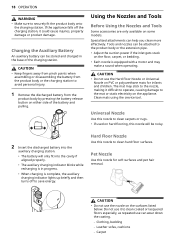
... pinch points when assembling or disassembling the battery from the product body by pressing the battery release button on the surfaces listed below. CAUTION • Do not use the nozzle on either side of the charging station. Using the Nozzles and Tools Before Using the Nozzles and Tools Some accessories are only available on PVC or polyurethane mats for soft surfaces and pet hair removal. Specialized attachments can be...
... pinch points when assembling or disassembling the battery from the product body by pressing the battery release button on the surfaces listed below. CAUTION • Do not use the nozzle on either side of the charging station. Using the Nozzles and Tools Before Using the Nozzles and Tools Some accessories are only available on PVC or polyurethane mats for soft surfaces and pet hair removal. Specialized attachments can be...

Owners Manual
Page 20
... product body before resuming use . • If the dust bin is clogged, the suction power may be easily removed. Empty the dust bin into the motor. WARNING • Never wash the nozzle, rotating brush or product body with foreign objects, the power will then automatically turn off the power before cleaning the appliance. • The frequency of the product body, extension pipe, inlets, pre-filter, or fine dust filter is clogged with water...
... product body before resuming use . • If the dust bin is clogged, the suction power may be easily removed. Empty the dust bin into the motor. WARNING • Never wash the nozzle, rotating brush or product body with foreign objects, the power will then automatically turn off the power before cleaning the appliance. • The frequency of the product body, extension pipe, inlets, pre-filter, or fine dust filter is clogged with water...
Owners Manual
Page 21
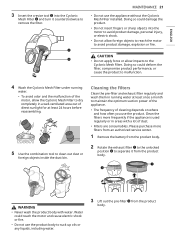
... the optimum suction power of the appliance. • The frequency of dust. • Filters are consumables. Water could deform the filter, compromise product performance, or cause the product to malfunction. 4 Wash the Cyclonic Mesh Filter under running water at least 24 hours before reassembling. 5 Use the combination tool to clean out dust or foreign objects inside the dust bin. ENGLISH 3 Insert the crevice tool c into the motor to avoid product damage...
... the optimum suction power of the appliance. • The frequency of dust. • Filters are consumables. Water could deform the filter, compromise product performance, or cause the product to malfunction. 4 Wash the Cyclonic Mesh Filter under running water at least 24 hours before reassembling. 5 Use the combination tool to clean out dust or foreign objects inside the dust bin. ENGLISH 3 Insert the crevice tool c into the motor to avoid product damage...

Owners Manual
Page 22
If the nozzle starts to operate during operation. Doing so could cause an injury. • Keep fingers away from the product body or remove the battery before cleaning. Cleaning the Universal/Hard Floor Nozzle Clean the brush and roller heads before reassembling. 4 Use the combination tool d to clean any dust off the motor. • Do not wash the motor with water. 7 Insert the clean, dry pre-filter and rotate the exhaust filter to the locked position e to reassemble it...
If the nozzle starts to operate during operation. Doing so could cause an injury. • Keep fingers away from the product body or remove the battery before cleaning. Cleaning the Universal/Hard Floor Nozzle Clean the brush and roller heads before reassembling. 4 Use the combination tool d to clean any dust off the motor. • Do not wash the motor with water. 7 Insert the clean, dry pre-filter and rotate the exhaust filter to the locked position e to reassemble it...

Owners Manual
Page 23
... the brush b into place. MAINTENANCE 23 6 Slide the brush back into the nozzle and rotate the cover back into the groove c inside the nozzle. ENGLISH 1 Press the nozzle release button a to lock the cover. 2 Turn the nozzle upside down the PUSH button on the nozzle while removing the rotating brush. 4 Attach the crevice tool to the product body and use the vacuum to remove foreign objects and dust from the brush and...
... the brush b into place. MAINTENANCE 23 6 Slide the brush back into the nozzle and rotate the cover back into the groove c inside the nozzle. ENGLISH 1 Press the nozzle release button a to lock the cover. 2 Turn the nozzle upside down the PUSH button on the nozzle while removing the rotating brush. 4 Attach the crevice tool to the product body and use the vacuum to remove foreign objects and dust from the brush and...

Owners Manual
Page 24
Cleaning the Bedding Nozzle 1 Press the nozzle release button to remove the nozzle from the extension pipe or product body and turn the nozzle upside down. 2 Attach the crevice tool to the product body and use the vacuum to remove foreign objects and dust from the bottom of the nozzle. • Use a damp towel or cloth to lock the brush in water. After cleaning, wipe the nozzle dry. • Do not rinse or submerge the nozzle in place. 24 MAINTENANCE 6 Press the brush cover until it clicks to remove any remaining foreign objects and dust from the bottom of the nozzle.
Cleaning the Bedding Nozzle 1 Press the nozzle release button to remove the nozzle from the extension pipe or product body and turn the nozzle upside down. 2 Attach the crevice tool to the product body and use the vacuum to remove foreign objects and dust from the bottom of the nozzle. • Use a damp towel or cloth to lock the brush in water. After cleaning, wipe the nozzle dry. • Do not rinse or submerge the nozzle in place. 24 MAINTENANCE 6 Press the brush cover until it clicks to remove any remaining foreign objects and dust from the bottom of the nozzle.
Owners Manual
Page 25
... filter was installed while damp or wet. • Wash the pre-filter with running in a well-ventilated area out of malfunction. Vacuum cleaner is running water. A strange odor is coming from the charging terminals with running normally, the hot air is a result of the motor cooling and is turned off. • Press the Power button to dry completely in a well-ventilated area out of dust. • The dust in...
... filter was installed while damp or wet. • Wash the pre-filter with running in a well-ventilated area out of malfunction. Vacuum cleaner is running water. A strange odor is coming from the charging terminals with running normally, the hot air is a result of the motor cooling and is turned off. • Press the Power button to dry completely in a well-ventilated area out of dust. • The dust in...
Owners Manual
Page 26
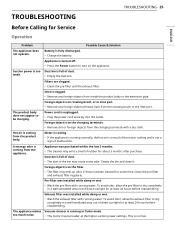
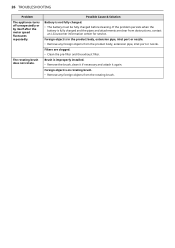
... and attach it again. Foreign object is not fully charged. • The battery must be fully charged before cleaning. Filters are clear from the product body, extension pipe, inlet port or nozzle. Brush is fully charged and the pipes and attachments are clogged. • Clean the pre-filter and the exhaust filter. 26 TROUBLESHOOTING Problem The appliance turns off unexpectedly or by itself after the motor speed...
... and attach it again. Foreign object is not fully charged. • The battery must be fully charged before cleaning. Filters are clear from the product body, extension pipe, inlet port or nozzle. Brush is fully charged and the pipes and attachments are clogged. • Clean the pre-filter and the exhaust filter. 26 TROUBLESHOOTING Problem The appliance turns off unexpectedly or by itself after the motor speed...

Owners Manual
Page 27
... U.S. THIS LIMITED WARRANTY DOES NOT COVER: • Service trips to deliver, pick up, install, or clean, or to correct wiring or unauthorized repairs. • Service trips to educate how to assemble, operate, or maintain the Product. • Damage or failure of the Product to perform during the warranty period set forth below, LG will, at its option, repair or replace the Product. Territories. Should your LG Vacuum Cleaner ("Product") fail due to...
... U.S. THIS LIMITED WARRANTY DOES NOT COVER: • Service trips to deliver, pick up, install, or clean, or to correct wiring or unauthorized repairs. • Service trips to educate how to assemble, operate, or maintain the Product. • Damage or failure of the Product to perform during the warranty period set forth below, LG will, at its option, repair or replace the Product. Territories. Should your LG Vacuum Cleaner ("Product") fail due to...
Owners Manual
Page 28
... disclaimer. • Products with original serial numbers that are not authorized by LG. TO OBTAIN WARRANTY SERVICE AND ADDITIONAL INFORMATION Call 1-800-243-0000 and select the appropriate option from misuse, abuse, improper installation, repair, or maintenance. Improper installation or maintenance includes installation or maintenance contrary to the Product owner's manual. • Damage or failure of the Product caused by the use of parts, components, accessories, consumable cleaning products, detergents, chemicals...
... disclaimer. • Products with original serial numbers that are not authorized by LG. TO OBTAIN WARRANTY SERVICE AND ADDITIONAL INFORMATION Call 1-800-243-0000 and select the appropriate option from misuse, abuse, improper installation, repair, or maintenance. Improper installation or maintenance includes installation or maintenance contrary to the Product owner's manual. • Damage or failure of the Product caused by the use of parts, components, accessories, consumable cleaning products, detergents, chemicals...


