

Owner's Manual
Page 1
... 42PW340 42PW350U 22LV2500 32LV3500 47LW5000 32LK330 37LK450 50PW340 50PW350U 26LV2500 37LV3500 55LW5000 32LK430 42LK450 42PW350 42PW350R 32LV2500 42LV3500 47LW5300 42LK430 47LK450 50PW350 50PW350R 26LV2520 47LV3500 55LW5300 42LK451C 42LK520 50PZ200 32LV2520 55LV3500 42LV355C 47LK451C 47LK520 60PZ200 22LV255C 32LV3520 55LV355C 32LK453C 55LK520 26LV255C 42LV3520 37LK453C 55LV5300 42LK453C P/NO : SAC34134216 (1106-REV11) www...
... 42PW340 42PW350U 22LV2500 32LV3500 47LW5000 32LK330 37LK450 50PW340 50PW350U 26LV2500 37LV3500 55LW5000 32LK430 42LK450 42PW350 42PW350R 32LV2500 42LV3500 47LW5300 42LK430 47LK450 50PW350 50PW350R 26LV2520 47LV3500 55LW5300 42LK451C 42LK520 50PZ200 32LV2520 55LV3500 42LV355C 47LK451C 47LK520 60PZ200 22LV255C 32LV3520 55LV355C 32LK453C 55LK520 26LV255C 42LV3520 37LK453C 55LV5300 42LK453C P/NO : SAC34134216 (1106-REV11) www...
Owner's Manual
Page 8
... 77 - Component Connection Mounting on for the first time 40 Watching TV 40 Managing channels 40 - Using the input list 46 - OPTION Settings 75 MAKING CONNECTIONS 76 Connection Overview 77 Connecting to HDMI Connection 78 - When using 3D Glasses 49 - 3D Imaging Viewing Range 50 Viewing 3D... Imaging 52 ENTERTAINMENT 52 - AUDIO Settings 70 - LOCK Settings 73 - Tidying cables 34 REMOTE CONTROL 38 WATCHING TV 38 Connecting to an antenna or cable 38 - Checking current program info 44 ...
... 77 - Component Connection Mounting on for the first time 40 Watching TV 40 Managing channels 40 - Using the input list 46 - OPTION Settings 75 MAKING CONNECTIONS 76 Connection Overview 77 Connecting to HDMI Connection 78 - When using 3D Glasses 49 - 3D Imaging Viewing Range 50 Viewing 3D... Imaging 52 ENTERTAINMENT 52 - AUDIO Settings 70 - LOCK Settings 73 - Tidying cables 34 REMOTE CONTROL 38 WATCHING TV 38 Connecting to an antenna or cable 38 - Checking current program info 44 ...

Owner's Manual
Page 16
Adjusts the image quality and brightness based on the surrounding environment. 2 All of the buttons are touch sensitive and can set the power indicator light to on or off by selecting OPTION in the main menus. Adjusts the volume level. Accesses the main menus, or saves ...
Adjusts the image quality and brightness based on the surrounding environment. 2 All of the buttons are touch sensitive and can set the power indicator light to on or off by selecting OPTION in the main menus. Adjusts the volume level. Accesses the main menus, or saves ...
Owner's Manual
Page 17
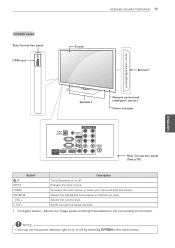
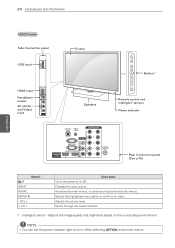
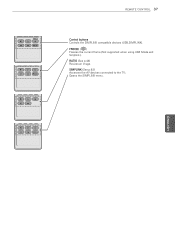
... ⊙ - Adjusts the volume level. Adjusts the image quality and brightness based on or off by selecting OPTION in the main menus. NOTE yyYou can set the power indicator light to on or off . v CH ^ Scrolls through the saved channels. 1 Intelligent sensor - VOL + Accesses the main menus, or saves your input...
... ⊙ - Adjusts the volume level. Adjusts the image quality and brightness based on or off by selecting OPTION in the main menus. NOTE yyYou can set the power indicator light to on or off . v CH ^ Scrolls through the saved channels. 1 Intelligent sensor - VOL + Accesses the main menus, or saves your input...
Owner's Manual
Page 18
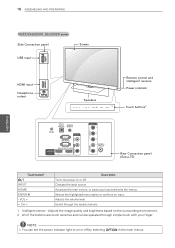
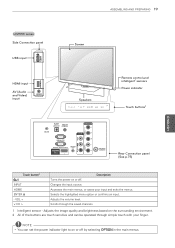
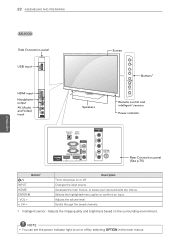
... the saved channels. 1 Intelligent sensor - Adjusts the image quality and brightness based on the surrounding environment. 2 All of the buttons are touch sensitive and can set the power indicator light to on or off by selecting OPTION in the main menus. Adjusts the volume level. Changes the input source. Accesses the...
... the saved channels. 1 Intelligent sensor - Adjusts the image quality and brightness based on the surrounding environment. 2 All of the buttons are touch sensitive and can set the power indicator light to on or off by selecting OPTION in the main menus. Adjusts the volume level. Changes the input source. Accesses the...
Owner's Manual
Page 19
... option or confirms an input. Adjusts the image quality and brightness based on the surrounding environment. 2 All of the buttons are touch sensitive and can set the power indicator light to on or off by selecting OPTION in the main menus. VOL + v CH ^ Description Turns the power on or off . Changes...
... option or confirms an input. Adjusts the image quality and brightness based on the surrounding environment. 2 All of the buttons are touch sensitive and can set the power indicator light to on or off by selecting OPTION in the main menus. VOL + v CH ^ Description Turns the power on or off . Changes...
Owner's Manual
Page 20
... selecting OPTION in the main menus. VOL + v CH ^ Description Turns the power on the surrounding environment. 2 All of the buttons are touch sensitive and can set the power indicator light to on or off .
... selecting OPTION in the main menus. VOL + v CH ^ Description Turns the power on the surrounding environment. 2 All of the buttons are touch sensitive and can set the power indicator light to on or off .
Owner's Manual
Page 21
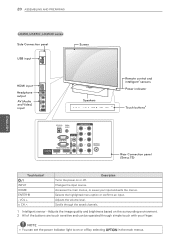
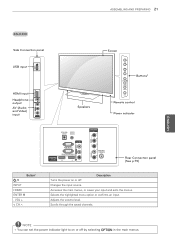
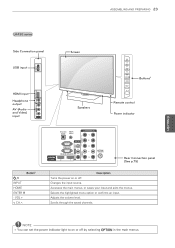
... Rear Connection panel (See p.75) Button2 / I INPUT HOME ENTER ⊙ - Accesses the main menus, or saves your input and exits the menus. NOTE yyYou can set the power indicator light to on or off by selecting OPTION in the main menus. VOL + v CH ^ Description Turns the power on or off . Selects...
... Rear Connection panel (See p.75) Button2 / I INPUT HOME ENTER ⊙ - Accesses the main menus, or saves your input and exits the menus. NOTE yyYou can set the power indicator light to on or off by selecting OPTION in the main menus. VOL + v CH ^ Description Turns the power on or off . Selects...
Owner's Manual
Page 22
... ^ Description Turns the power on or off by selecting OPTION in the main menus. Changes the input source. Adjusts the volume level. NOTE yyYou can set the power indicator light to on the surrounding environment. Selects the highlighted menu option or confirms an input. Adjusts the image quality and brightness based...
... ^ Description Turns the power on or off by selecting OPTION in the main menus. Changes the input source. Adjusts the volume level. NOTE yyYou can set the power indicator light to on the surrounding environment. Selects the highlighted menu option or confirms an input. Adjusts the image quality and brightness based...
Owner's Manual
Page 23
Adjusts the volume level. NOTE yyYou can set the power indicator light to on or off by selecting OPTION in the main menus. Changes the input source. Selects the highlighted menu option or ...
Adjusts the volume level. NOTE yyYou can set the power indicator light to on or off by selecting OPTION in the main menus. Changes the input source. Selects the highlighted menu option or ...
Owner's Manual
Page 24
... highlighted menu option or confirms an input. Scrolls through the saved channels. 1 Intelligent sensor - Adjusts the volume level. Changes the input source. NOTE yyYou can set the power indicator light to on or off . VOL + v CH ^ Description Turns the power on the surrounding environment. 24 ASSEMBLING AND PREPARING ENEGNLGISH LK520 series...
... highlighted menu option or confirms an input. Scrolls through the saved channels. 1 Intelligent sensor - Adjusts the volume level. Changes the input source. NOTE yyYou can set the power indicator light to on or off . VOL + v CH ^ Description Turns the power on the surrounding environment. 24 ASSEMBLING AND PREPARING ENEGNLGISH LK520 series...
Owner's Manual
Page 25
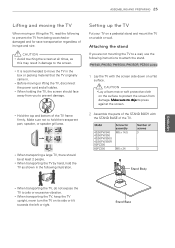
... packing material that the TV originally came in the following instructions to prevent the TV from you are not mounting the TV to prevent damage. Setting up the TV Put your TV on a pedestal stand and mount the TV on its type and size. Stand Base yyBefore moving or lifting the...
... packing material that the TV originally came in the following instructions to prevent the TV from you are not mounting the TV to prevent damage. Setting up the TV Put your TV on a pedestal stand and mount the TV on its type and size. Stand Base yyBefore moving or lifting the...
Owner's Manual
Page 34
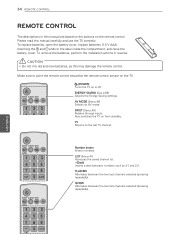
... CH A G E ENERGY AV MOMDUETEINPUT SAINVIFNGO TV Home Q.MENU 123 4 5 ENTER 6 789 BLAISCTK VOL 0 MARK FAV 3D MUTE EQX.IVTIEW 3D SETTING FREEZE P CH A G E RATIO ENERGY AV MODE INPUT INFO Home Q.METNUV SAVING 123 ENTER 456 7 BACK LIST VOL 89 EXIT 0 F3LDASSEHTTBINKG MARK ... correctly. CAUTION yyDo not mix old and new batteries, as 2-1 and 2-2. ENERGY SAVING (See p.65) Adjusts the Energy Saving settings. QVIEW Alternates between the two last channels selected (pressing repeatedly). 34 REMOTE CONTROL ENEGNLGISH REMOTE CONTROL The descriptions in reverse. INPUT (...
... CH A G E ENERGY AV MOMDUETEINPUT SAINVIFNGO TV Home Q.MENU 123 4 5 ENTER 6 789 BLAISCTK VOL 0 MARK FAV 3D MUTE EQX.IVTIEW 3D SETTING FREEZE P CH A G E RATIO ENERGY AV MODE INPUT INFO Home Q.METNUV SAVING 123 ENTER 456 7 BACK LIST VOL 89 EXIT 0 F3LDASSEHTTBINKG MARK ... correctly. CAUTION yyDo not mix old and new batteries, as 2-1 and 2-2. ENERGY SAVING (See p.65) Adjusts the Energy Saving settings. QVIEW Alternates between the two last channels selected (pressing repeatedly). 34 REMOTE CONTROL ENEGNLGISH REMOTE CONTROL The descriptions in reverse. INPUT (...
Owner's Manual
Page 36
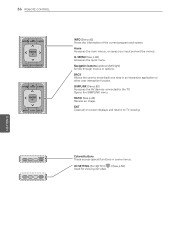
... LIST MARK FAV P VOL CH 3D ENERGY AV MODE INPUT A G E MUTE TV SAVING 1INFO 2 3 Home Q.MENU 456 ENTER 789 BLIASCTK 0 MARK FAV FLASHBK EXIT 3D SETTING P VOL CH ENERGY AV MOD3EDINPUTFREEZE A G E MUTE TV SAVING RATIO 1 2 3 INFO Home Q.MENU 4 5 6 ENERGY AV MODE INPUT TV 7 8 9 SAVING ENTER 1... 6 EXIT 9P CH A G E FLASHBK LIST INFO MARK HFoAmVe Q.MENU VOL 3D P CH A G E EMNUTTEER INFO Home Q.MENU BACK EXIT ENTER 3D SETTING FREEZE RATIO BACK RATIO EXIT INFO (See p.42) Views the information of the current program and screen. Q. MENU (See p.46) Accesses the quick menu....
... LIST MARK FAV P VOL CH 3D ENERGY AV MODE INPUT A G E MUTE TV SAVING 1INFO 2 3 Home Q.MENU 456 ENTER 789 BLIASCTK 0 MARK FAV FLASHBK EXIT 3D SETTING P VOL CH ENERGY AV MOD3EDINPUTFREEZE A G E MUTE TV SAVING RATIO 1 2 3 INFO Home Q.MENU 4 5 6 ENERGY AV MODE INPUT TV 7 8 9 SAVING ENTER 1... 6 EXIT 9P CH A G E FLASHBK LIST INFO MARK HFoAmVe Q.MENU VOL 3D P CH A G E EMNUTTEER INFO Home Q.MENU BACK EXIT ENTER 3D SETTING FREEZE RATIO BACK RATIO EXIT INFO (See p.42) Views the information of the current program and screen. Q. MENU (See p.46) Accesses the quick menu....
Owner's Manual
Page 37
... CH A G E 4 5MUTE 6 BACK EXIT 7 8 9 INFO Home Q3.DMSEETNTUING 0 ENERGY AV MODE INPUT FRLAESEHZTEBVK SAVLINISG T 1 ENMATREKR 2FAV RATIO 3 P VOL RATIO CH A G E 4 5MUTE 6 BACK EXIT 7 INFO 8 93D SETTING Home Q.MENU 0 FLASHBK LIST ENMFAATRVEKR RATIO VOL 3D P CH A G E MUTE BACK EXIT INFO Home Q.MENU ENTER BACK RATIO EXIT ENERGY AV MODE INPUT TV SAVING...
... CH A G E 4 5MUTE 6 BACK EXIT 7 8 9 INFO Home Q3.DMSEETNTUING 0 ENERGY AV MODE INPUT FRLAESEHZTEBVK SAVLINISG T 1 ENMATREKR 2FAV RATIO 3 P VOL RATIO CH A G E 4 5MUTE 6 BACK EXIT 7 INFO 8 93D SETTING Home Q.MENU 0 FLASHBK LIST ENMFAATRVEKR RATIO VOL 3D P CH A G E MUTE BACK EXIT INFO Home Q.MENU ENTER BACK RATIO EXIT ENERGY AV MODE INPUT TV SAVING...

Owner's Manual
Page 39
...connecting the TV's power plug to turn the TV off, press the power button on . Turning the TV on for the first time, the Initial setting screen appears. WATCHING TV 39 ENEGNLGISH Connecting to the AC/DC adapter (For 19/22/26LV2500, 26LV2520, 22/26LV255C) AC/DC Adaptor 1 Connect the...to your home environment, select Home Use. NOTE yyTo display images in Store Demo mode. 4 When the basic settings are complete, press ENTER. yyIf you select Store Demo, any customized settings will appear whenever the TV turns on for the first time. The Power indicator turns red and the TV ...
...connecting the TV's power plug to turn the TV off, press the power button on . Turning the TV on for the first time, the Initial setting screen appears. WATCHING TV 39 ENEGNLGISH Connecting to the AC/DC adapter (For 19/22/26LV2500, 26LV2520, 22/26LV255C) AC/DC Adaptor 1 Connect the...to your home environment, select Home Use. NOTE yyTo display images in Store Demo mode. 4 When the basic settings are complete, press ENTER. yyIf you select Store Demo, any customized settings will appear whenever the TV turns on for the first time. The Power indicator turns red and the TV ...
Owner's Manual
Page 40
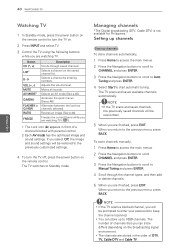
...TV. The TV scans and saves available channels automatically. NOTE yyIf the TV scans a blocked channel, you will be restored to the previously customized settings. 4 To turn the TV on. 2 Press INPUT and select TV. 3 Control the TV using the following buttons while you select Off, ...). 1 The Lock icon (ꔒ) appears in the order of a channel blocked with parental control. 2 Each AV mode has the optimized image and sound settings. To store channels manually, 1 Press Home to access the main menus. 2 Press the Navigation buttons to scroll CHANNEL and press ENTER. 3 Press the ...
...TV. The TV scans and saves available channels automatically. NOTE yyIf the TV scans a blocked channel, you will be restored to the previously customized settings. 4 To turn the TV on. 2 Press INPUT and select TV. 3 Control the TV using the following buttons while you select Off, ...). 1 The Lock icon (ꔒ) appears in the order of a channel blocked with parental control. 2 Each AV mode has the optimized image and sound settings. To store channels manually, 1 Press Home to access the main menus. 2 Press the Navigation buttons to scroll CHANNEL and press ENTER. 3 Press the ...

Owner's Manual
Page 41
.... Registers or cancels the current channel in favorite channel list. Using favorite channels Add the channels that you return to the previous menu, press BACK. Setting up your favorite list 1 Select a channel to add to the favorite list. 2 Press FAV. 3 Press the Navigation buttons to select your desired favorite channel group...
.... Registers or cancels the current channel in favorite channel list. Using favorite channels Add the channels that you return to the previous menu, press BACK. Setting up your favorite list 1 Select a channel to add to the favorite list. 2 Press FAV. 3 Press the Navigation buttons to select your desired favorite channel group...
Owner's Manual
Page 42
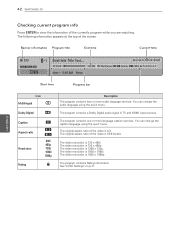
... change the caption language using the quick menu. The video resolution is 16:9 (wide). The program contains one or more audio language services. See "LOCK Settings" on p.71.
... change the caption language using the quick menu. The video resolution is 16:9 (wide). The program contains one or more audio language services. See "LOCK Settings" on p.71.
Owner's Manual
Page 44
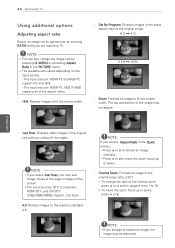
...and bottom of the image may be distorted. Just Scan: Displays video images in the same aspect ratio as the original image. (4:3 4:3 ) Set By Program (16:9 16:9 ) Set By Program - NOTE If you may see image noises at its range is from 1 to the previous standard 4:3. yyThe input sources: DTV, ...yyIf you are watching TV. NOTE yyYou can also change the ratio of the cinema zoom, press < or > and its optimal size by pressing Q. Set By Program: Displays images in the original size without cutting off the edges. MENU or accessing Aspect Ratio in the Quick menus, yyPress < or > to...
...and bottom of the image may be distorted. Just Scan: Displays video images in the same aspect ratio as the original image. (4:3 4:3 ) Set By Program (16:9 16:9 ) Set By Program - NOTE If you may see image noises at its range is from 1 to the previous standard 4:3. yyThe input sources: DTV, ...yyIf you are watching TV. NOTE yyYou can also change the ratio of the cinema zoom, press < or > and its optimal size by pressing Q. Set By Program: Displays images in the original size without cutting off the edges. MENU or accessing Aspect Ratio in the Quick menus, yyPress < or > to...

