

Specification (English)
Page 1
Full HD 1080p resolution and a unique panel design set the LH55 series apart. TV • TruMotion 240Hz • Intelligent Sensor Mode • Full HD ...• Wide Viewing Angle • XD Engine® • 24p Real Cinema • ISFccc® Ready • Picture Wizard • AV Mode II (Cinema, Sports, Game) • 60,000 Hour Panel Life (typical) • NTSC... (JPEG, MP3) (side) • PC Connectivity (D-sub 15pin) • RF Antenna Input LGusa.com LCD TV 55LH55 55" Class Full HD 1080p 240Hz LCD TV (54.6" diagonal) TruMotion 240Hz provides clearer, fast-action scenes.
Full HD 1080p resolution and a unique panel design set the LH55 series apart. TV • TruMotion 240Hz • Intelligent Sensor Mode • Full HD ...• Wide Viewing Angle • XD Engine® • 24p Real Cinema • ISFccc® Ready • Picture Wizard • AV Mode II (Cinema, Sports, Game) • 60,000 Hour Panel Life (typical) • NTSC... (JPEG, MP3) (side) • PC Connectivity (D-sub 15pin) • RF Antenna Input LGusa.com LCD TV 55LH55 55" Class Full HD 1080p 240Hz LCD TV (54.6" diagonal) TruMotion 240Hz provides clearer, fast-action scenes.
Owner's Manual (English)
Page 6
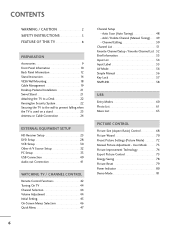
... 53 Input List 54 Input Label 55 AV Mode 56 Simple Manual 56 Key Lock 57 SIMPLINK 58 USB Entry Modes 60 Photo List 61 Music List 65 PICTURE CONTROL Picture Size (Aspect Ratio) Control 68 Picture Wizard 70 Preset Picture Settings (Picture Mode 72 Manual Picture Adjustment - User Mode 73 Picture Improvement Technology 74 Expert Picture Control 75 Energy...
... 53 Input List 54 Input Label 55 AV Mode 56 Simple Manual 56 Key Lock 57 SIMPLINK 58 USB Entry Modes 60 Photo List 61 Music List 65 PICTURE CONTROL Picture Size (Aspect Ratio) Control 68 Picture Wizard 70 Preset Picture Settings (Picture Mode 72 Manual Picture Adjustment - User Mode 73 Picture Improvement Technology 74 Expert Picture Control 75 Energy...
Owner's Manual (English)
Page 8
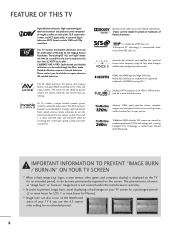
...is displayed on the letterboxed areas of your TV screen for a prolonged period (2 or more hours for LCD, 1 or more stable structure for the picture they are trademarks of digital television, HDTV ...Foundation. TruMotion 240Hz displays 240 scenes per second by the user to experience the best their LG HDTV has to the video and audio content. Image burn is verified from SRS Labs,... burn" or "burn-in strategic spots behind the front cabinet and use the 4:3 aspect ratio setting for an extended period, it can be accessible by combining advanced 120Hz technology with scanning backlight. ...
...is displayed on the letterboxed areas of your TV screen for a prolonged period (2 or more hours for LCD, 1 or more stable structure for the picture they are trademarks of digital television, HDTV ...Foundation. TruMotion 240Hz displays 240 scenes per second by the user to experience the best their LG HDTV has to the video and audio content. Image burn is verified from SRS Labs,... burn" or "burn-in strategic spots behind the front cabinet and use the 4:3 aspect ratio setting for an extended period, it can be accessible by combining advanced 120Hz technology with scanning backlight. ...

Owner's Manual (English)
Page 11
Remote Control Sensor POWER Button 11 PREPARATION 32/42/47CL40 CH CHANNEL ( , ) Buttons SPEAKER Intelligent Sensor Adjusts picture according to the surrounding conditions VOL ENTER MENU INPUT VOLUME (+, -) Buttons ENTER Button MENU Button INPUT Button Power/Standby Indicator Illuminates red in standby mode. Illuminates blue when the set is switched on.
Remote Control Sensor POWER Button 11 PREPARATION 32/42/47CL40 CH CHANNEL ( , ) Buttons SPEAKER Intelligent Sensor Adjusts picture according to the surrounding conditions VOL ENTER MENU INPUT VOLUME (+, -) Buttons ENTER Button MENU Button INPUT Button Power/Standby Indicator Illuminates red in standby mode. Illuminates blue when the set is switched on.
Owner's Manual (English)
Page 23
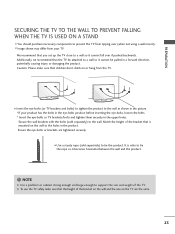
...I Use a sturdy rope (sold separately) to support the size and weight of the TV. Additionally, we recommend that you set up the TV close to tie the rope so it cannot fall over (when not using a wall ... separately) to a wall so it cannot be pulled in the upper holes. We recommend that the TV be attached to tie the product. Caution: Please make sure that the height of the bracket that children...on the wall to the wall as shown in the picture. * If your TV. Ensure the eye-bolts or brackets are the same. 23 G To use the TV safely make sure that is safer to a wall so...
...I Use a sturdy rope (sold separately) to support the size and weight of the TV. Additionally, we recommend that you set up the TV close to tie the rope so it cannot fall over (when not using a wall ... separately) to a wall so it cannot be pulled in the upper holes. We recommend that the TV be attached to tie the product. Caution: Please make sure that the height of the bracket that children...on the wall to the wall as shown in the picture. * If your TV. Ensure the eye-bolts or brackets are the same. 23 G To use the TV safely make sure that is safer to a wall so...

Owner's Manual (English)
Page 35
... positioned on the graphics card, DOS mode may not allow the image to DVI Cable is separate. G Depending on the graphics card, some resolution settings may not work if a HDMI to be noise associated with the resolution, vertical pattern, contrast or brightness. G Avoid keeping a fixed image on ...the screen for Horizontal and Vertical frequencies is in use. NOTES G To get the the best picture quality, adjust the PC graphics card to another rate or adjust the brightness and contrast on the screen. G If there are overscan in the OPTION...
... positioned on the graphics card, DOS mode may not allow the image to DVI Cable is separate. G Depending on the graphics card, some resolution settings may not work if a HDMI to be noise associated with the resolution, vertical pattern, contrast or brightness. G Avoid keeping a fixed image on ...the screen for Horizontal and Vertical frequencies is in use. NOTES G To get the the best picture quality, adjust the PC graphics card to another rate or adjust the brightness and contrast on the screen. G If there are overscan in the OPTION...

Owner's Manual (English)
Page 36
... Enter E • Contrast 50 • Brightness 50 • Sharpness 50 • Color 50 • Tint 0R G • Advanced Control • Picture Reset Screen (RGB-PC) 1 MENU 2 ENTER 3 ENTER 4 ENTER 5 ENTER Select PICTURE. Select the desired resolution. Select Resolution. SCREEN Resolution Auto Config. Position Size Phase Reset Move Prev. 1024 x 768 1280 x 768... EQUIPMENT SETUP Screen Setup for PC mode Selecting Resolution You can also be adjusted. You can use this function only when the PC resolution is set to 1024X768, 1280X768 or 1360X768.
... Enter E • Contrast 50 • Brightness 50 • Sharpness 50 • Color 50 • Tint 0R G • Advanced Control • Picture Reset Screen (RGB-PC) 1 MENU 2 ENTER 3 ENTER 4 ENTER 5 ENTER Select PICTURE. Select the desired resolution. Select Resolution. SCREEN Resolution Auto Config. Position Size Phase Reset Move Prev. 1024 x 768 1280 x 768... EQUIPMENT SETUP Screen Setup for PC mode Selecting Resolution You can also be adjusted. You can use this function only when the PC resolution is set to 1024X768, 1280X768 or 1360X768.

Owner's Manual (English)
Page 37
...; Sharpness 50 • Color 50 • Tint 0R G • Advanced Control • Picture Reset Screen (RGB-PC) 1 MENU 2 ENTER 3 ENTER Select PICTURE. SCREEN Resolution Auto Config. Select Auto Config.. 4 ENTER Select Y e s. 5 ENTER Start Auto Configuration. To Set Yes No I If picture needs to be adjusted again after Auto adjustment in RGB-PC, you can...
...; Sharpness 50 • Color 50 • Tint 0R G • Advanced Control • Picture Reset Screen (RGB-PC) 1 MENU 2 ENTER 3 ENTER Select PICTURE. SCREEN Resolution Auto Config. Select Auto Config.. 4 ENTER Select Y e s. 5 ENTER Start Auto Configuration. To Set Yes No I If picture needs to be adjusted again after Auto adjustment in RGB-PC, you can...

Owner's Manual (English)
Page 39
EXTERNAL EQUIPMENT SETUP Screen Reset (Reset to original factory values) Returns Position, S i z e, and Phase to the default factory settings. Select Screen (RGB-PC). This feature operates only in RGB-PC mode. Select Y e s. PICTURE Move Enter E • Contrast 50 • Brightness 50 • Sharpness 50 • Color 50 • Tint 0R G • Advanced Control • Picture Reset Screen (RGB-PC) 1 MENU 2 ENTER 3 ENTER 4 ENTER 5 ENTER Select PICTURE. Position Size Phase Reset Move Prev. SCREEN Resolution Auto Config. To Set Yes No 39 Select Reset.
EXTERNAL EQUIPMENT SETUP Screen Reset (Reset to original factory values) Returns Position, S i z e, and Phase to the default factory settings. Select Screen (RGB-PC). This feature operates only in RGB-PC mode. Select Y e s. PICTURE Move Enter E • Contrast 50 • Brightness 50 • Sharpness 50 • Color 50 • Tint 0R G • Advanced Control • Picture Reset Screen (RGB-PC) 1 MENU 2 ENTER 3 ENTER 4 ENTER 5 ENTER Select PICTURE. Position Size Phase Reset Move Prev. SCREEN Resolution Auto Config. To Set Yes No 39 Select Reset.

Owner's Manual (English)
Page 43
G p.52 MARK Select the input to mark or unmark a photo/music. G p.71 Use to apply the Picture Wizard settings. G p.44 CHANNEL Changes the channel. G p.53 AV MODE Toggles through the programmed Favorite channels. G p.62, 66 MUTE Switches the sound on the back side... or other user interaction function. UP/DOWN Installing Batteries I Open the battery compartment cover on or off. WATCHING TV / CHANNEL CONTROL THUMBSTICK Navigates the on-screen menus and adjusts the system settings to your preference. (Up/Down/Left Right/ENTER) RETURN Allows the user to move return one . UP/DOWN...
G p.52 MARK Select the input to mark or unmark a photo/music. G p.71 Use to apply the Picture Wizard settings. G p.44 CHANNEL Changes the channel. G p.53 AV MODE Toggles through the programmed Favorite channels. G p.62, 66 MUTE Switches the sound on the back side... or other user interaction function. UP/DOWN Installing Batteries I Open the battery compartment cover on or off. WATCHING TV / CHANNEL CONTROL THUMBSTICK Navigates the on-screen menus and adjusts the system settings to your preference. (Up/Down/Left Right/ENTER) RETURN Allows the user to move return one . UP/DOWN...

Owner's Manual (English)
Page 45
... Language Language English Español Français Previous Next 1 ENTER Select Menu Language. I You can also adjust Initial Setting in retail environments. Picture mode" manually while inspecting the TV, but the TV will be activated from the user menus. I "Store Demo" Mode is connected. 1 ENTER Previous INFO i Simple Manual Next Check your...
... Language Language English Español Français Previous Next 1 ENTER Select Menu Language. I You can also adjust Initial Setting in retail environments. Picture mode" manually while inspecting the TV, but the TV will be activated from the user menus. I "Store Demo" Mode is connected. 1 ENTER Previous INFO i Simple Manual Next Check your...

Owner's Manual (English)
Page 46
... : Standard • SRS TruSurround XT: Off • Treble 50 • Bass 50 E WATCHING TV / CHANNEL CONTROL OPTION Menu Language Audio Language Input Label SIMPLINK Key Lock Simple Manual Caption Set ID E Move Enter : English : English : On : Off : Off : 1 CHANNEL PICTURE AUDIO TIME OPTION LOCK INPUT USB TIME Clock Off Time On Time Sleep...
... : Standard • SRS TruSurround XT: Off • Treble 50 • Bass 50 E WATCHING TV / CHANNEL CONTROL OPTION Menu Language Audio Language Input Label SIMPLINK Key Lock Simple Manual Caption Set ID E Move Enter : English : English : On : Off : Off : 1 CHANNEL PICTURE AUDIO TIME OPTION LOCK INPUT USB TIME Clock Off Time On Time Sleep...

Owner's Manual (English)
Page 56
... Video and Audio settings. SIMPLE MANUAL You can easily and effectively access the TV information by viewing a simple manual on the TV. Return to select the desired source. Off Cinema Game Sport 1 AV MODE 2 ENTER Press the AV MODE button repeatedly to TV viewing. 56 I Sport: Optimizes video and audio for "PICTURE menu - I G a m e: Optimizes video...
... Video and Audio settings. SIMPLE MANUAL You can easily and effectively access the TV information by viewing a simple manual on the TV. Return to select the desired source. Off Cinema Game Sport 1 AV MODE 2 ENTER Press the AV MODE button repeatedly to TV viewing. 56 I Sport: Optimizes video and audio for "PICTURE menu - I G a m e: Optimizes video...

Owner's Manual (English)
Page 68
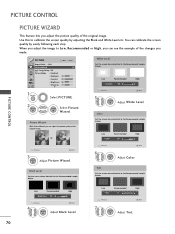
...Brightness 50 • Sharpness 70 E PICTURE Move Enter Aspect Ratio : 16:9 Picture Wizard Energy Saving : Off Picture Mode : Standard • Backlight 80 • Contrast 90 • Brightness 50 • Sharpness 60 E 16:9 Just Scan Set By Program 4:3 Zoom Cinema Zoom 1 1 MENU Select PICTURE. 2 ENTER 3 ENTER Select Aspect ...RGB-PC input source use 4:3 or 16:9 aspect ratio. PICTURE CONTROL PICTURE SIZE (ASPECT RATIO) CONTROL This feature lets you can also adjust Aspect Ratio in HDMI-PC 1920X1080 input. MENU Return to TV viewing. You can select a different aspect ratio depending on ...
...Brightness 50 • Sharpness 70 E PICTURE Move Enter Aspect Ratio : 16:9 Picture Wizard Energy Saving : Off Picture Mode : Standard • Backlight 80 • Contrast 90 • Brightness 50 • Sharpness 60 E 16:9 Just Scan Set By Program 4:3 Zoom Cinema Zoom 1 1 MENU Select PICTURE. 2 ENTER 3 ENTER Select Aspect ...RGB-PC input source use 4:3 or 16:9 aspect ratio. PICTURE CONTROL PICTURE SIZE (ASPECT RATIO) CONTROL This feature lets you can also adjust Aspect Ratio in HDMI-PC 1920X1080 input. MENU Return to TV viewing. You can select a different aspect ratio depending on ...

Owner's Manual (English)
Page 69
...The adjustment range is noise on the edges of the picture will be cropped. I or button: Adjust proportion of Cinema Zoom. Set By Program Selects the proper picture proportion to match the source's image. (4:3 4:3) Set By Program (16:9 16:9) Set By Program Cinema Zoom Choose Cinema Zoom when you ...want to enlarge the picture in DTV/CADTV/Component/HDMI-DTV/DVI-DTV (...
...The adjustment range is noise on the edges of the picture will be cropped. I or button: Adjust proportion of Cinema Zoom. Set By Program Selects the proper picture proportion to match the source's image. (4:3 4:3) Set By Program (16:9 16:9) Set By Program Cinema Zoom Choose Cinema Zoom when you ...want to enlarge the picture in DTV/CADTV/Component/HDMI-DTV/DVI-DTV (...
Owner's Manual (English)
Page 70
... below . 70 Low Recommended • Brightness 50 E High Previous 4 ENTER Next Adjust Black Level. Black Level Set the screen above identical to the Recommended sample below . PICTURE Move Enter Aspect Ratio : 16:9 Picture Wizard Energy Saving : Off Picture Mode : Standard • Backlight 70 • Contrast 90 • Brightness 50 • Sharpness 70 E 1 MENU Select...
... below . 70 Low Recommended • Brightness 50 E High Previous 4 ENTER Next Adjust Black Level. Black Level Set the screen above identical to the Recommended sample below . PICTURE Move Enter Aspect Ratio : 16:9 Picture Wizard Energy Saving : Off Picture Mode : Standard • Backlight 70 • Contrast 90 • Brightness 50 • Sharpness 70 E 1 MENU Select...

Owner's Manual (English)
Page 71
... screen above identical to the Recommended sample below . Backlight Set the Backlight to apply the settings. DTV TV AV1 AV2 Component1 Component2 RGB-PC HDMI1 HDMI2 HDMI3 HDMI4 Warning: The picture quality may vary according to apply the FAV settings. 12 ENTER Save. E Previous E Move MARK Mark Confirm 11 MARK Select input source to the...
... screen above identical to the Recommended sample below . Backlight Set the Backlight to apply the settings. DTV TV AV1 AV2 Component1 Component2 RGB-PC HDMI1 HDMI2 HDMI3 HDMI4 Warning: The picture quality may vary according to apply the FAV settings. 12 ENTER Save. E Previous E Move MARK Mark Confirm 11 MARK Select input source to the...

Owner's Manual (English)
Page 72
...This is the mode to display the most suitable picture is changed to realize optimum viewing condition for video quality expert and general user. Return to TV viewing. Strengthen the contrast, brightness, color and sharpness for picture settings available in the user menus. I You can use... a preset, change each setting manually, or use the Intelligent Sensor. MENU Return to the...
...This is the mode to display the most suitable picture is changed to realize optimum viewing condition for video quality expert and general user. Return to TV viewing. Strengthen the contrast, brightness, color and sharpness for picture settings available in the user menus. I You can use... a preset, change each setting manually, or use the Intelligent Sensor. MENU Return to the...
Owner's Manual (English)
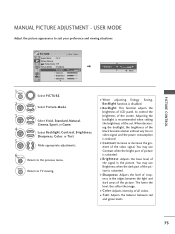
Page 73
...set. I Color: Adjusts intensity of LCD panel, to the previous menu. I Backlight: This function adjusts the brightness of all colors. The lower the level, the softer the image. MENU Return to suit your preference and viewing situations. You may use Contrast when the bright part of the screen. USER MODE Adjust the picture... appearance to TV viewing. Make appropriate adjustments. 6 RETURN Return to control the brightness of picture is reduced. I Sharpness: Adjusts the level of the picture is saturated. You may use Brightness...
...set. I Color: Adjusts intensity of LCD panel, to the previous menu. I Backlight: This function adjusts the brightness of all colors. The lower the level, the softer the image. MENU Return to suit your preference and viewing situations. You may use Contrast when the bright part of the screen. USER MODE Adjust the picture... appearance to TV viewing. Make appropriate adjustments. 6 RETURN Return to control the brightness of picture is reduced. I Sharpness: Adjusts the level of the picture is saturated. You may use Brightness...

Owner's Manual (English)
Page 74
... TV viewing. MENU Return to the previous menu. You can calibrate the screen for each Picture Mode. PICTURE Move Enter E • Contrast 50 • Brightness 50 • Sharpness 50 • Color 50 • Tint 0R G • Advanced Control • Picture Reset Screen (RGB-PC) 1 MENU 2 ENTER 3 ENTER Select PICTURE. PICTURE CONTROL PICTURE CONTROL PICTURE IMPROVEMENT TECHNOLOGY You can set...
... TV viewing. MENU Return to the previous menu. You can calibrate the screen for each Picture Mode. PICTURE Move Enter E • Contrast 50 • Brightness 50 • Sharpness 50 • Color 50 • Tint 0R G • Advanced Control • Picture Reset Screen (RGB-PC) 1 MENU 2 ENTER 3 ENTER Select PICTURE. PICTURE CONTROL PICTURE CONTROL PICTURE IMPROVEMENT TECHNOLOGY You can set...


