Owners Manual
Page 3
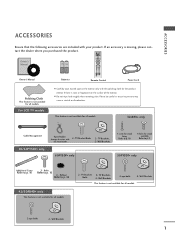
..., Bolts 2- TV Bracket Bolts the twist holder. 2- Rubber Refer to p. 16 2 - INPUT D/A INPUT POWER SIMPLINK BRIGHT MODE TV VCR DVD RATIO TEXT INFO i GUIDE Owner's Manual 1.5V 1.5V Batteries MENU EXIT SUBTITLE MARK OK VOL Q.VIEW PR PAGE MUTE 1 2 3 4 5 6 7 8 9 LIST 0 FAV SIZE ?
..., Bolts 2- TV Bracket Bolts the twist holder. 2- Rubber Refer to p. 16 2 - INPUT D/A INPUT POWER SIMPLINK BRIGHT MODE TV VCR DVD RATIO TEXT INFO i GUIDE Owner's Manual 1.5V 1.5V Batteries MENU EXIT SUBTITLE MARK OK VOL Q.VIEW PR PAGE MUTE 1 2 3 4 5 6 7 8 9 LIST 0 FAV SIZE ?
Owners Manual
Page 4
...Setup 26 - Picture Mode - User Option 68 - Cinema 72 Advanced - Preset 66 - Colour Tone - Auto Colour Tone Control (Warm/Medium/Cool 67 Manual Picture Adjustment - Picture Improvement Technology 71 Advanced - Black( Darkness) Level 73 Picture Reset 74 Image Sticking Minimization(ISM) Method . . . . 75 Low...37 Volume Adjustment 37 On-Screen Menus Selection and Adjustment . . 38 Factory Reset 39 Model Info 39 Auto Programme Tuning 40 Manual Programme Tuning 42 Fine Tuning 44 Assigning a Station Name 45 Programme Edit 46 Input List 48 Calling Up the Channel List 49...
...Setup 26 - Picture Mode - User Option 68 - Cinema 72 Advanced - Preset 66 - Colour Tone - Auto Colour Tone Control (Warm/Medium/Cool 67 Manual Picture Adjustment - Picture Improvement Technology 71 Advanced - Black( Darkness) Level 73 Picture Reset 74 Image Sticking Minimization(ISM) Method . . . . 75 Low...37 Volume Adjustment 37 On-Screen Menus Selection and Adjustment . . 38 Factory Reset 39 Model Info 39 Auto Programme Tuning 40 Manual Programme Tuning 42 Fine Tuning 44 Assigning a Station Name 45 Programme Edit 46 Input List 48 Calling Up the Channel List 49...

Owners Manual
Page 5
... 109 Open Source License 115 TELETEXT Switch On/Off 96 Simple Text 96 TOP Text 96 Fastext 97 Special Teletext Functions 97 After reading this manual, keep it handy for future reference. 3 Stereo/Dual Reception 84 - CONTENTS SOUND & LANGUAGE CONTROL Auto Volume Leveler ( Auto Volume 78 Preset Sound Settings...
... 109 Open Source License 115 TELETEXT Switch On/Off 96 Simple Text 96 TOP Text 96 Fastext 97 Special Teletext Functions 97 After reading this manual, keep it handy for future reference. 3 Stereo/Dual Reception 84 - CONTENTS SOUND & LANGUAGE CONTROL Auto Volume Leveler ( Auto Volume 78 Preset Sound Settings...
Owners Manual
Page 12
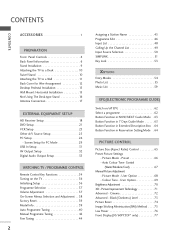
... TV and serious personal injury. 1-screw Stand Desk SWIVEL STAND After installing the TV, you must close (to the right) the shaft bolt to set manually to the left or right direction by 20 degrees to suit your viewing position. 50/60PY3DF* models NOTE G Before adjusting the angle, you can adjust...
... TV and serious personal injury. 1-screw Stand Desk SWIVEL STAND After installing the TV, you must close (to the right) the shaft bolt to set manually to the left or right direction by 20 degrees to suit your viewing position. 50/60PY3DF* models NOTE G Before adjusting the angle, you can adjust...

Owners Manual
Page 20
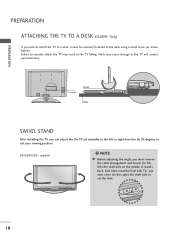
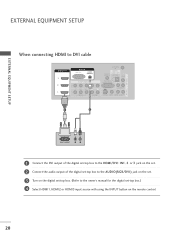
If connected to the owner's manual for the LCD TV models. EXTERNAL EQUIPMENT SETUP EXTERNAL EQUIPMENT SETUP I This part of EXTERNAL EQUIPMENT SETUP mainly use pictures for the digital set . Match ...
If connected to the owner's manual for the LCD TV models. EXTERNAL EQUIPMENT SETUP EXTERNAL EQUIPMENT SETUP I This part of EXTERNAL EQUIPMENT SETUP mainly use pictures for the digital set . Match ...

Owners Manual
Page 21
....) 1 COMPONENT IN VIDEO AUDIO 4 Select HDMI1, HDMI2 or HDMI3 input source using the INPUT button on the digital set-top box. (Refer to the owner's manual for the digital set -top box supports Auto HDMI function, the output resolution of the source device to 1280x720p. AUDIO 2 3 Turn on the remote control. !
....) 1 COMPONENT IN VIDEO AUDIO 4 Select HDMI1, HDMI2 or HDMI3 input source using the INPUT button on the digital set-top box. (Refer to the owner's manual for the digital set -top box supports Auto HDMI function, the output resolution of the source device to 1280x720p. AUDIO 2 3 Turn on the remote control. !
Owners Manual
Page 22
... the digital set-top box to the AUDIO(RGB/DVI) jack on the set. 3 Turn on the digital set-top box. (Refer to the owner's manual for the digital set-top box.) 4 Select HDMI1, HDMI2 or HDMI3 input source with using the INPUT button on the remote control. 20
... the digital set-top box to the AUDIO(RGB/DVI) jack on the set. 3 Turn on the digital set-top box. (Refer to the owner's manual for the digital set-top box.) 4 Select HDMI1, HDMI2 or HDMI3 input source with using the INPUT button on the remote control. 20
Owners Manual
Page 23
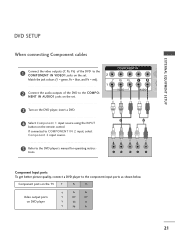
... RGB (PC) COMPONENT IN DIGI AUDIO (C VIDEO AUDIO S 1 2 Y PB PR L R Component Input ports To get better picture quality, connect a DVD player to the DVD player's manual for operating instruc- Component ports on the TV Y PB PR Video output ports on the set . DVD SETUP When connecting Component cables 1 Connect the video...
... RGB (PC) COMPONENT IN DIGI AUDIO (C VIDEO AUDIO S 1 2 Y PB PR L R Component Input ports To get better picture quality, connect a DVD player to the DVD player's manual for operating instruc- Component ports on the TV Y PB PR Video output ports on the set . DVD SETUP When connecting Component cables 1 Connect the video...

Owners Manual
Page 24
... the set . 3 Turn on the DVD player, insert a DVD. 4 Select A V 1 input source using the INPUT button on the remote control. 4 Refer to the DVD player's manual for operating instruc- tions. If connected to AV IN 2 input, select A V 2 input source.(Except 32LB9D*) 5 Refer to 1280x720p. UO S-VIDEO VIDEO (MONO) AUDIO 1 2 When connecting... RGB (PC) A (R COMPONENT IN VIDEO AUDIO 1 HDMI-DVD OUTPUT G If the DVD does not support Auto HDMI, you need to set to the DVD player's manual for operating instructions. !
... the set . 3 Turn on the DVD player, insert a DVD. 4 Select A V 1 input source using the INPUT button on the remote control. 4 Refer to the DVD player's manual for operating instruc- tions. If connected to AV IN 2 input, select A V 2 input source.(Except 32LB9D*) 5 Refer to 1280x720p. UO S-VIDEO VIDEO (MONO) AUDIO 1 2 When connecting... RGB (PC) A (R COMPONENT IN VIDEO AUDIO 1 HDMI-DVD OUTPUT G If the DVD does not support Auto HDMI, you need to set to the DVD player's manual for operating instructions. !

Owners Manual
Page 25
... I N socket on the screen. 2 1 (DVI) COMPONENT IN VIDEO AUDIO VIDEO ( ) AUDIO AV IN 1 VCR SETUP I If the 4:3 picture format is common to the VCR owner's manual.) 23 I To avoid picture noise (interference), leave an adequate distance between the VCR and TV. the fixed images on the sides of the VCR. 3 Set...
... I N socket on the screen. 2 1 (DVI) COMPONENT IN VIDEO AUDIO VIDEO ( ) AUDIO AV IN 1 VCR SETUP I If the 4:3 picture format is common to the VCR owner's manual.) 23 I To avoid picture noise (interference), leave an adequate distance between the VCR and TV. the fixed images on the sides of the VCR. 3 Set...
Owners Manual
Page 26
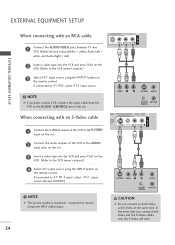
... event that you have a mono VCR, connect the audio cable from the VCR to the AUDIO L(MONO) jack of the VCR to the VCR owner's manual.) 1 3 Select A V 1 input source using the INPUT button on the set . Match the jack colours(Video = yellow, Audio Left = white, and Audio ...Video cables, only the S-Video will work. 24 S-VIDEO VIDEO L R ANT IN OUTPUT ANT OUT SWITCH CAUTION G Do not connect to the VCR owner's manual.) 4 SeleCctOAMVPO1NinEpNuTtINsource using the INPUT button on the set . VIDEO L R S-VIDEO DIGITAL AUDIO OUT ANT IN OUTPUT ANT OUT SWITCH AV IN 1 AUDIO S-VIDEO...
... event that you have a mono VCR, connect the audio cable from the VCR to the AUDIO L(MONO) jack of the VCR to the VCR owner's manual.) 1 3 Select A V 1 input source using the INPUT button on the set . Match the jack colours(Video = yellow, Audio Left = white, and Audio ...Video cables, only the S-Video will work. 24 S-VIDEO VIDEO L R ANT IN OUTPUT ANT OUT SWITCH CAUTION G Do not connect to the VCR owner's manual.) 4 SeleCctOAMVPO1NinEpNuTtINsource using the INPUT button on the set . VIDEO L R S-VIDEO DIGITAL AUDIO OUT ANT IN OUTPUT ANT OUT SWITCH AV IN 1 AUDIO S-VIDEO...

Owners Manual
Page 34
... to use the AV OUT jacks for VCR recording. 1 VIDEO L R S-VIDEO 32 G We recommend to the TV's AV OUT jacks. COMPONENT IN 2 2 See the Operating Manual of the second TV or monitor for AV out. NOTE G Only Digital, Analogue mode can be used for fur1th(DeVrI) details regarding that device's input...
... to use the AV OUT jacks for VCR recording. 1 VIDEO L R S-VIDEO 32 G We recommend to the TV's AV OUT jacks. COMPONENT IN 2 2 See the Operating Manual of the second TV or monitor for AV out. NOTE G Only Digital, Analogue mode can be used for fur1th(DeVrI) details regarding that device's input...
Owners Manual
Page 35
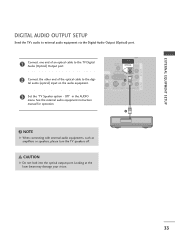
... amplifiers or speakers, please turn the TV speakers off. Looking at the laser beam may damage your vision. 33 See the external audio equipment instruction manual for operation. AV OUT EXTERNAL EQUIPMENT SETUP AV IN 1 DIGITAL AUDIO OUTPUT SETUP Send the TV's audio to the TRGVB (DPCi)gital Audio (Optical) Output...
... amplifiers or speakers, please turn the TV speakers off. Looking at the laser beam may damage your vision. 33 See the external audio equipment instruction manual for operation. AV OUT EXTERNAL EQUIPMENT SETUP AV IN 1 DIGITAL AUDIO OUTPUT SETUP Send the TV's audio to the TRGVB (DPCi)gital Audio (Optical) Output...

Owners Manual
Page 40
SETUP Auto Tuning Manual Tuning Programme Edit PICTURE Picture Mode Colour Temperature XD Advanced Aspect Ratio Picture Reset Screen : Dynamic : Auto LOCK Lock System : Off Set Password Block Programme ... WATCHING TV/PROGRAMME CONTROL ON SCREEN MENUS SELECTION AND ADJUSTMENT Your TV's OSD (On Screen Display) may differ slightly from what is shown in this manual. 1 Press the MENU button and then use D or E button to select each menu. 2 Press the G button and then use D or E or F or G button to display...
SETUP Auto Tuning Manual Tuning Programme Edit PICTURE Picture Mode Colour Temperature XD Advanced Aspect Ratio Picture Reset Screen : Dynamic : Auto LOCK Lock System : Off Set Password Block Programme ... WATCHING TV/PROGRAMME CONTROL ON SCREEN MENUS SELECTION AND ADJUSTMENT Your TV's OSD (On Screen Display) may differ slightly from what is shown in this manual. 1 Press the MENU button and then use D or E button to select each menu. 2 Press the G button and then use D or E or F or G button to display...

Owners Manual
Page 42
...to assign the station name. 1 Press the MENU button and then D or E button to select N o. 4 Press the O K button. Auto Tuning Manual Tuning Programme Edit To Start All of programmes will be assigned to search. Press (OK) to start . MENU EXIT SUBTITLE MARK OK VOL Q.VIEW PR... PAGE MUTE 1 2 3 4 5 6 Auto Tuning Manual Tuning Programme Edit 2 Press the G button and then D or E button to select Auto Tuning. 3 Press the G button to select To Start and then...
...to assign the station name. 1 Press the MENU button and then D or E button to select N o. 4 Press the O K button. Auto Tuning Manual Tuning Programme Edit To Start All of programmes will be assigned to search. Press (OK) to start . MENU EXIT SUBTITLE MARK OK VOL Q.VIEW PR... PAGE MUTE 1 2 3 4 5 6 Auto Tuning Manual Tuning Programme Edit 2 Press the G button and then D or E button to select Auto Tuning. 3 Press the G button to select To Start and then...

Owners Manual
Page 43
... TV/PROGRAMME CONTROL NOTE G In Auto Tuning mode, schedule list is completed, the Programme Edit menu appears on the screen. Auto Tuning Manual Tuning Programme Edit To Start Processing Auto Tuning... and digital), TV(analogue only) or DTV(digitalMoEnNlyU) tPoresve.arch. Press (OK) to start .... Auto Tuning Manual Tuning Programme Edit To Start All of analogue programmes are deleted and all analogue stations are stored. To stop the current scan and ...
... TV/PROGRAMME CONTROL NOTE G In Auto Tuning mode, schedule list is completed, the Programme Edit menu appears on the screen. Auto Tuning Manual Tuning Programme Edit To Start Processing Auto Tuning... and digital), TV(analogue only) or DTV(digitalMoEnNlyU) tPoresve.arch. Press (OK) to start .... Auto Tuning Manual Tuning Programme Edit To Start All of analogue programmes are deleted and all analogue stations are stored. To stop the current scan and ...

Owners Manual
Page 44
...MENU button to return to keep on the screen. Do you want to the previous menu. WATCHING TV/PROGRAMME CONTROL MANUAL PROGRAMME TUNING POWER In Digital Mode Manual programme lets you manually add a programme to update?" When the programme is already added in programme list, the message "Already programmed channel...Press the MENU button and then use D or E button to select the SETUP menu. 2 Press the G button and then use D or E button to select Manual Tuning. 3 Press the G button and then use D or E button to select the programme number you want to add. 4 Press the O K button to ...
...MENU button to return to keep on the screen. Do you want to the previous menu. WATCHING TV/PROGRAMME CONTROL MANUAL PROGRAMME TUNING POWER In Digital Mode Manual programme lets you manually add a programme to update?" When the programme is already added in programme list, the message "Already programmed channel...Press the MENU button and then use D or E button to select the SETUP menu. 2 Press the G button and then use D or E button to select Manual Tuning. 3 Press the G button and then use D or E button to select the programme number you want to add. 4 Press the O K button to ...

Owners Manual
Page 45
... five characters to each programme number. 1 Press the MENU button and then use D or E button to select Manual Tuning. 3 Press the G button to select the SETUP menu. Auto Tuning Manual Tuning Programme Edit Storage 0 Band F V/UHF G Channel 0 Search Fine Name - - - - - INPUT...WATCHING TV/PROGRAMME CONTROL 2 Press the G button and then use D or E button to select B a n d. MANUAL PROGRAMME TUNING Continued POWER In Analogue Mode Manual programme lets you manually tune and arrange the stations in whatever order you can assign a station name with the F or G button. 7 ...
... five characters to each programme number. 1 Press the MENU button and then use D or E button to select Manual Tuning. 3 Press the G button to select the SETUP menu. Auto Tuning Manual Tuning Programme Edit Storage 0 Band F V/UHF G Channel 0 Search Fine Name - - - - - INPUT...WATCHING TV/PROGRAMME CONTROL 2 Press the G button and then use D or E button to select B a n d. MANUAL PROGRAMME TUNING Continued POWER In Analogue Mode Manual programme lets you manually tune and arrange the stations in whatever order you can assign a station name with the F or G button. 7 ...

Owners Manual
Page 46
.../PROGRAMME CONTROL 1 Press the MENU button and then use D or E button to select the SETUP menu. 2 Press the G button and then use D or E button select Manual Tuning. 3 Press the G button and then D or E button to select F i n e. 4 Press the F or G button to fine tune for the best picture ... store. 6 Press EXIT button to return to normal TV viewing or press MENU button to return to the previous menu. 44 Auto Tuning Manual Tuning Programme Edit Auto Tuning Manual Tuning Programme Edit G Storage Band Channel Search Fine Name 0 V/UHF 0 - - - - - In Analogue Mode only POWER Normally fine...
.../PROGRAMME CONTROL 1 Press the MENU button and then use D or E button to select the SETUP menu. 2 Press the G button and then use D or E button select Manual Tuning. 3 Press the G button and then D or E button to select F i n e. 4 Press the F or G button to fine tune for the best picture ... store. 6 Press EXIT button to return to normal TV viewing or press MENU button to return to the previous menu. 44 Auto Tuning Manual Tuning Programme Edit Auto Tuning Manual Tuning Programme Edit G Storage Band Channel Search Fine Name 0 V/UHF 0 - - - - - In Analogue Mode only POWER Normally fine...

Owners Manual
Page 47
...Press the MENU button and then use D or E button to select the SETUP menu. 2 Press the G button and then use D or E button to select Manual Tuning. 3 Press the G button and then use the numeric 0 to 9, the alphabet A to Z +, -, and blank. 5 Press the D or E button...- - - - - ASSIGNING A STATION NAME - You can assign a station name with the characters to select Name. 4 Press the F or G button. Auto Tuning Manual Tuning Programme Edit Storage 0 Band V/UHF Channel 1 Search Fine Name F ----- G store 45 In Analogue Mode only POWER You can use D or E button to each ...
...Press the MENU button and then use D or E button to select the SETUP menu. 2 Press the G button and then use D or E button to select Manual Tuning. 3 Press the G button and then use the numeric 0 to 9, the alphabet A to Z +, -, and blank. 5 Press the D or E button...- - - - - ASSIGNING A STATION NAME - You can assign a station name with the characters to select Name. 4 Press the F or G button. Auto Tuning Manual Tuning Programme Edit Storage 0 Band V/UHF Channel 1 Search Fine Name F ----- G store 45 In Analogue Mode only POWER You can use D or E button to each ...


